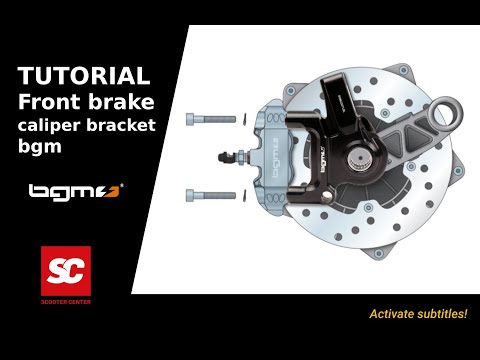


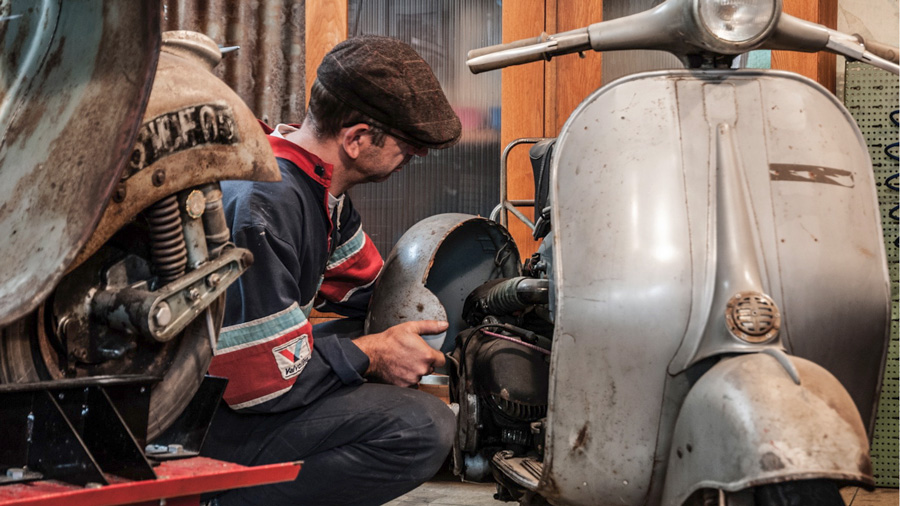
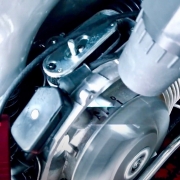
Many bgm innovations were part of our Platonica project, in this video you can see them Disc brake and the brake caliper mount im bgm Tutorial.
Our professional brake caliper mount from bgm PRO Made in Italy: Allows the assembly of the radially mounted BGM PRO 4-piston brake caliper, which enables braking values at motorbike level with fine dosing.
VESPA OR LML?
The brake caliper mount is available for Vespa or LML. The difference between the two types lies in the different dimensions of the speedometer drive. The selection of the right adapter therefore depends on the existing/used brake drum (Piaggio or LML).
Examples:
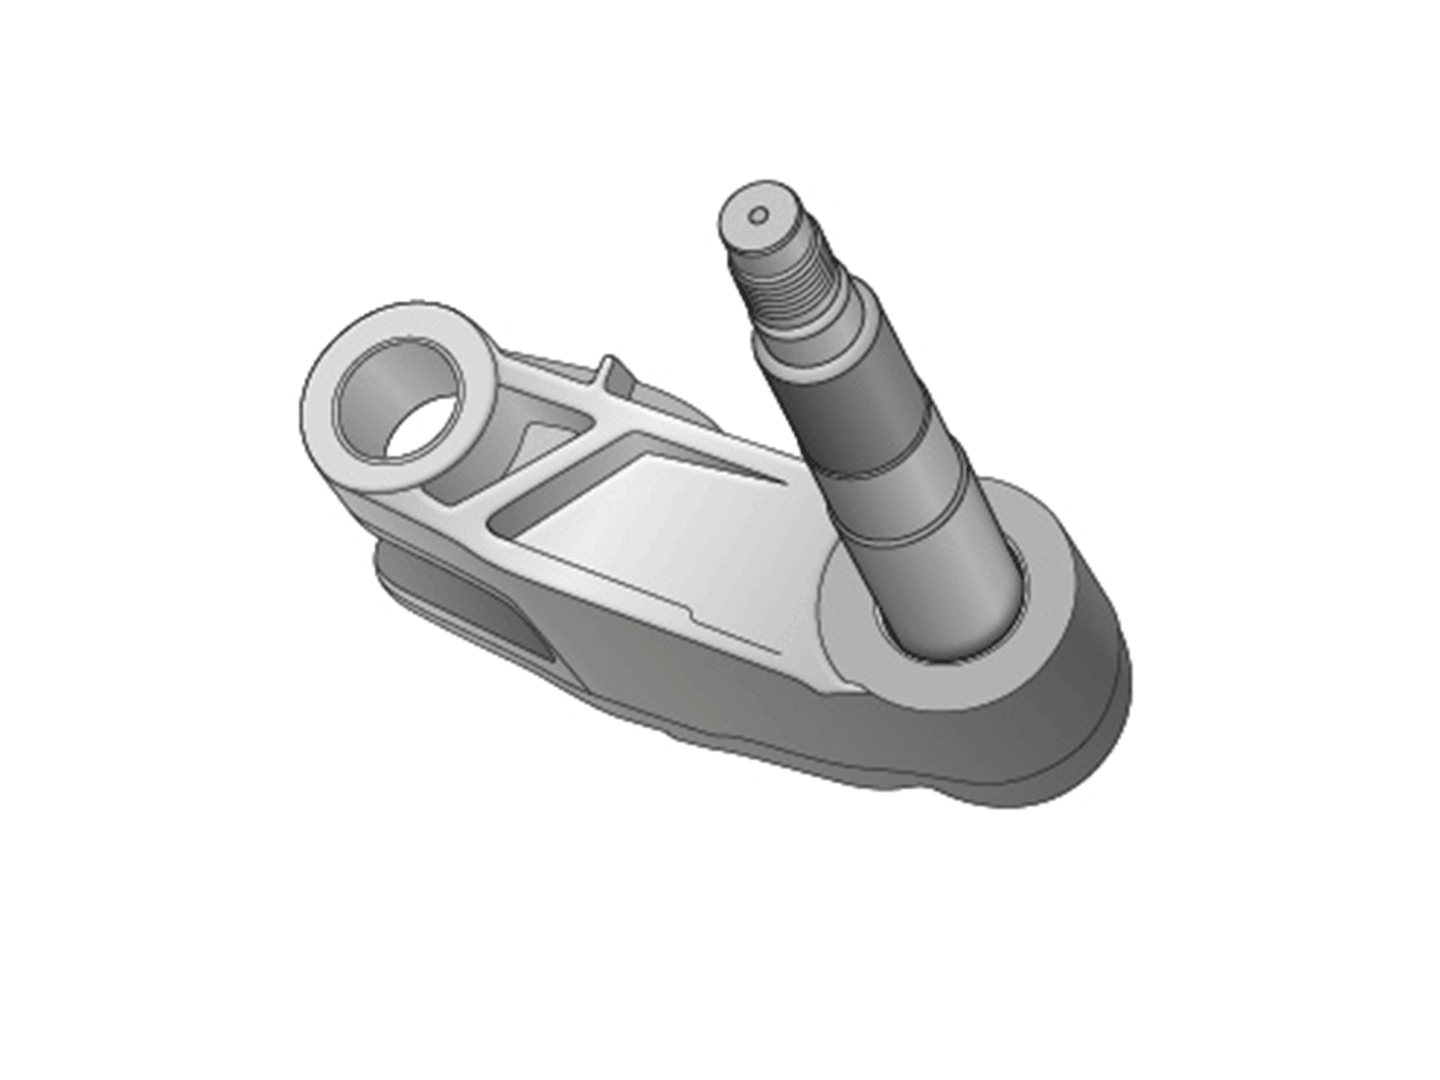
1. Put the O-ring on the axle and put it over the swingarm.
2. Put the shim on the axle.
3. Put the V-ring on the axle.
4. Grease the bearing of the brake caliper mount and put it on the axle.
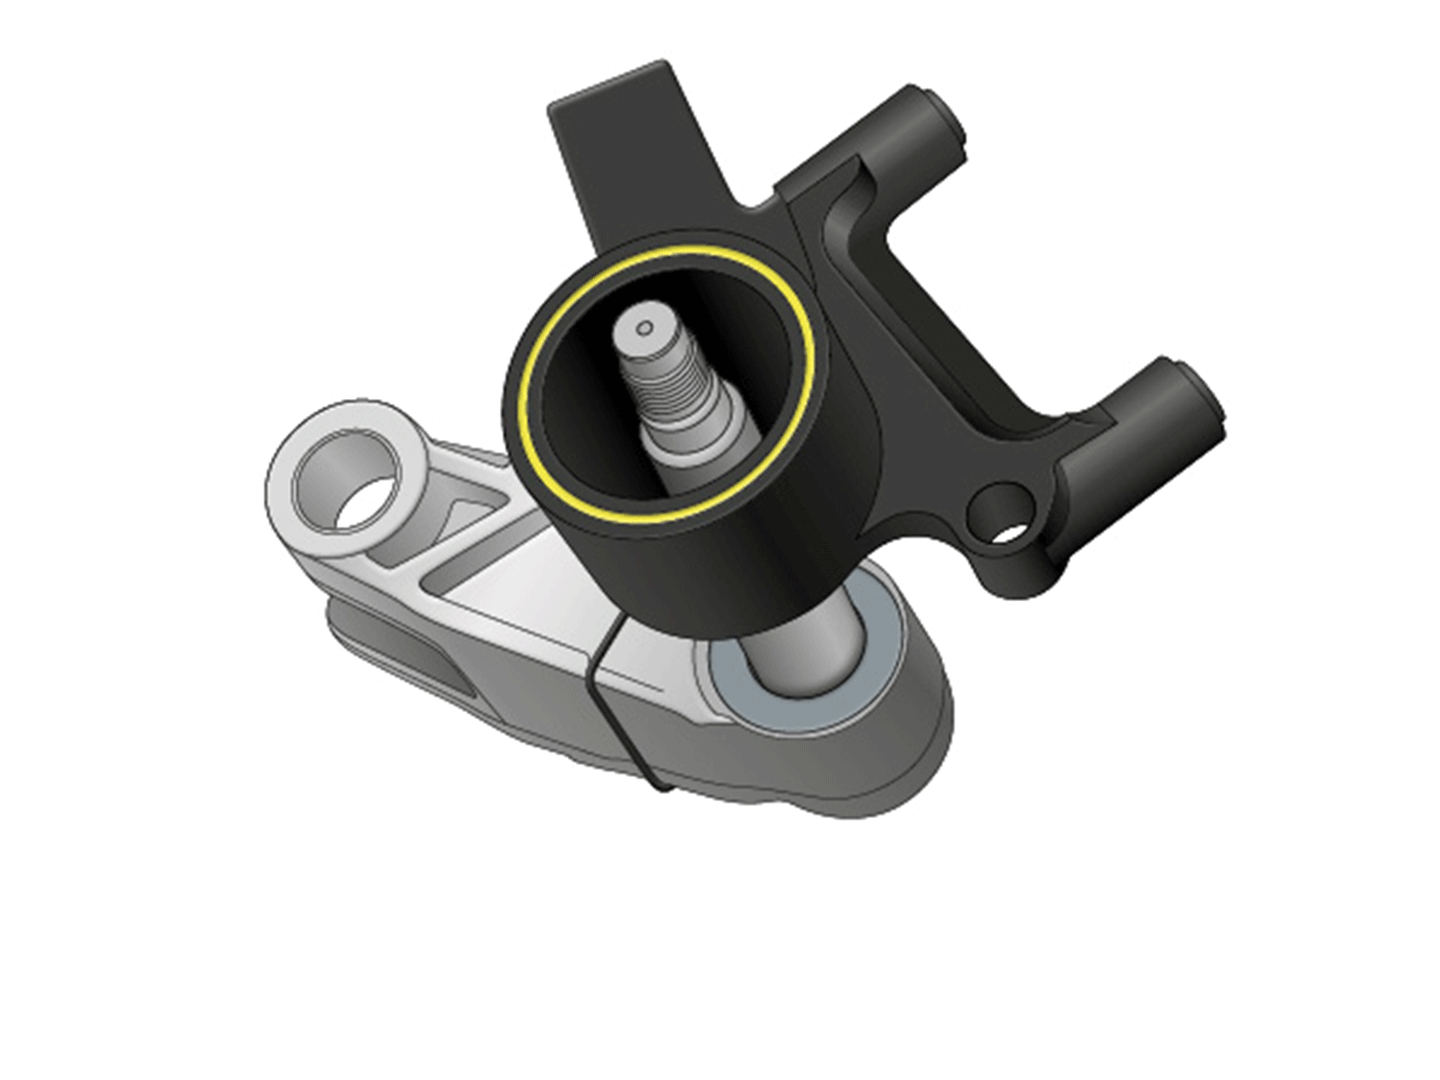
5. Place the appropriate D-washer on the axle and align it with the recess in the axle.
6. Place the Ø 20mm circlip on the axle and make sure it is securely seated in the groove, then position the O-ring.
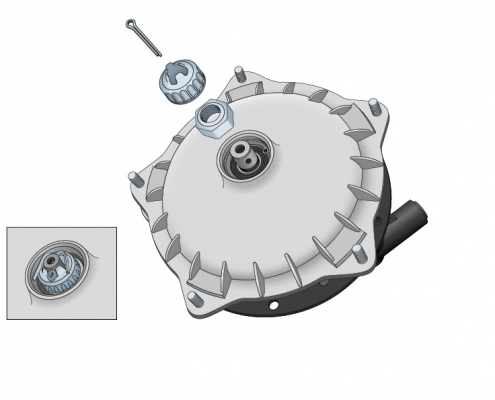
7. Put the brake drum on the axle and fasten it with a nut. Then secure with a safety cage and cotter pin. Attention, see step 13 before tightening the nut.
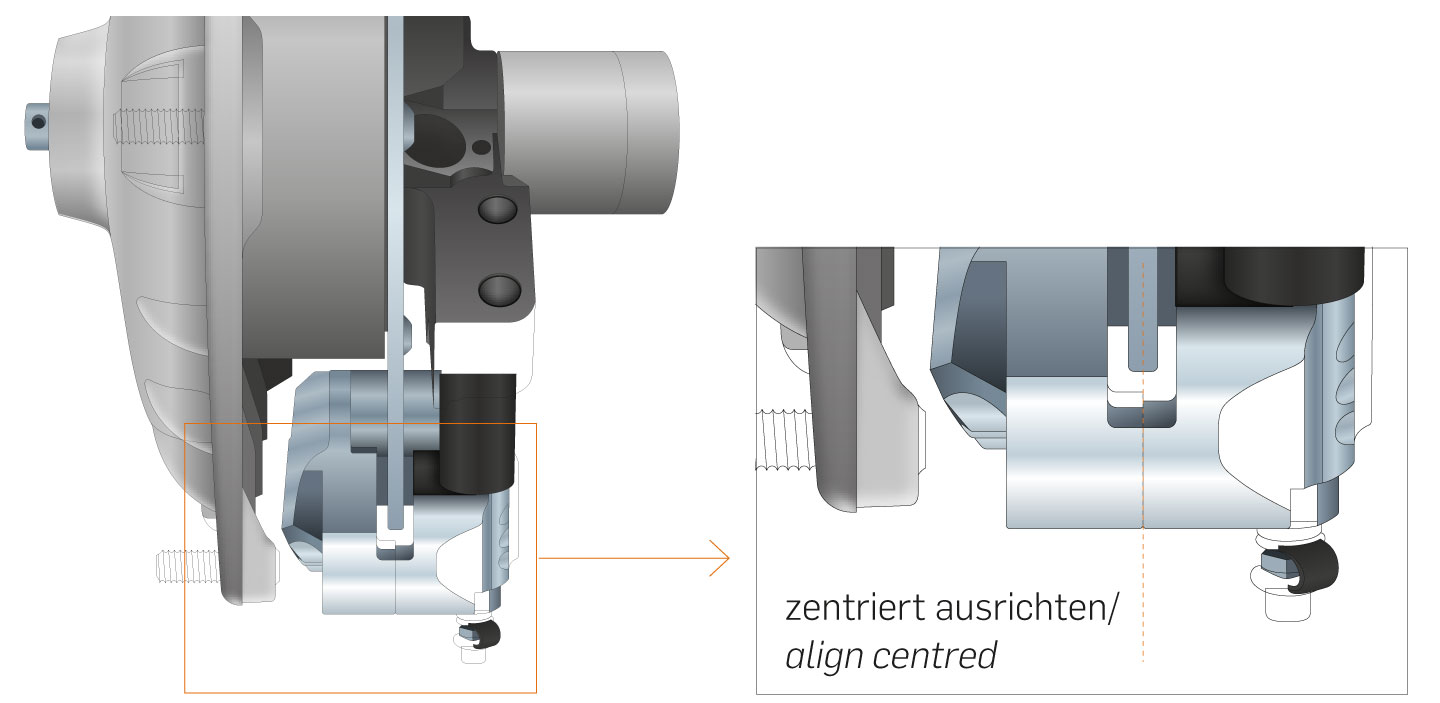
8. Fasten the brake caliper with the two screws and check the alignment with the brake disc.
9. Adjust the position of the brake caliper to the brake disc with the discs provided. Repeat steps 3 through 9 with the options until the caliper is centered over the disc as shown in Fig. 13. After the adjustment of the brake caliper mount, fasten the central nut of the brake drum with 90Nm. Tighten the brake caliper bolts to 16Nm.
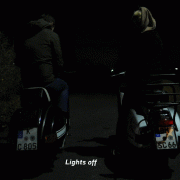
For most scooters, the limit with conventional Bilux light bulbs is a headlight bulb with 45/45 W. The ignitions, which are usually 80 W to a maximum of 120 W, do not provide any more. The luminosity is measured in lumens below 400. The LED headlight has a luminosity that is three times as high (1300 lumens). The power consumption is only 20 W. This corresponds to the light output of a conventional 100 watt spotlight. With a given alternator / power supply, a considerably better illumination can be achieved. In addition, there is more capacity for other consumers.
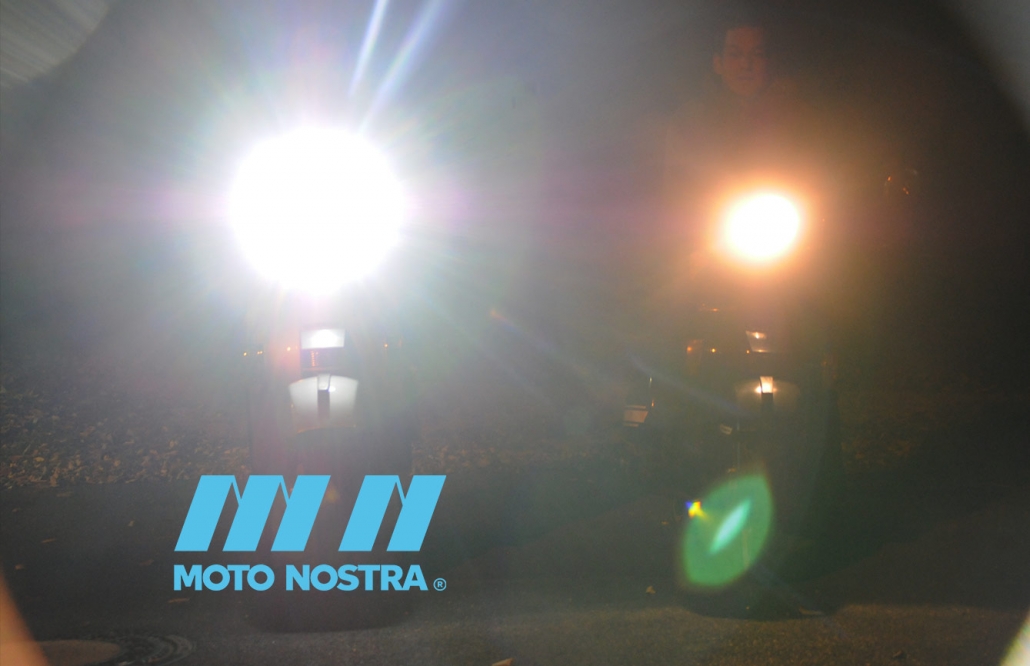
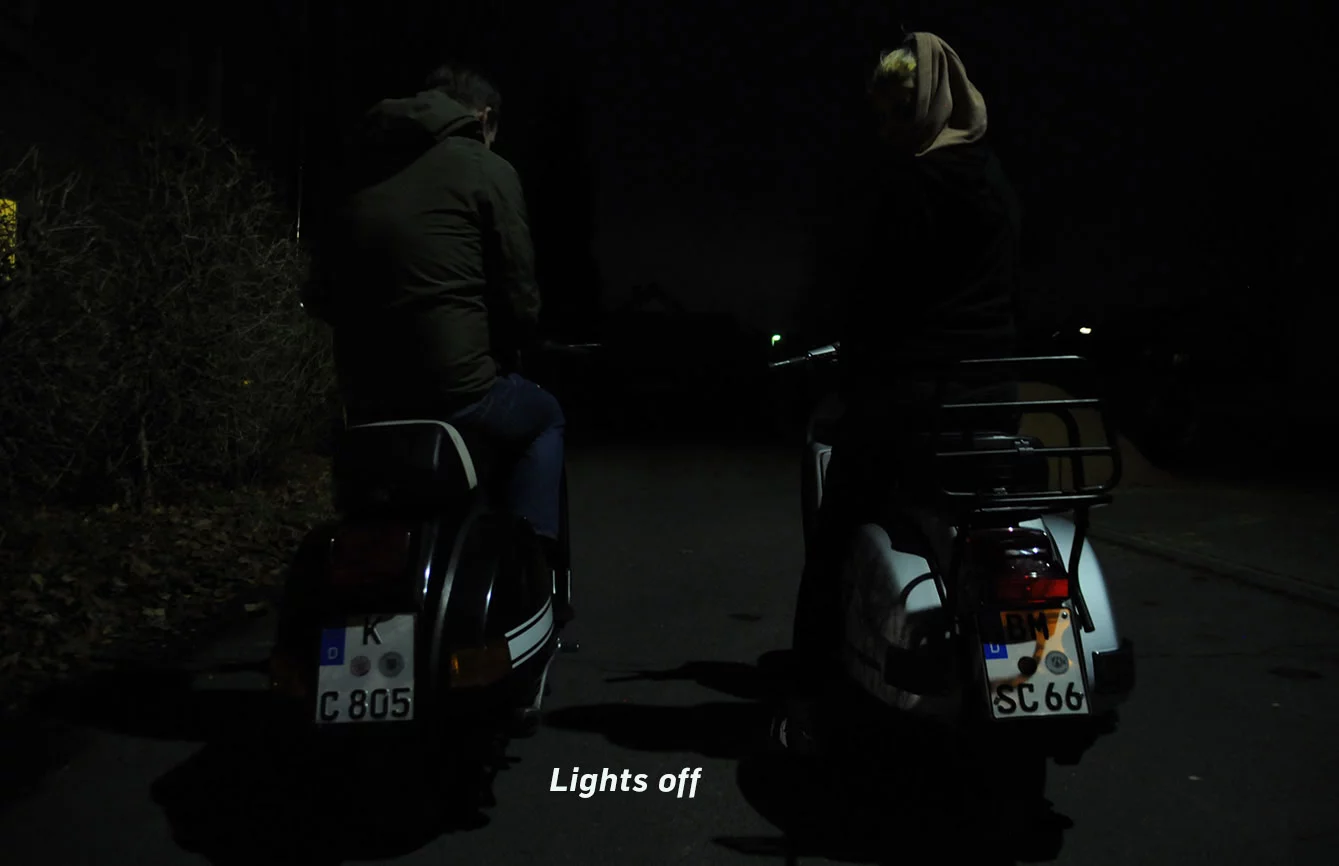
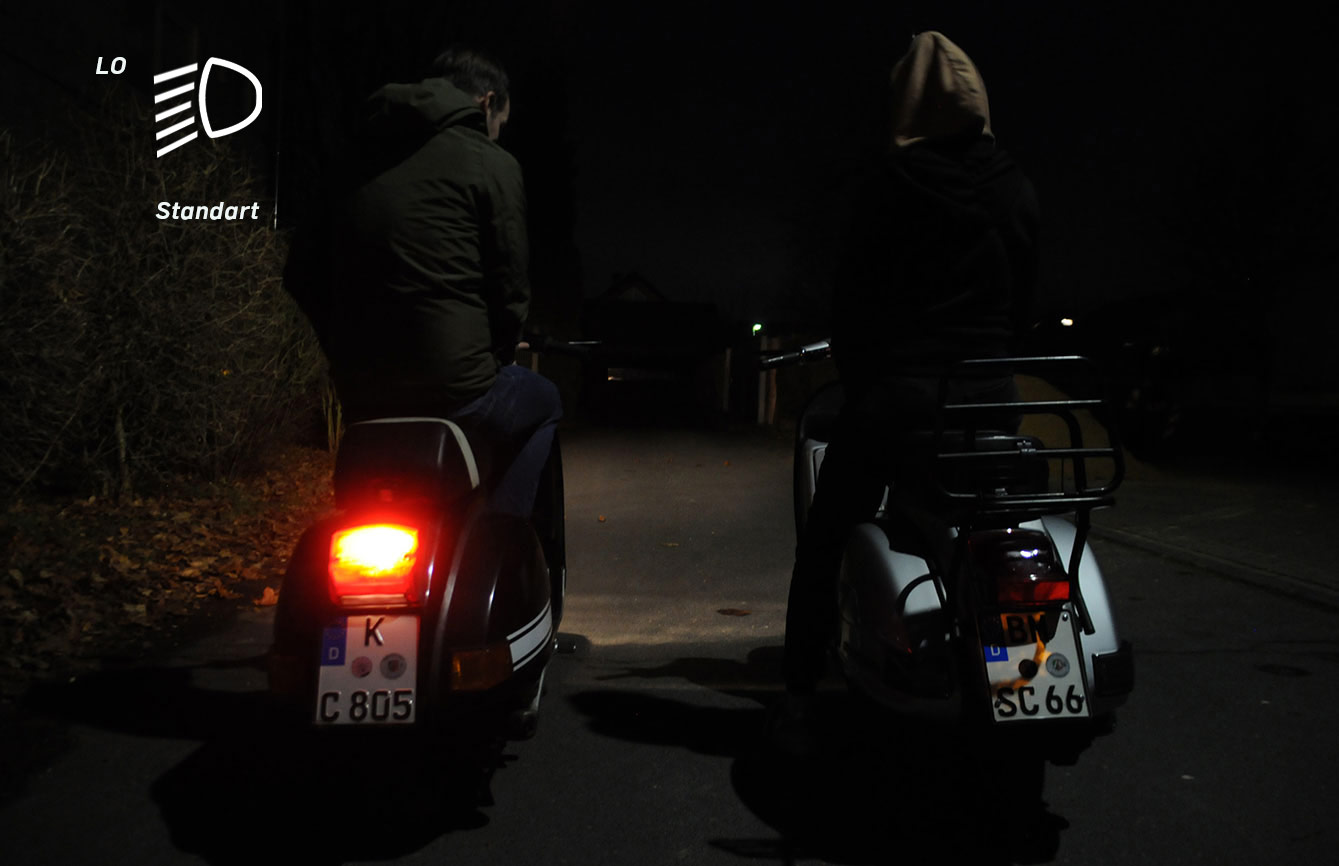
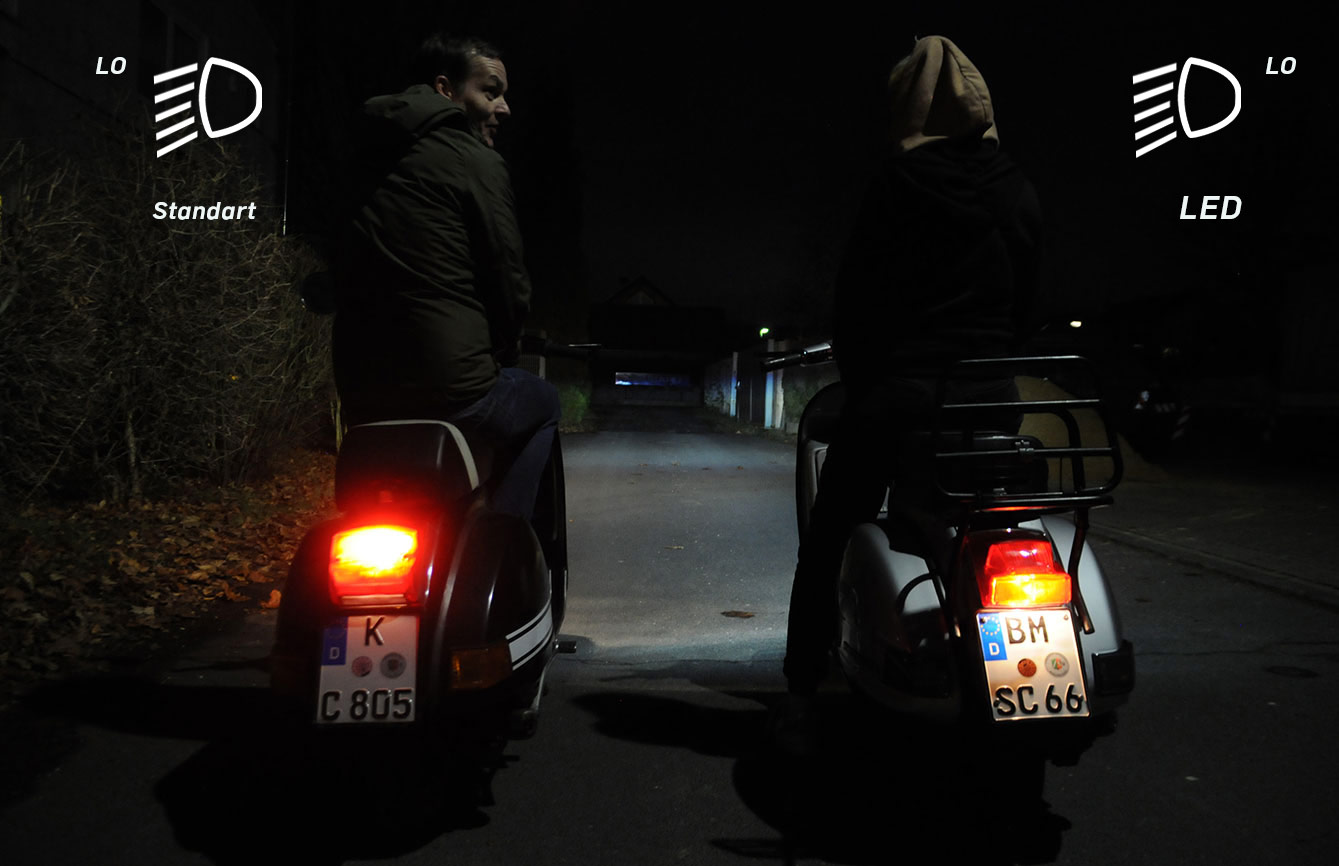
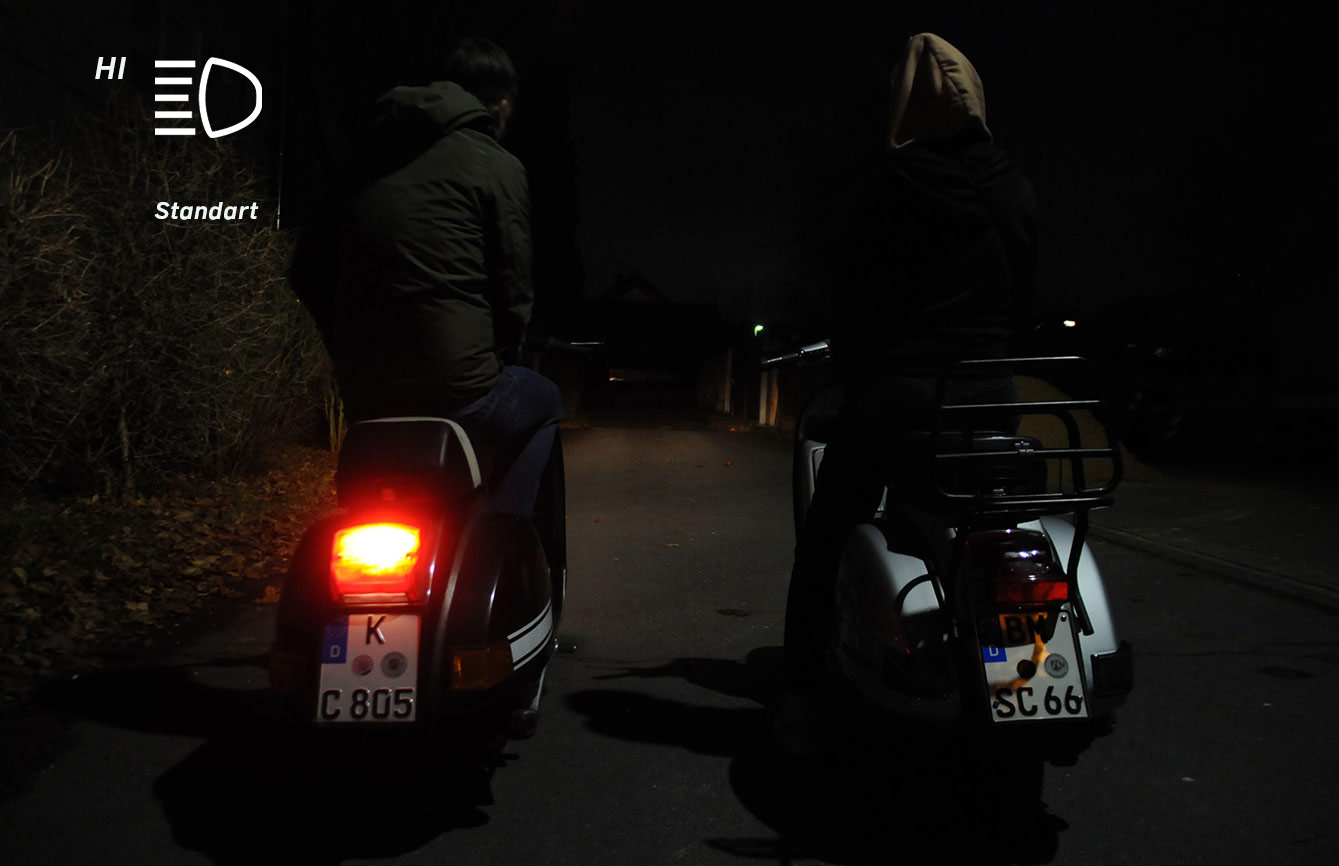
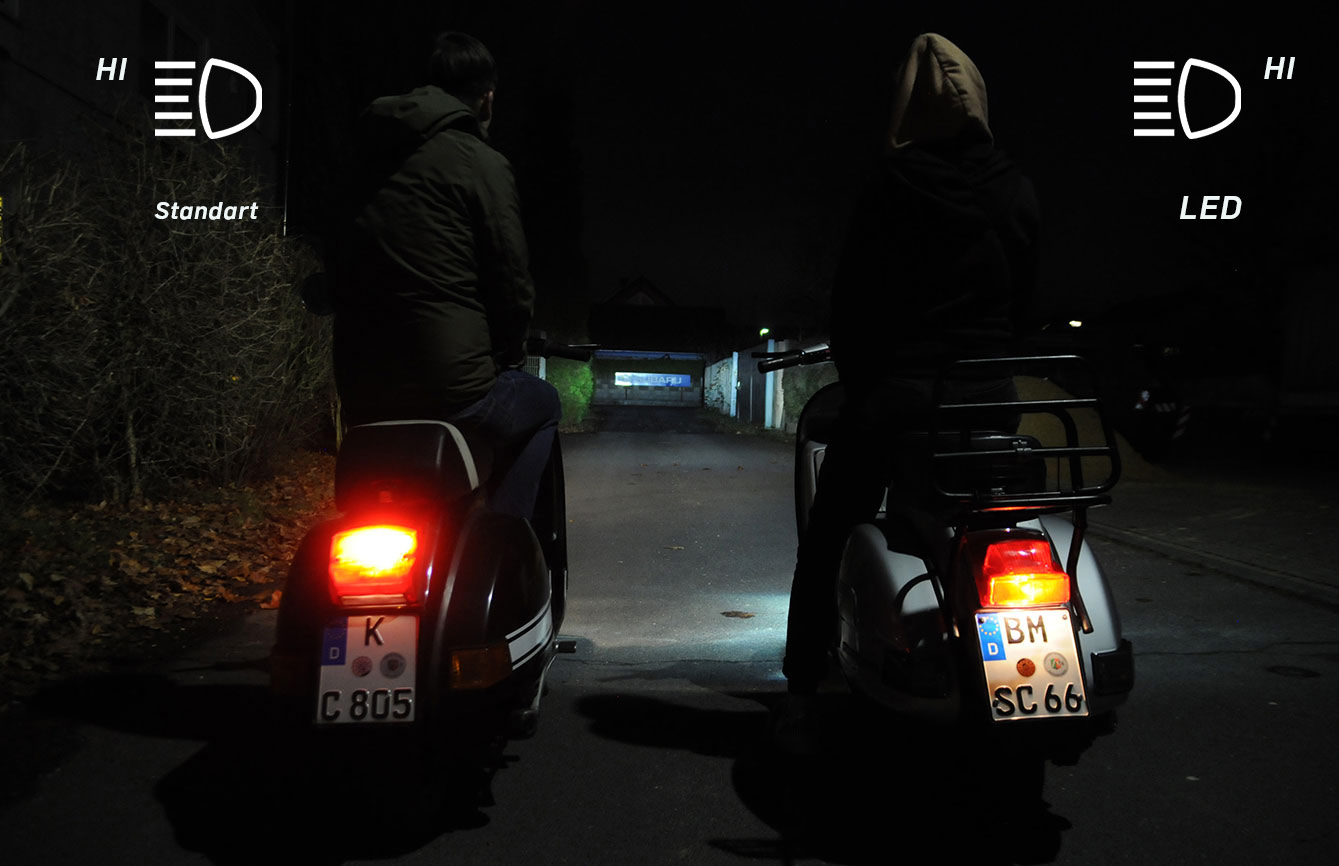
Evening light, high beam, what is the difference between the LED and standard light?
Parts used in this video:
NOTE
The LED headlight works exclusively with direct current, so it requires a battery or another equivalent power source with 12V DC. Operation on an alternating current voltage source leads to an immediate defect.
Assembly instructions for Print out as PDF


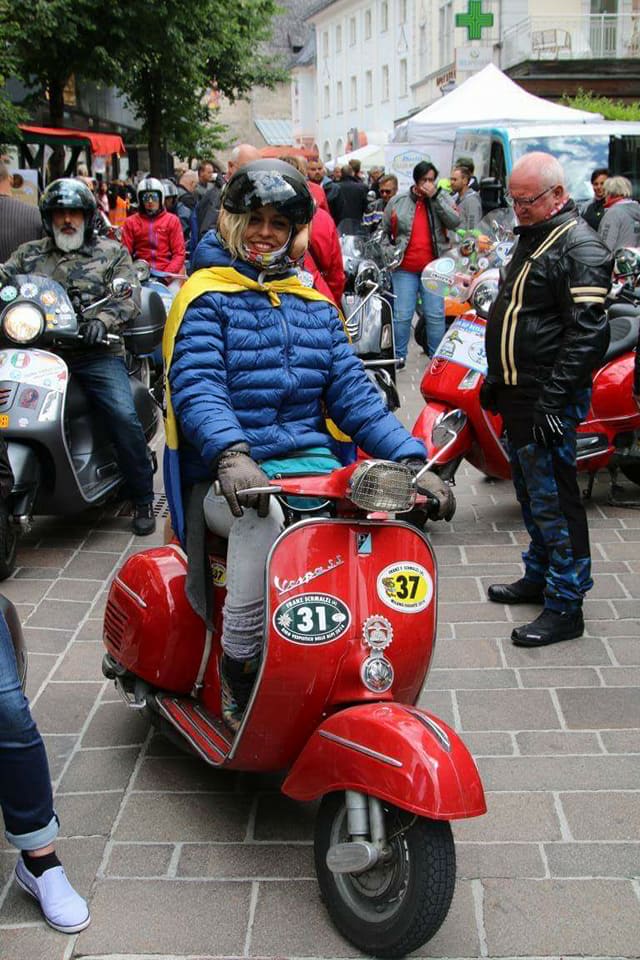
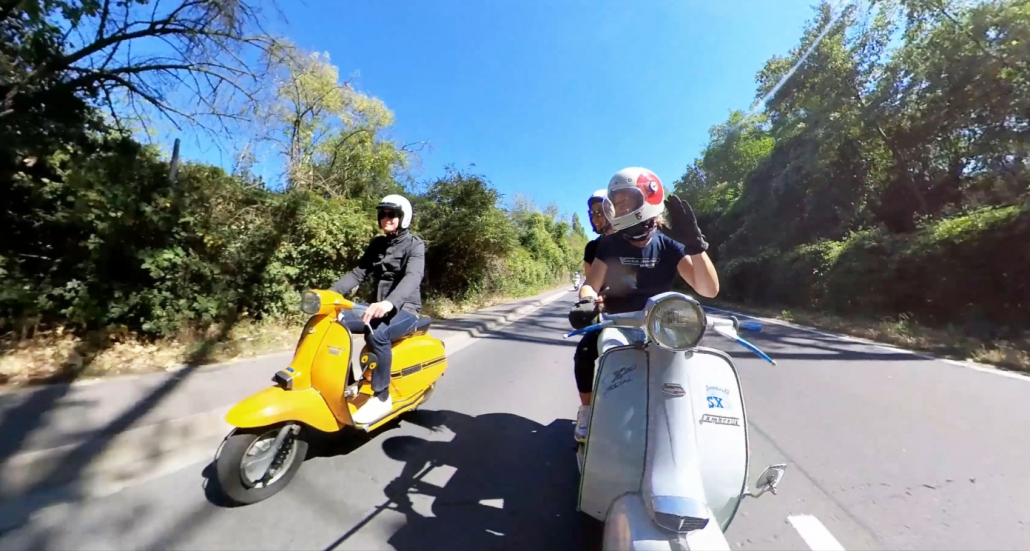
Slowly it is enough to just make kilometers on the way to and from work. It is time for longer journeys with Platónika and our trip to the Vespa Alp Days is the best opportunity!
In my personal ranking of the events, VAD has a special place:
Now the reasons are different, I travel to work. As part of the Scooter Centerwho is the official sponsor of the event. And of course, Platónika is coming with us.
I am preparing to show you all of these adventures firsthand. But now some nice memories of 2017.
The good friends I've made
The Colombian Representation
Super Sport 180 from Franz
See you there!
https://www.the-alp-days.at/
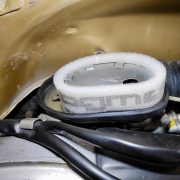
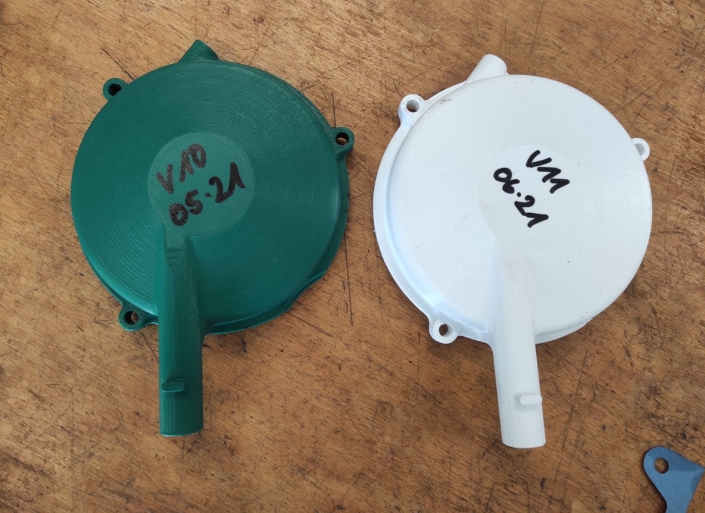
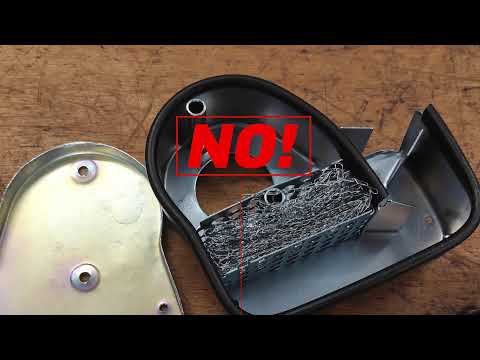
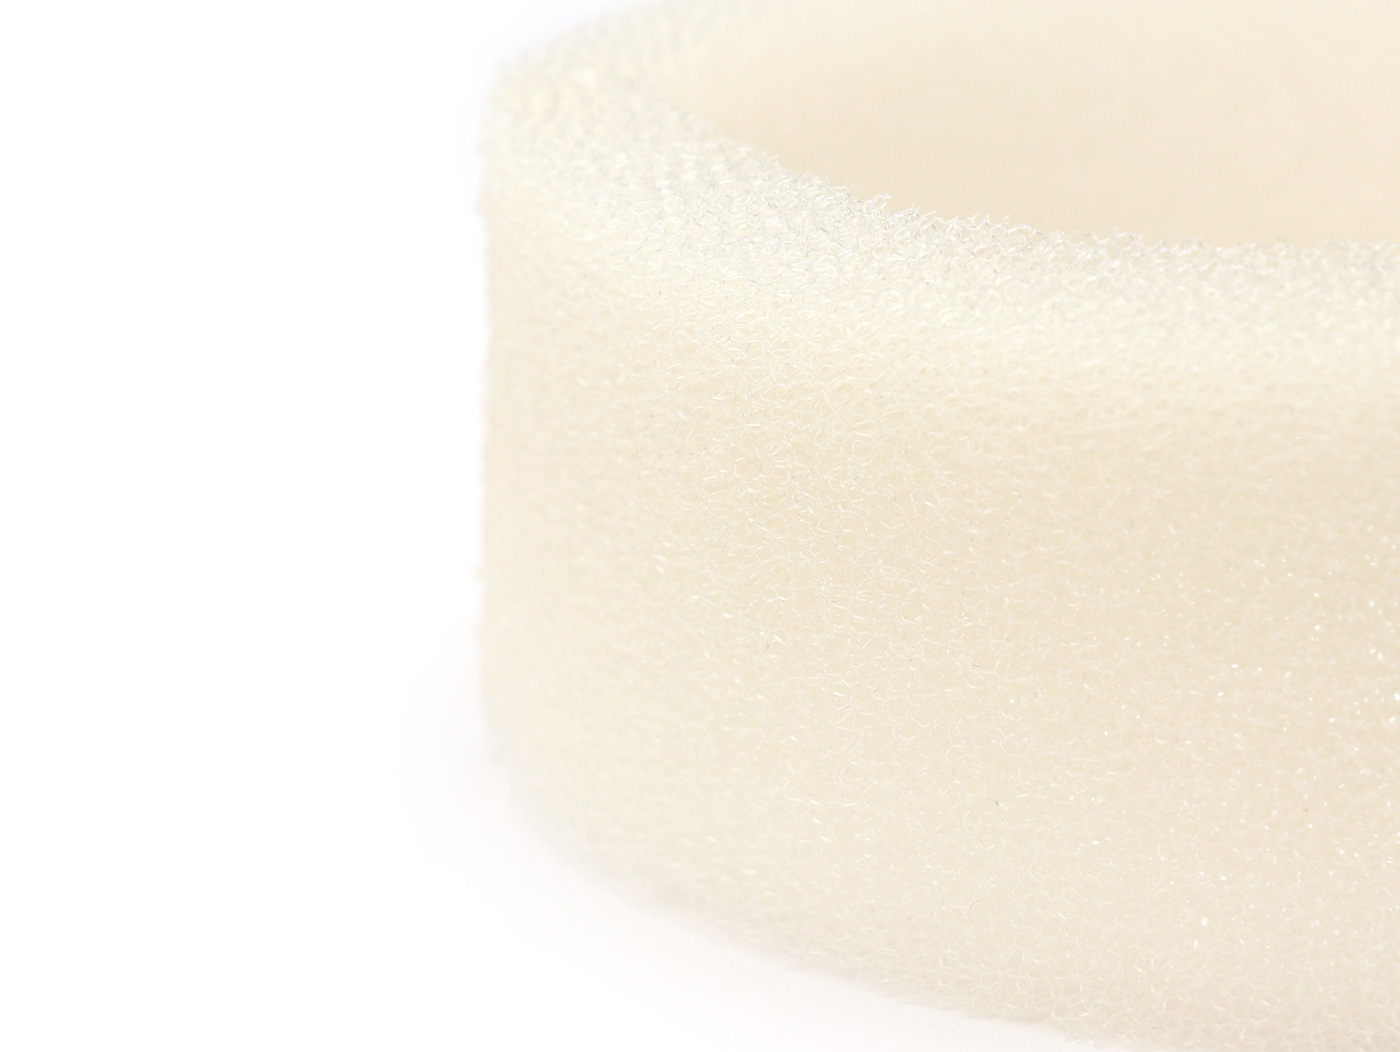
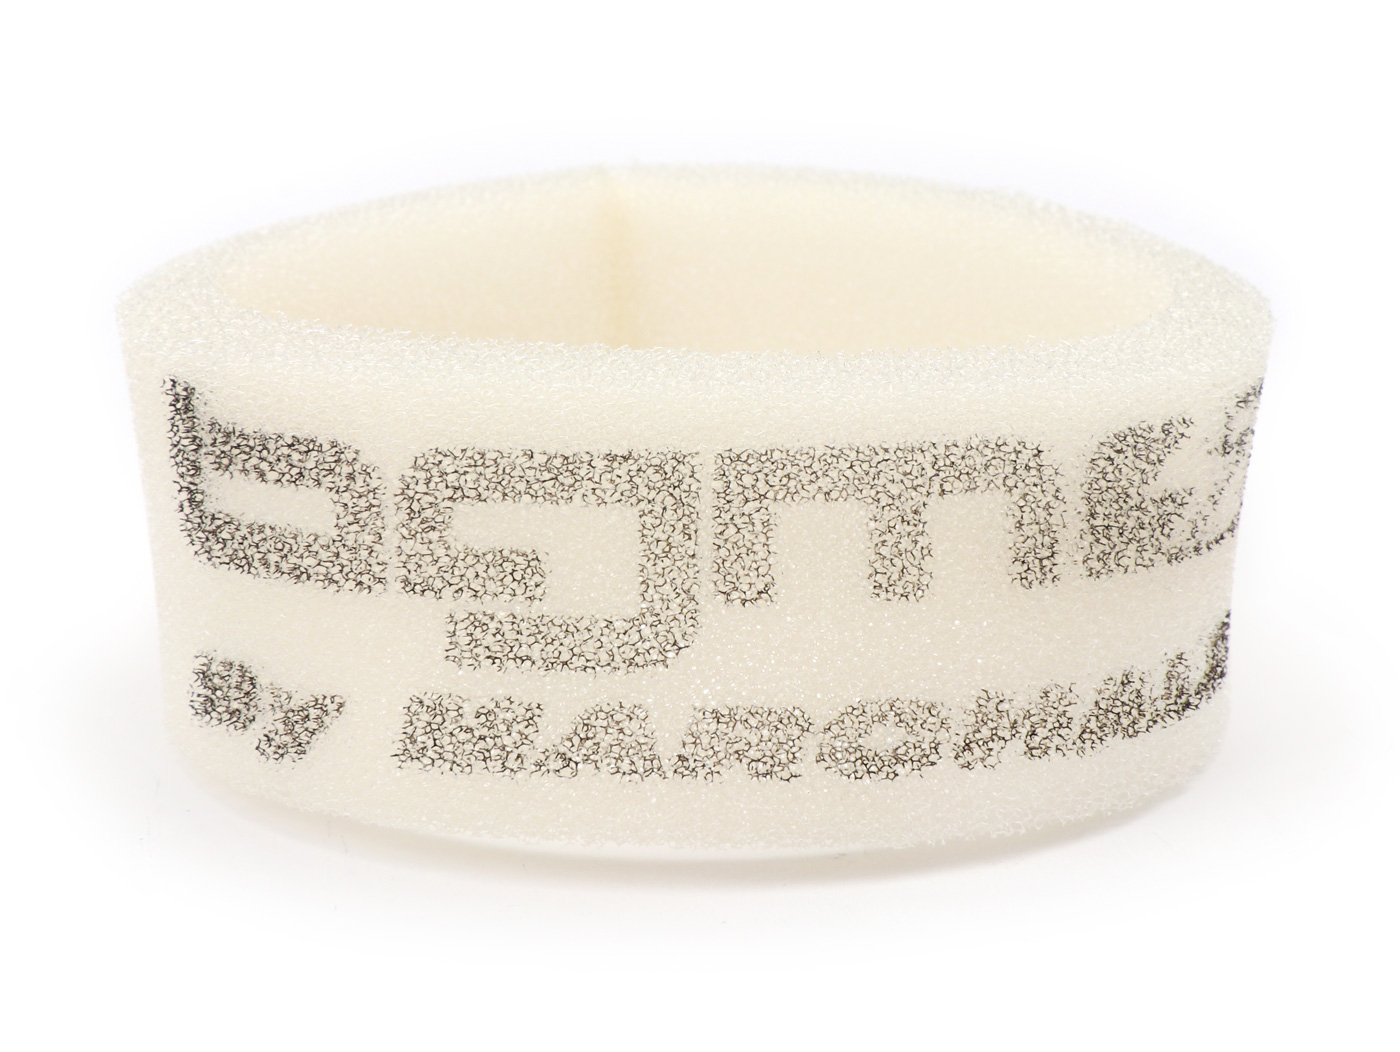
With many Motovespa Largeframe The identical air filter inserts are installed in the models.
Often the important component to protect the engine is missing or is no longer in a usable condition. That's why we have the Vespa for the Spanish license builds Largeframe Models one high quality air filter insert made.
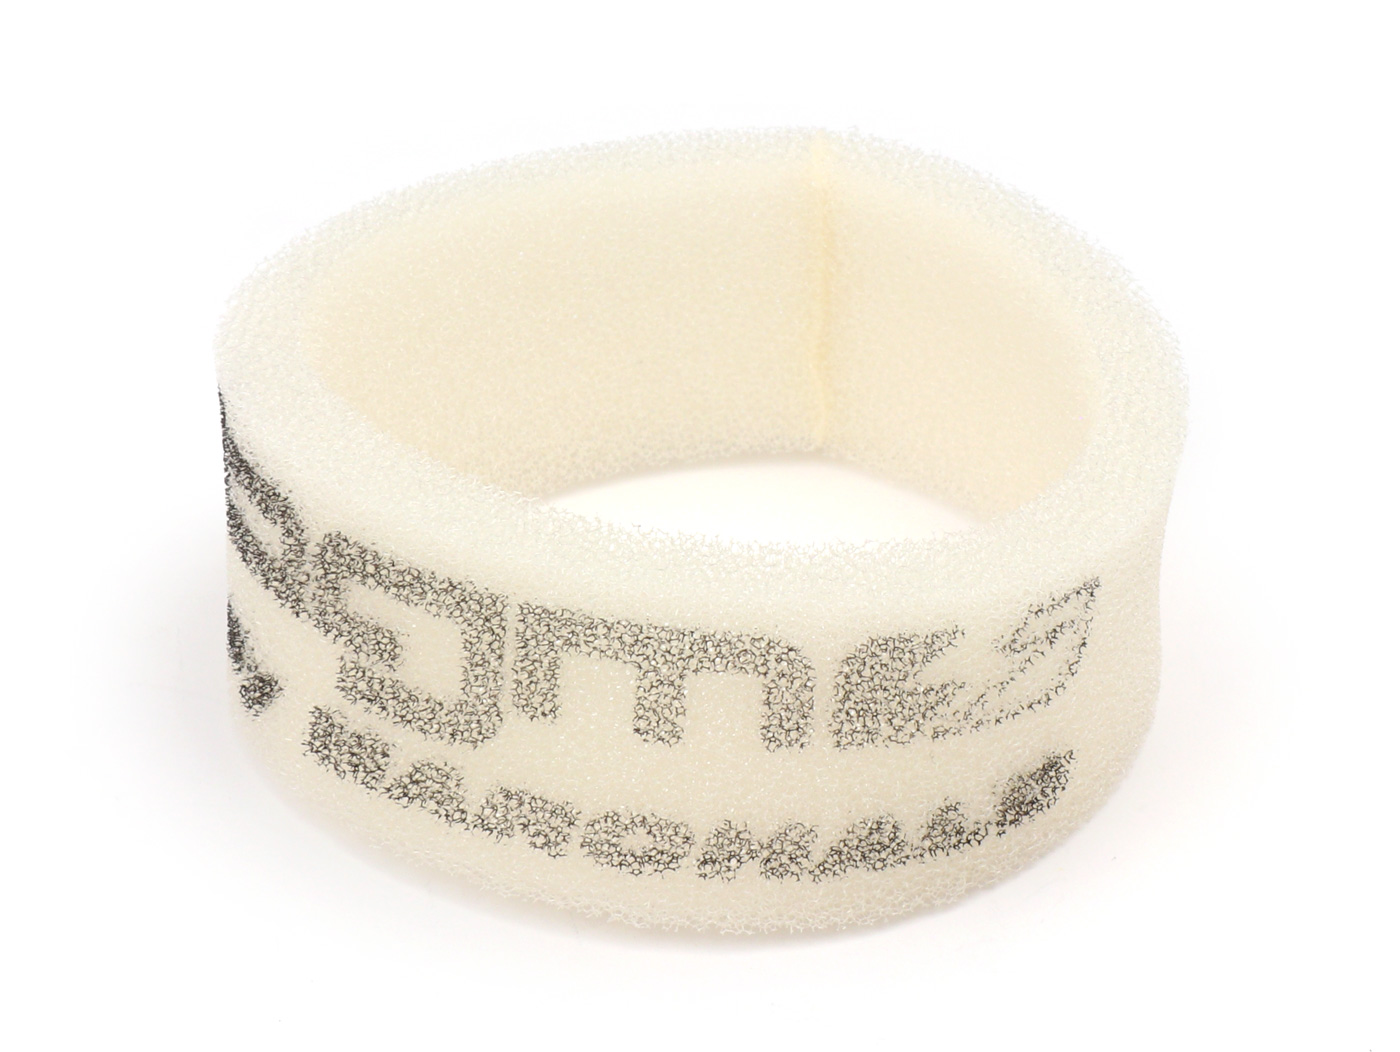
High quality filter fleece from Marchald (Italy), manufactured for bgm PRO.
Suitable for the direct intake engines (carburetor sits directly on the cylinder) of the Largeframe Motovespa engines.
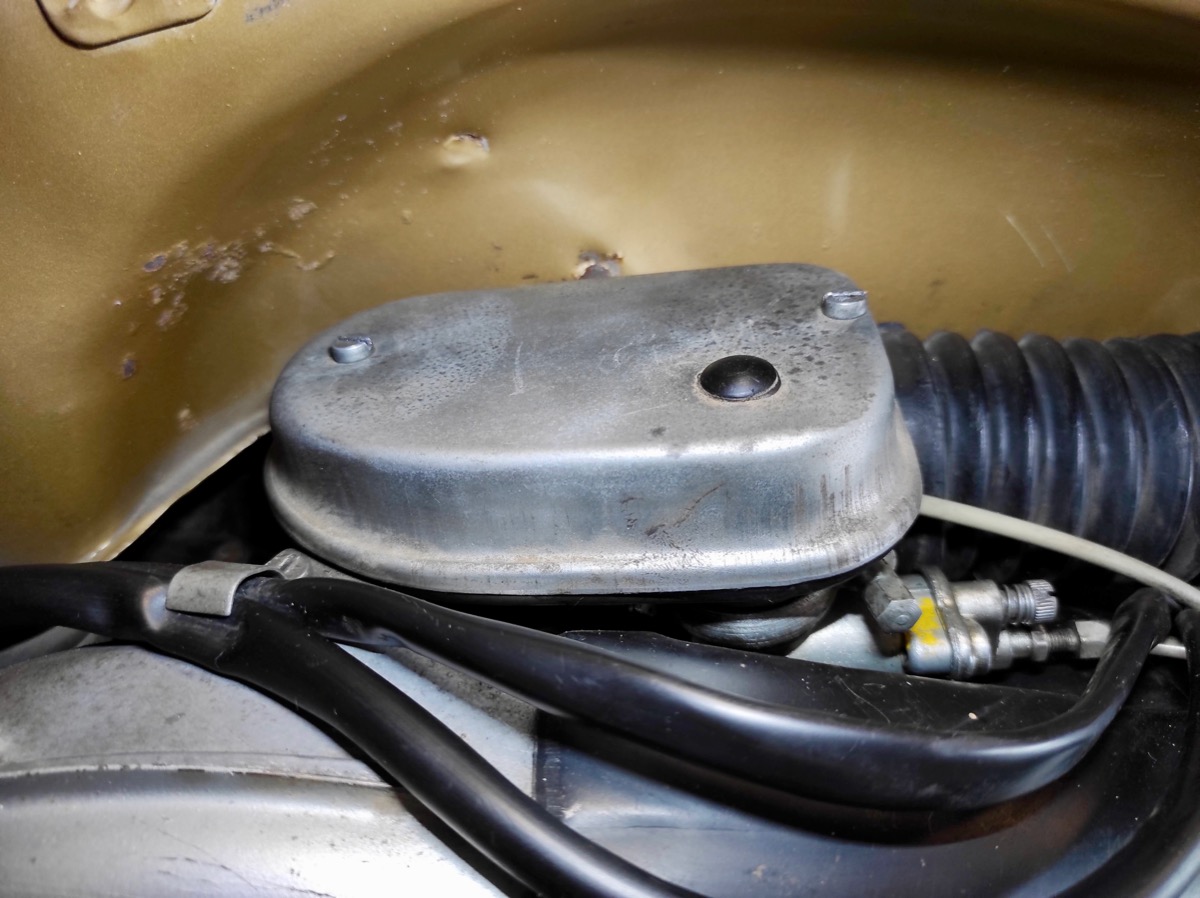
Replacing the air filter element is very easy. After removing the right side panel, the view of the air filter box is immediately clear.

The cover is attached with two M5 screws.
These can be loosened with a screwdriver size 5 to 6.
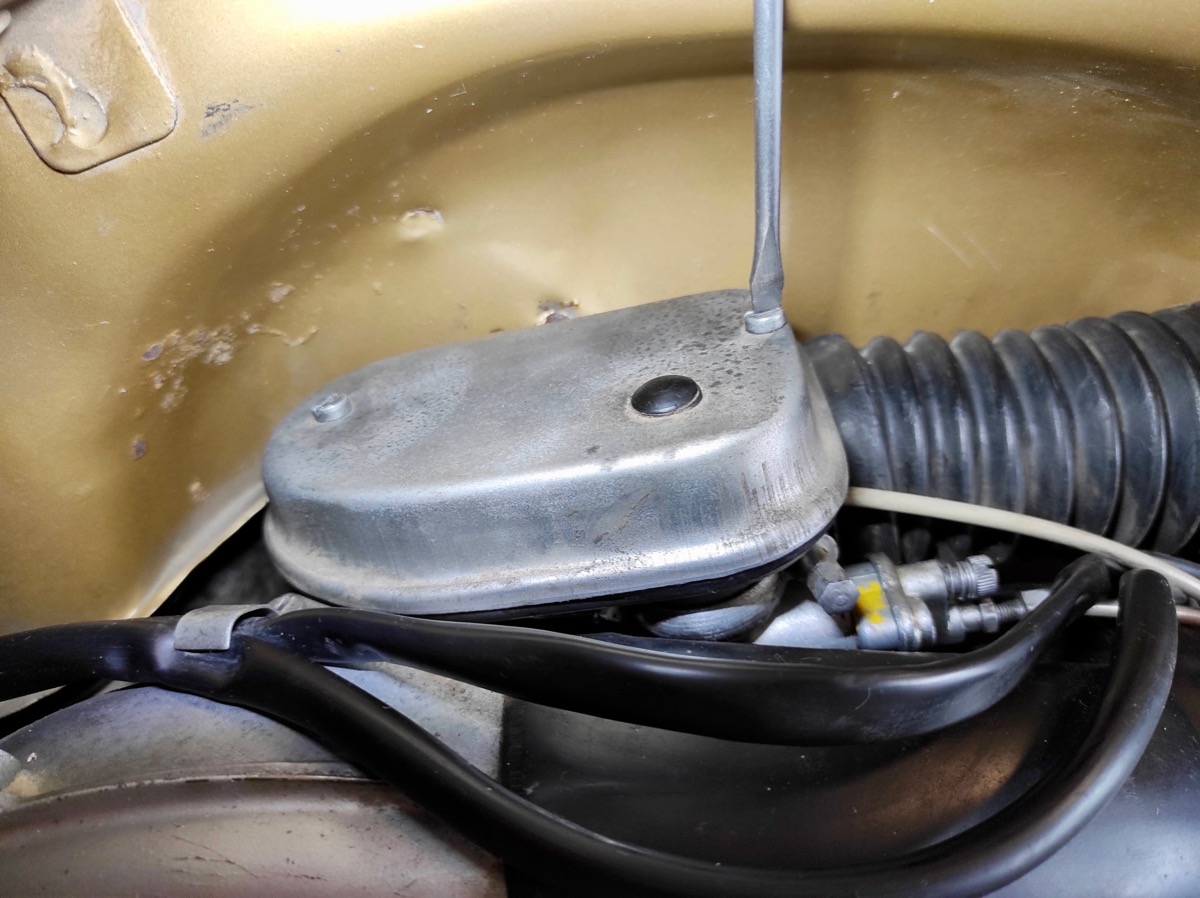
After removing the two screws, the cover can simply be lifted off.
Here, in our example, is the original one Motovespa air filter insert no longer available at first!
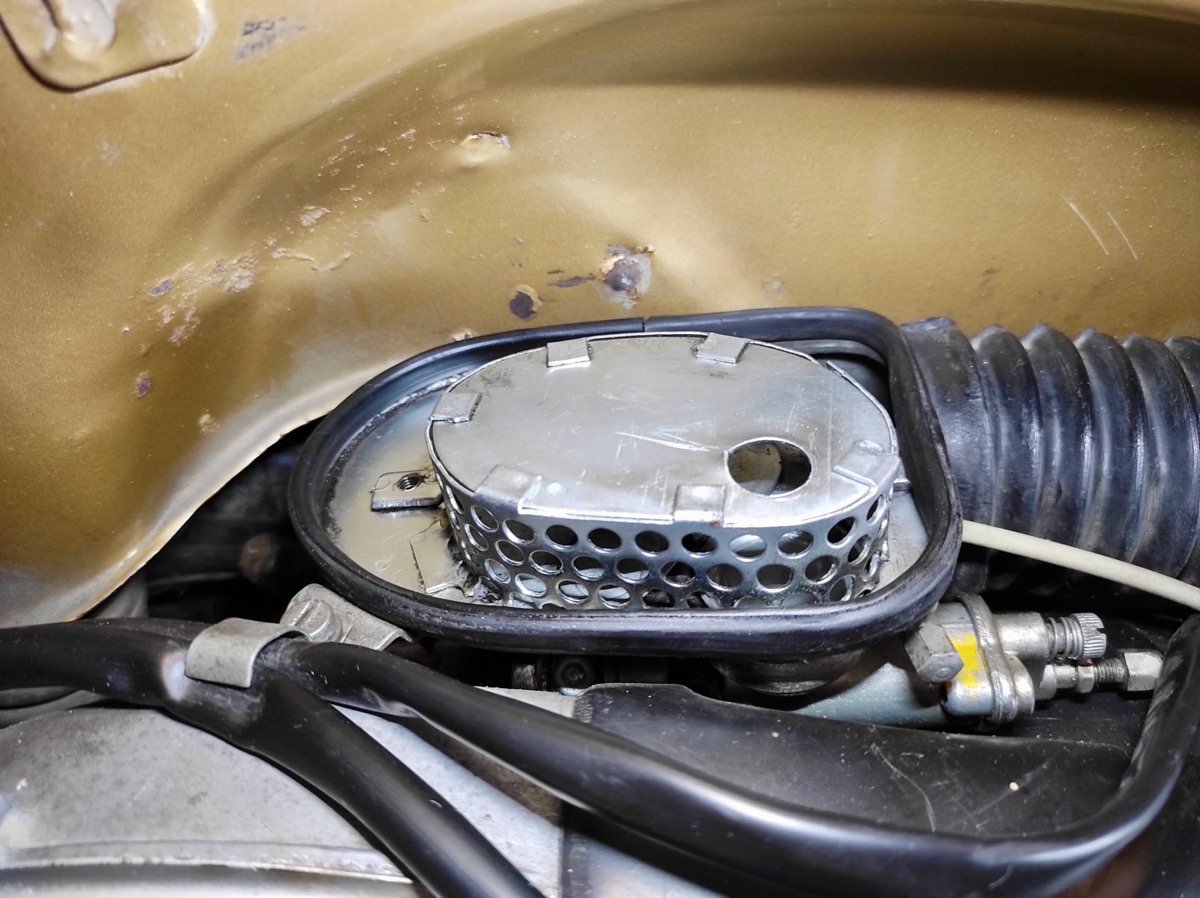
The air filter insert has no installation orientation and can simply be pushed onto the filter housing from above.
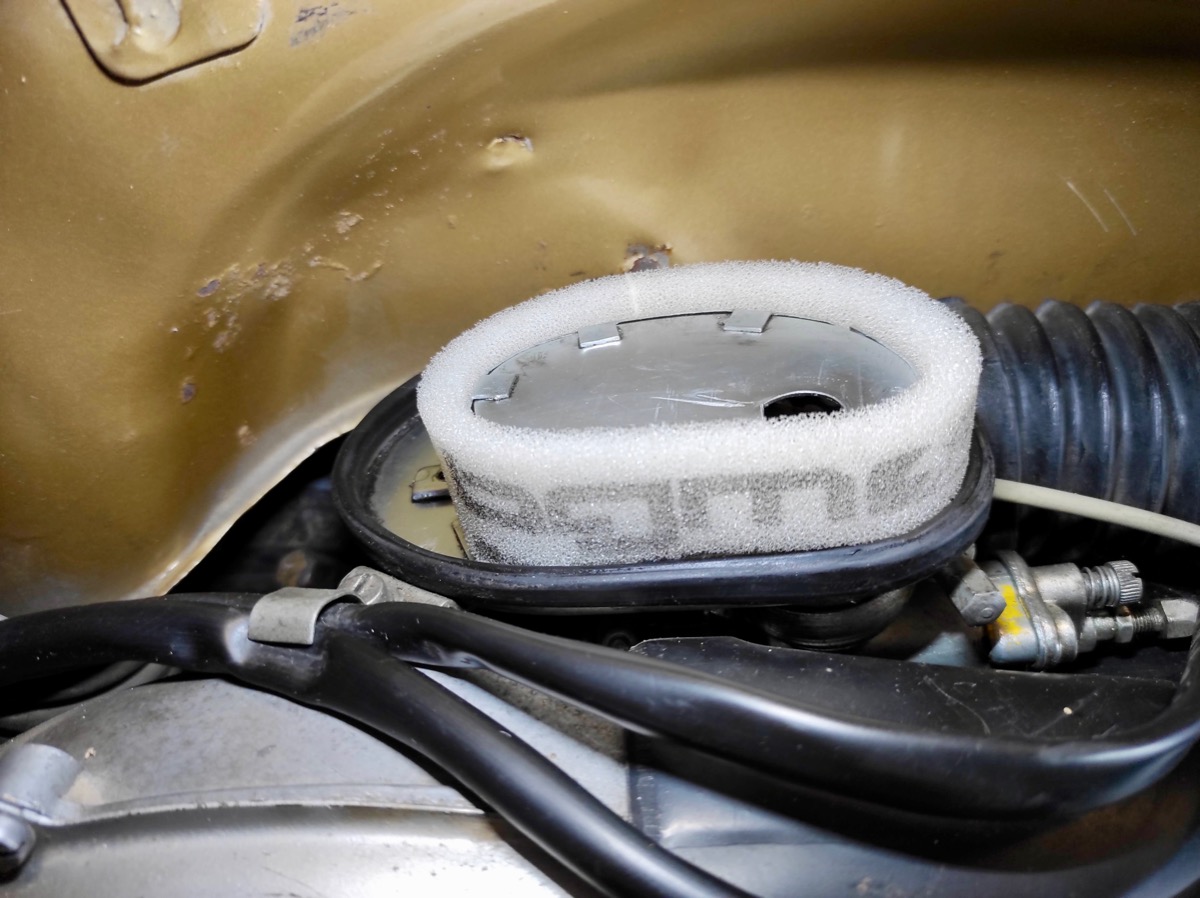
The remaining protrusion of the air filter insert seals against the air filter box cover when installed.
Fasten the cover of the air filter box again with the two screws, reassemble the side panel and the change is complete.
In order to achieve an even higher filter performance, the air filter insert with air filter oil can be used.
However, this is necessary due to the high quality filter material of the bgm PRO filter is not absolutely necessary.
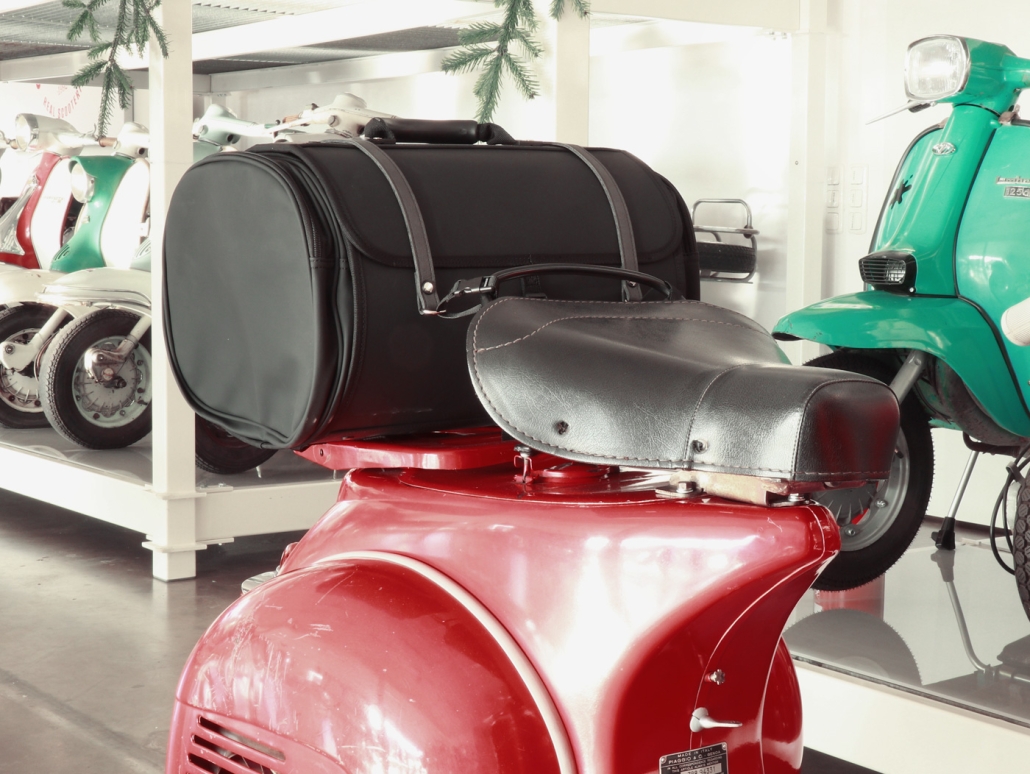
As we would say in Colombia: “I'm in my salsa * " (it means that I am fully in my element). I received Platónika with 18 km and exactly 15 days later, she had a thousand km more.
Completely excited because spring is already there colors I started to drive. And even put together a Motonostra accessory set for touring:
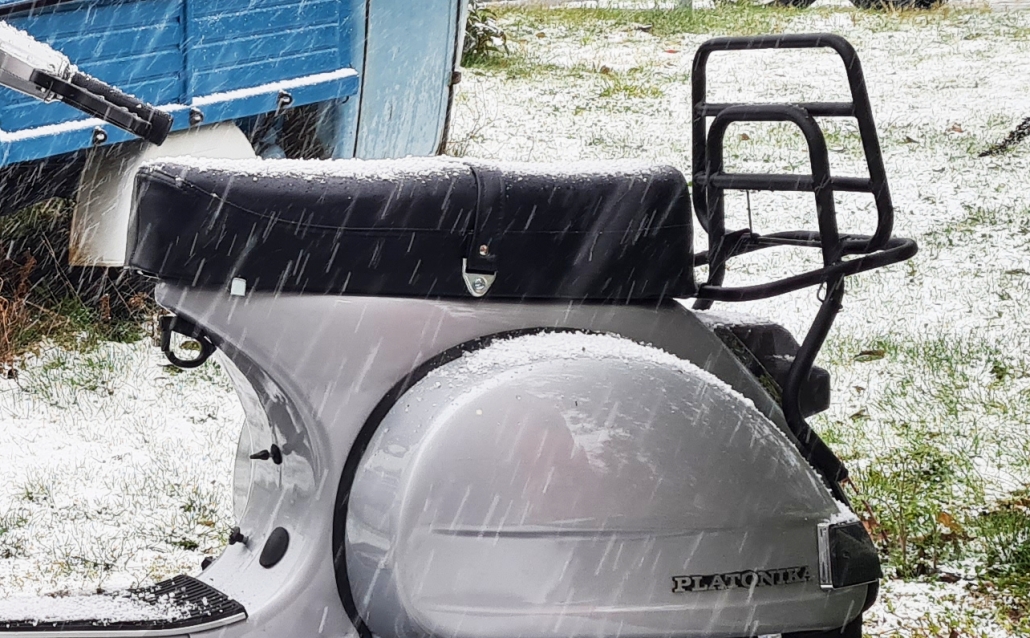
But with this German weather you never know! And sure enough, a week later it starts snowing ... that shouldn't stop me, so I'll protect myself from the harsh cold and keep going.
Pictures and videos come and go, but I still think I'm missing something. The reason I fell in love with this scene: Indeed, their Vespisti.
No meetings in sight, "then I'll go with my colleagues" I thought, but who could go with me? in the marketing office where i'm sitting i only have the two of them Lambretistas found…
And now ... why not?
Did you miss any details of Platónika's story? You can find the full story here.
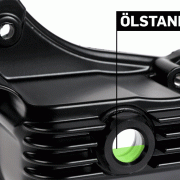
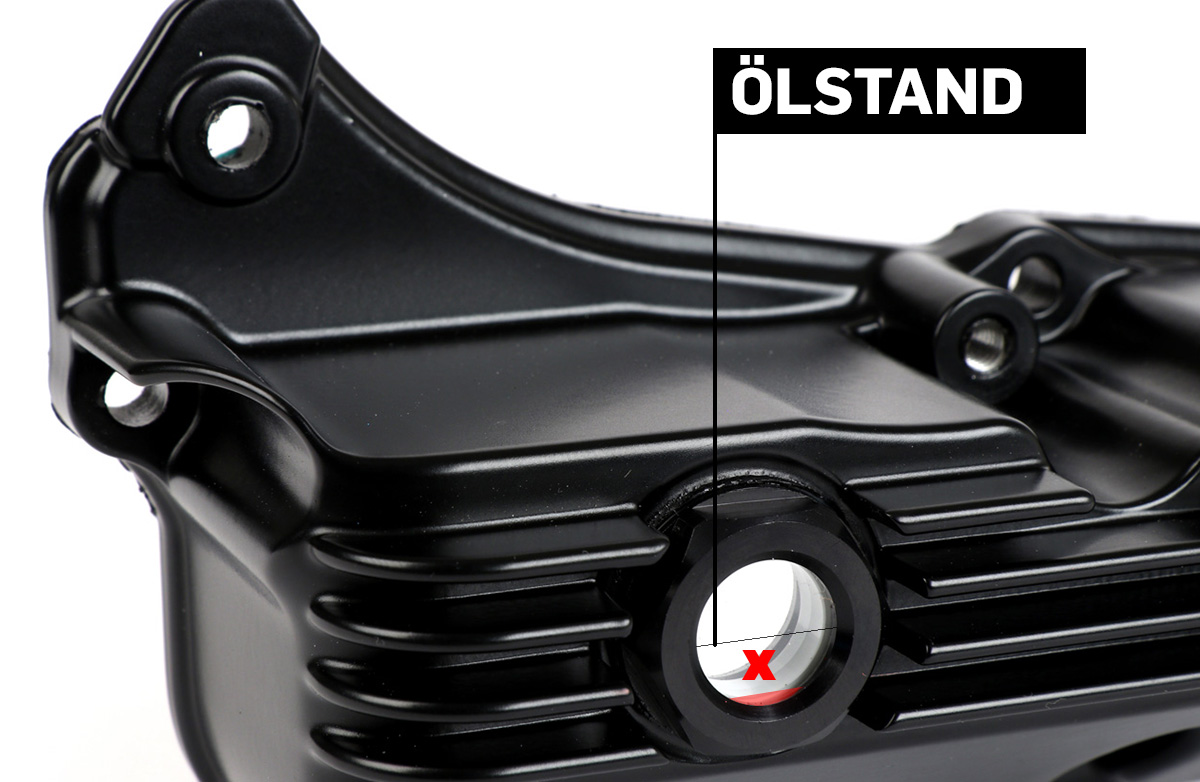
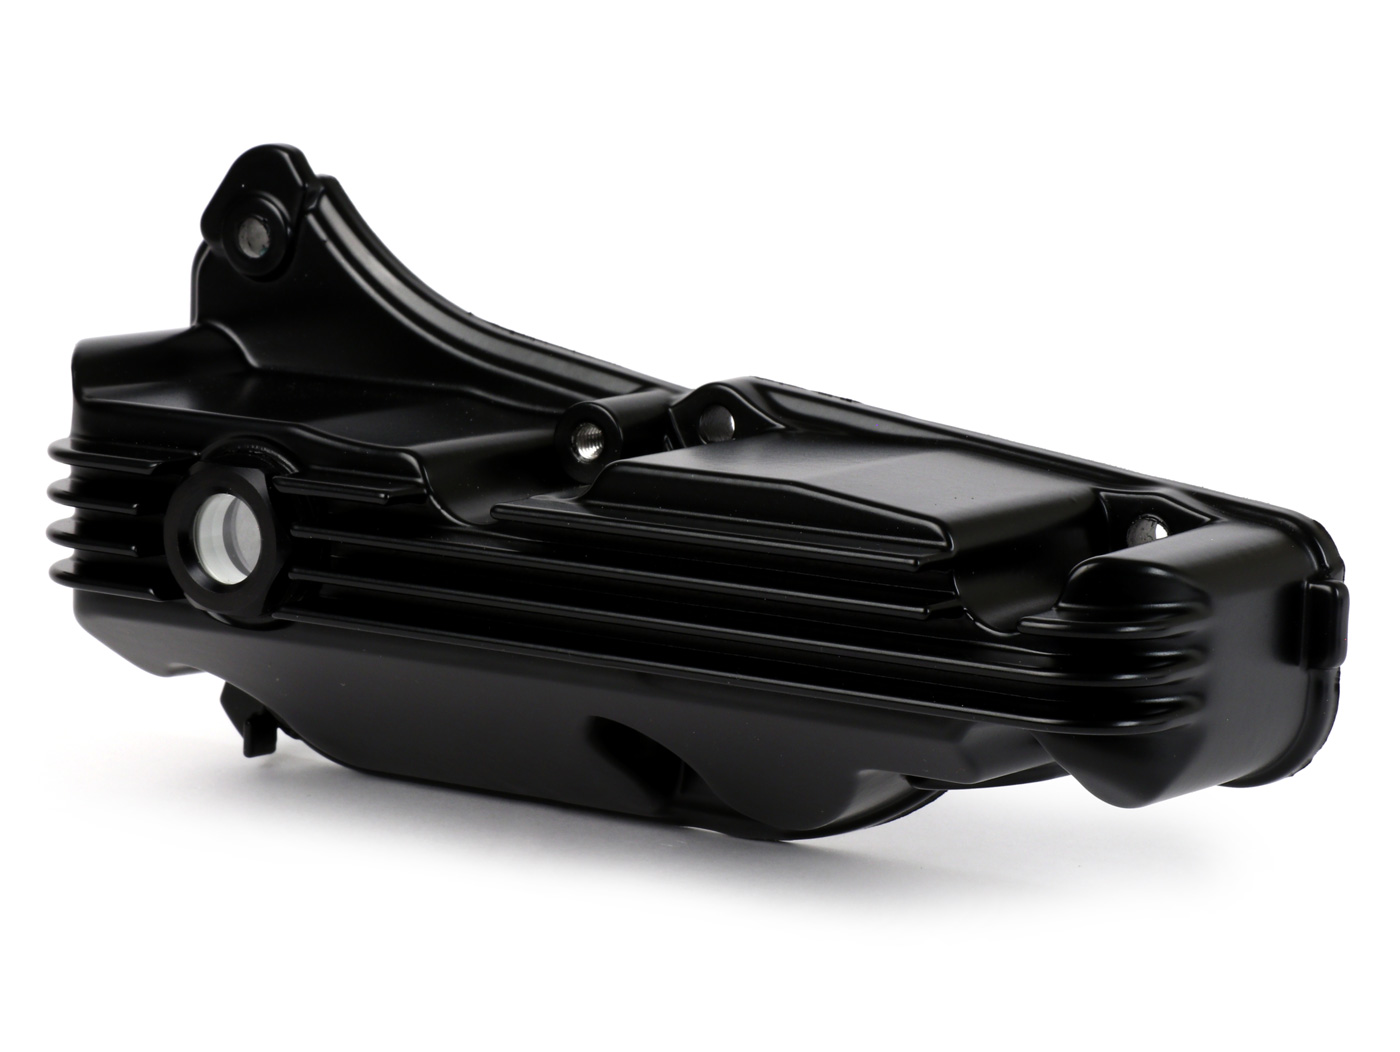
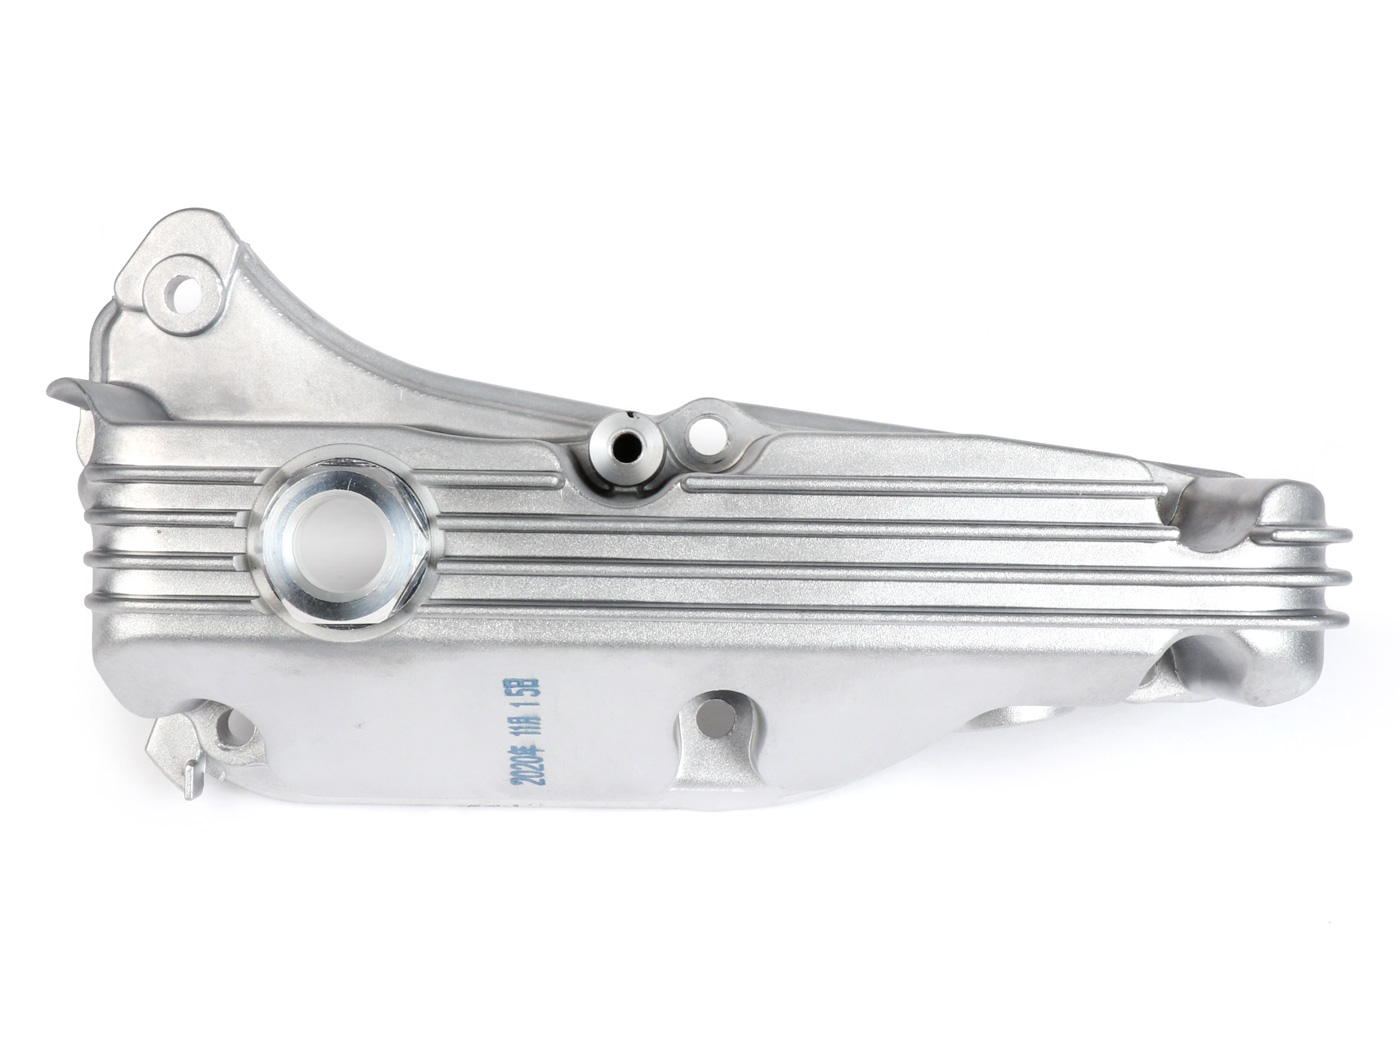
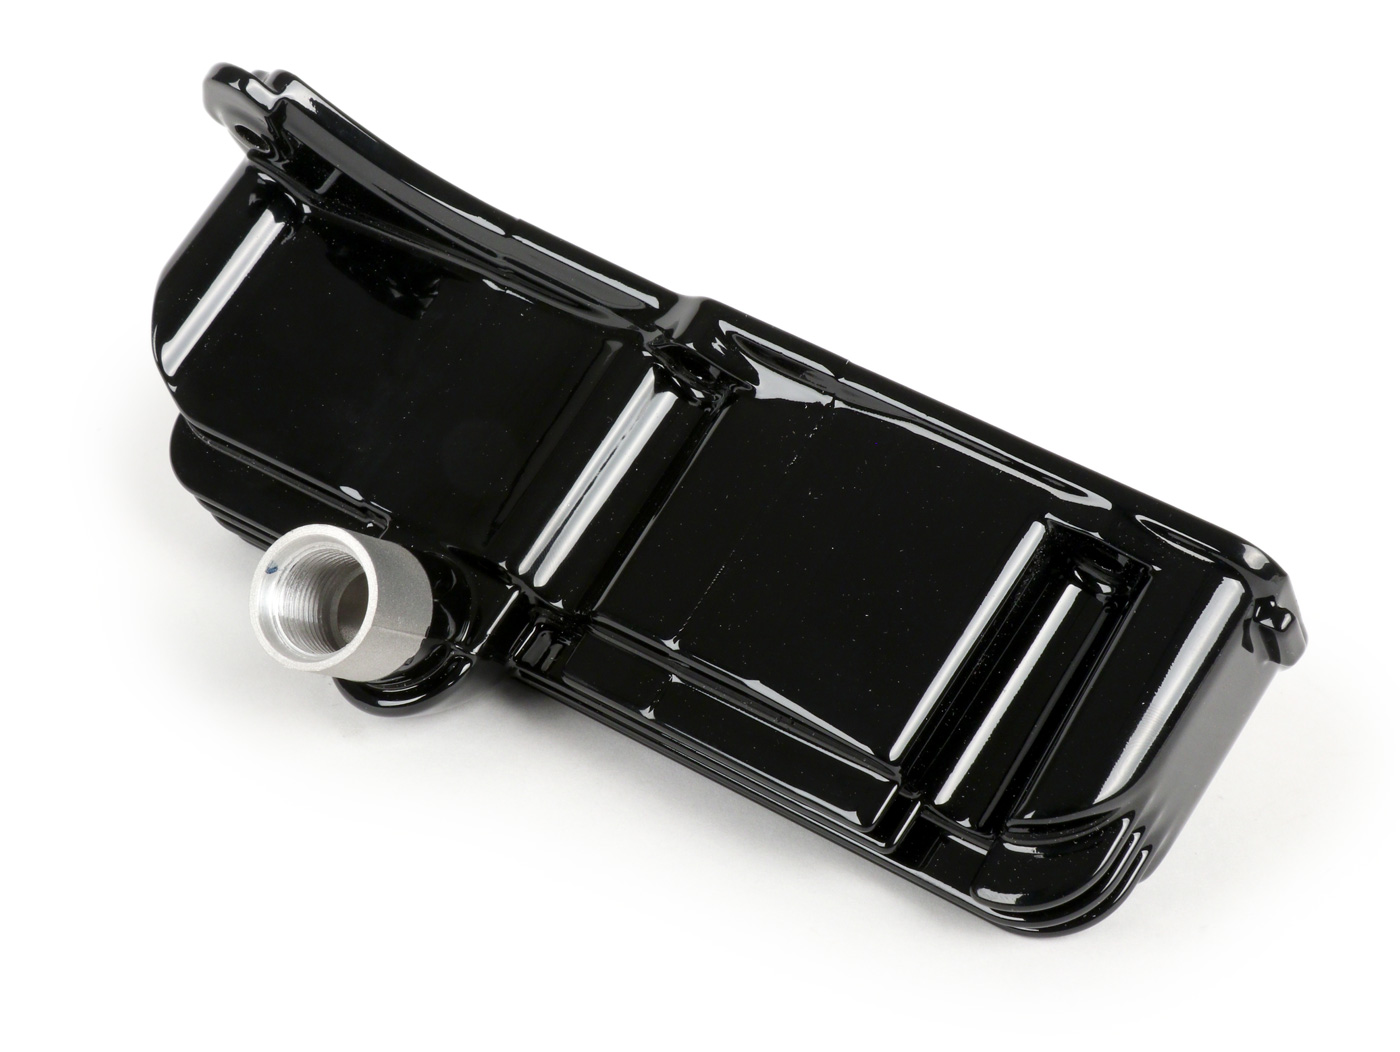
With this practical oil pan, you always have control over the engine oil in your Vespa engine. Already available for the new HPE / models without a connector for the dipstick and soon also for the older HPE models with an dipstick connector on the oil pan.
I think this part is brilliant - I could have come up with the idea, but Peter von Jack fox had the idea first and implemented it perfectly.
Because through this simple one Tuning trick for Vespa GTS The annoying, time-consuming and imprecise checking of the oil level using the dipstick is no longer necessary. A quick check before the tour is now done by simply looking at the oil sight glass.
We offer the oil pans in the following colors, always with us: black anodized sight glasses!
The dipstick does not fall away, it is still there for you to check the oil level. The middle of the sight glass shows you the maximum oil level. The sight glass also functions as a spirit level. To read it, it is best to place your GTS on the stand, make sure it is on a flat surface. According to Peter, whether the engine is warm or cold is irrelevant, it doesn't matter much when it comes to the Vespa oil level!
TIPP: Compare the oil level with the oil dipstick the first 2-3 times, this will give you a better feeling for the oil level in the sight glass! With you it could then for example look like this:
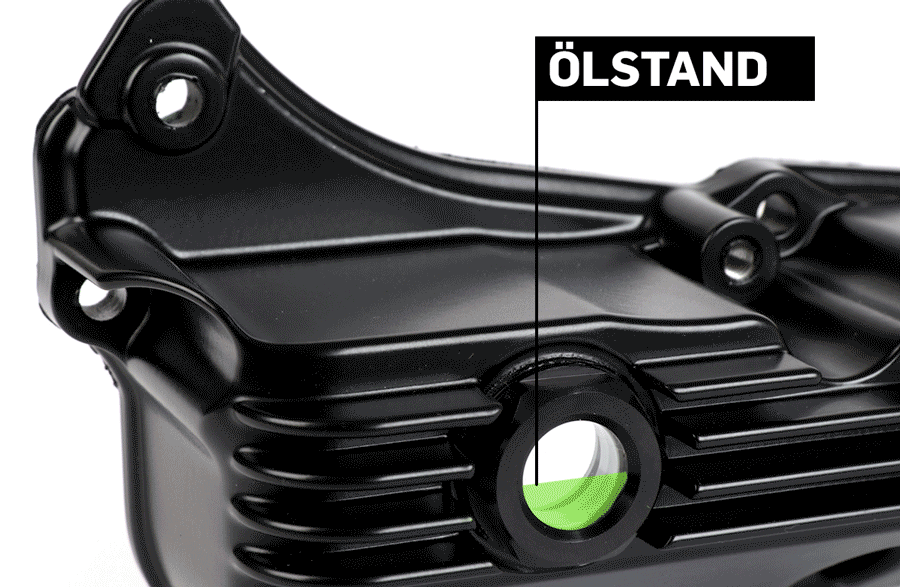
NOTE: The oil lamp on the Vespa is an oil pressure control. In practice this means: when the lamp comes on, the engine is usually already down. (If the oil pressure loss is due to insufficient oil quantity)
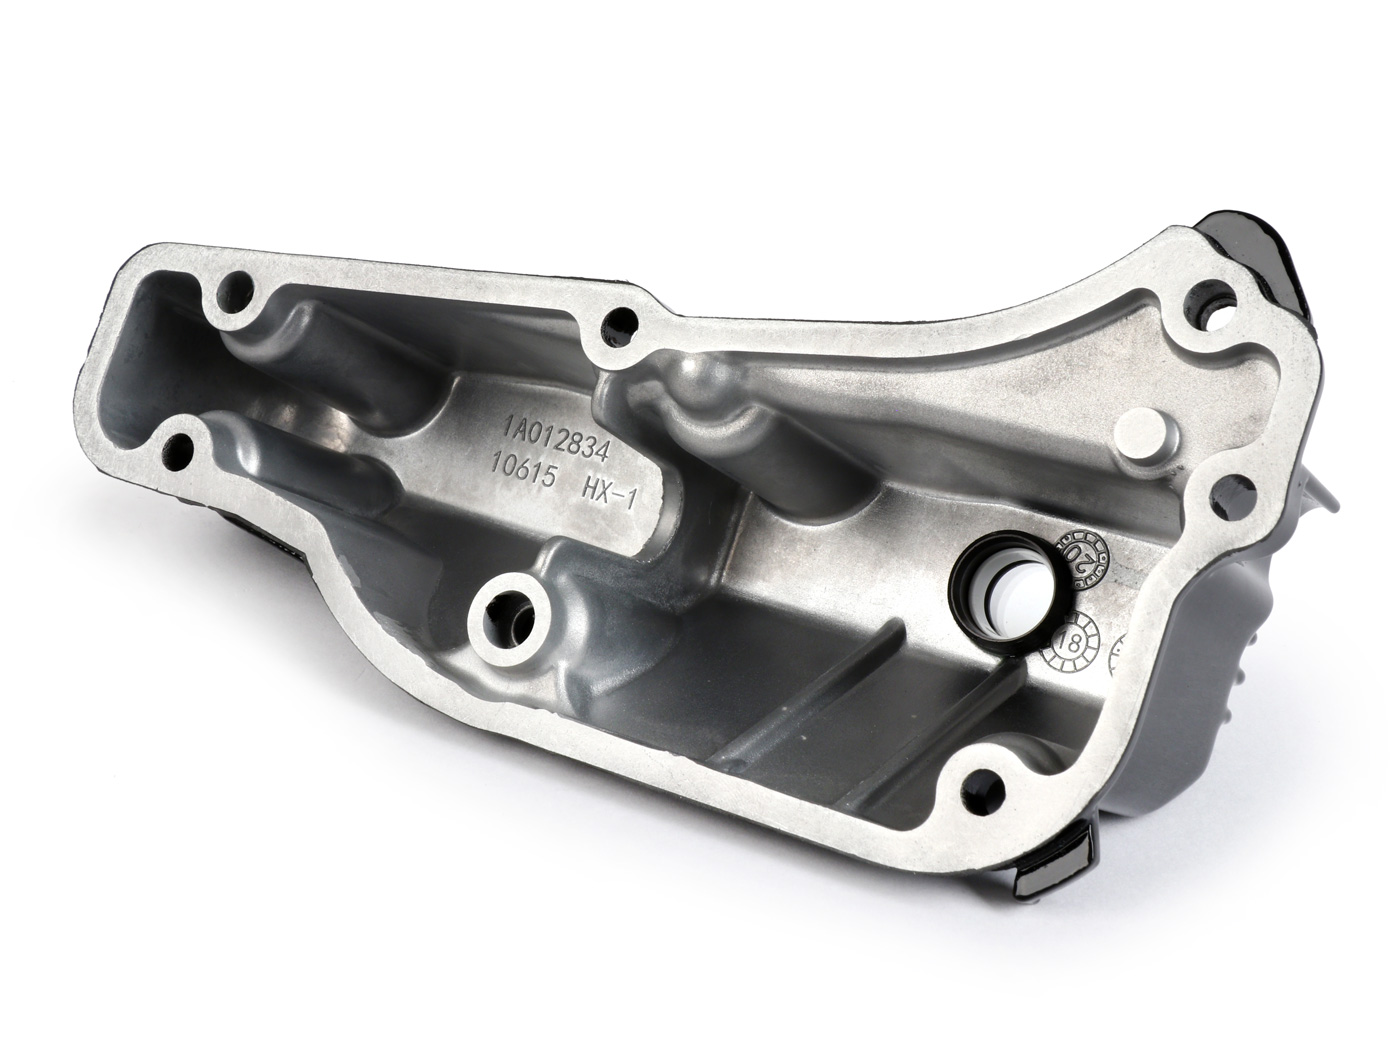
Only NEW ORIGINAL PIAGGIO oil pans are used for the production, which are laboriously reworked on the CNC milling machine for the installation of the oil sight glass.
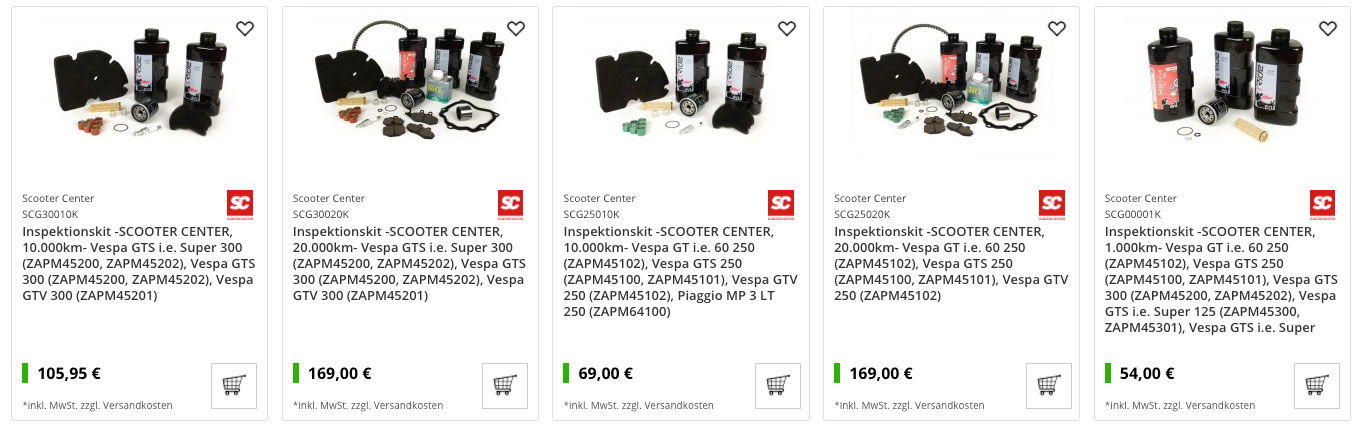
We also recommend the oil and the oil filter to change, that's what we have to do practical inspection kits.
The installation of an oil pan is easy, but you should work cleanly. Here we have information about Vespa GTS oil pan and assembly
CONCLUSION: Oil level check for Vespa GTS hpe made easy!
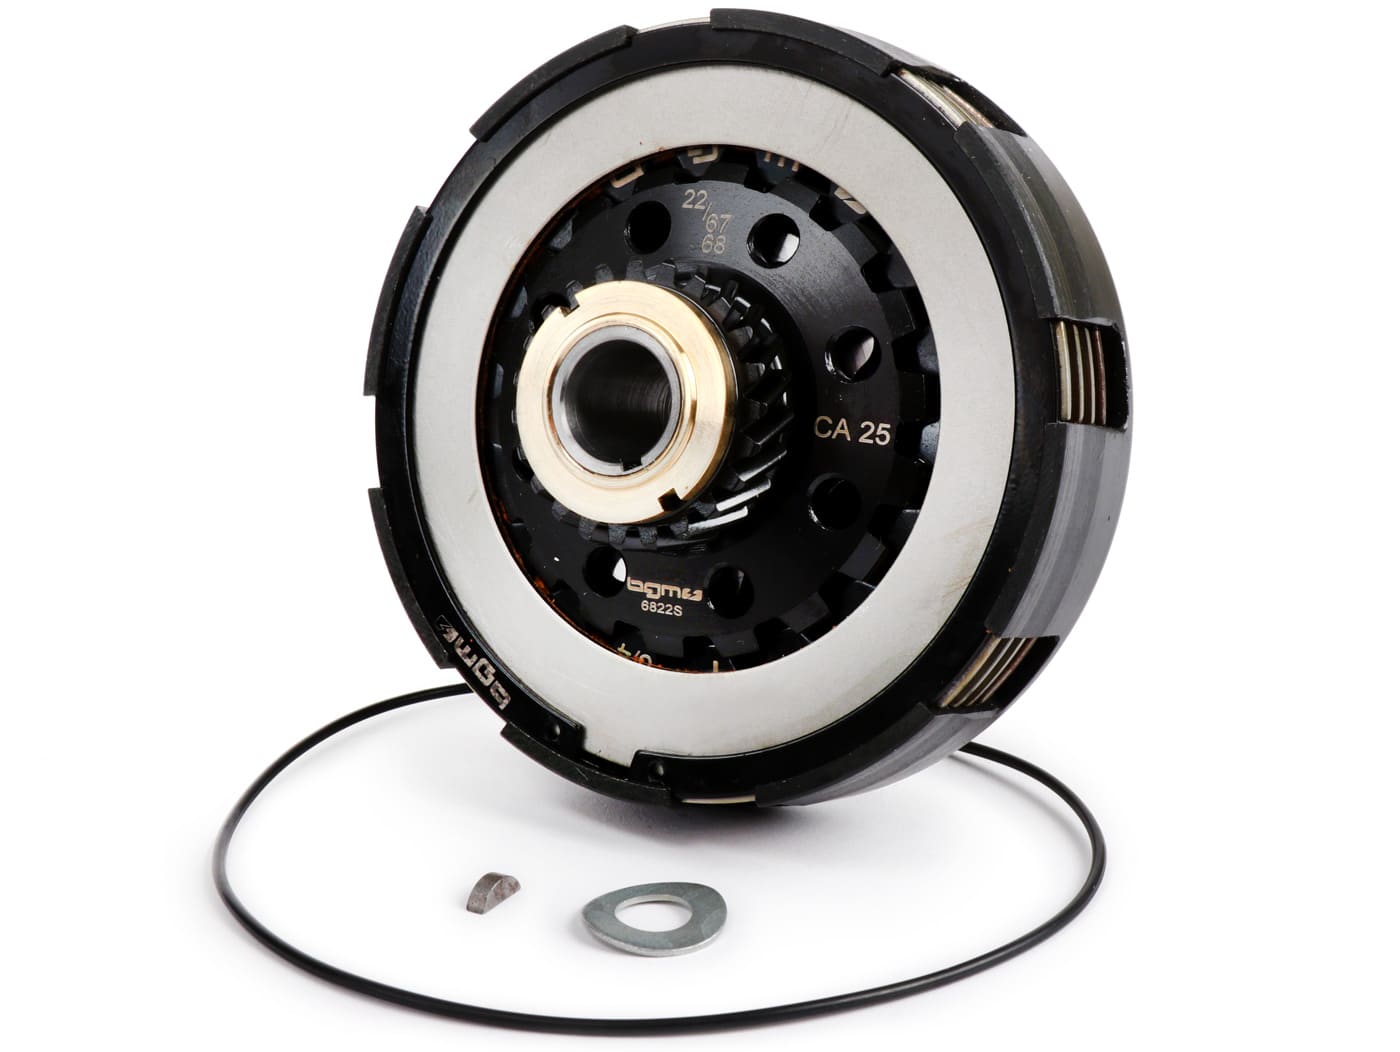
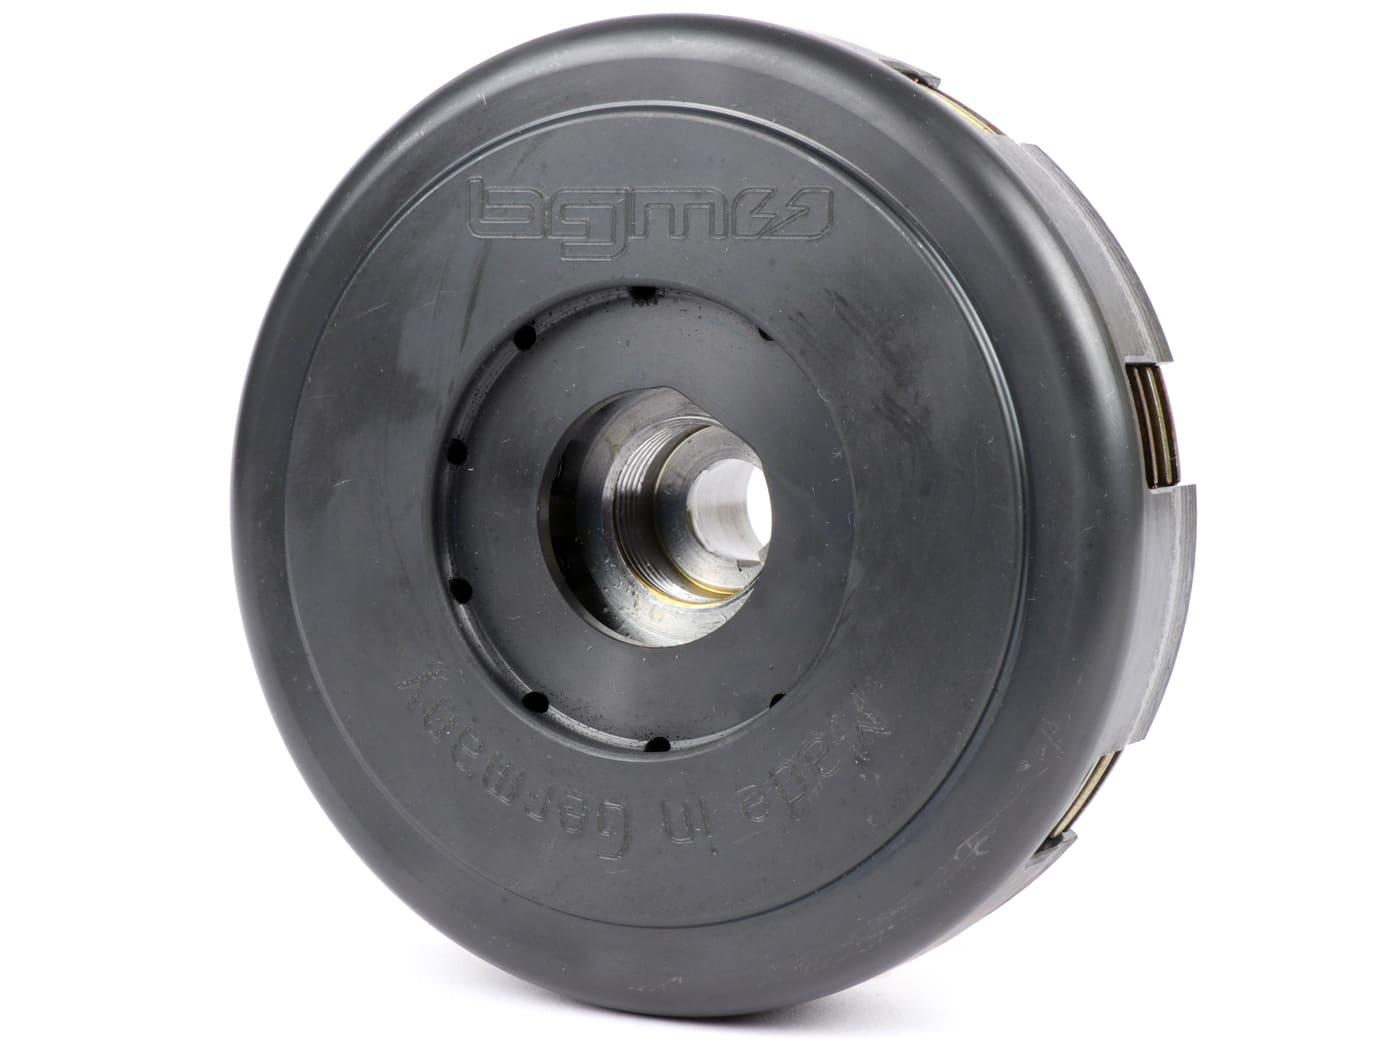
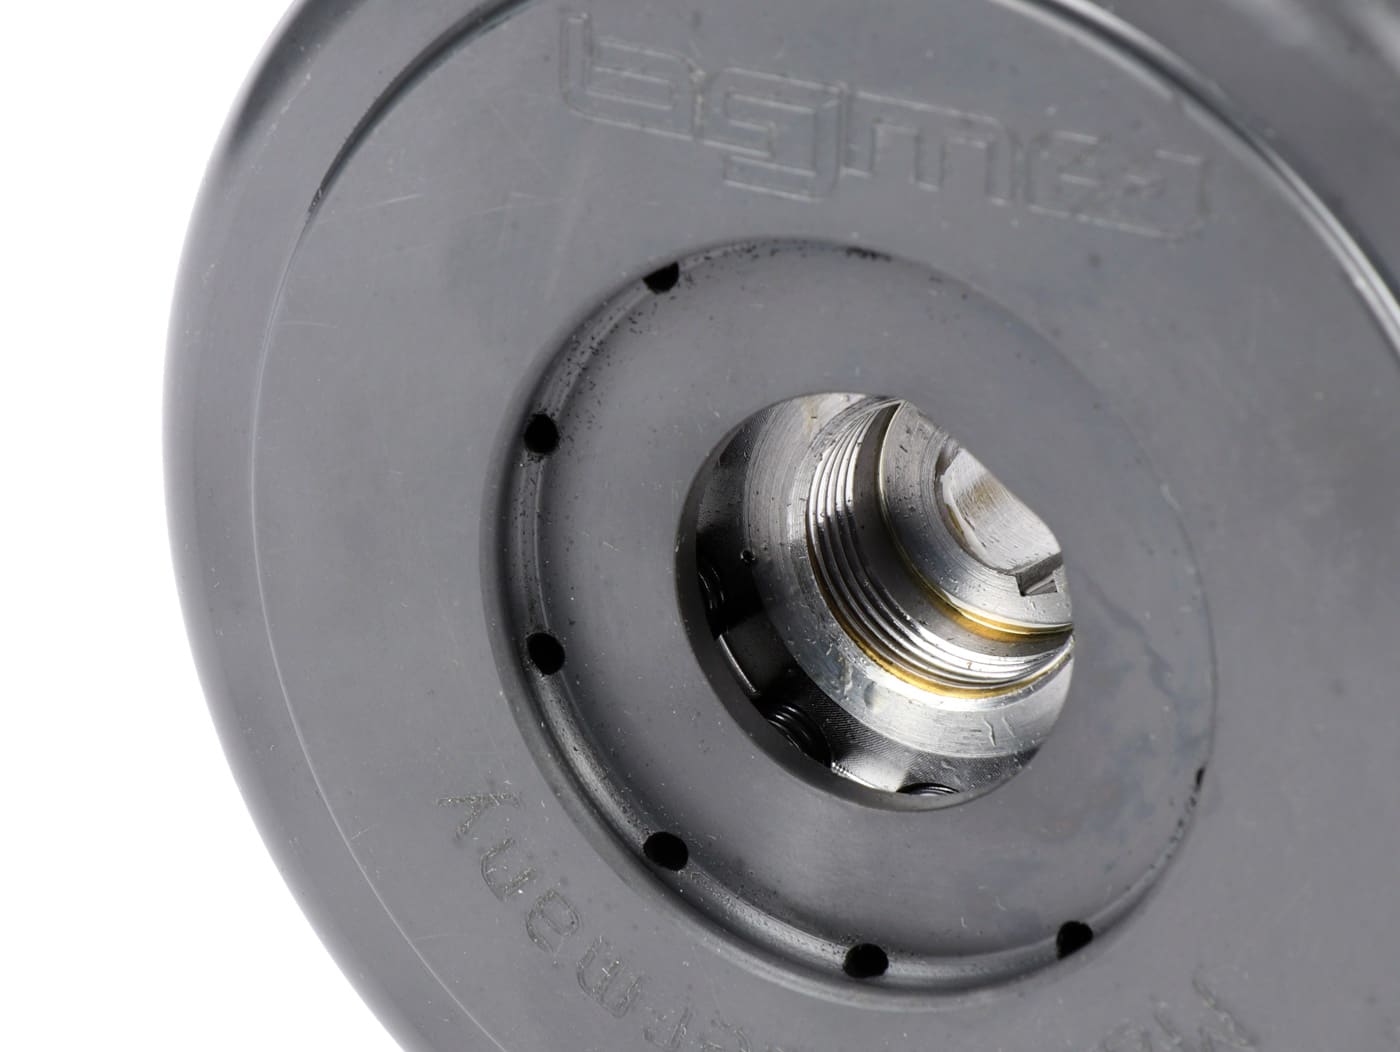
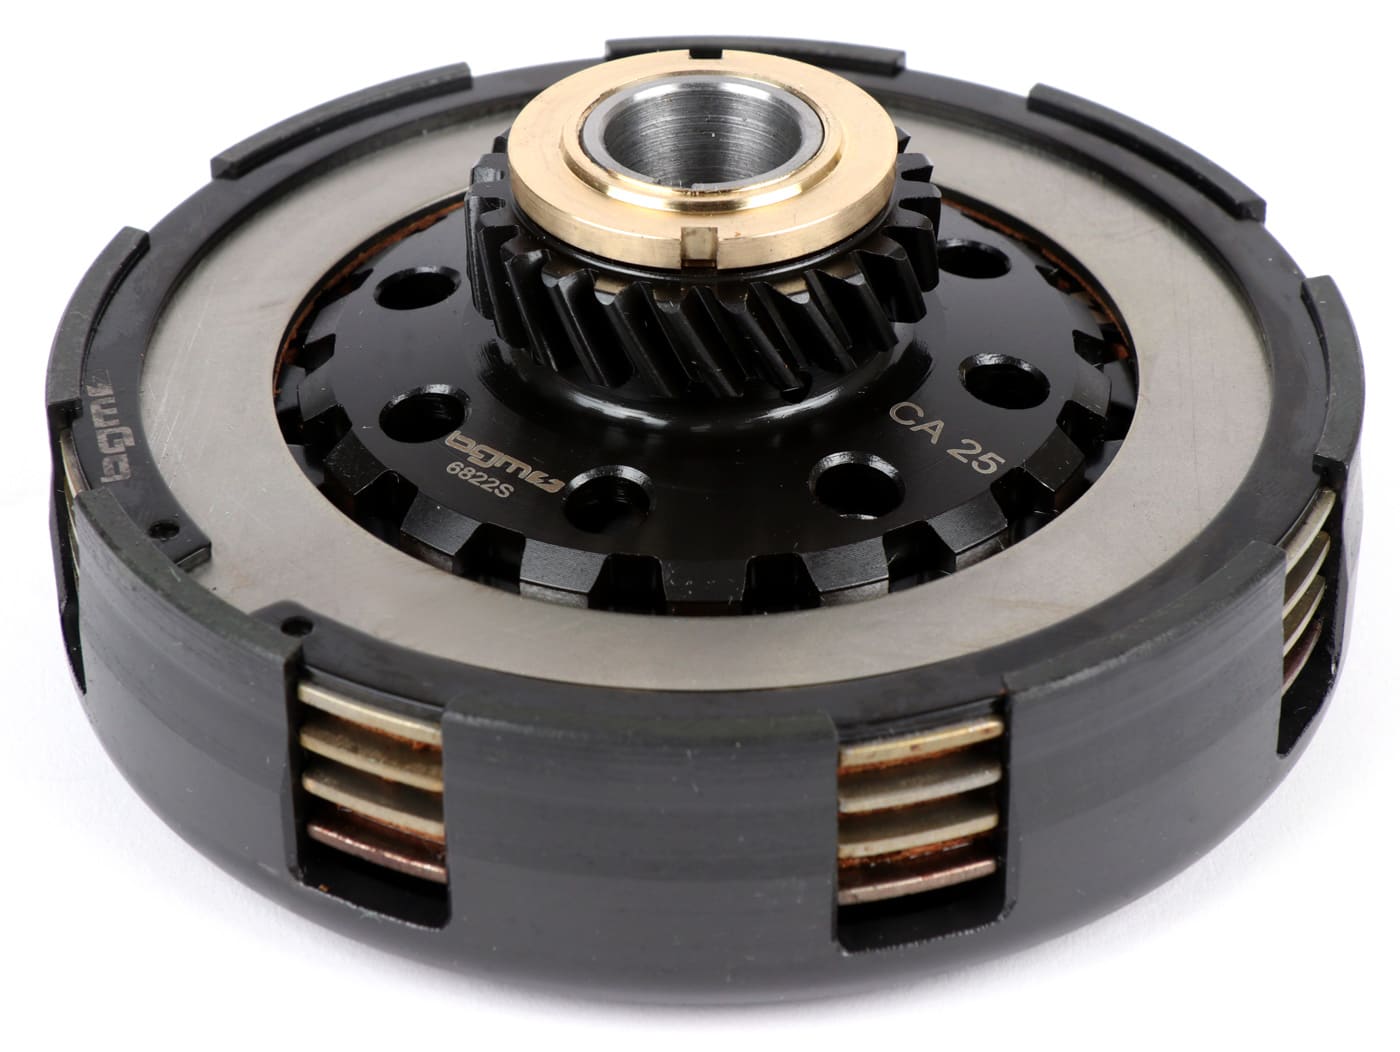
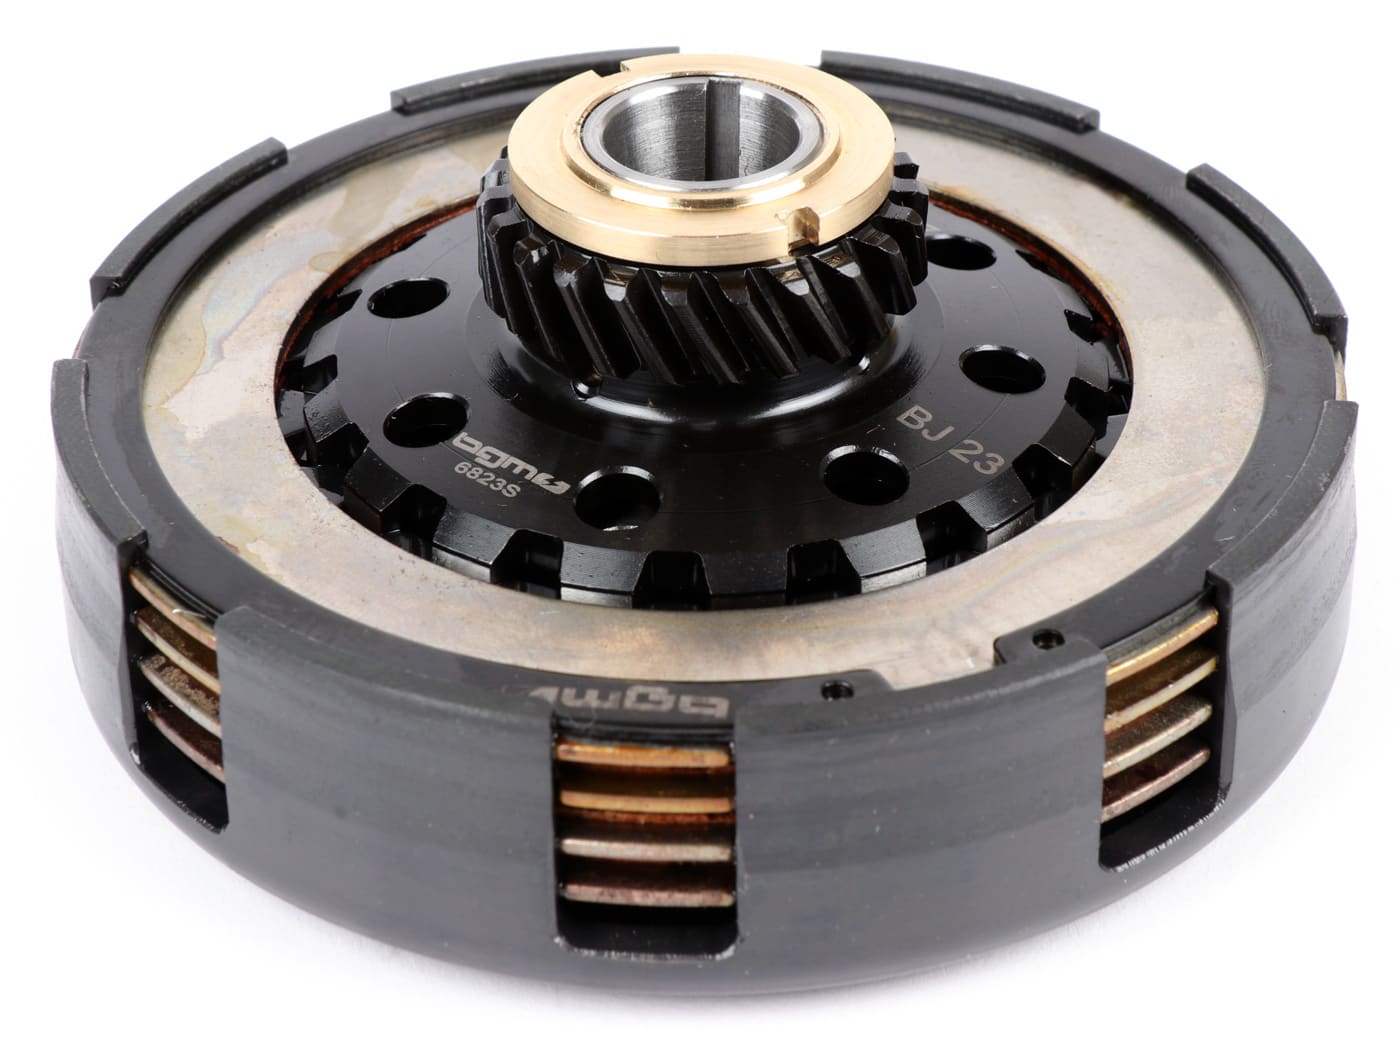
The proven bgm SUPERSTRONG clutch is now also available for the Vespa GS150 / GS160 and SS180 models.
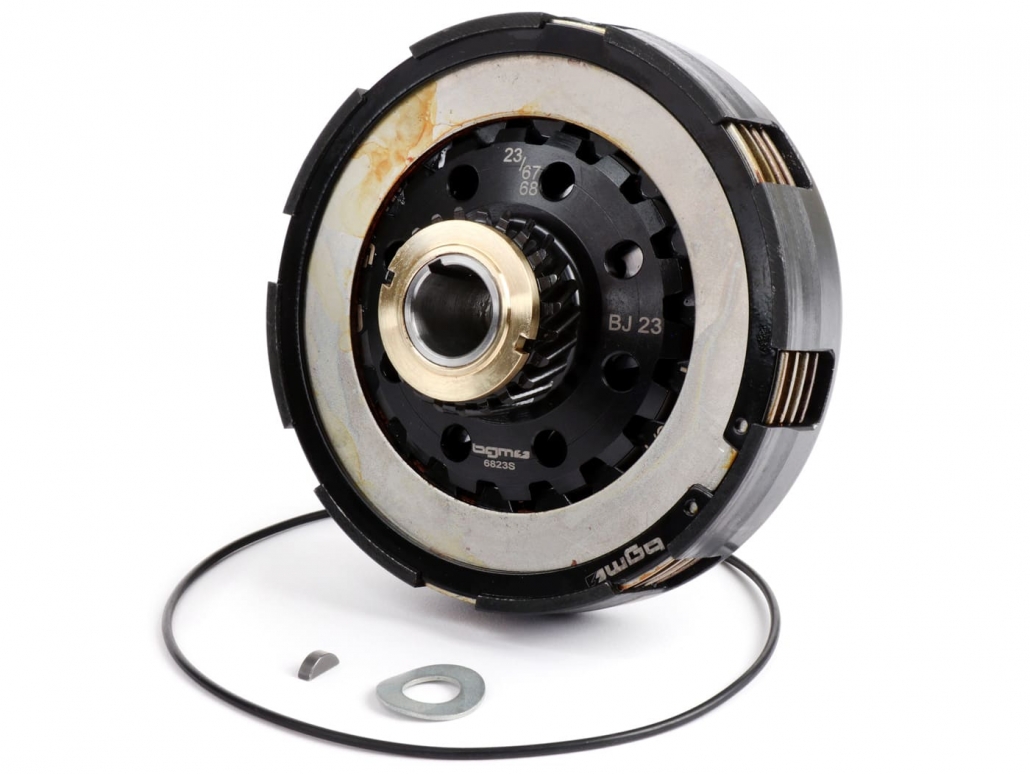
The bgm PRO coupling is delivered ready for installation. The scope of delivery includes
We also recommend the same Pressure plate and the separating mushroom to replace, available here in a practical set!
The Superstrong GS coupling replaces the serial coupling of the GS / SS models 1: 1 and can usually * be used without further modifications. The clutch is available with 22 teeth (like original) or with 23 teeth (longer stocky). Helical teeth for use with the standard 67-tooth primary gear.
The bgm SUPERSTRONG 2.0 Ultralube coupling combines:
It is the foundation of any solid Vespa engine tuning. The CNC-manufactured clutch basket has excellent concentricity and extremely high torsional rigidity. The Vespa clutch thus offers perfect coupling behavior with a clearly defined grinding point and clean separation of the clutch linings.
It is suitable for that Touring riderwho values high quality, as well as ambitious ones Racer, the one extremely resilient and stable coupling .
The latest generation of Superstrong clutches now has an innovative new technology: Ultralube.
Ultralube pumps (through precisely defined bores and centrifugal force) transmission oil both into the highly stressed hub profile (between clutch basket and clutch hub) and onto the clutch linings themselves.
This in the Vespa area unique technology makes the legendary Superstrong 2.0 clutch even more stable than it already is. A clutch designed to last.
The ready-to-install clutch is designed for a power range up to approx. 20PS / 22Nm by means of the mounted clutch springs. Reinforced springs (sold separately, bgm PRO XXL Reinforced clutch spring) expand the performance range of the clutch to over 40 hp. It is still easy to operate.
The scope of delivery includes the complete ready-to-install clutch with bgm PRO Cosa clutch facings and ten BGM PRO XL springs. A new O-ring for the clutch cover and a new crescent wedge are also included.
We also recommend a low-alloy gear oil of classes API GL3 / GL4 for high-performance engines in order to prevent the clutch from slipping even under extreme loads. This also applies to our bgm Superstrong couplings. The old engine oil specification SAE30 corresponds to today's transmission oil specification SAE 85W / 90. We recommend this as a lubricant bgm PRO Street gear oil (BGM2025, corresponds to specification API GL-3).
* In some cases it may be necessary to rework the clutch cover and arm, see Instructions & Video:
You can also find the installation instructions here: Instructions
TIPP: Toptul tool
Putting your feet on the ground is a statement in itself!
A confirmation of our identity; Scooter Boys & Girls, Mods, Racers and Travelers know that their ideologies and beliefs end up in accessories that become symbols of their very own qualities.
So do too Platonica this big step after having been in the air for months preparing for the existence of an ideal Vespa to finally touch the garage floor that has endowed her with symbols of safety, style and fun.
For her strong personality, Platonika has now received the latest bgm products, check out the video!
bgm PRO SPORT Shock absorber set | bgm7741BKTS
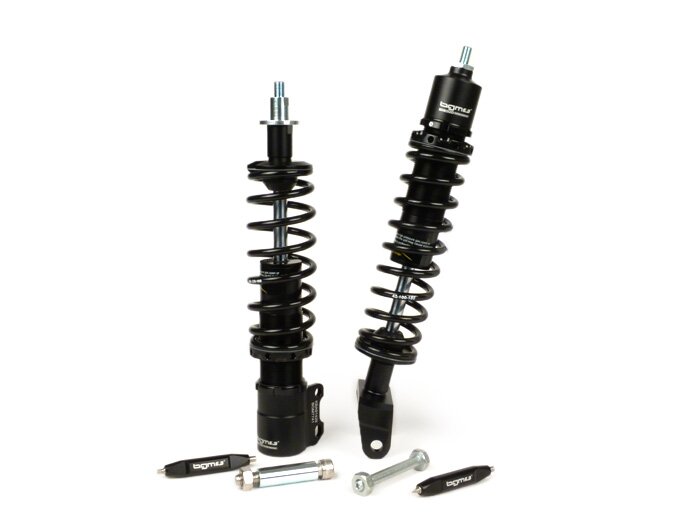
Based on the competition chassis, but without a separate expansion tank and a fixed damping rate. Ideal for everyday sporting use, even with powerful engines.
Very harmonious basic set-up with an optimal balance between sportiness and suitability for everyday use. Compared to the Competition chassis, it is infinitely adjustable in height. This means that the height of the vehicle can be adjusted on both axles. In this way, the front can be lowered or the rear can be raised without having to change the pre-load, which is so important for the negative spring deflection. The front shock absorber can be continuously adjusted between a height of 240mm and 220mm.
The Complete set of tires -bgm Sport black matt tubeless bgm tire and bgm Vespa aluminum rim | bgm35010SLKB 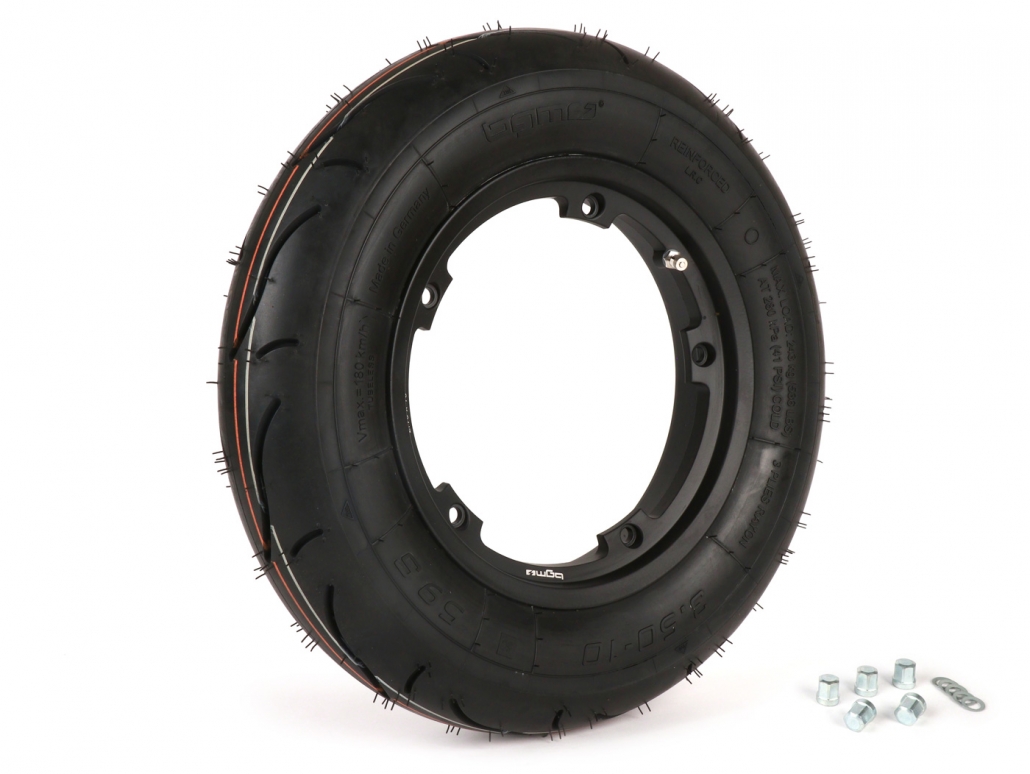
BGM Pro Sport tires (3.50-10) fully assembled on aluminum sport rim BGM Pro tubeless (2.10-10)
Ready-to-install tire set consisting of the first-class BGM Pro sports tire with a speed index S (approved up to 180km / h) and a load index of 59 (243kg per tire) as well as the exclusive BGM Pro light alloy wheel *.
TIRE
The specially coordinated material mix with a high silica compound ensures excellent grip in dry and wet conditions. The extremely stable carcass ensures perfect straight-line stability and excellent line accuracy when cornering quickly. Usually tires are simply pressed into shape from a layer of rubber. The bgm tires are significantly more complex to produce and consist of several layers in order to create the perfect tire that meets the highest requirements and has the highest speed rating on the market.
RIMS
The solid aluminum rim from BGM PRO made by FA.Italia saves around 600 grams compared to an original PX steel rim. In addition, there is a weight saving of around 370 grams due to the hose that is no longer required. The unsprung mass is thus reduced by almost one kilogram per axle. The responsiveness of the chassis improves noticeably.
SAFETY
With a double so-called "hump" in the rim bed, the tire is always safely guided in the rim. Similar to the latest runflat technology in the automotive sector, the air can slowly escape if a foreign object (nail or similar) is inserted without the tire slipping into the rim well. The vehicle comes to a controlled stop. The rim has recesses between the screw-on points. The cooling of the brake is improved.
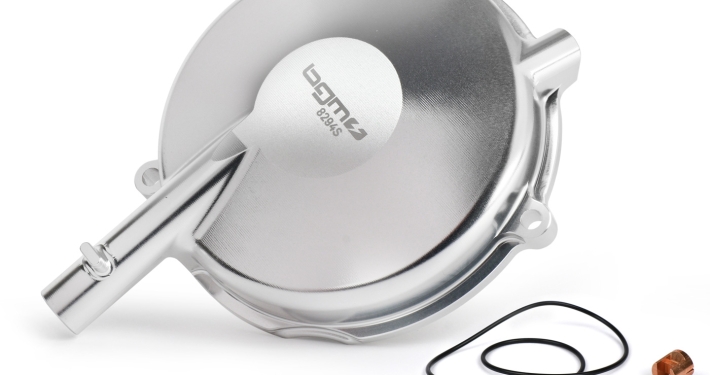
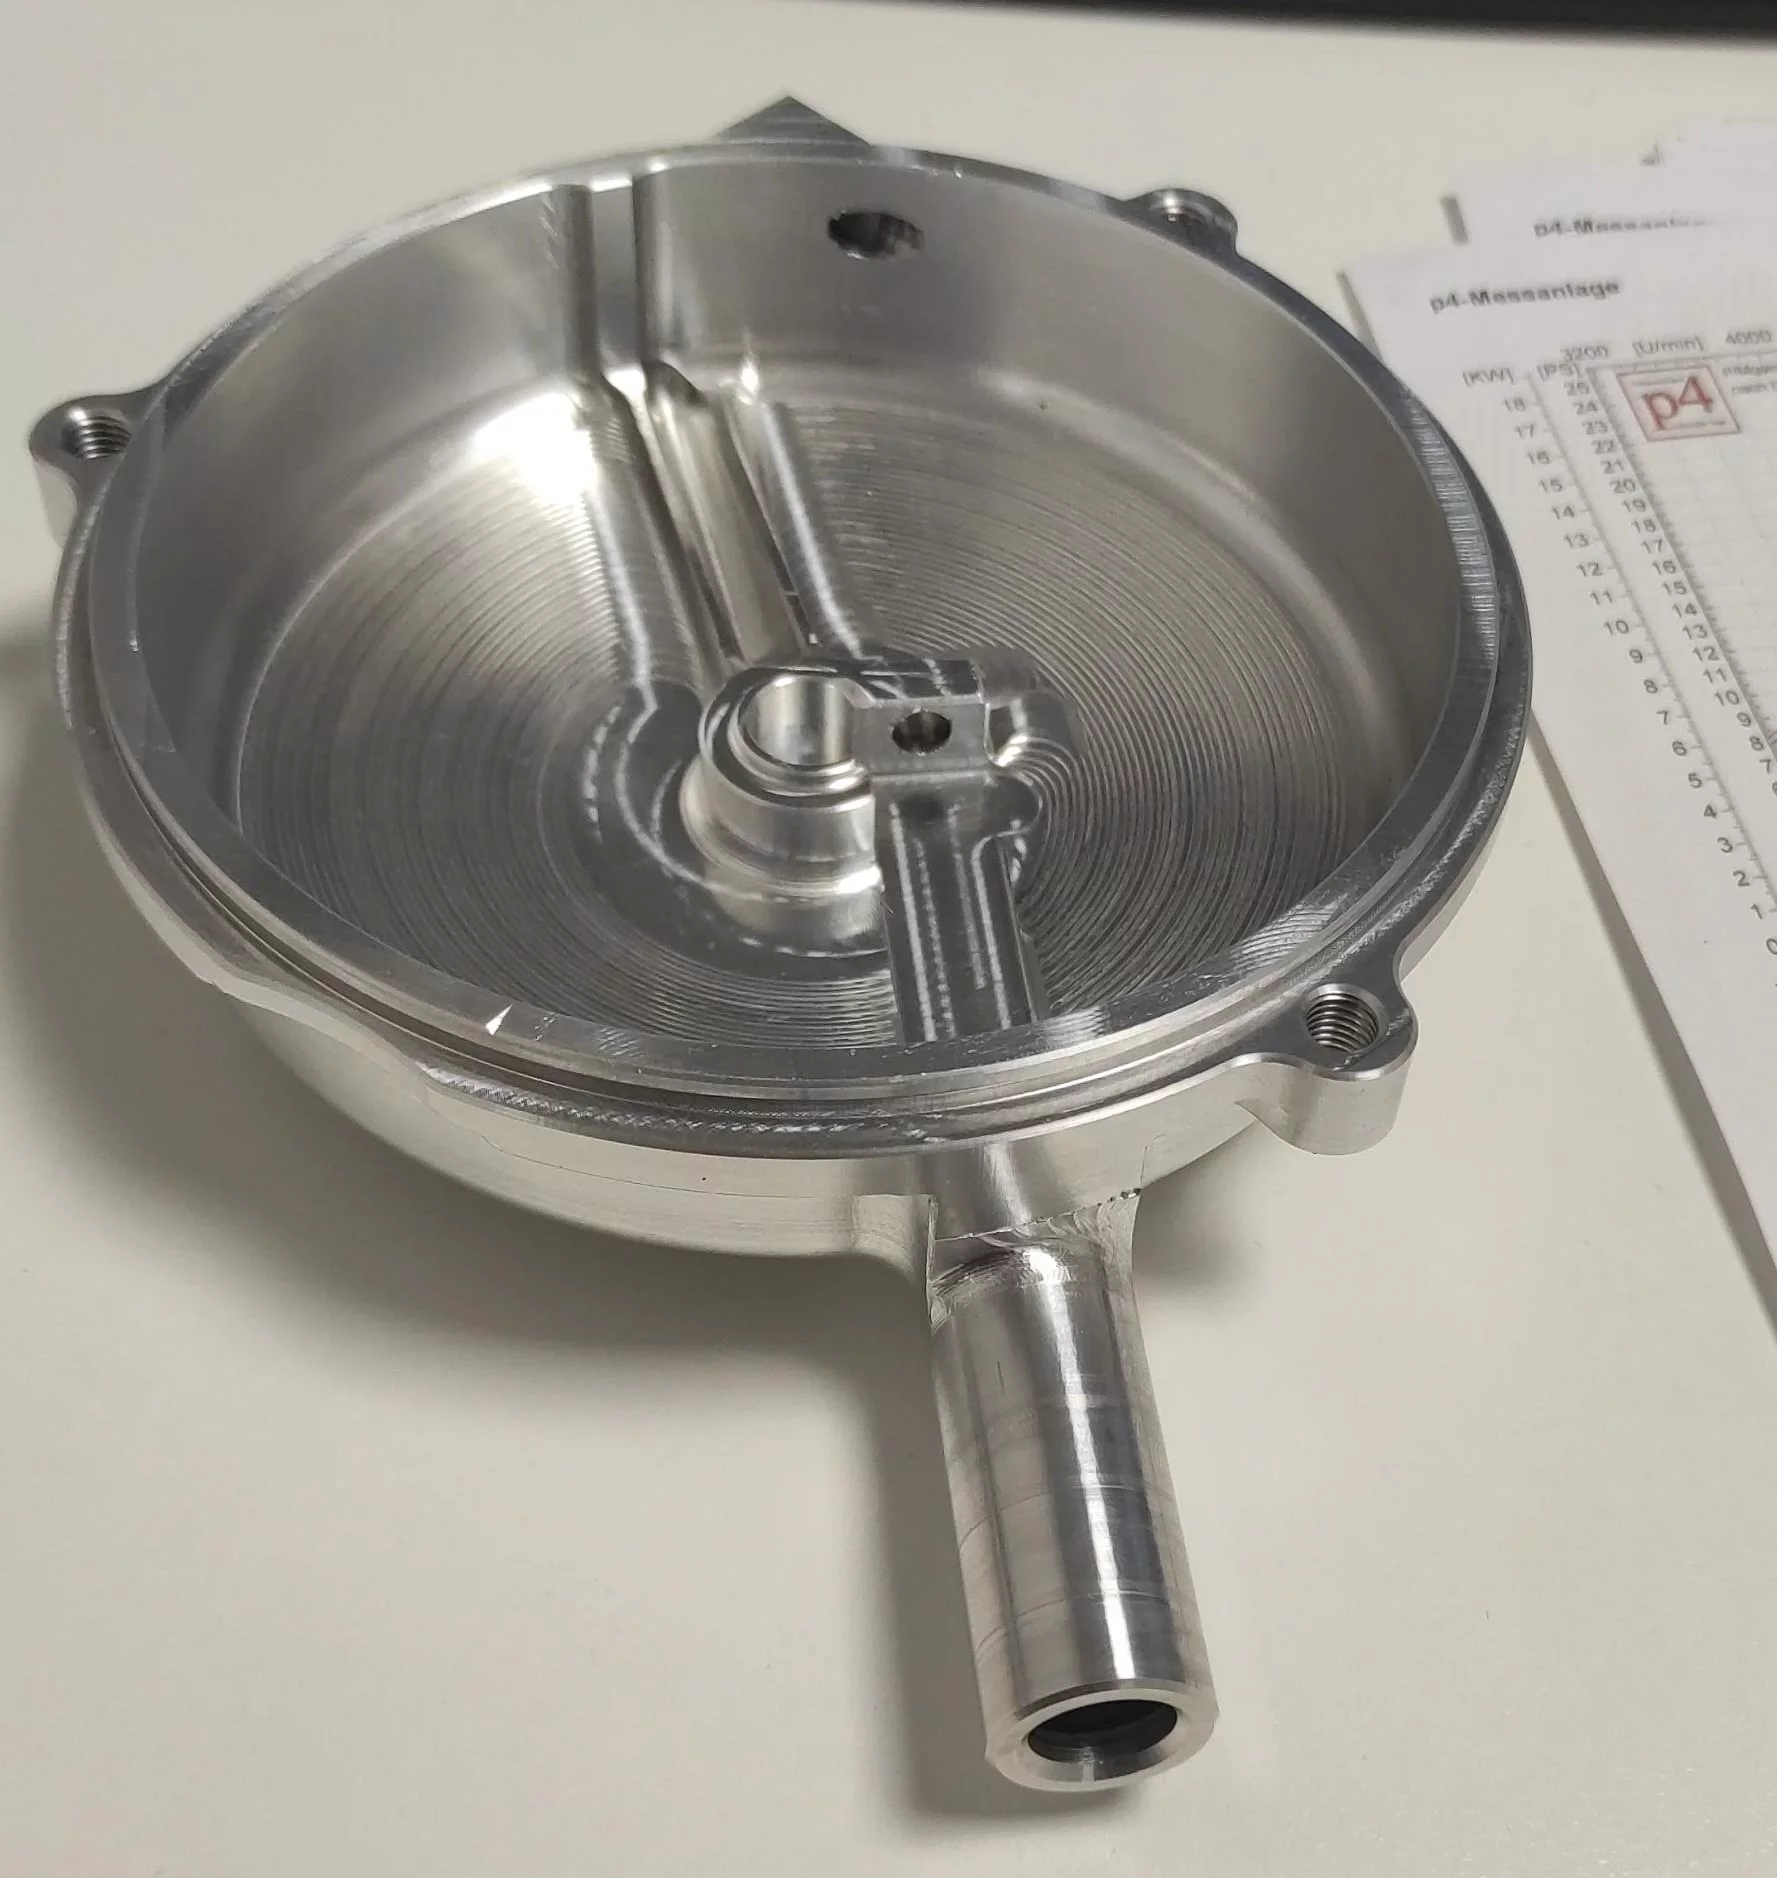
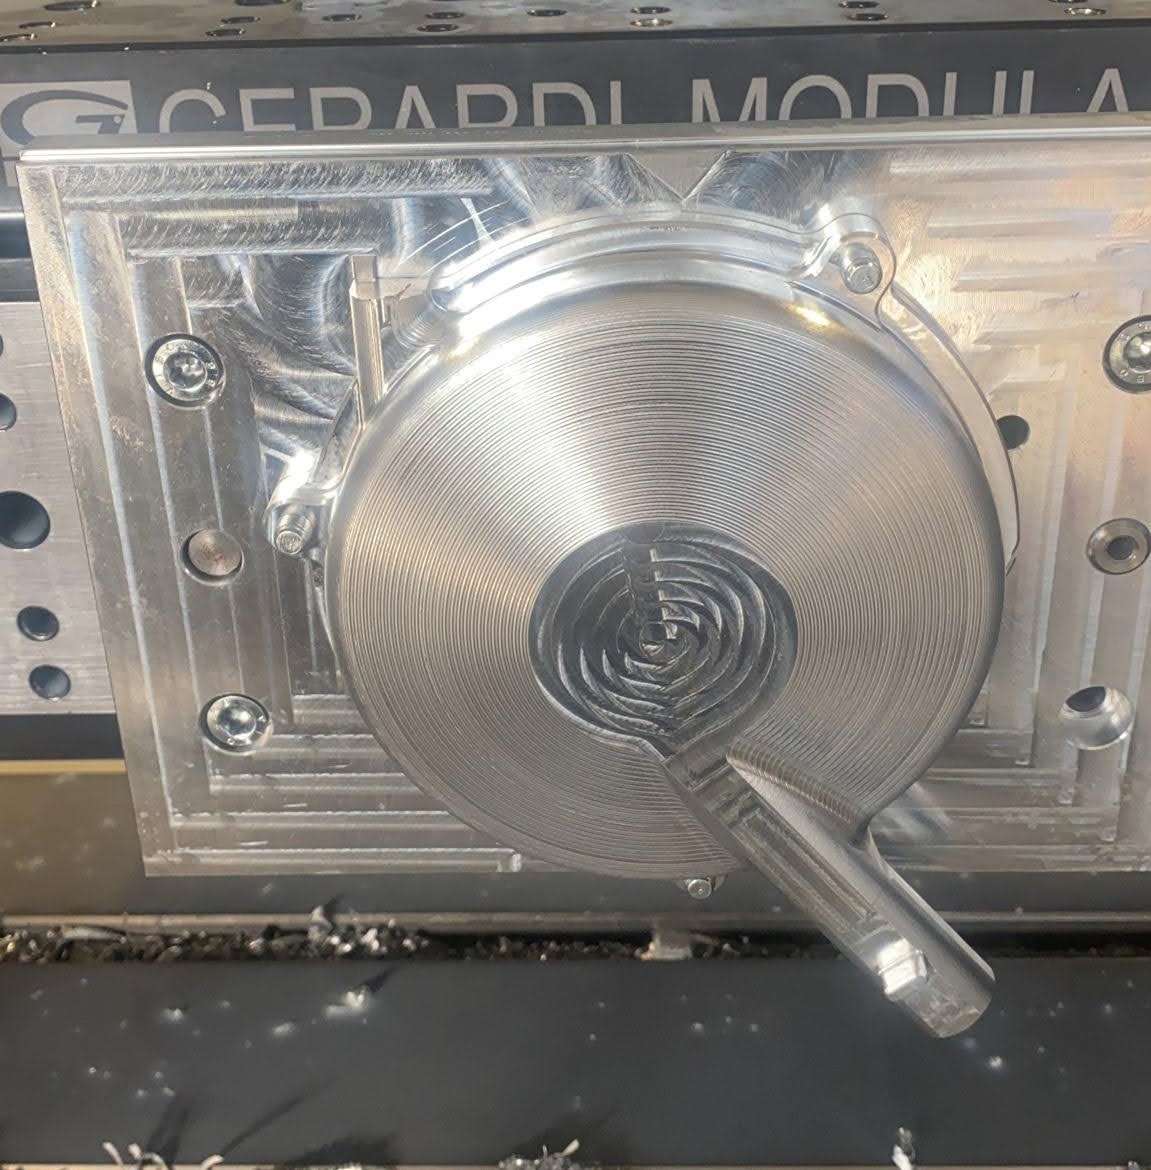
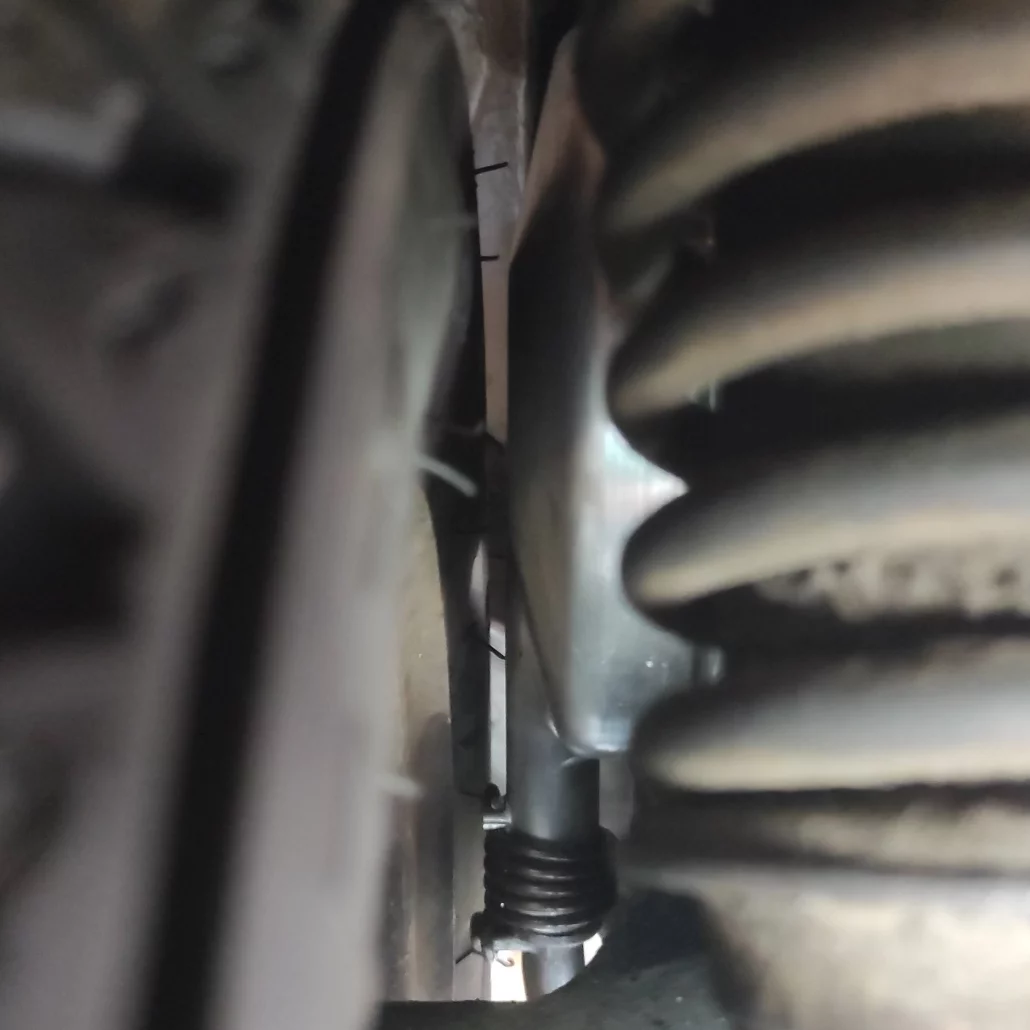
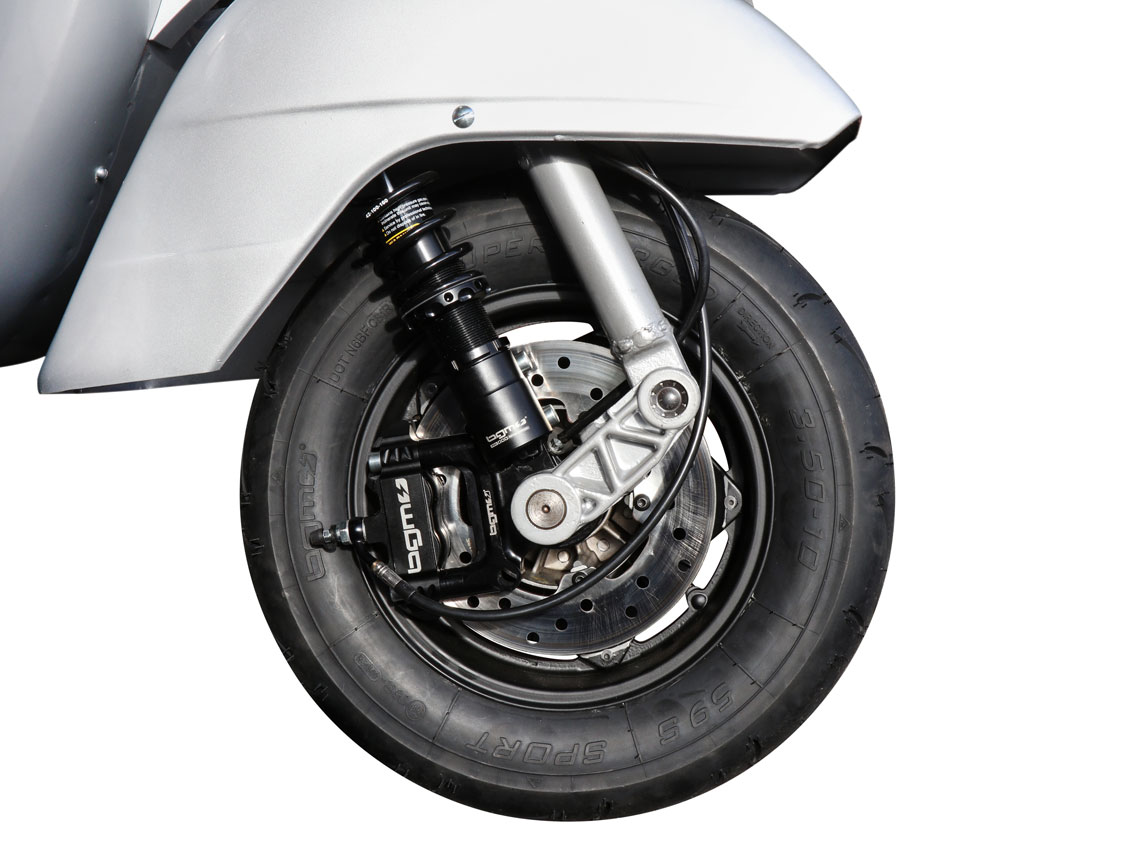
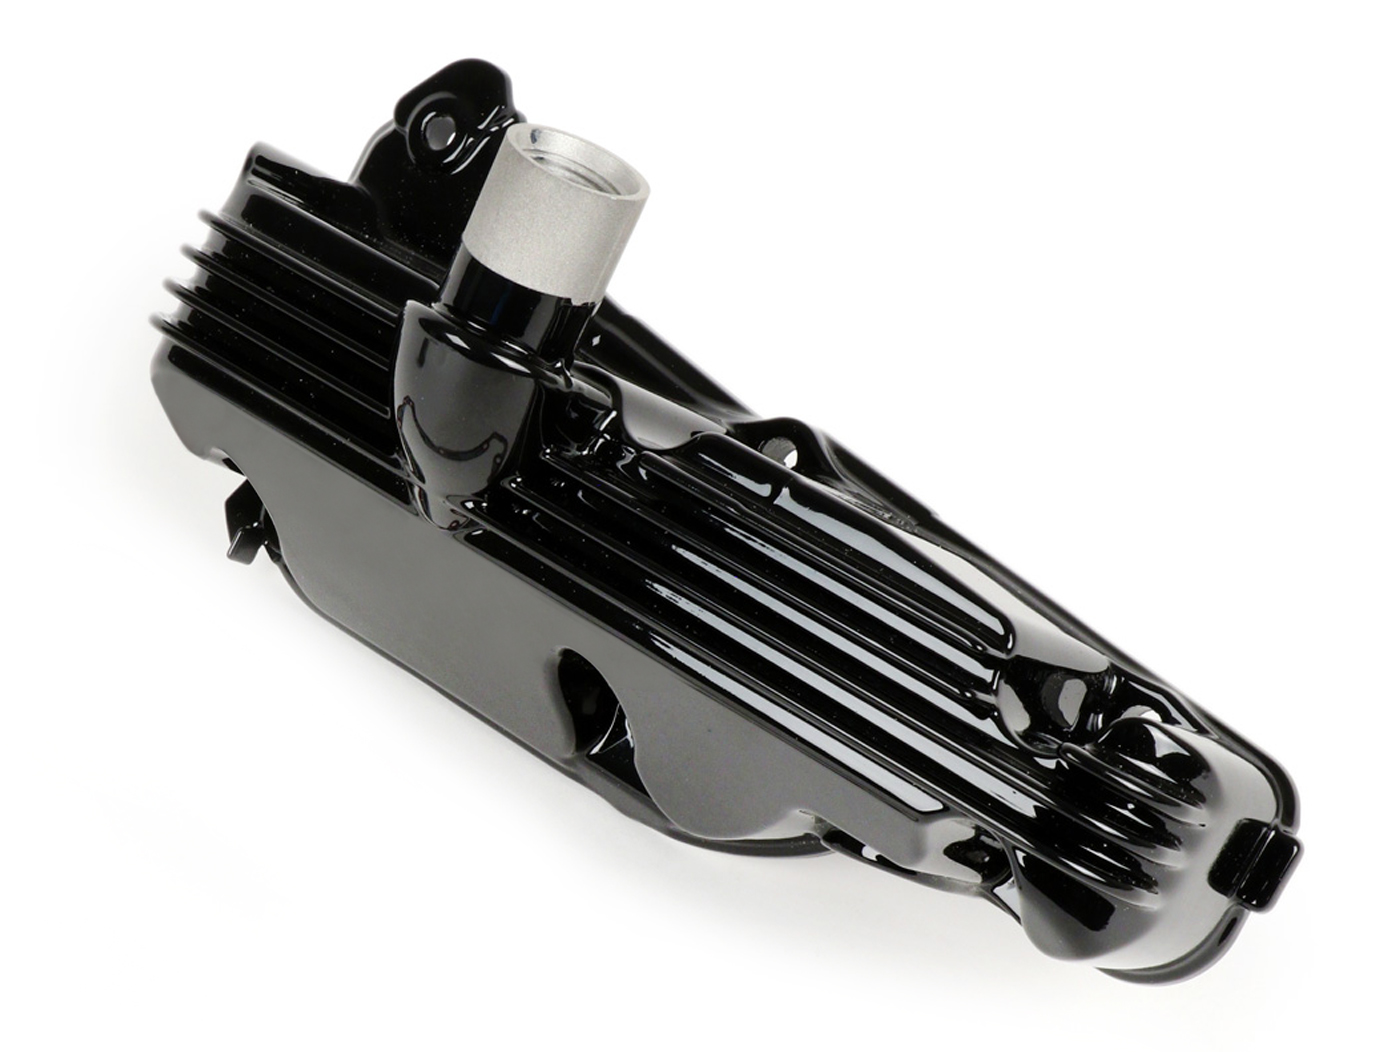
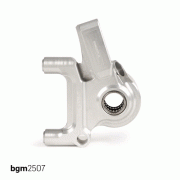
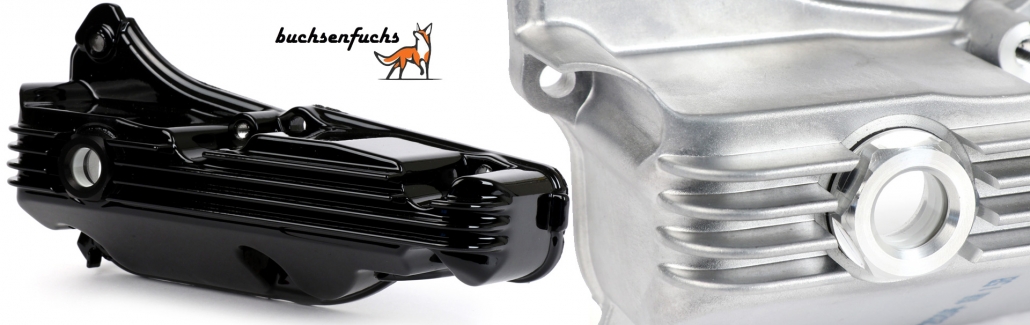
Brake caliper and brake carrier bgm Touring | Bgm2506BK & bgm2507LBL 
Solid 4 piston Vespa brake caliper with radial attachment.
Two-part CNC milled housing made of high-strength aluminum, anodized.
With 4x25mm pistons, the caliper has 40% more piston area than a conventional two-piston caliper with 30mm pistons. The hydraulic transmission ratio is greatly improved and the braking force (with the same lever force) increased. Another advantage of the 4 piston technology is the symmetrical loading of the pads, which means that they are always fully in contact. A pad change is done quickly and easily with a stud bolt. A big advantage in racing. Central connection of the brake line.
You can find all Platónika episodes here: Vespa Platonic
Music in the video: Artist: Sunsearcher Title: Flamenco Rhythm Album: Sunsearcher Spirit License: CC-BY-SA
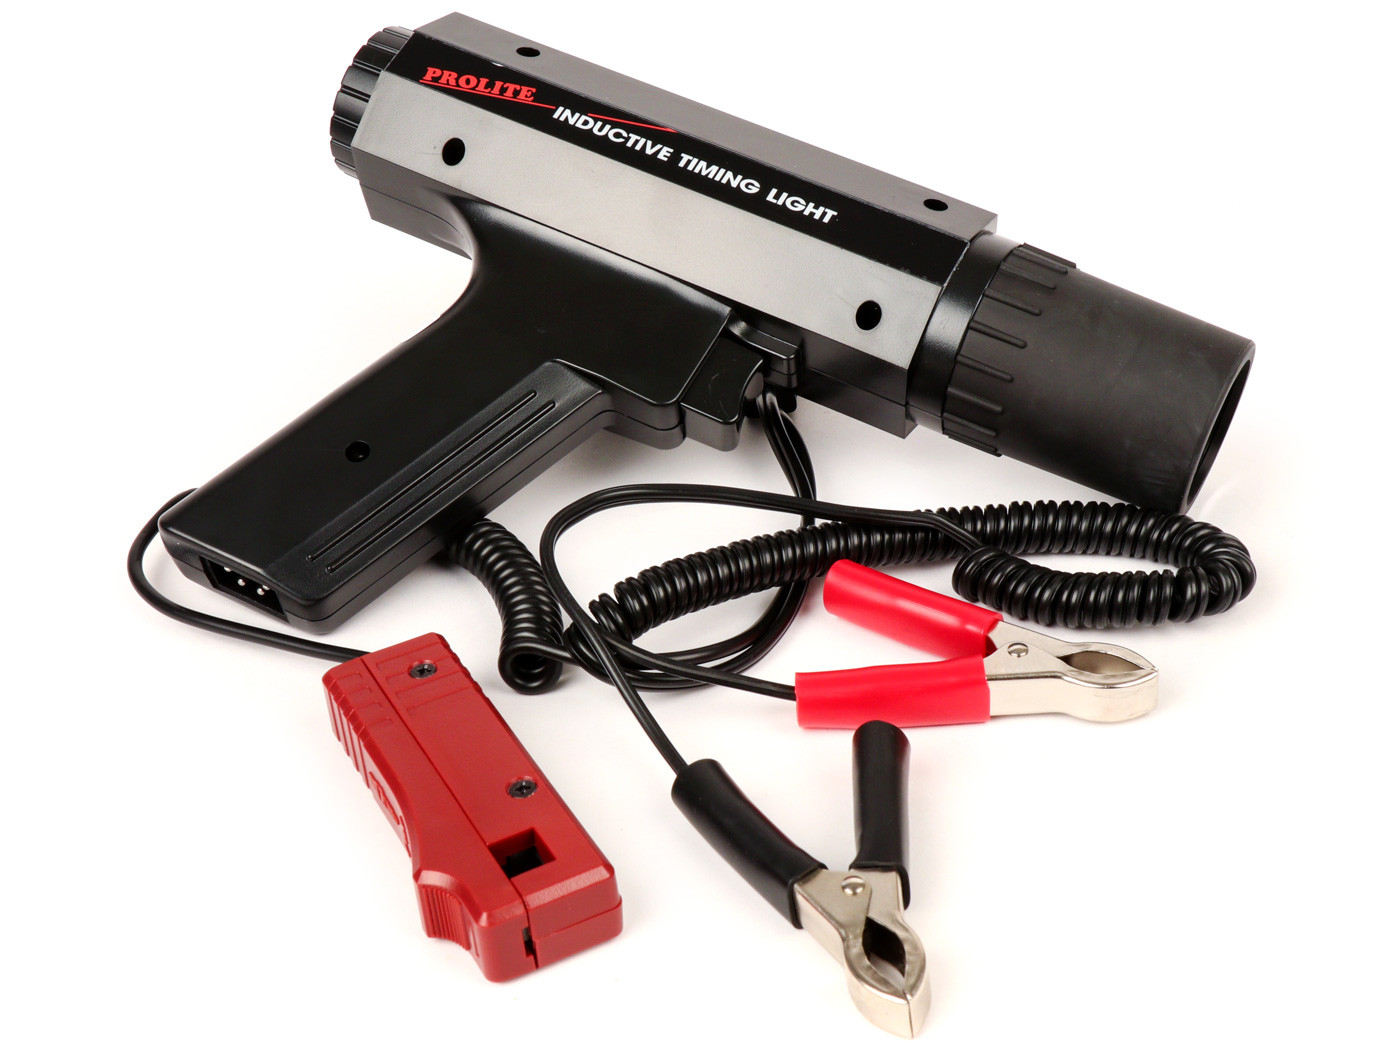
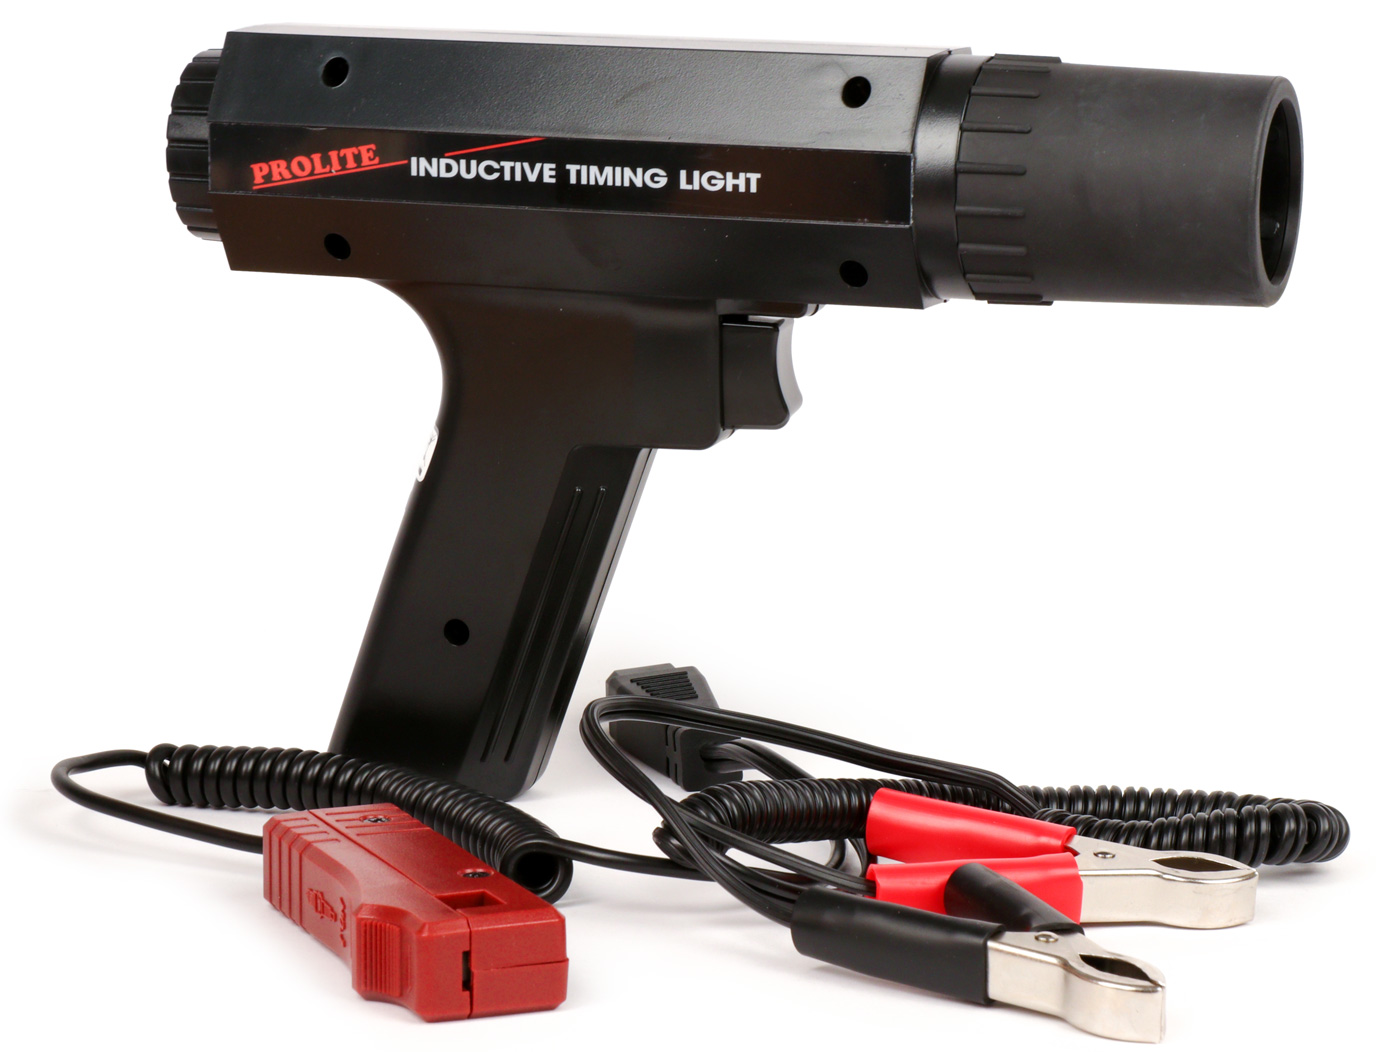
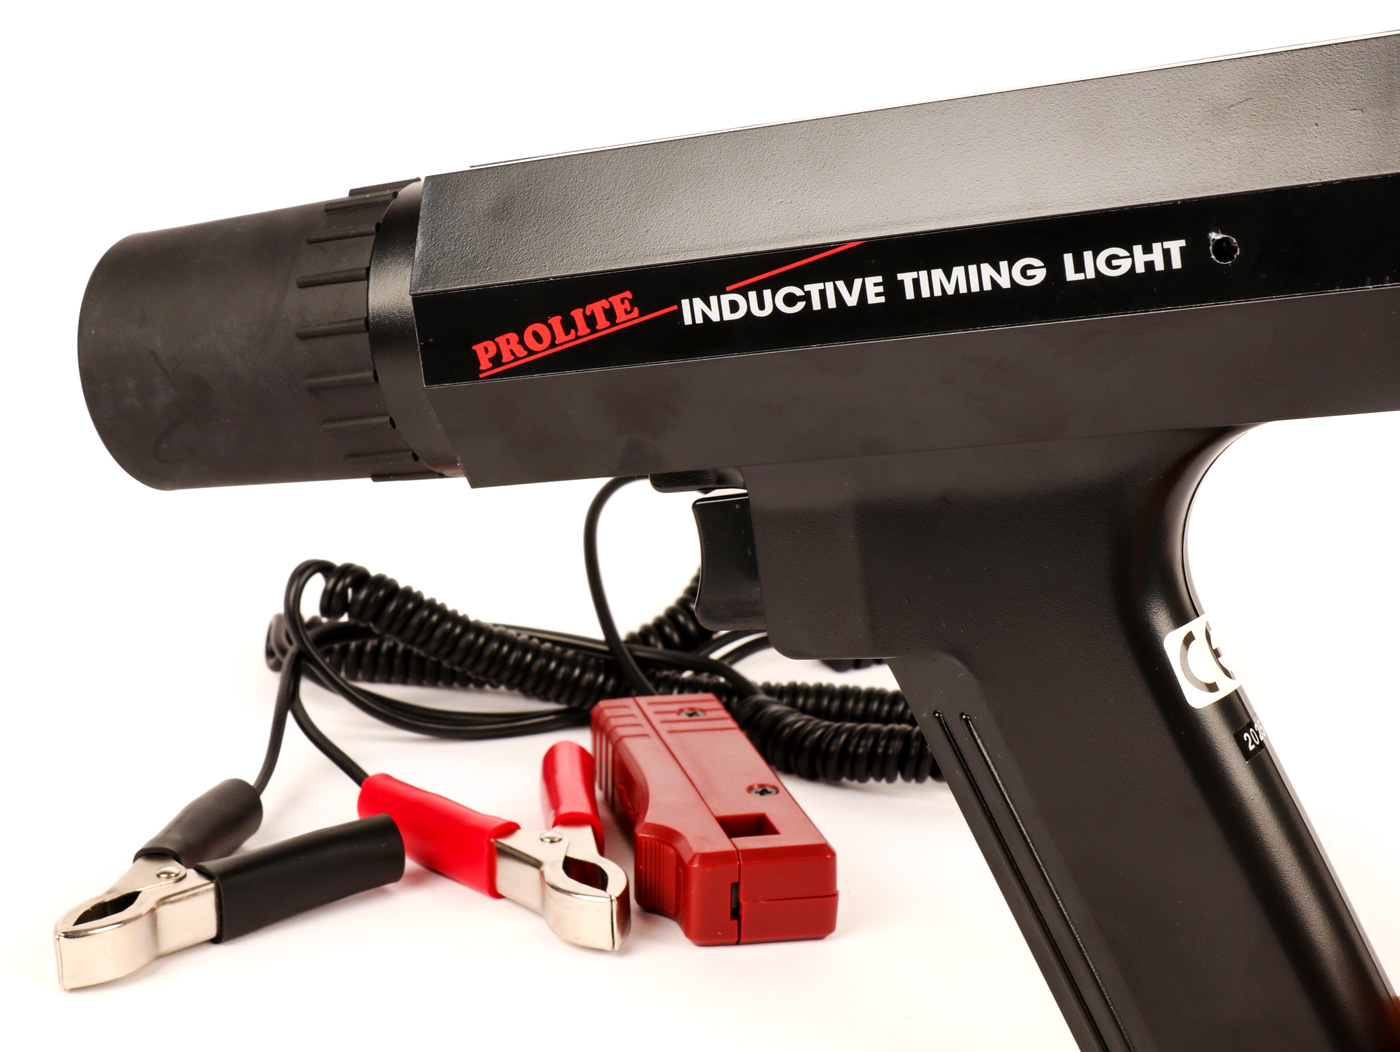
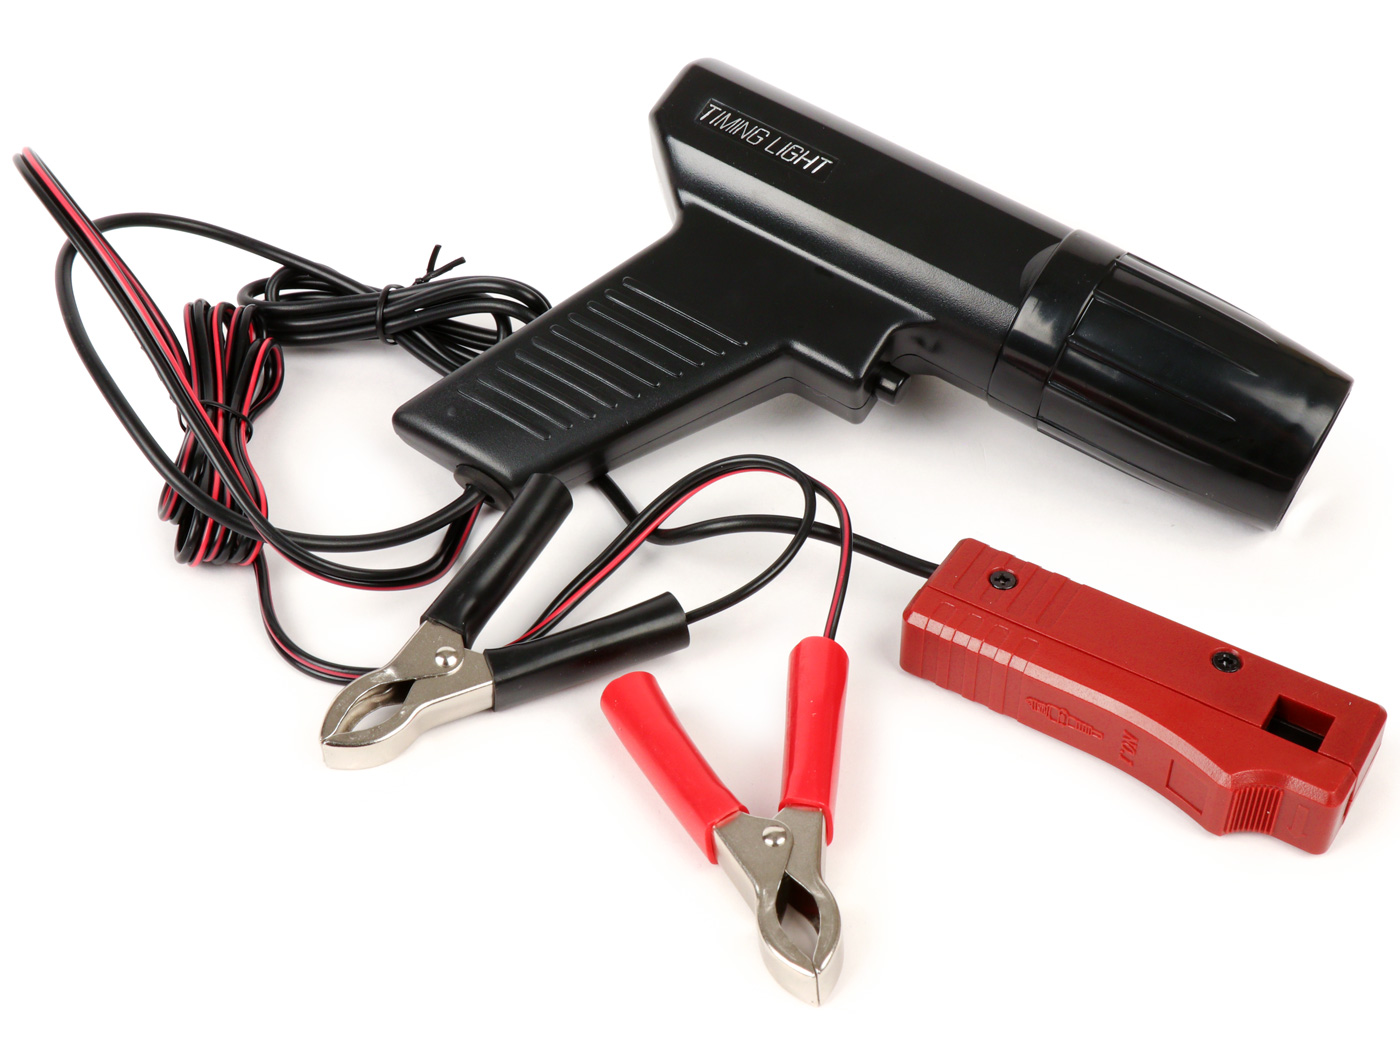
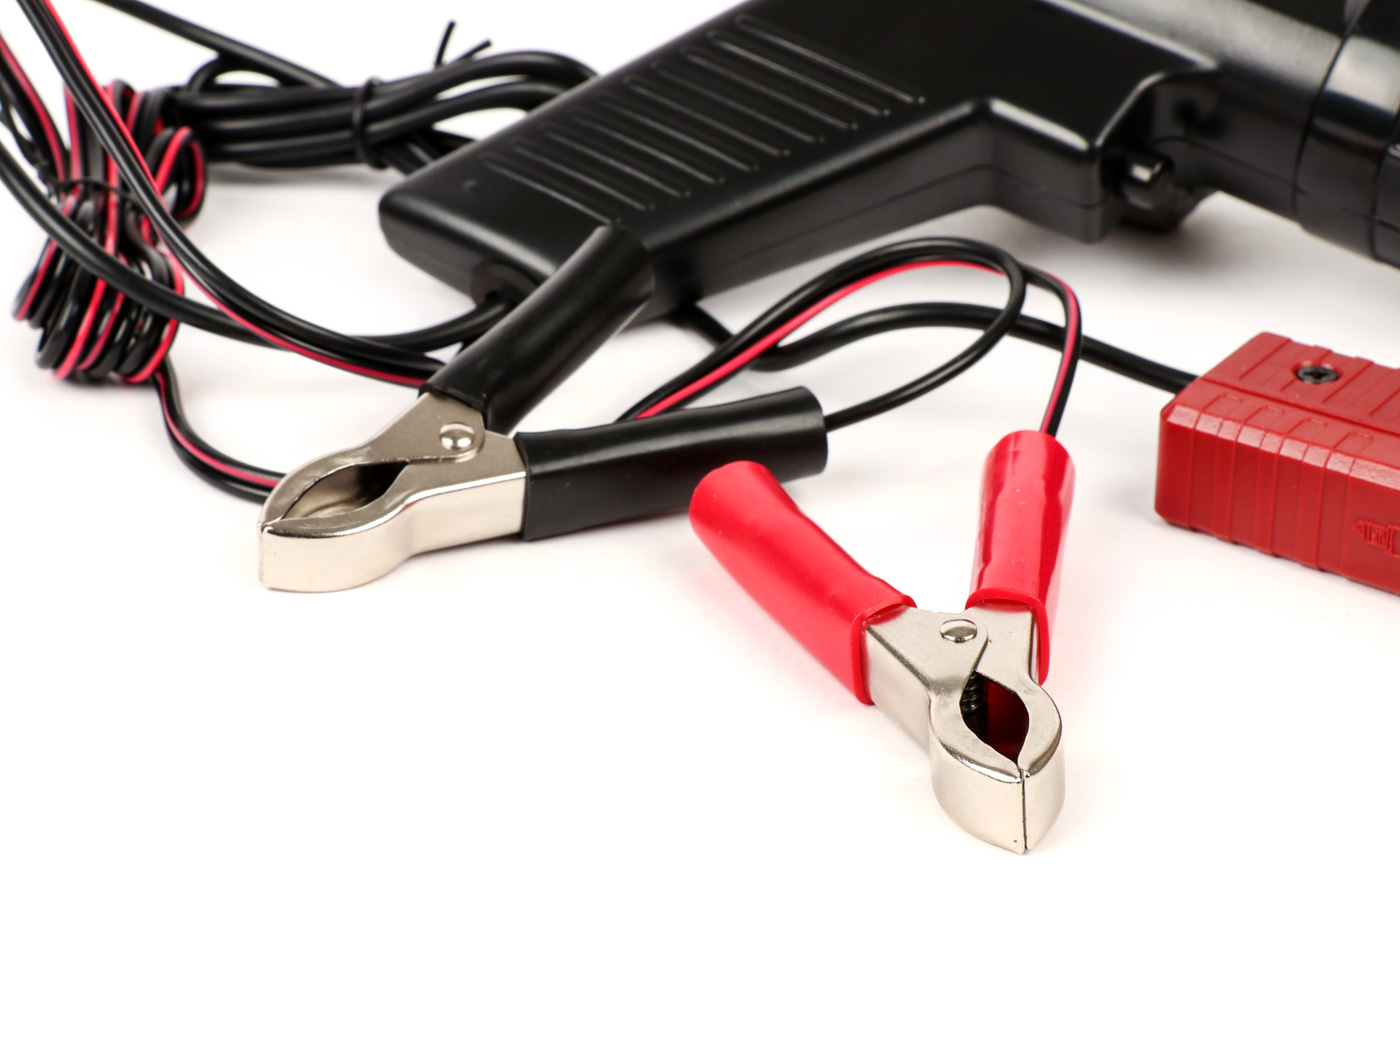
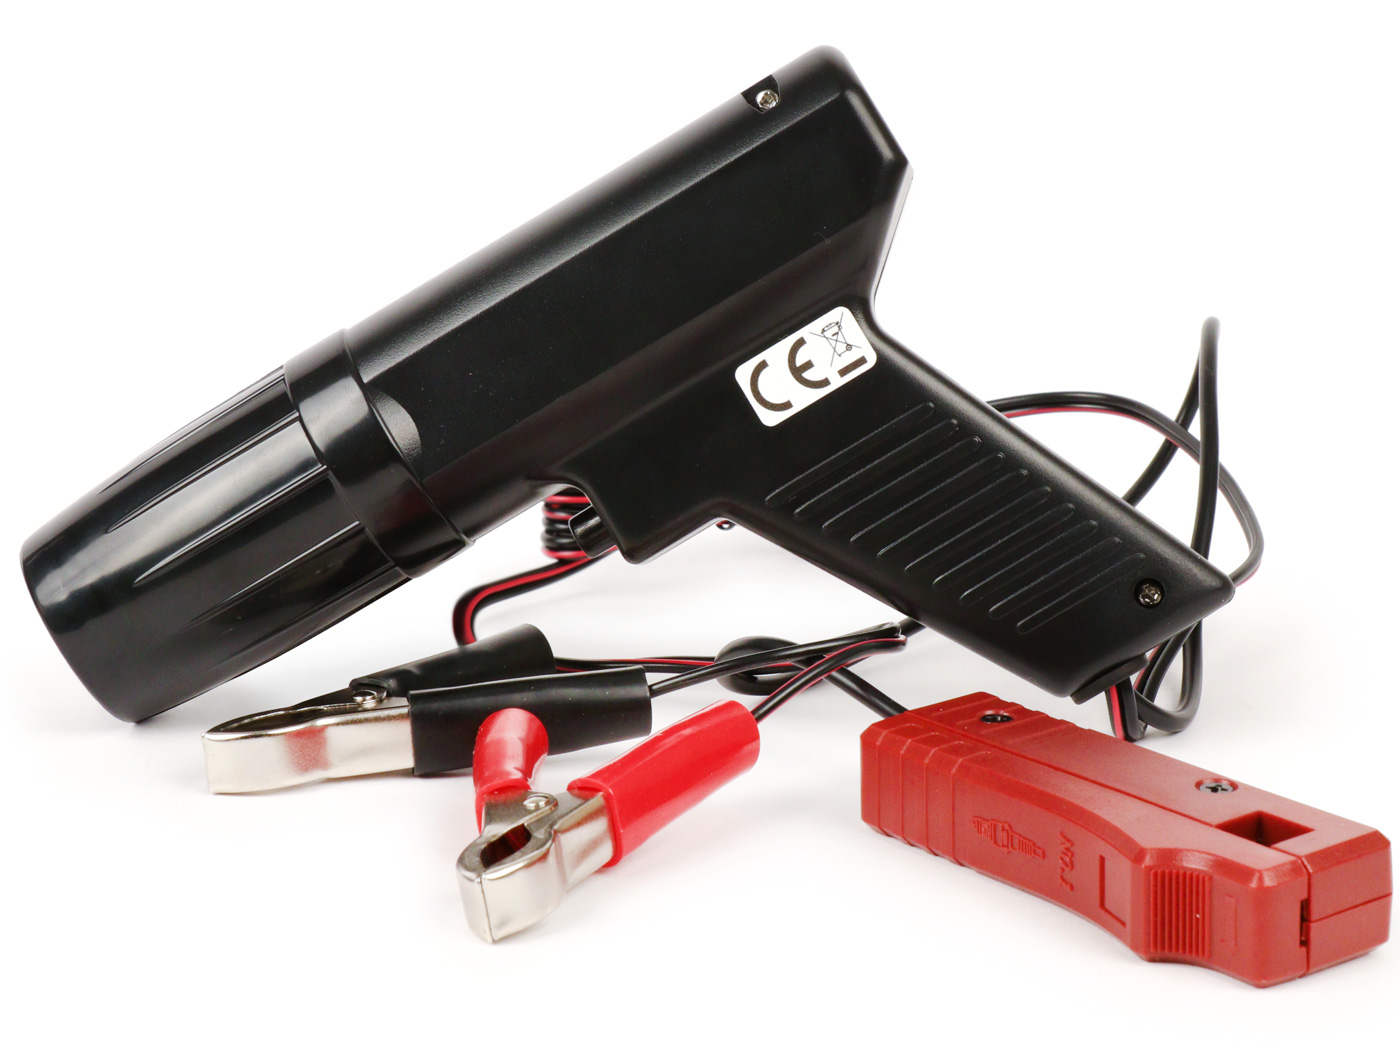
Correct ignition timing is important for the thermal health of the engine:
Anyone who tunes their Vespa, rebuilds the engine or rebuilds it as part of a restoration should do it not on the existing markings rely on the motor housing, the pole wheel and the ignition base plate for ignition adjustment, but measure yourself and the Set the Vespa ignition correctly.
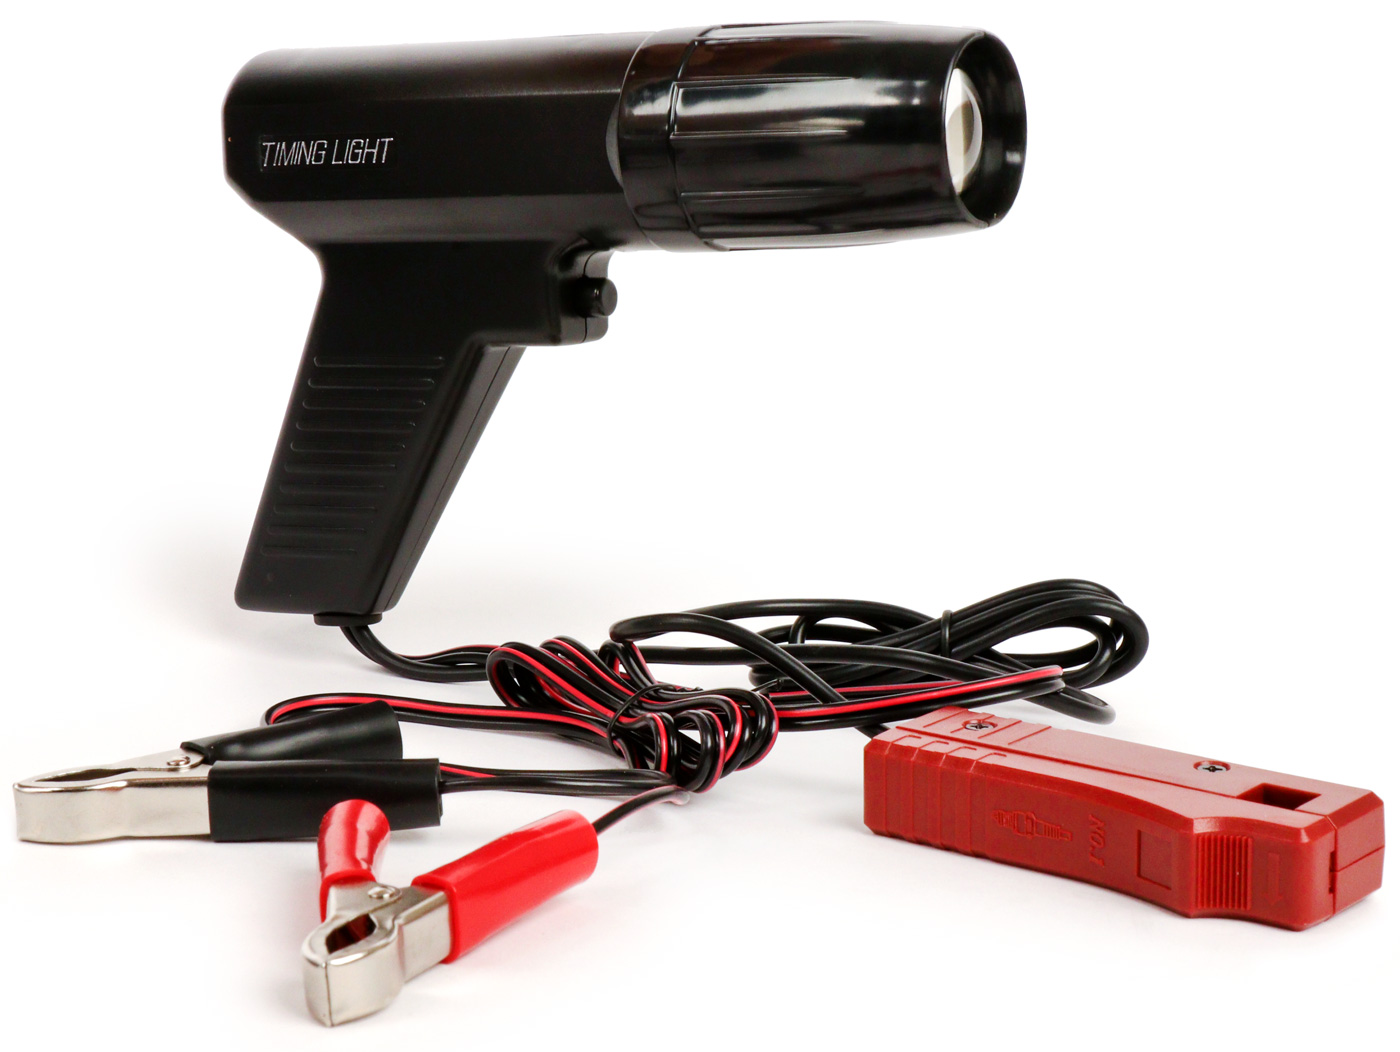
The correct setting of the ignition on your Vespa engine is electronic with these Ignition timing guns For petrol engines with contact or electronic ignition -> transistor ignition system (CDI ignition as in series with ET3, PK, PX, Cosa, T5 etc.) possible without any problems. Of course, this also works with the ignitions of the Lambretta with these ignition pistols also adjust the Lambretta ignition.
With these stroboscopic pistols, both old 6-volt and modern 12-volt ignitions can be set!
To the pilot light pistols in the shopIn this video tutorial Adjust the Vespa ignition we'll show you how Maryzabel and Alex set the ignition on ours Platonica Vespa have set:
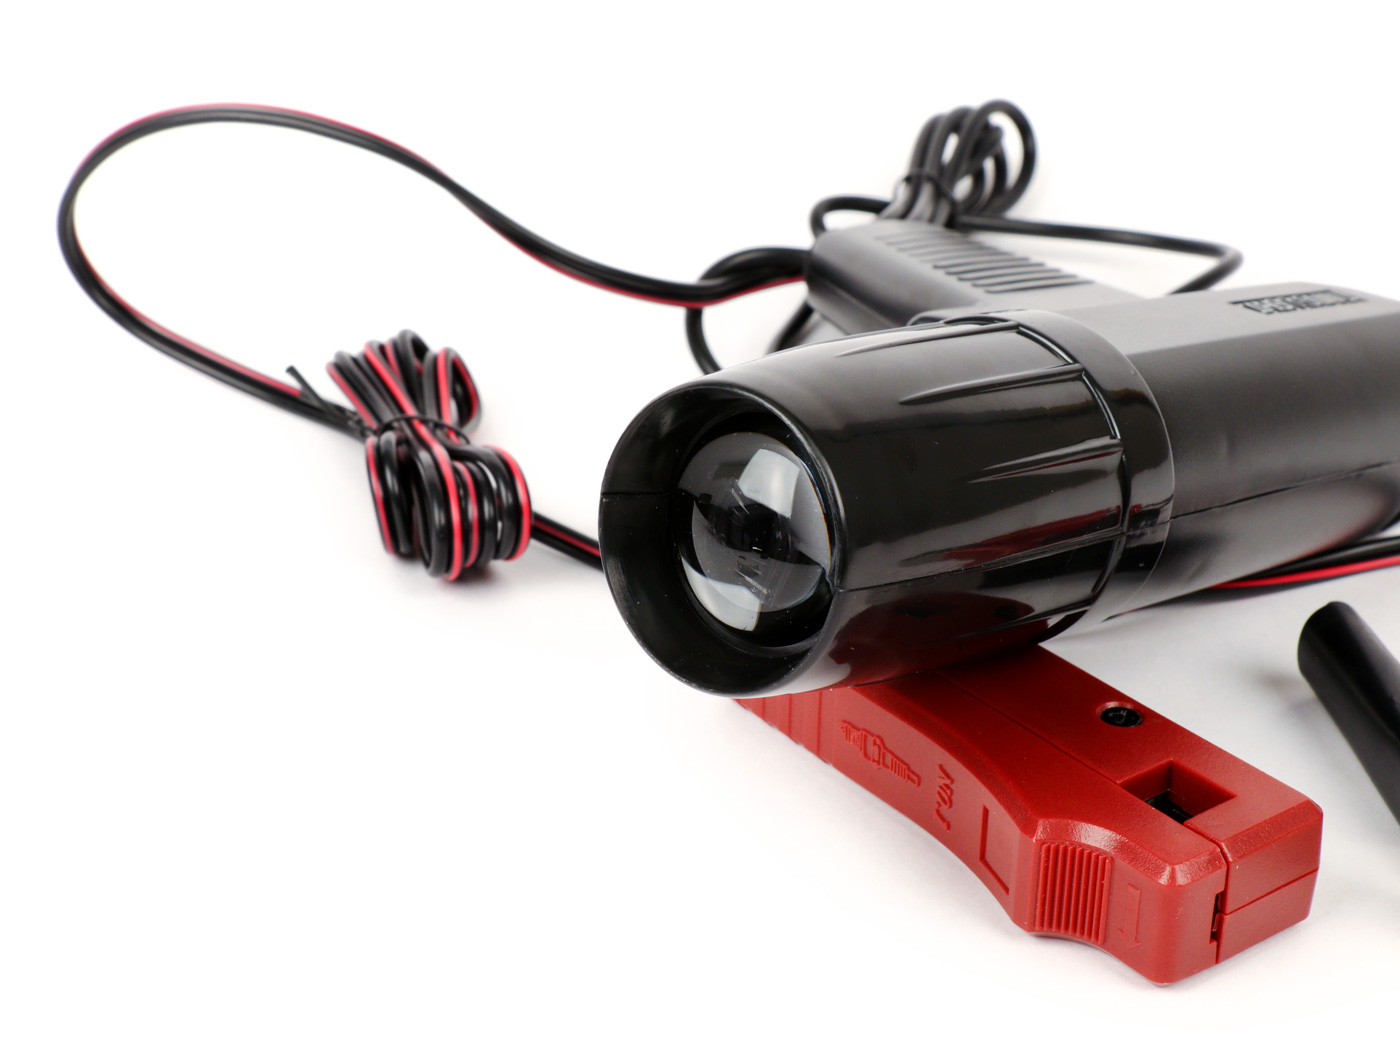
A super bright xenon tube and a special converging lens guarantee optimal visibility of the fixed marks with these ignition light pistols: even at speeds of over 8000 rpm in the near field range.
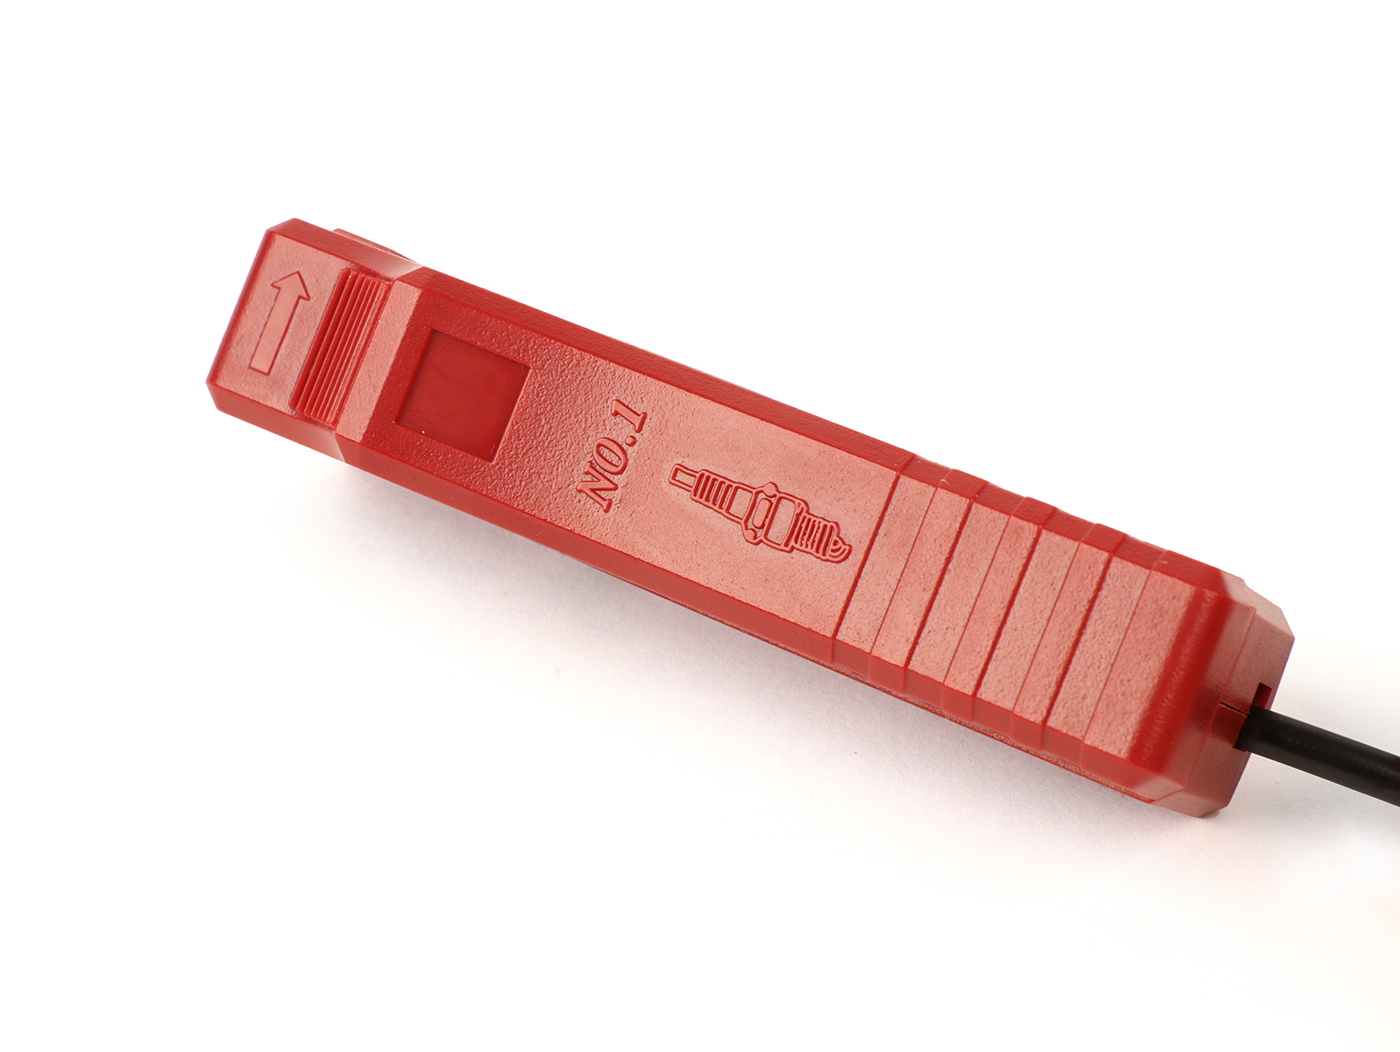
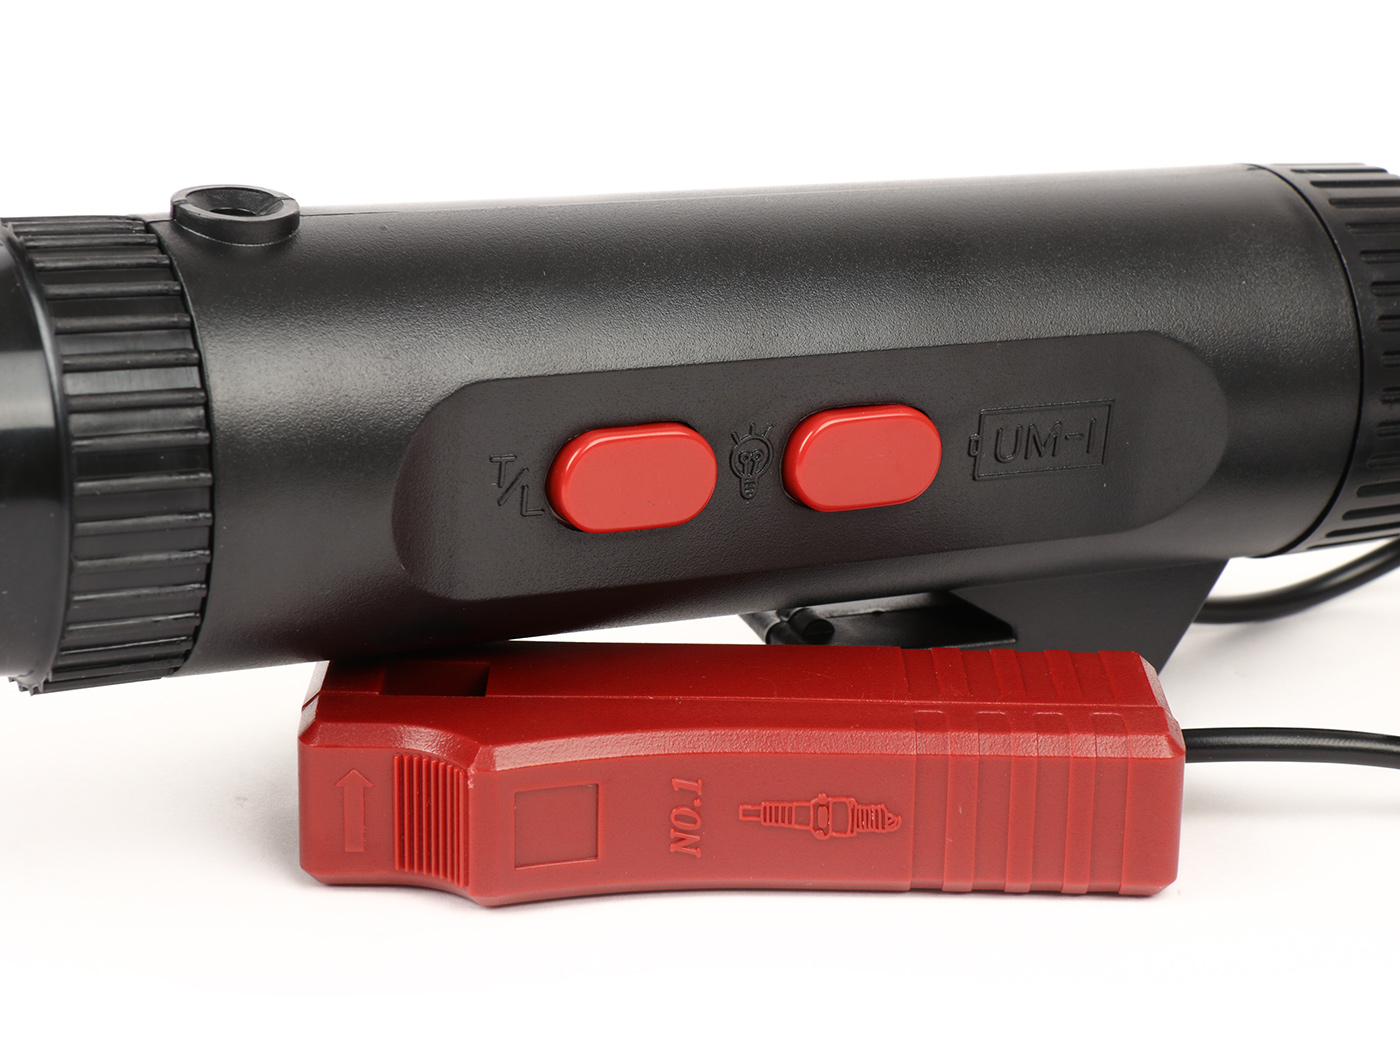
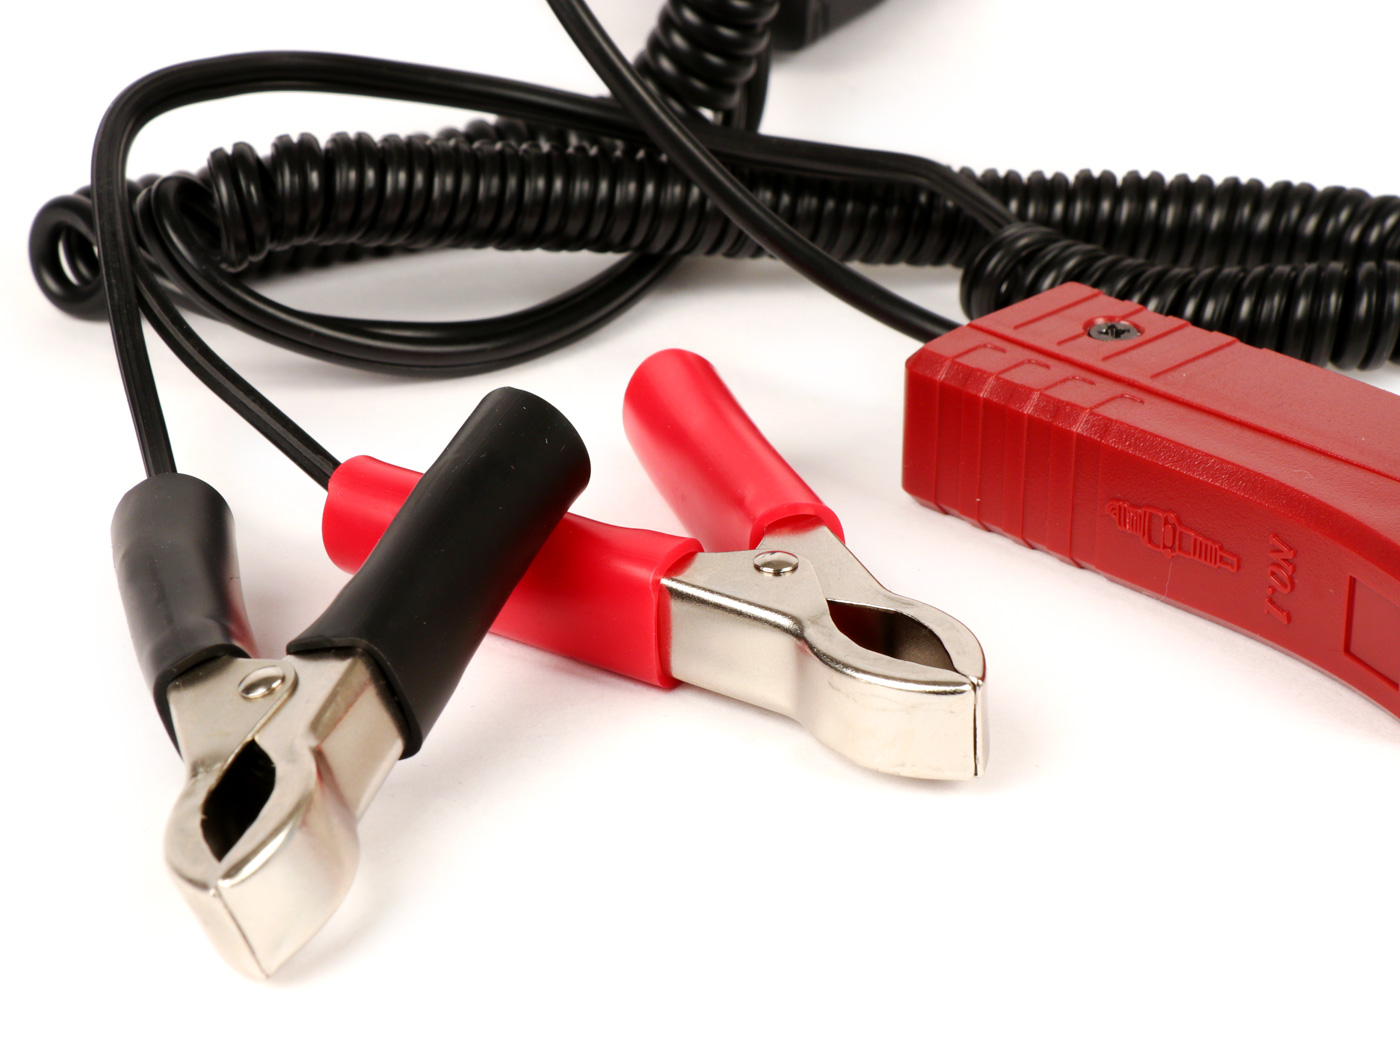
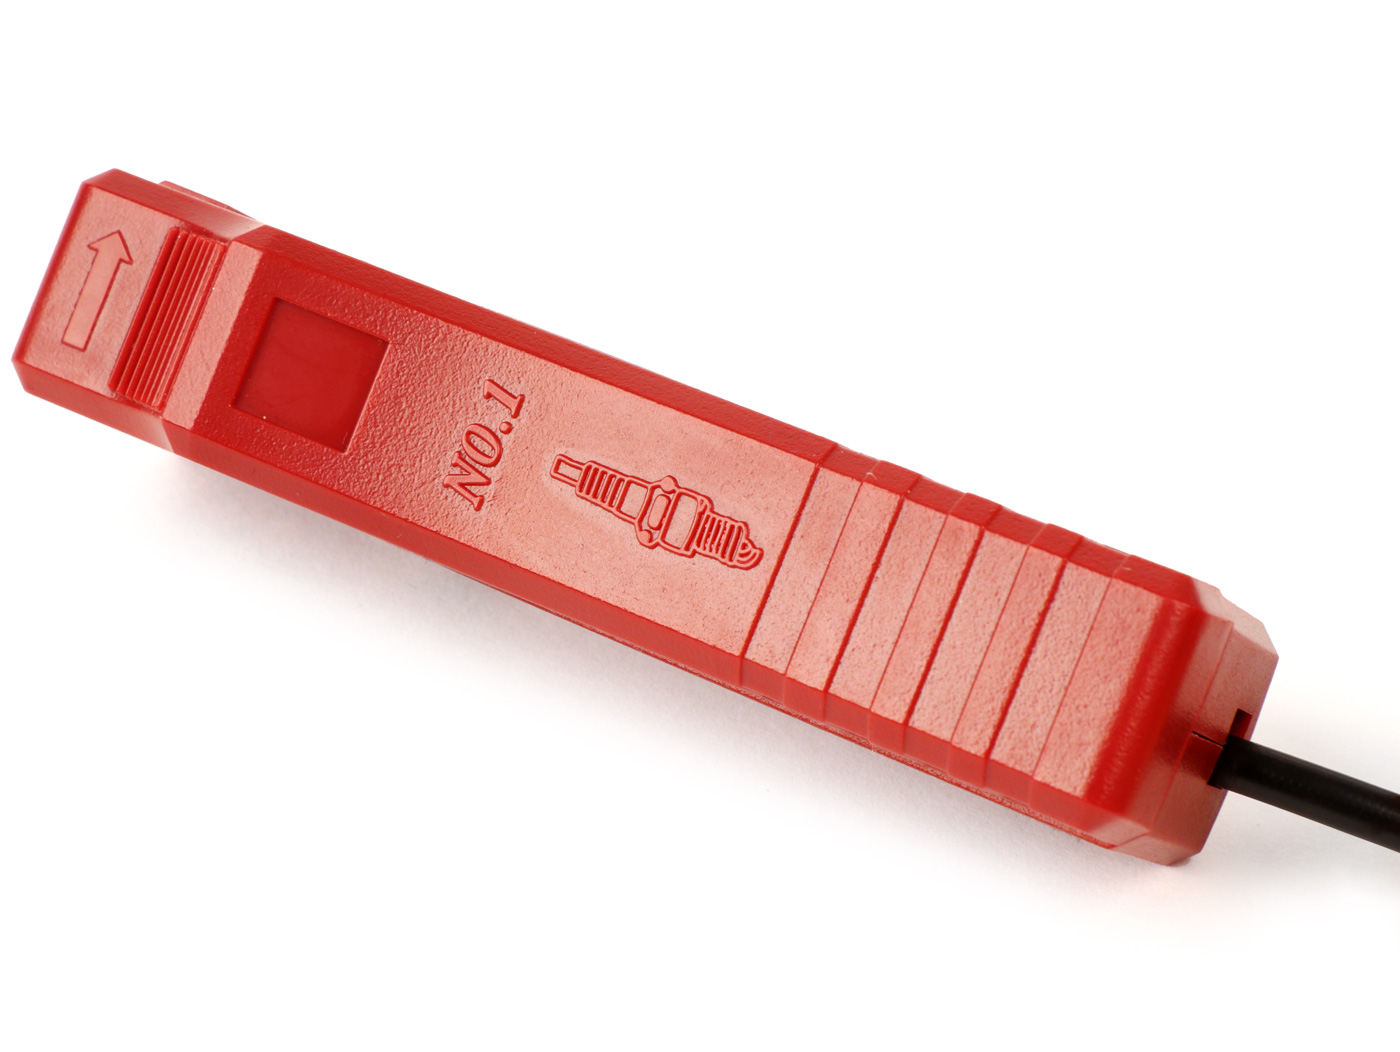
The gun is connected by means of an inductive clamp on the spark plug cable directly to the rubber insulation, without direct contact with the strand.
Our ignition timing guns are attached to the lens with a Rubber coating Mistake. This protector protects the plastic housing and the lens and ensures that you will enjoy the product for as long as possible.
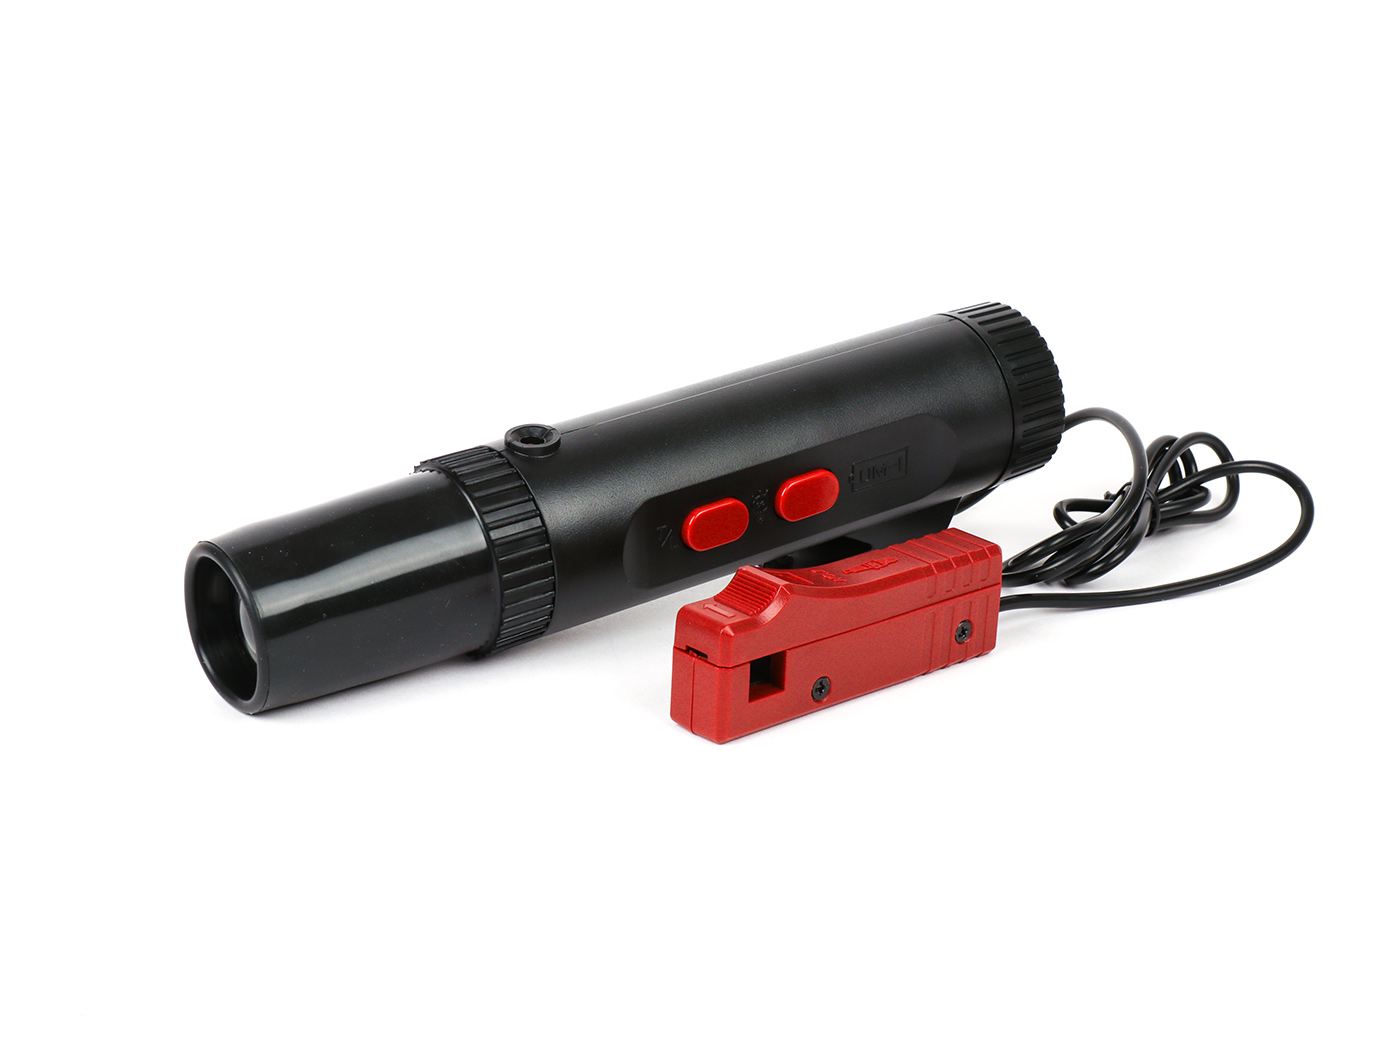
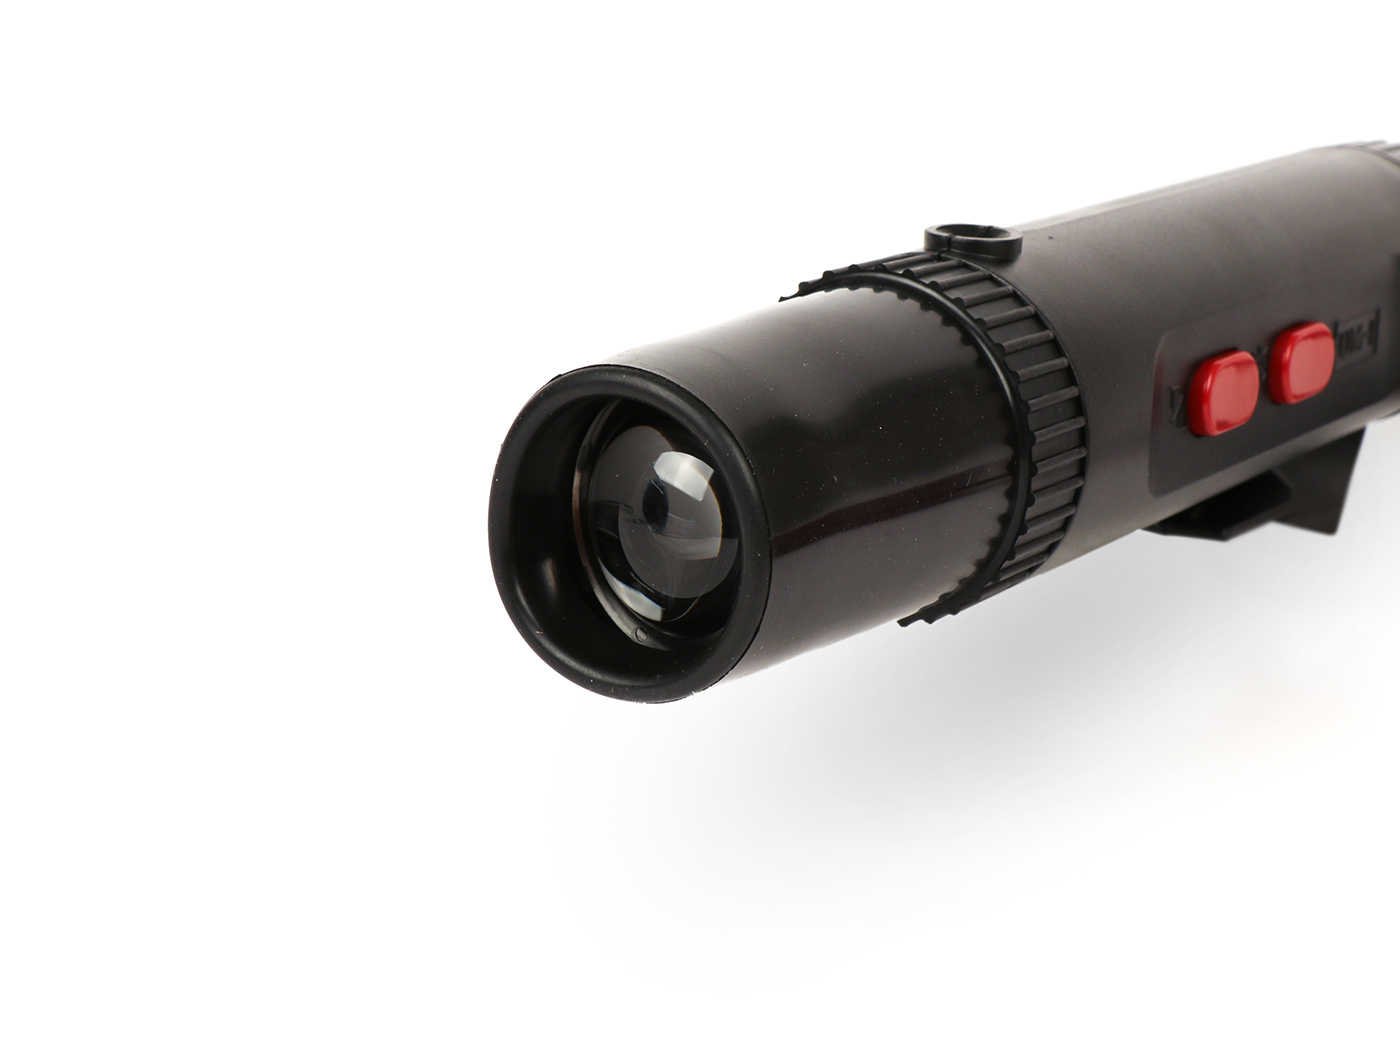
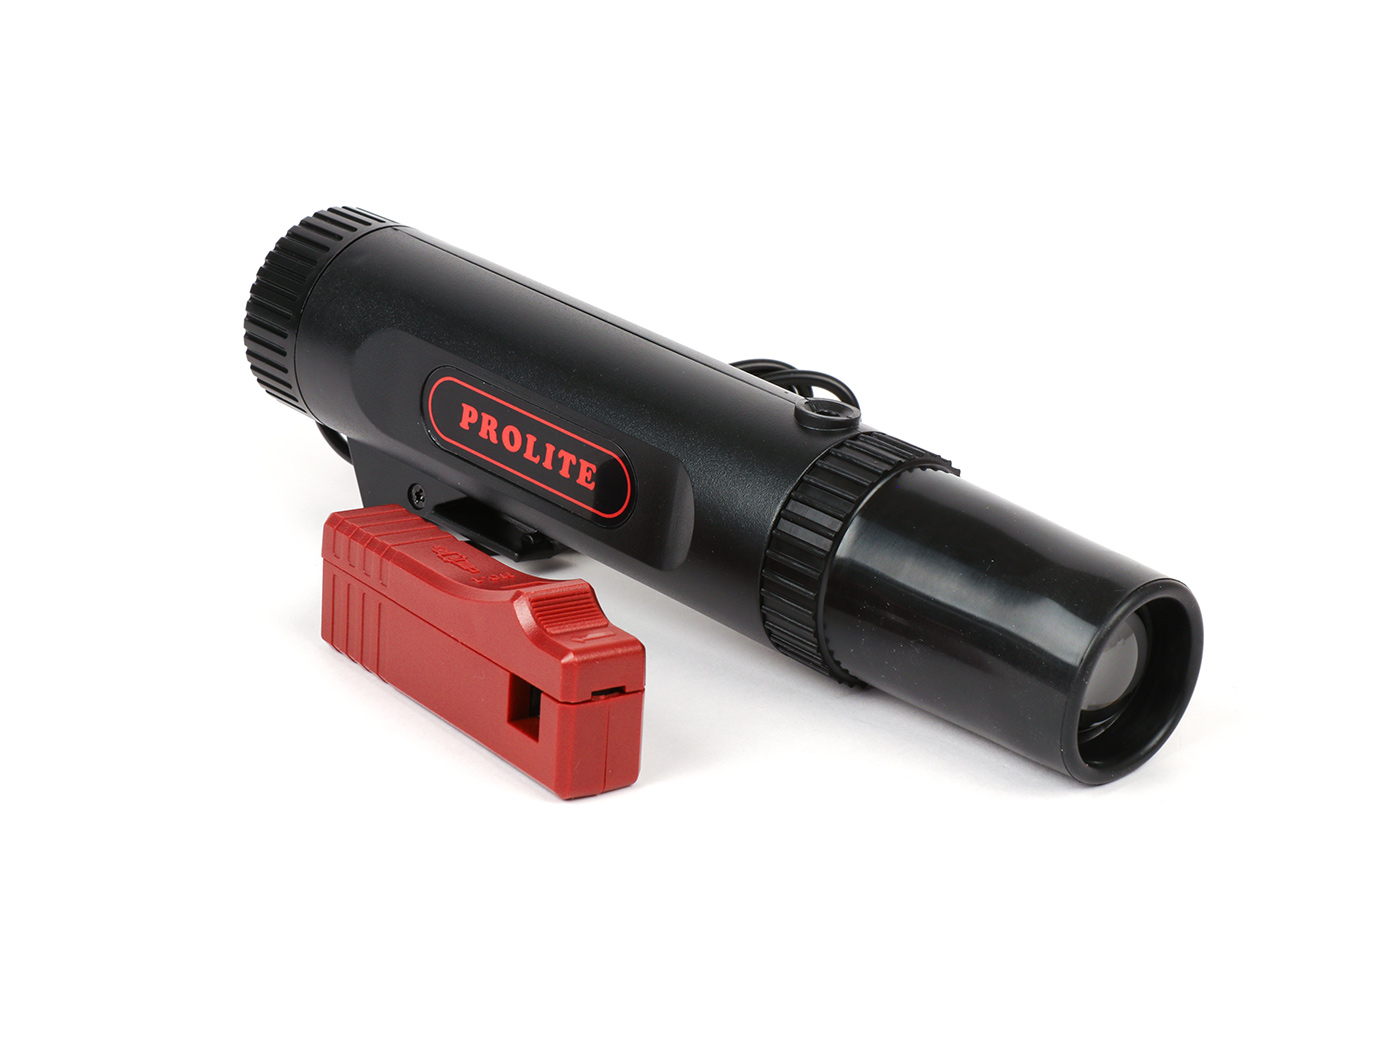
Ignition light gun TRISCO-ProLITE (double-D) (- strobe light flash gun - ignition 6V / 12V
Article no.: MN911B

Es wird no external power supply needed. Two D batteries (Mono, LR20, MN1300) are used for the power supply; But you can order here at the same time.
In addition to being used as a pilot light gun, it can also be used as a work lamp!
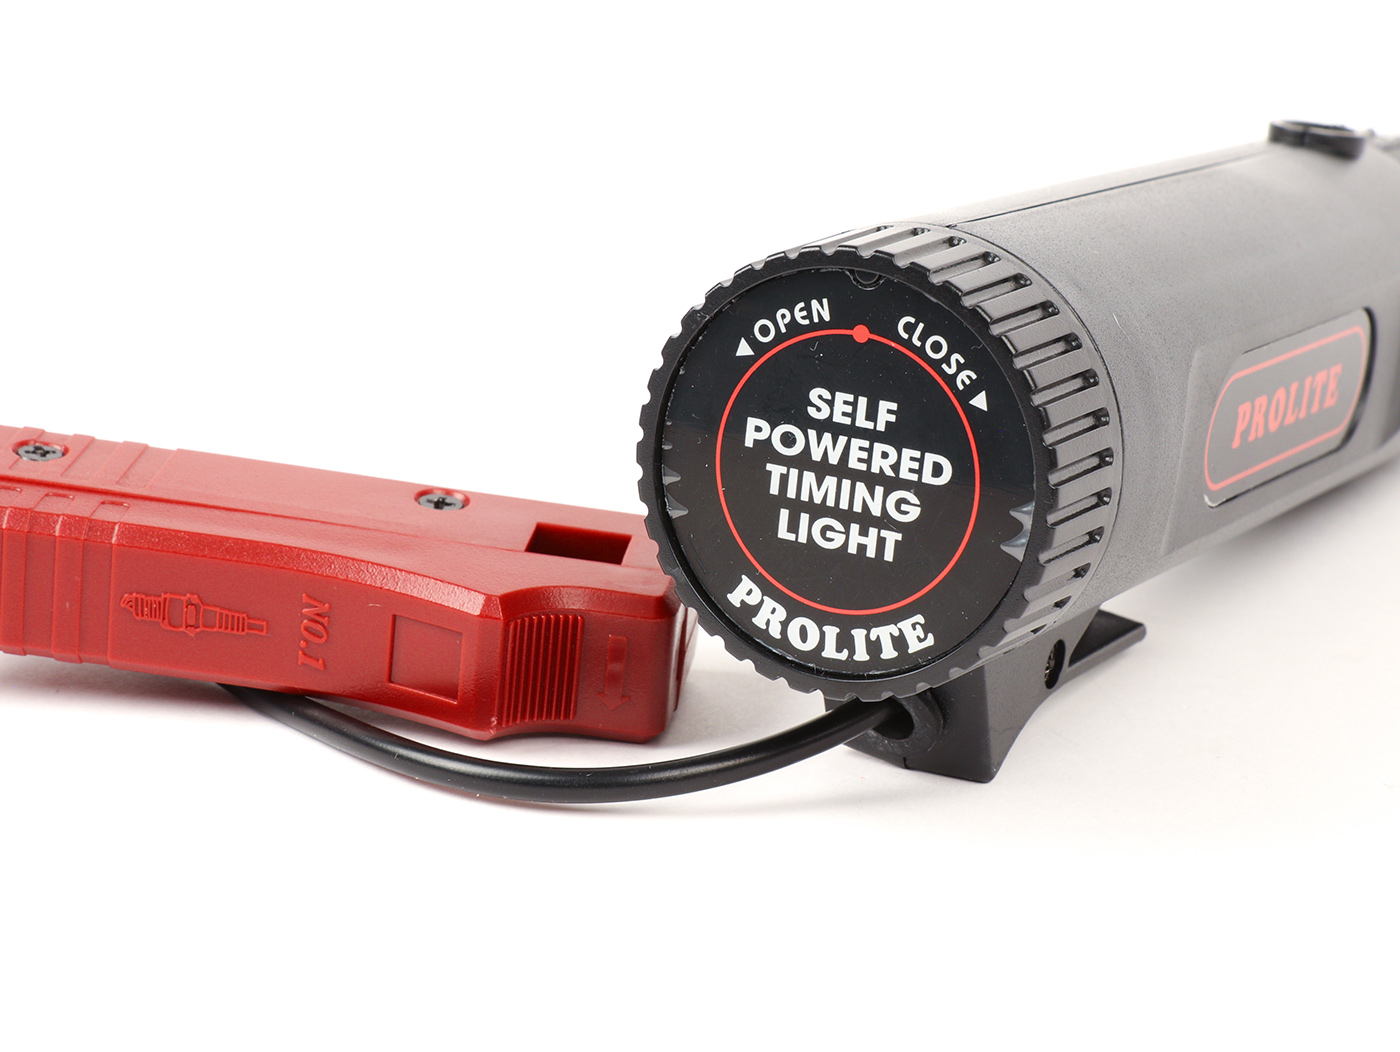
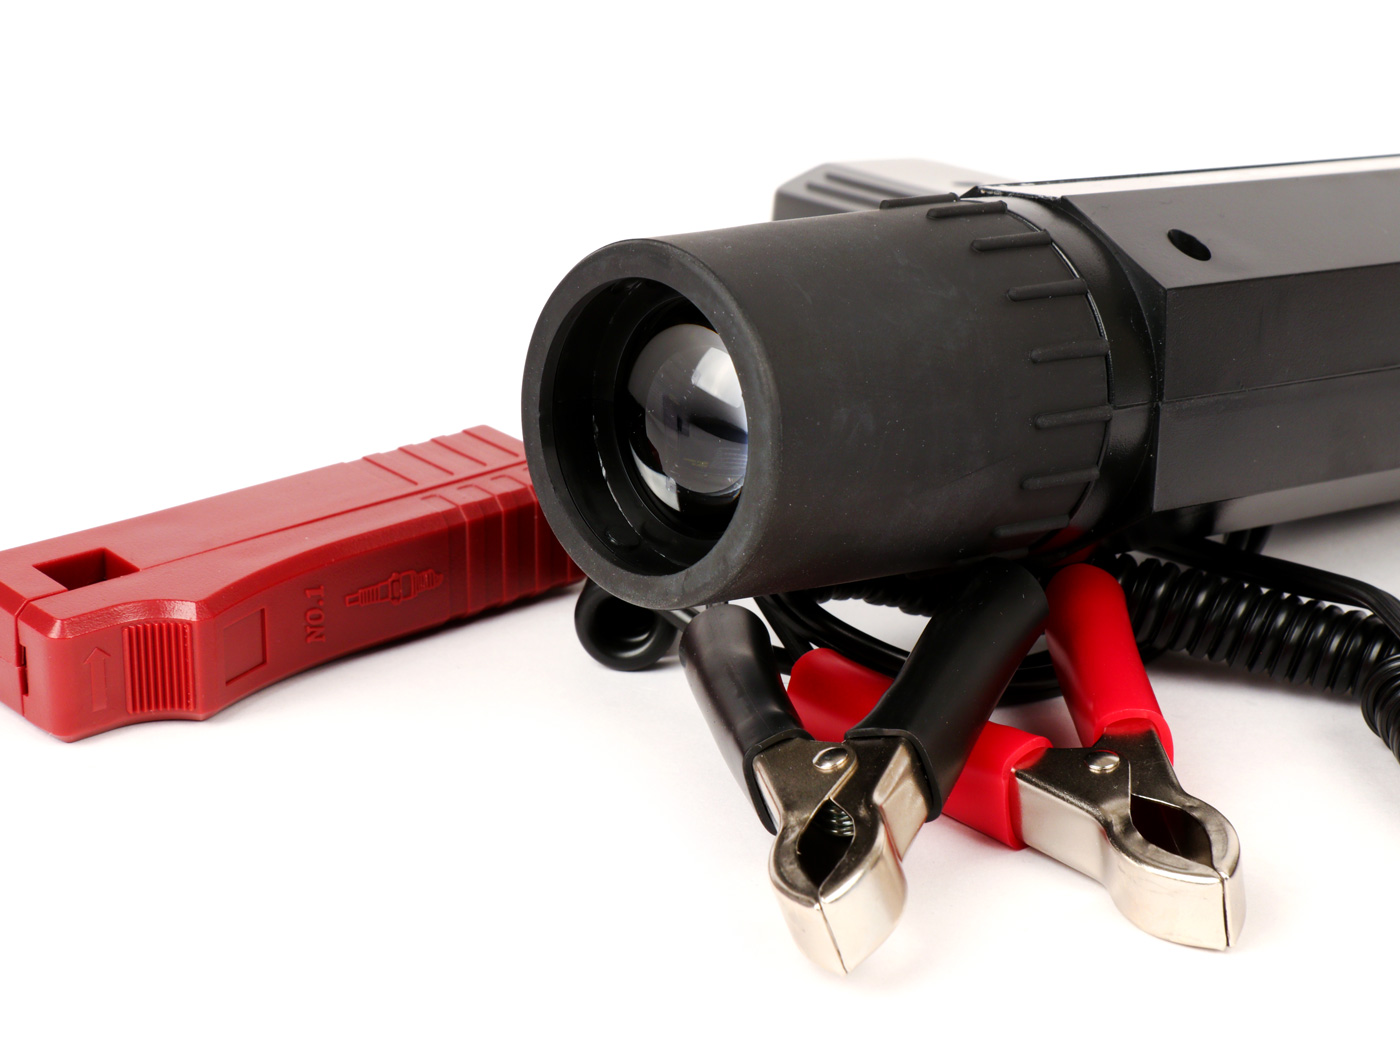
Pilot light gun TRISCO-ProLite - stroboscopic lamp flash gun - ignition 6V / 12V
Article no.: MN922

This is the largest pistol that feels great in the hand. The cable with the two crocodile clips is a robust and practical spiral cable that is connected to a plug on the gun. Optimal pistol for the ambitious screwdriver and tuner - PROLITE version.
It will always be, regardless of whether it is a 6V or 12V ignition an external power source with 12 volts (e.g. a car battery) if the vehicle does not already have one.
Ignition light pistol TRISCO-ProLite stroboscopic lamp flash pistol - ignition 6V / 12V
Article no.: MN912

For the occasional setting of the ignition, we have this light and handy TRISCO-ProLite ignition light gun in our range. It lies comfortably in the hand and of course also has the rubber protector. The cables are firmly connected to the gun body.
It will always be, regardless of whether it is a 6V or 12V ignition an external power source with 12 volts (e.g. a car battery) if the vehicle does not already have one.
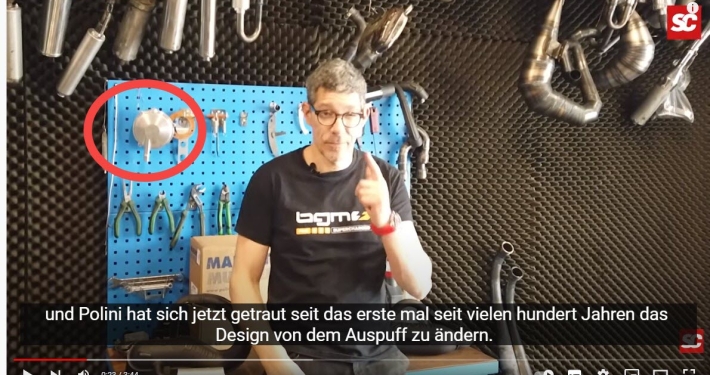
With us you can now get it again ARROW exhaust systems.
You may be with ours Vespa GTS - Custom-Special already noticed that most of the custom scooters are from Cafe Racer 69 have installed an Arrow exhaust system. This is certainly not without reason, the Berlin Vespa Customizer team knows what it's doing!
Make yourself a picture Scooteria made a nice comparison video here and compares the original Piaggio Vespa GTS exhaust with the ARROW exhaust:
Giorgio Giannelli founded ARROW SPECIAL PARTS in 1985 and very successfully built racing exhaust systems for professional competition. In the 4-stroke and 2-stroke area, drivers won world championships in various classes with the Arrow exhaust systems.
In the meantime, Gianelli brings the know-how gained from racing with Arrow to the streets and offers exhaust systems for the Vespa GTS, for example. The sound, workmanship and performance make it the best for many Exhaust for the Vespa GTS. Of course available with E-marking and approval!
When the technology is in place, it is time to tackle the visual down to the smallest detail. Details that let us recognize the Vespa, which is built entirely from new parts and will be one of the few who will not come from one of the factories.
All words are superfluous when we can look at the result of hours in the workshop in a good mood, because the assembly was almost as fun as it will be to drive it.
All Platónika products in the shop wishlist
Music:
Artist: DJ Freedem
Title: Cutting It Close

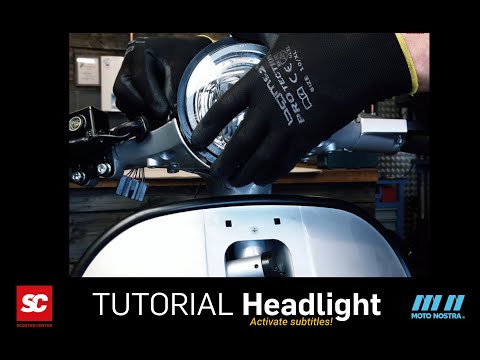
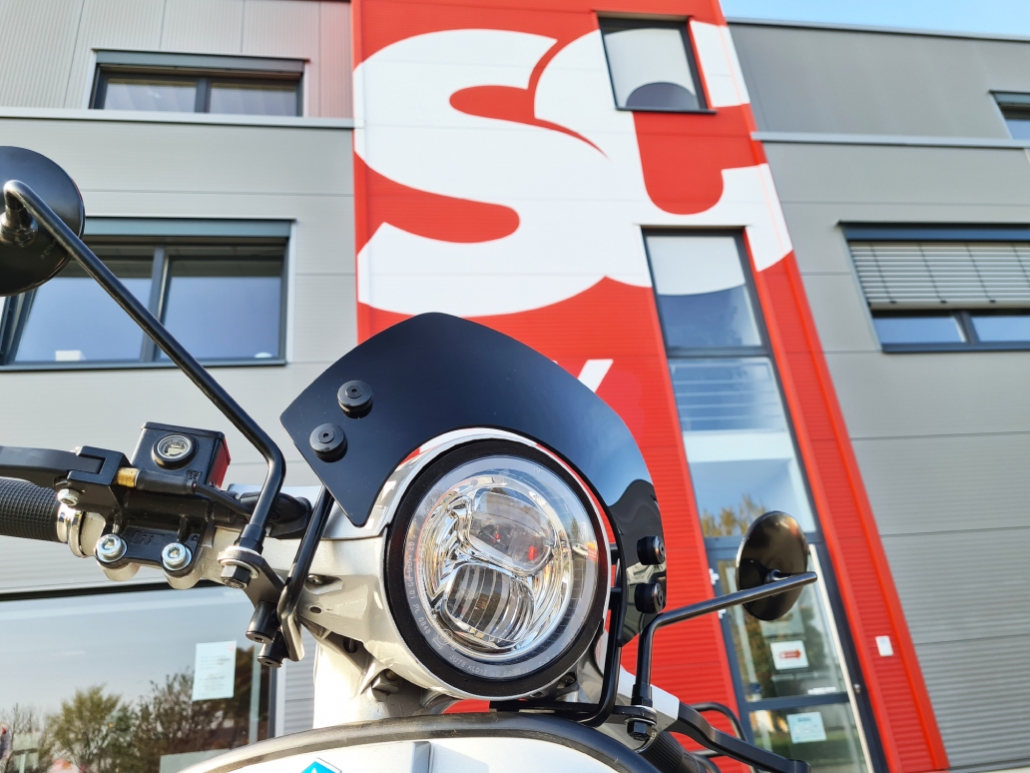
In this Vespa tutorial video we show you how our Vespa PX LED headlight is installed for the Vespa PX. the MOTO NOSTRA HighPower LED headlights can also be installed in other vehicles (Lambretta, Vespa GTS, Sprint, Rally), with the supplied, vehicle-specific frame, the installation of the Vespa headlight is as eg Vespa PX LED headlights easily.
CONTENT
DOWNLOAD PDF
Assembly instructions for Print out as PDF
For most scooters, the limit with conventional Bilux light bulbs is a headlight bulb with 45/45 W. The ignitions, which are usually 80 W to a maximum of 120 W, do not provide any more. The luminosity is measured in lumens below 400. The LED headlight has a luminosity that is three times as high (1300 lumens). The power consumption is only 20 W. This corresponds to the light output of a conventional 100 watt spotlight. With a given alternator / power supply, a considerably better illumination can be achieved. In addition, there is more capacity for other consumers.
Parts used in this video:
LED headlights with E9 marking (street legal) and bright high / low beam. An additional feature is a separately switchable position light. With a diameter of 143mm it also fits perfectly into the steering head of the PX and Cosa models as well as into the lamp ring of e.g. Vespa Sprint, GTR and Rally.
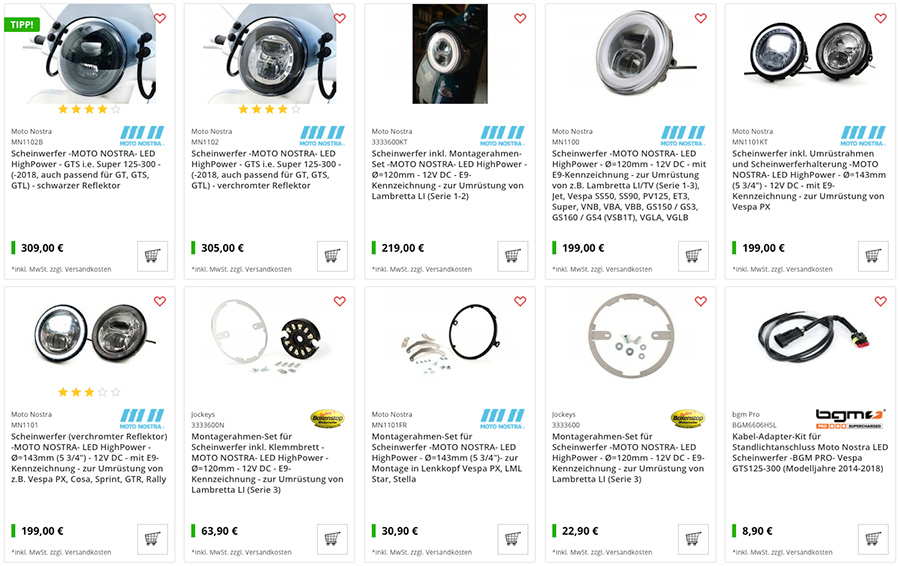
Luminosity 1300 lumens Voltage: 12 volts DC (direct current) Current consumption: 1,8A / 1,3A Power consumption: 21,5W / 15W / 1,9W Diameter: Ø143mm Body depth: 54mm (measured from the headlight ring without glass bulge) Overall depth: 79mm (measured from the headlight ring without glass bulge with cable feed)
The LED headlight works exclusively with direct current, it therefore requires a battery or another equivalent power source with 12V DC. Operation with an alternating current voltage source leads to an immediate defect.

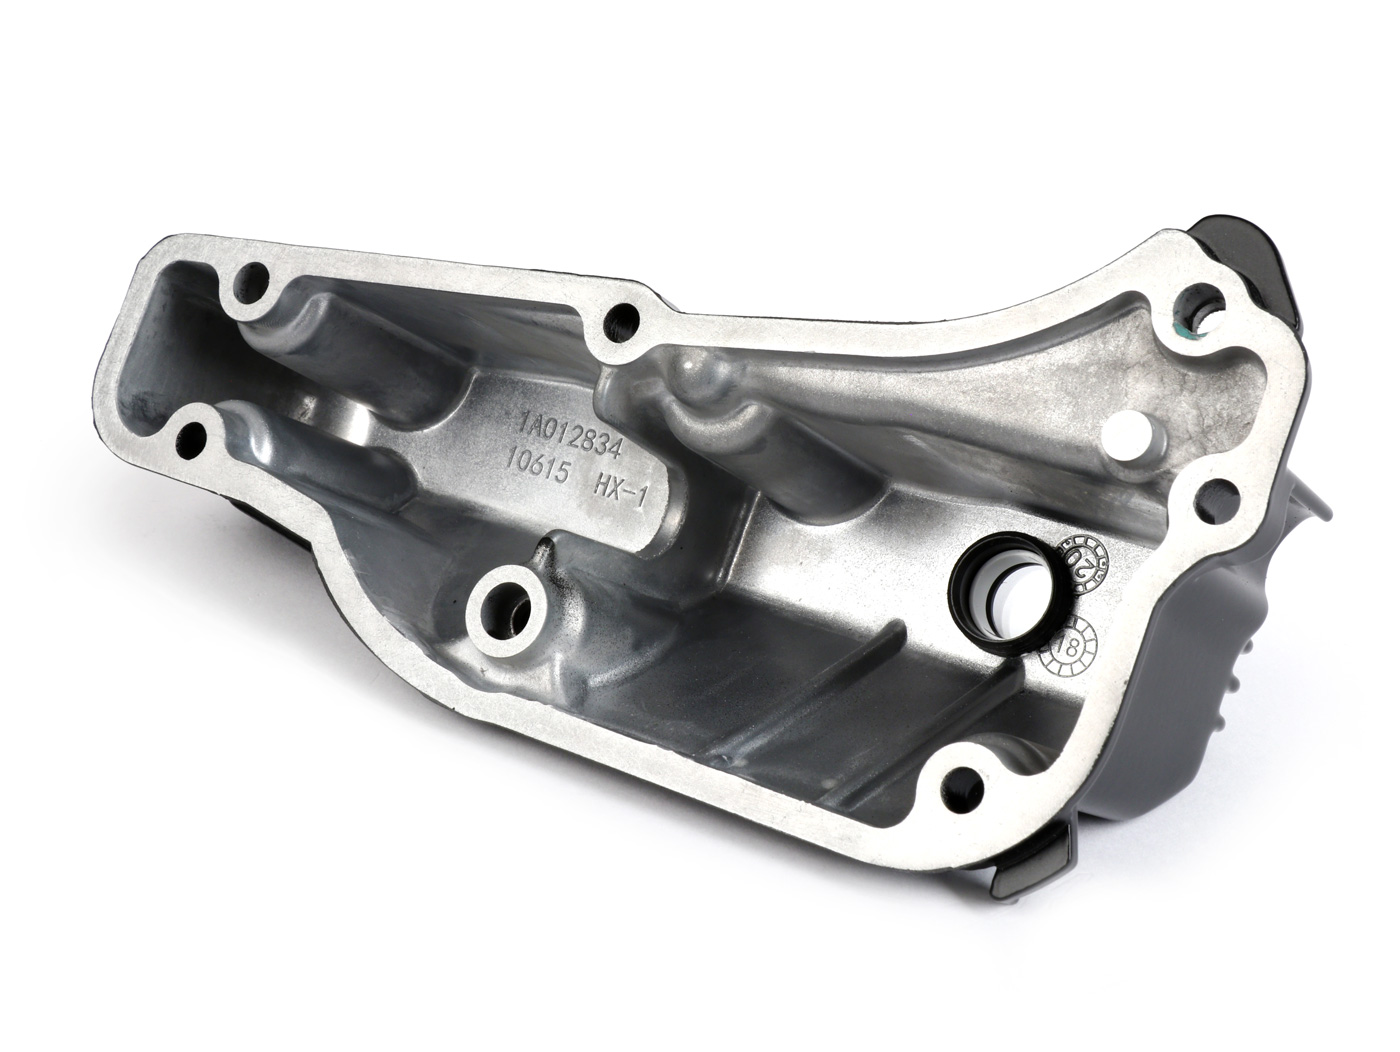
Why convert a Vespa GTS oil pan?
In this post too Vespa GTS conversion we have some great examples of Custom and tuning for a Vespa GTS gezeigt.
Often it is the details that make a successful renovation with a coherent overall concept.
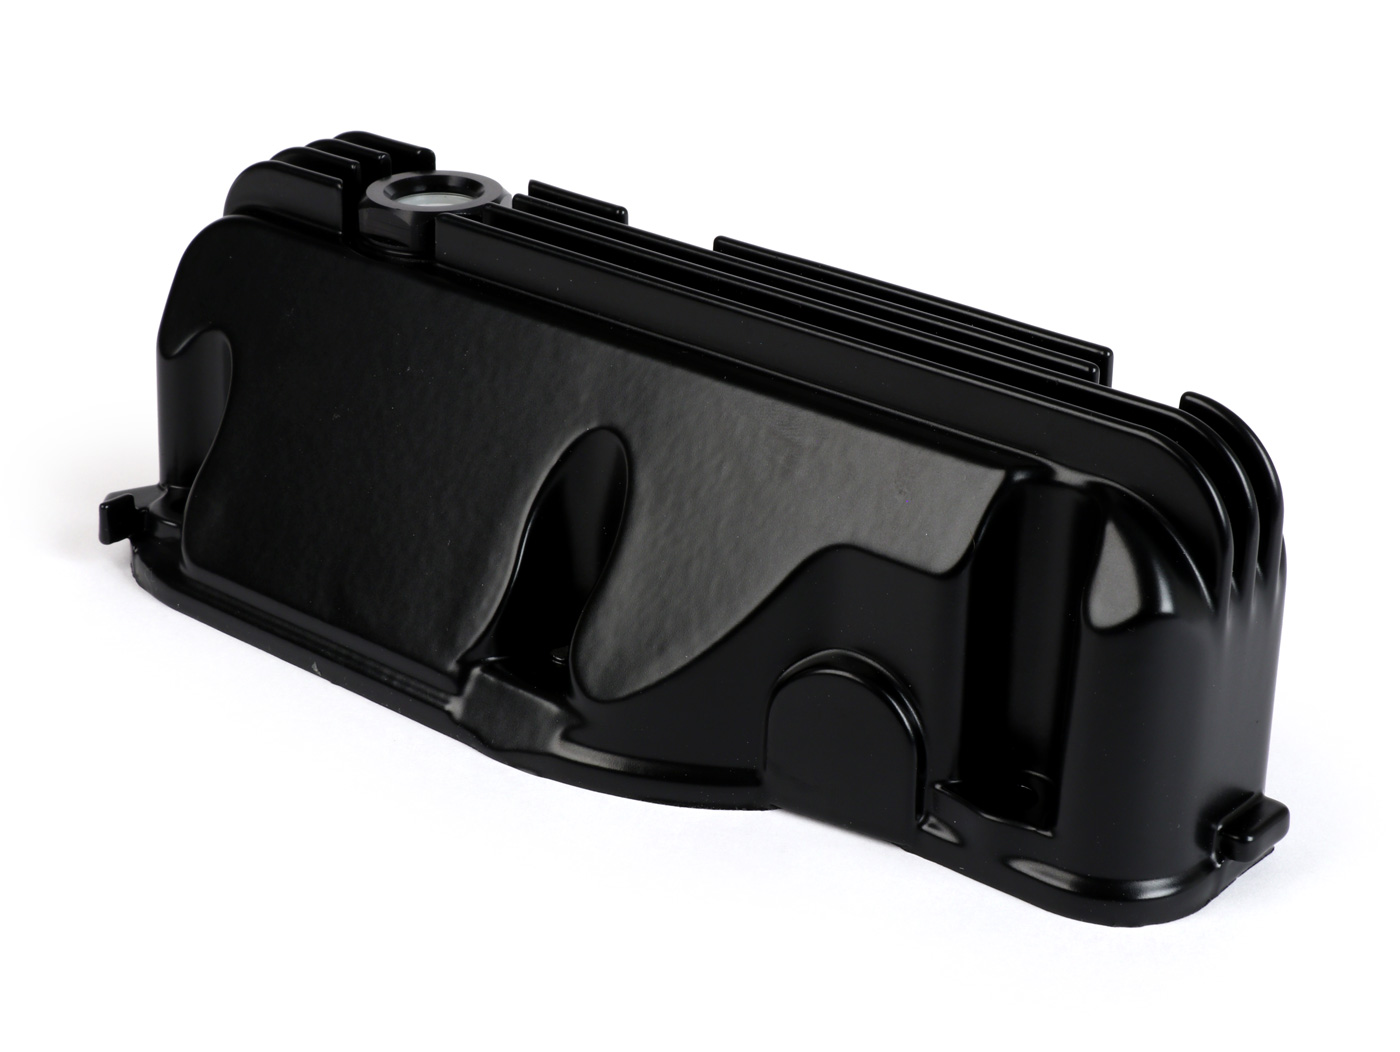
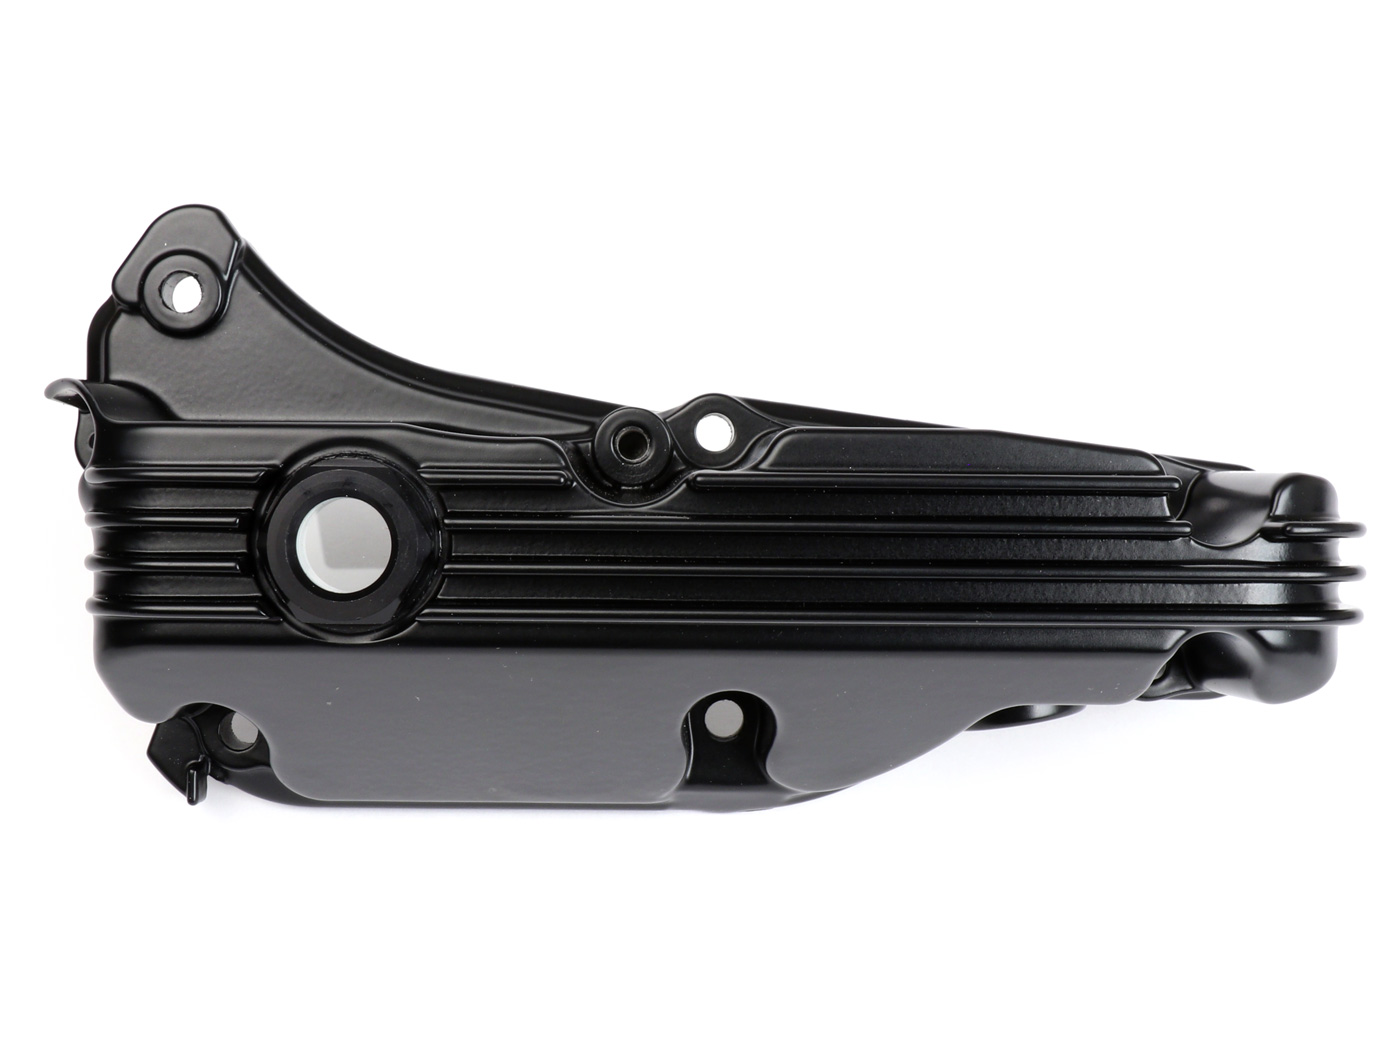
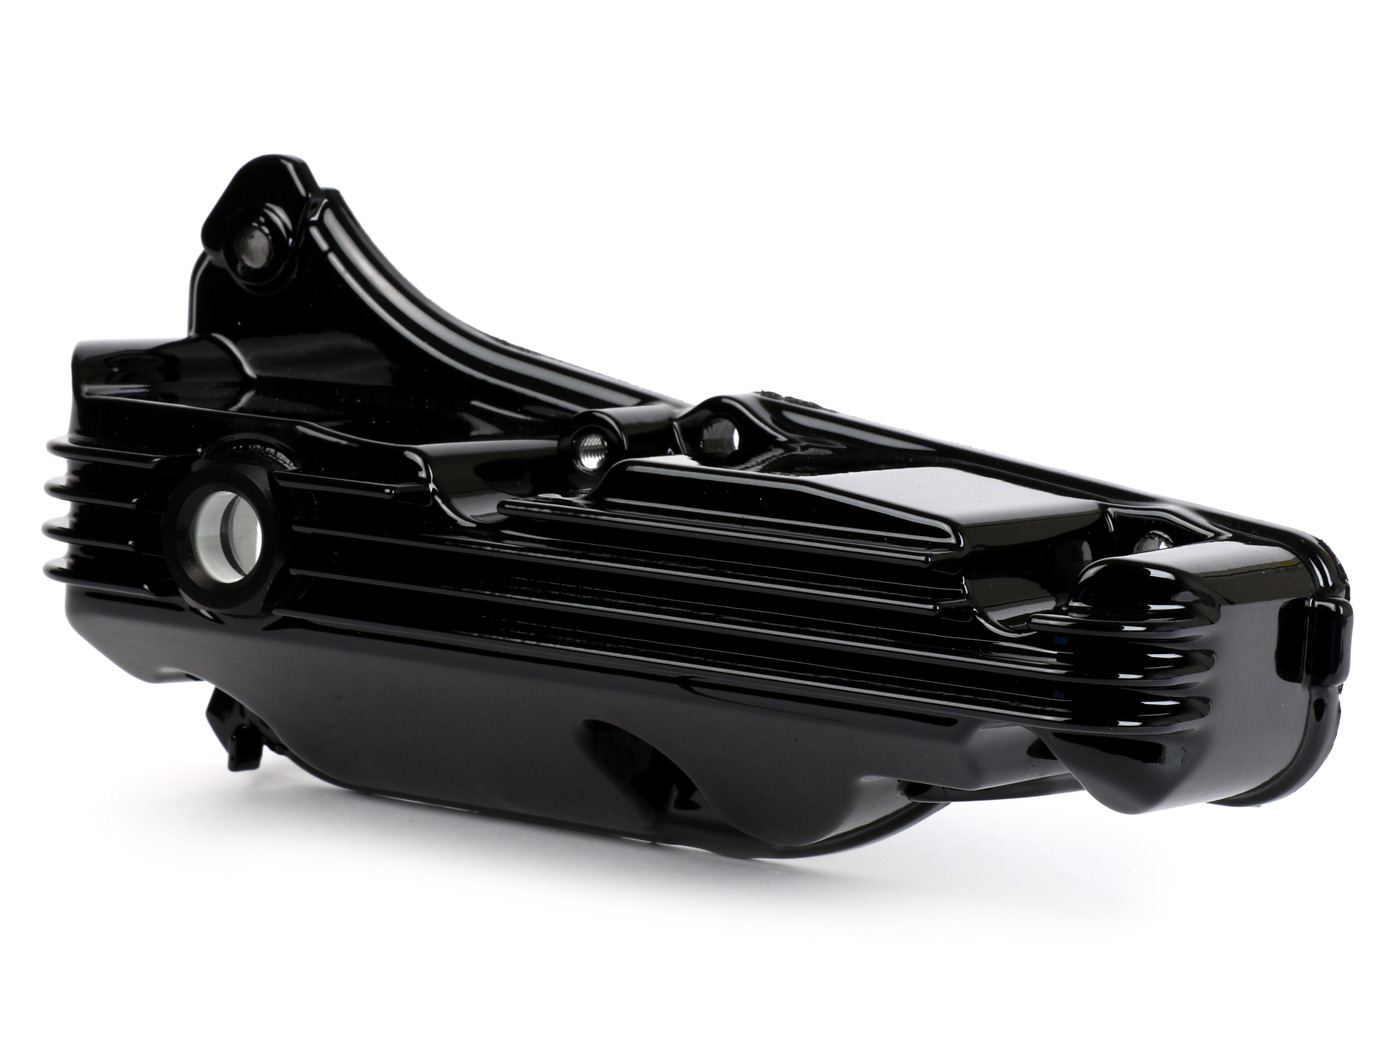
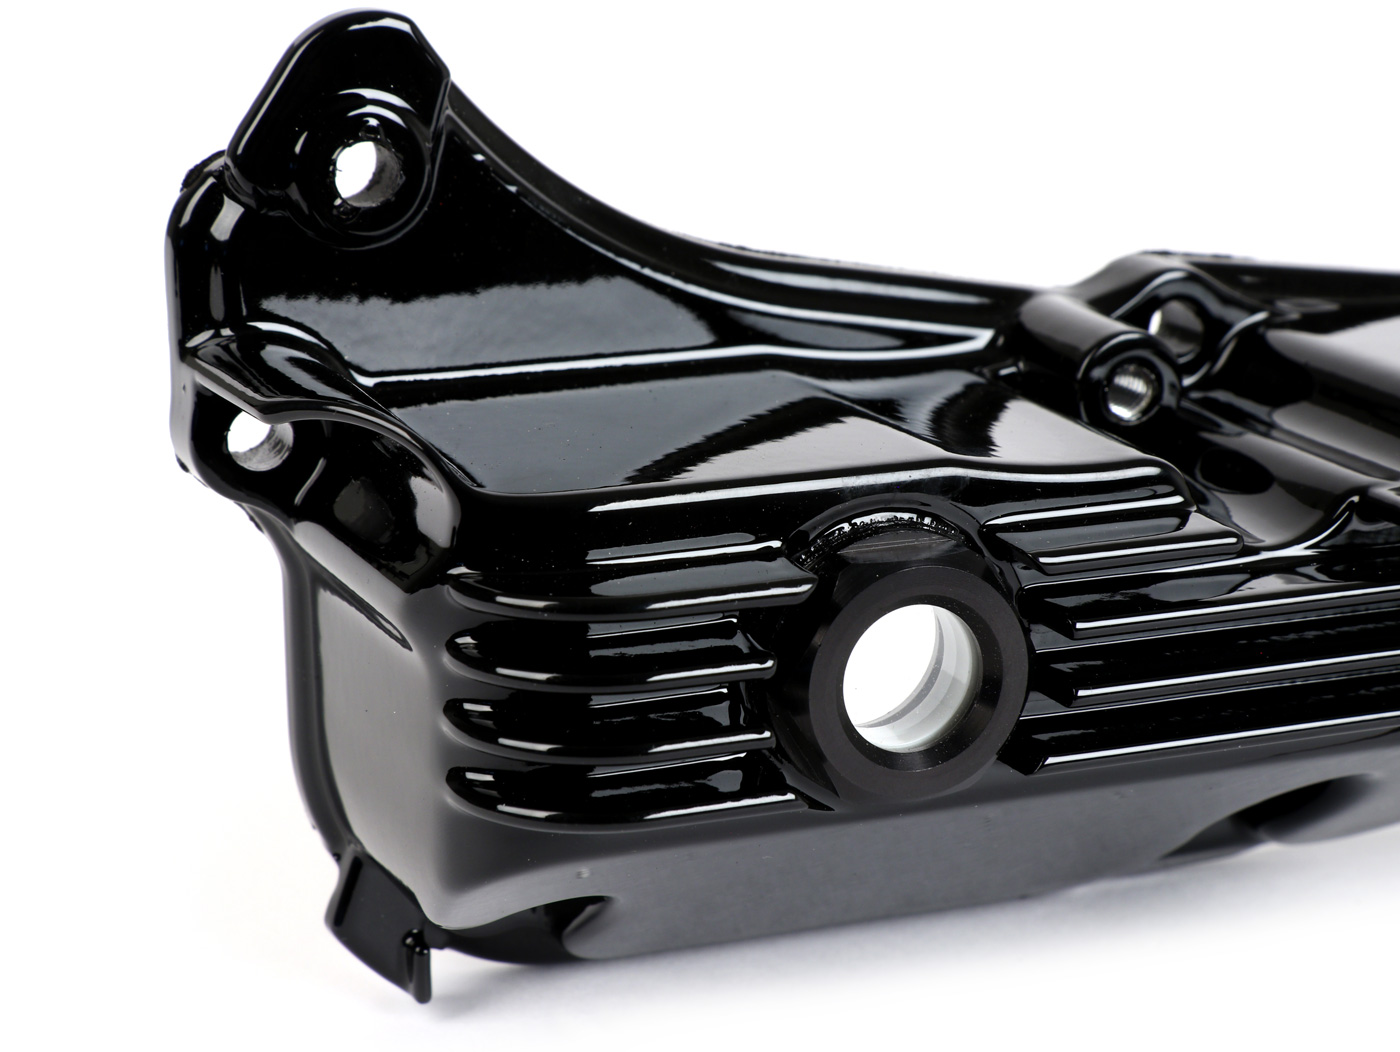
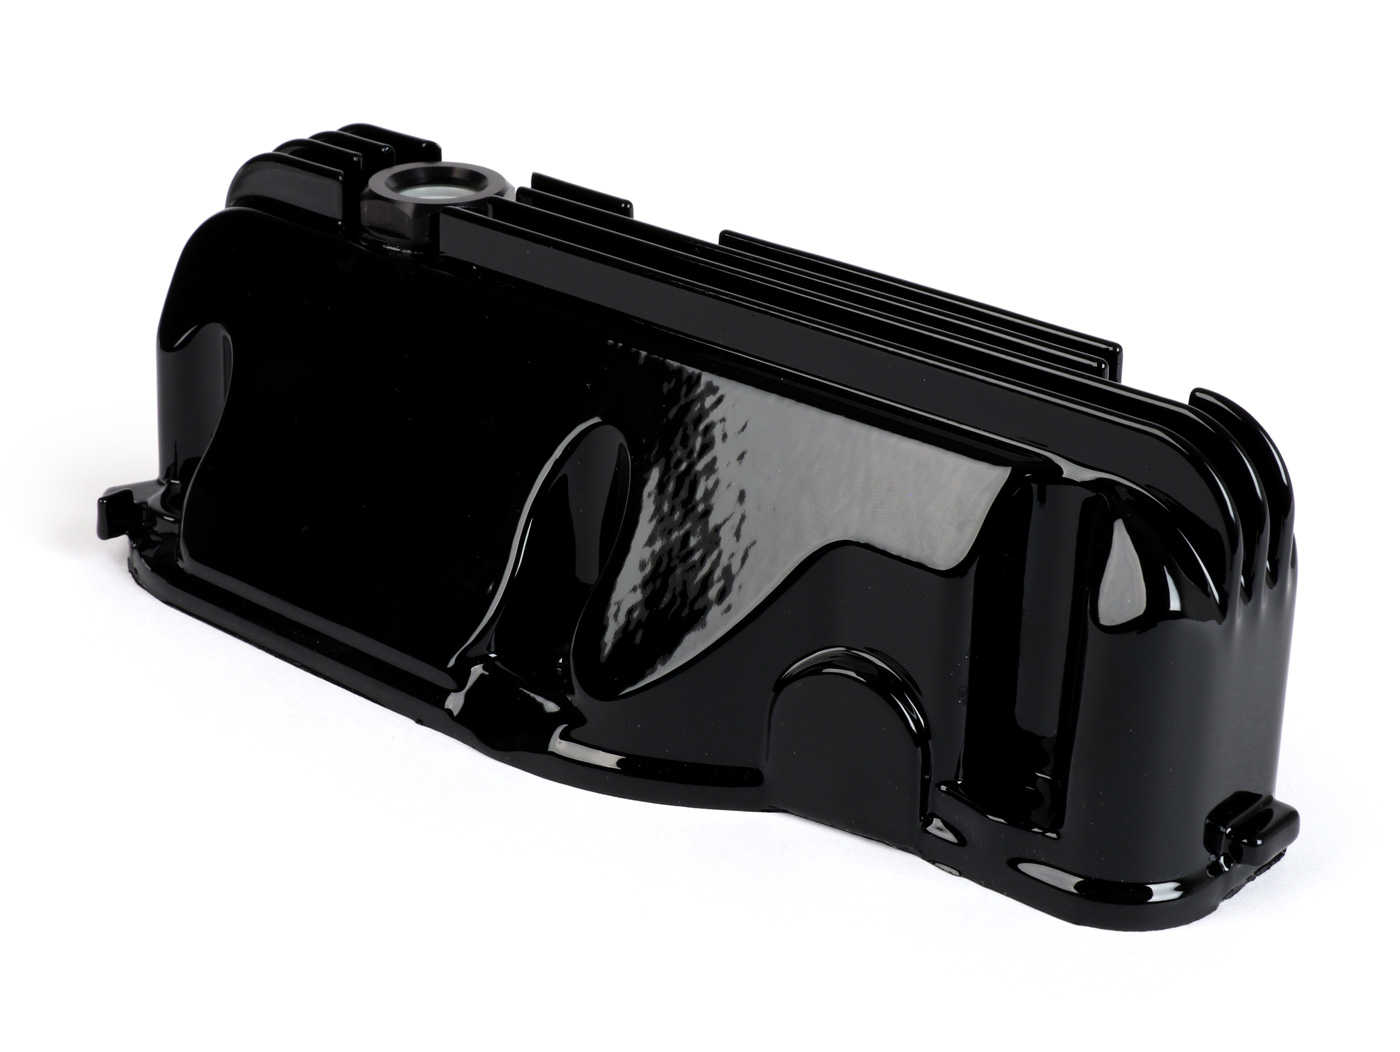
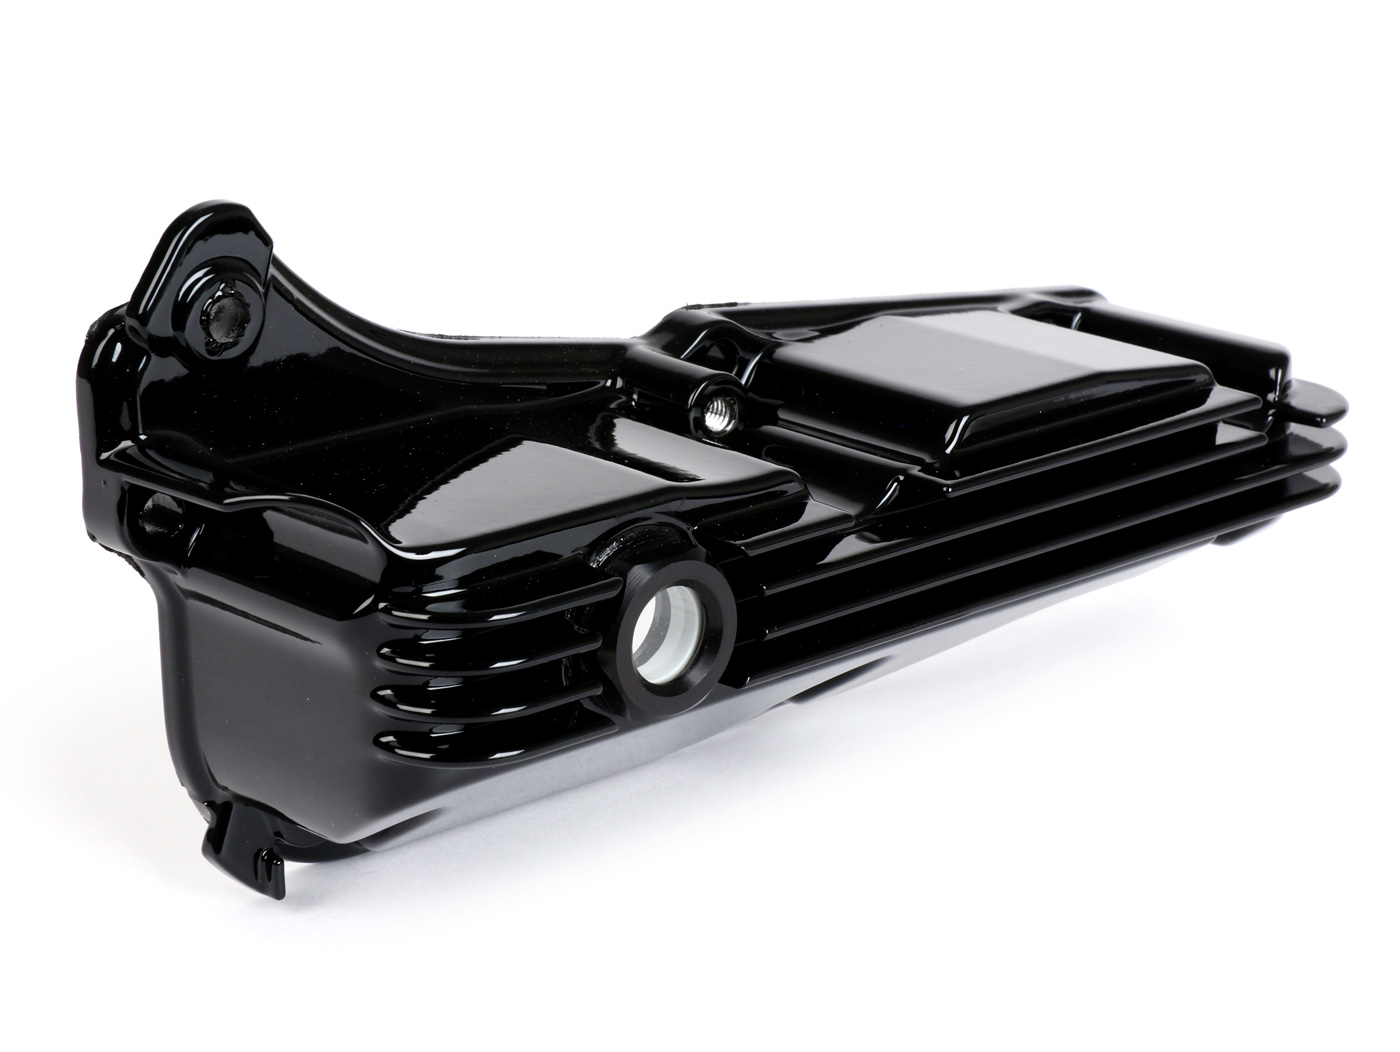
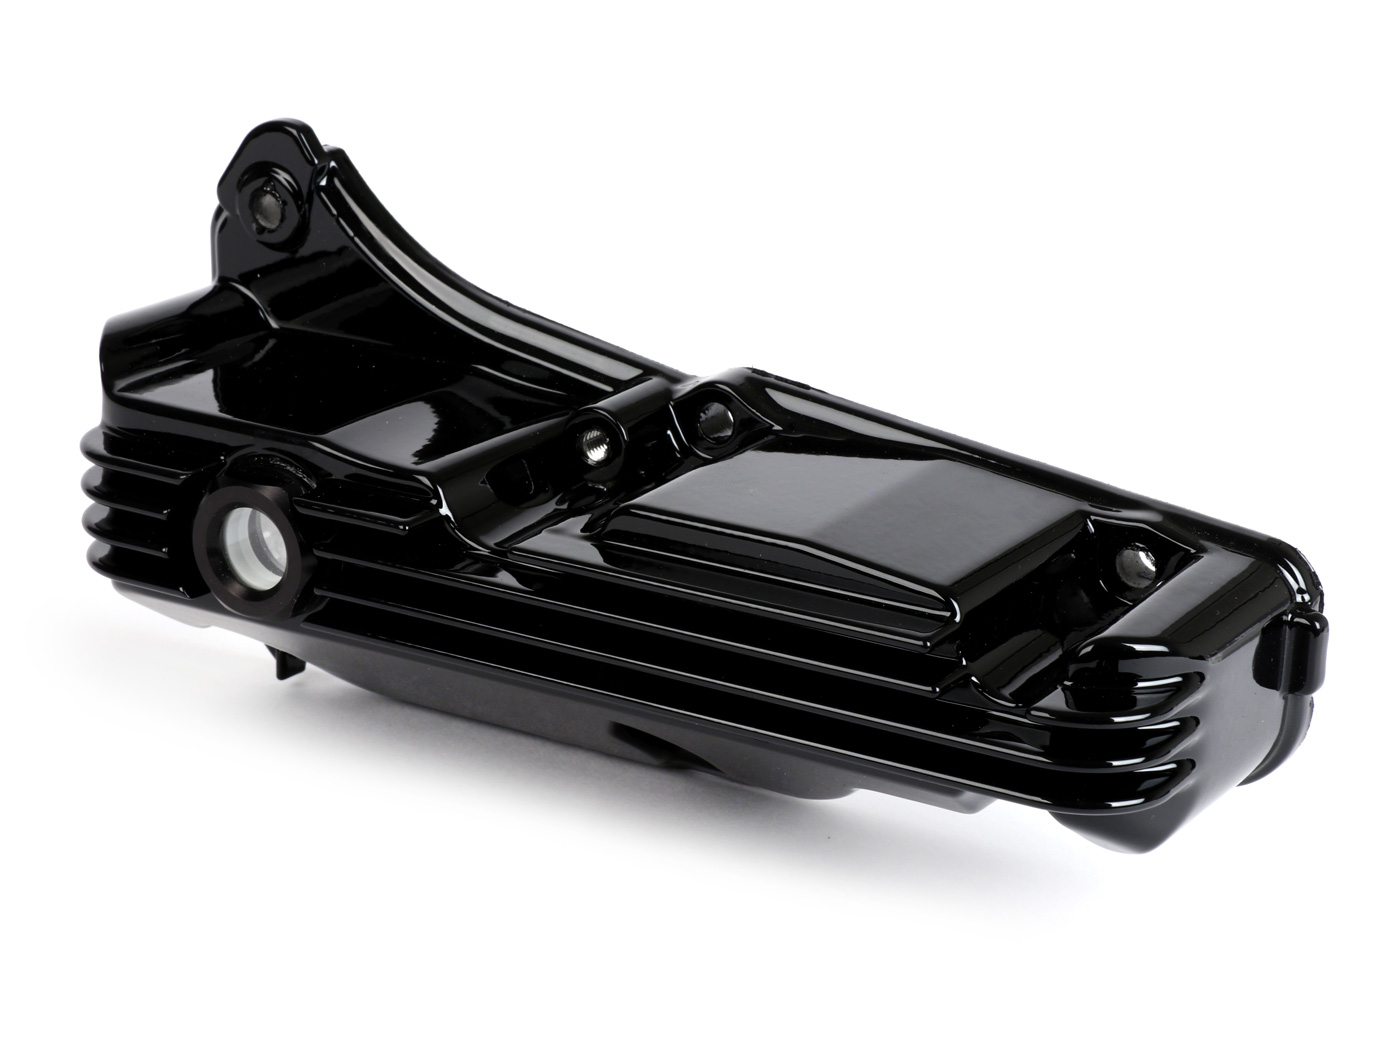
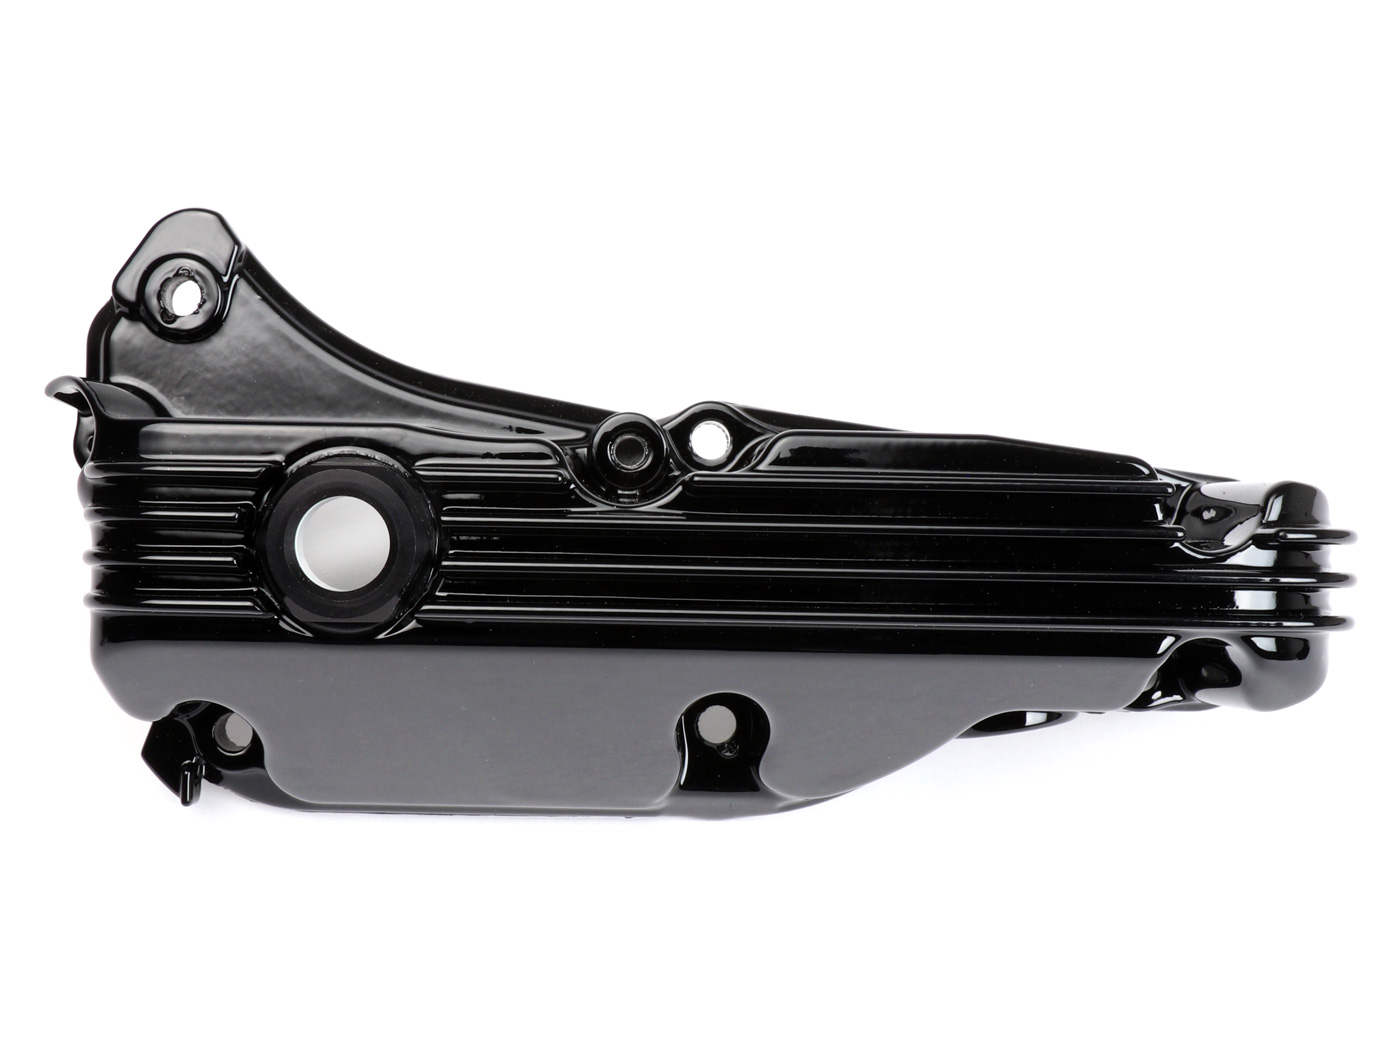
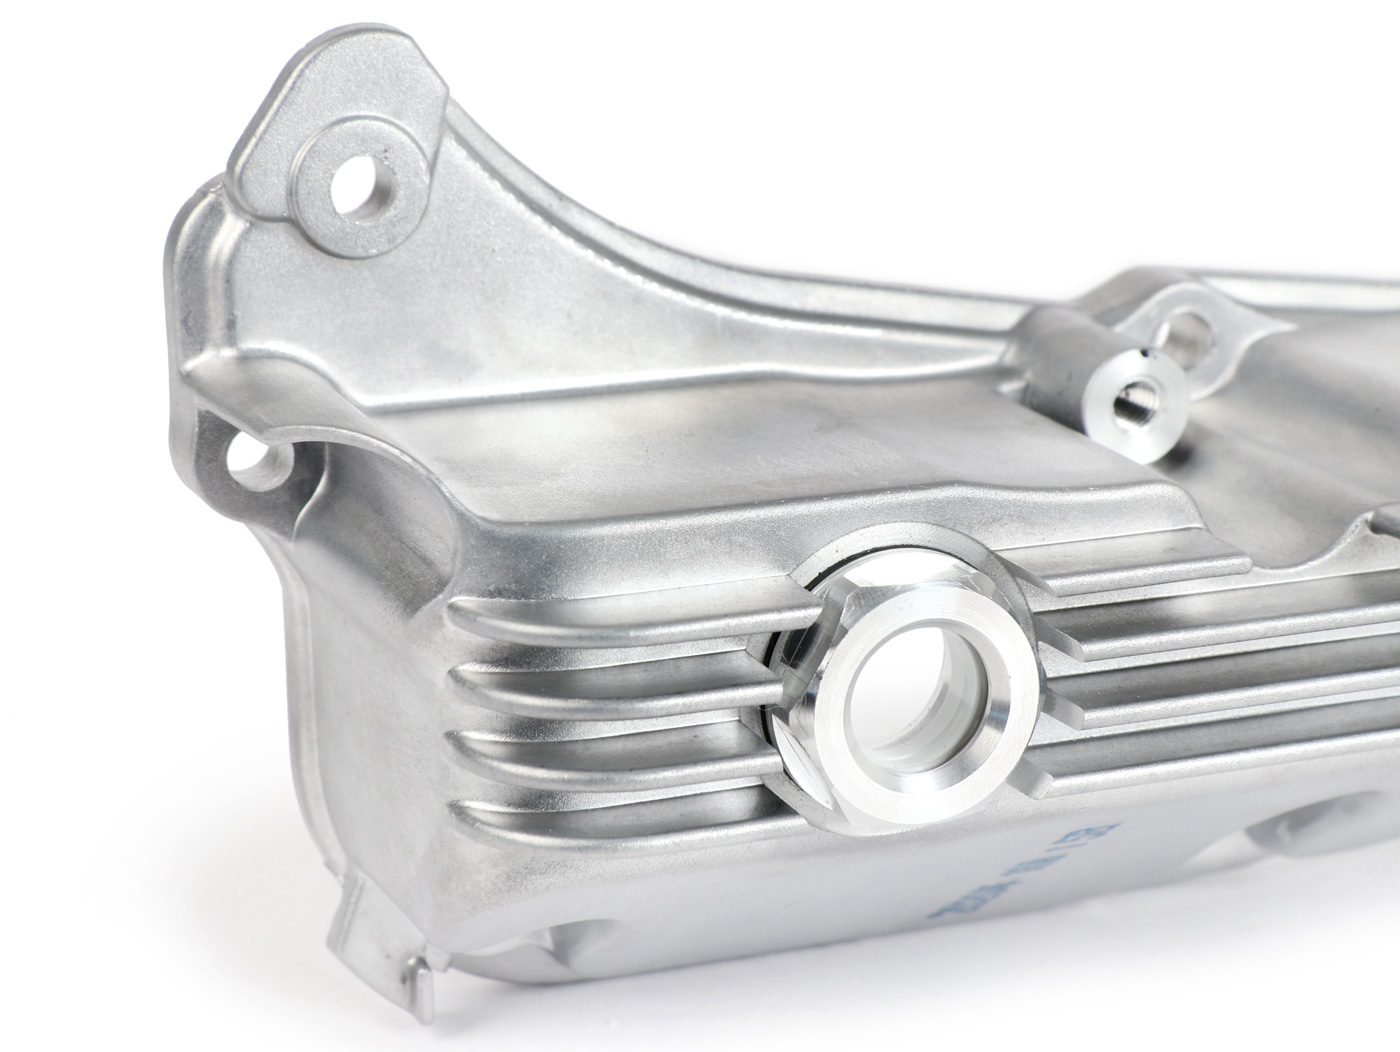
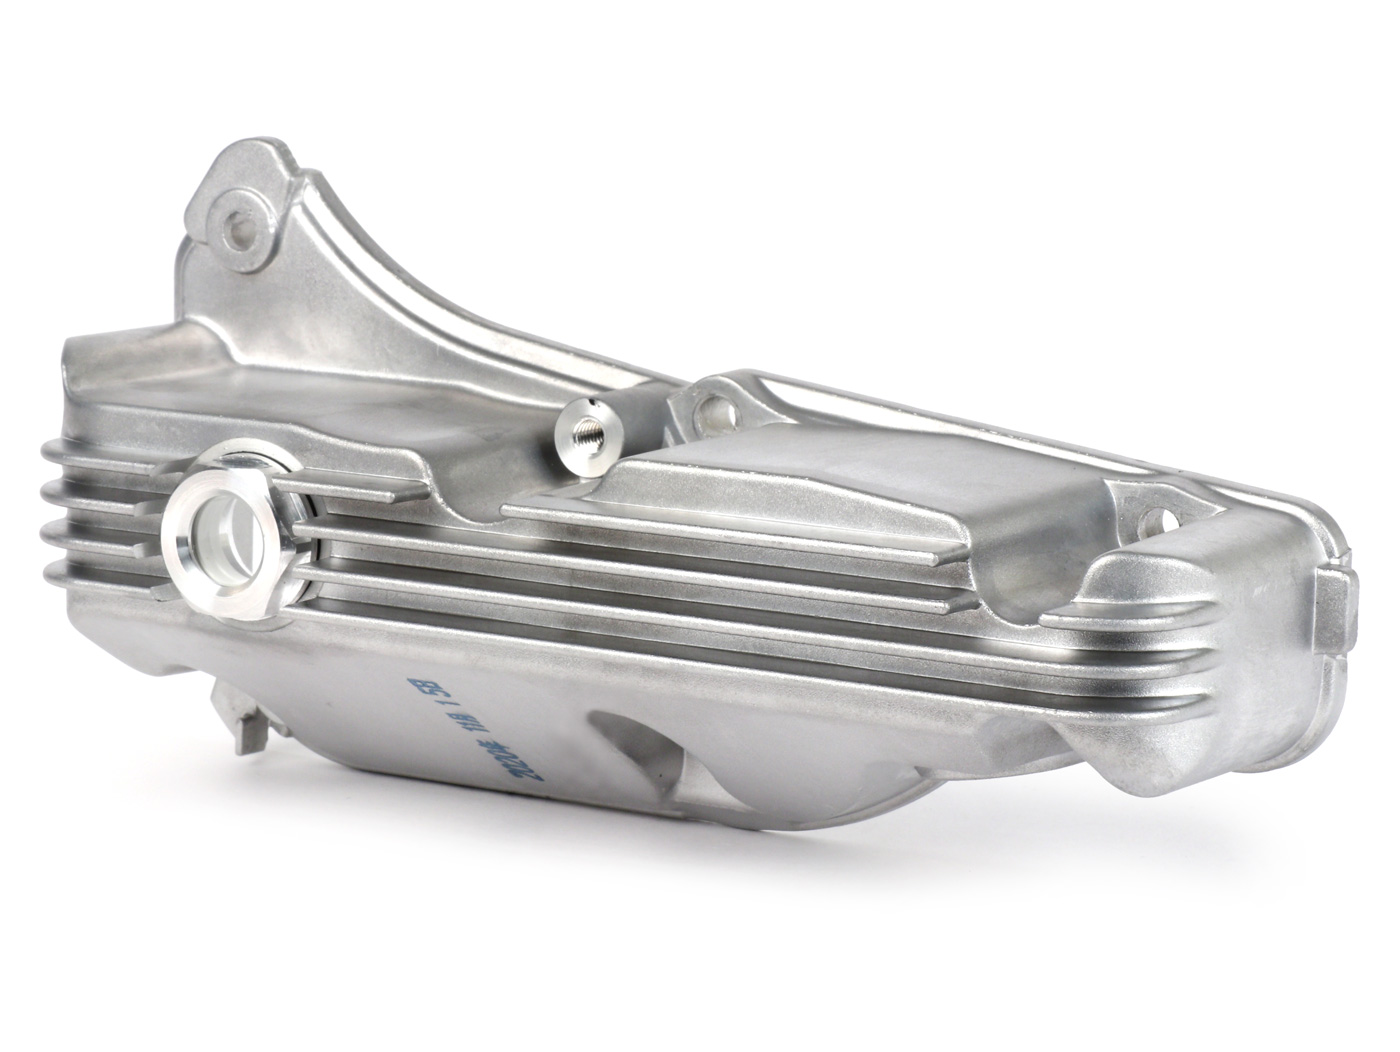
A nice detail on the modern Vespa scooters is, for example, a black oil pan. We offer you with our MOTO NOSTRA Oil pan one brand new original Piaggio oil pan which we have provided with a high-quality, high-gloss powder coating. The video below shows how the conversion can be done very easily.
This GTS oil pan is first prepared in a complex process for refinement and then professionally processed. The result is an extremely hard-wearing surface with a great look. The bathtub is of course delivered ready for installation, you have the choice:
Note: Please do not forget to install a new seal -> Oil pan seal
A great opportunity for something new Engine oil and use an oil filter:
Tip: We offer you cheap and practical sets! the Inspection kits are equipped with all parts that are required for an inspection, depending on the mileage and recommended overhaul work:
It is very easy to assemble, but there are a few things to keep in mind.
Here you can find a great video from Scooteria, who are also replacing the MOTO NOSTRA oil pan as part of their GTS 300 conversion. Helpful tips from the custom professionals at Cafe Racer 69 with tricks for installing the Vespa GTS oil pan:
Note:
See video above. Use correct screws, reinsert the spring, observe the tightening torque: M6 screws oil pan: 10-14Nm.
Buy MOTO NOSTRA oil sumpThe MOTO NOSTRA carrycot is available in:
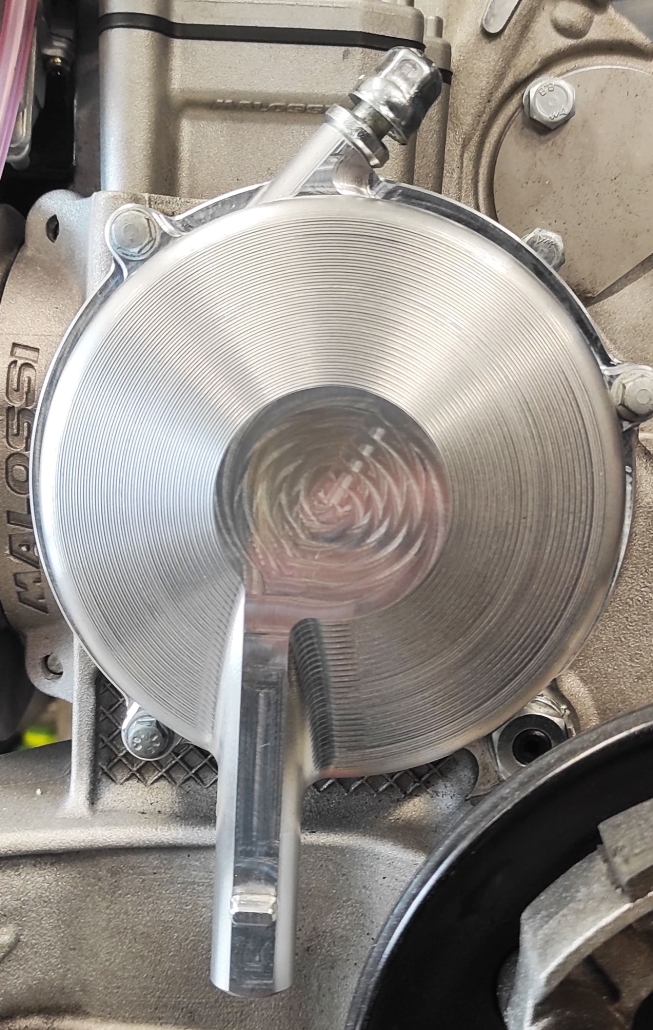
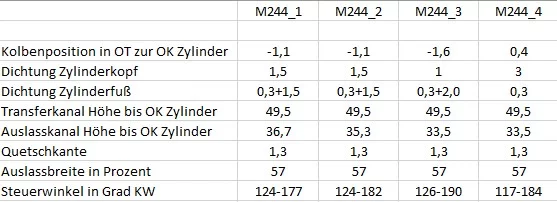
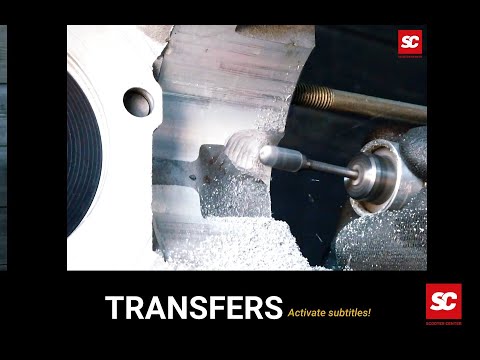
The Vespa engine - the heart of Platonica - Has in the last post get the desired control angle of the crankshaft
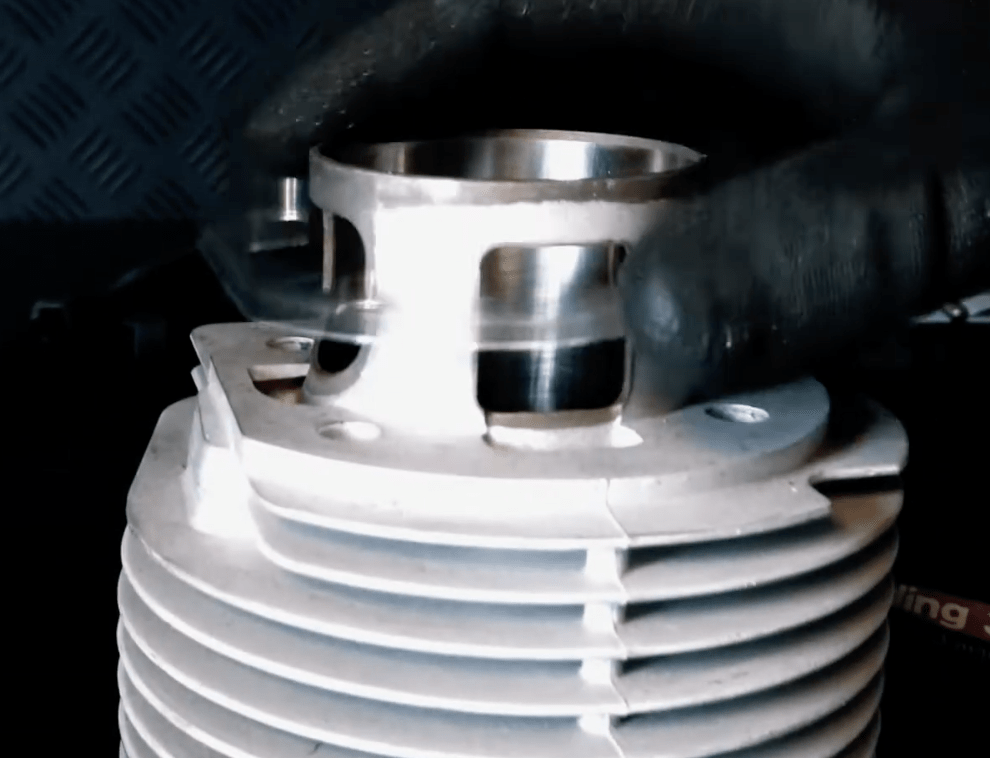
Vespa Tuning: Before the complete assembly of the engine can be done, all the work that generates chips has to be done. Only then can the housing be cleaned.
In the next step, this includes the overcurrent channels of the cylinder in the motor.
The BGM177 is designed in such a way that the cylinder also works perfectly on the original overflow channels.
In our project, however, we use the opportunity to adapt the housing directly. Better filling of the cylinder always means one higher possible torque.
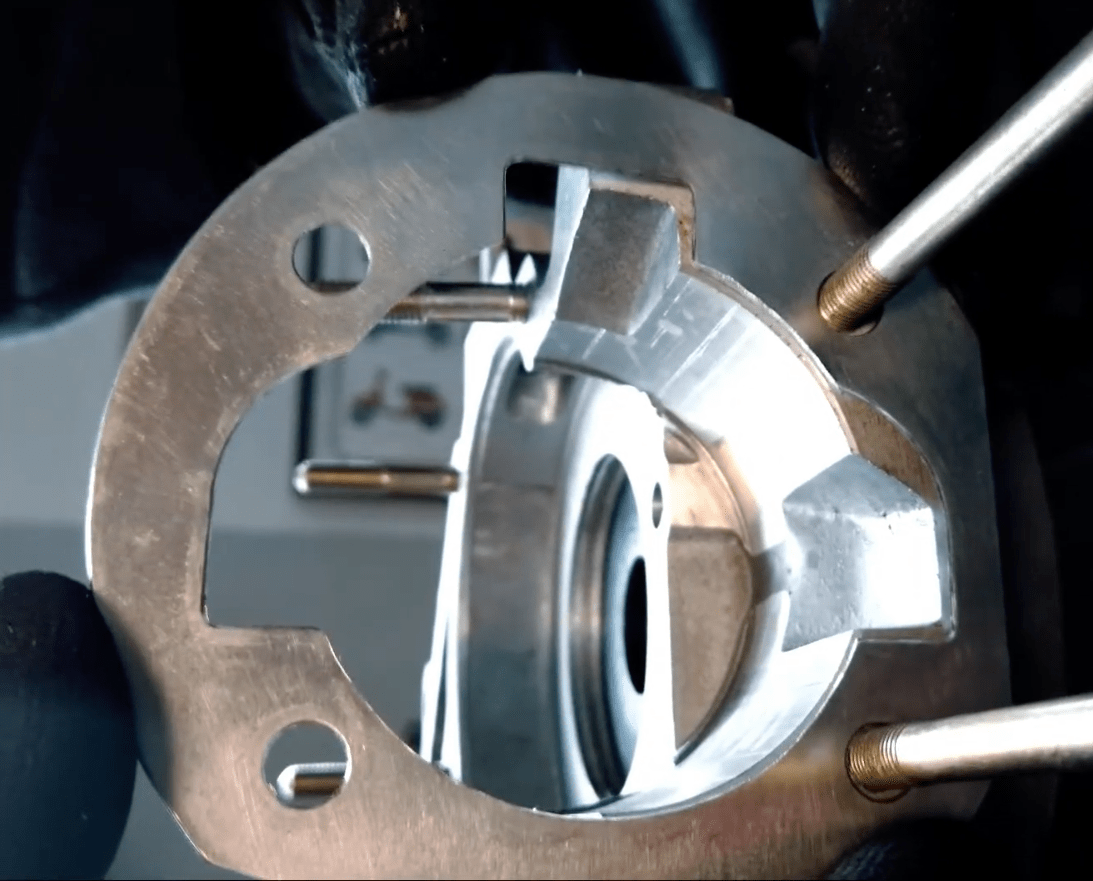
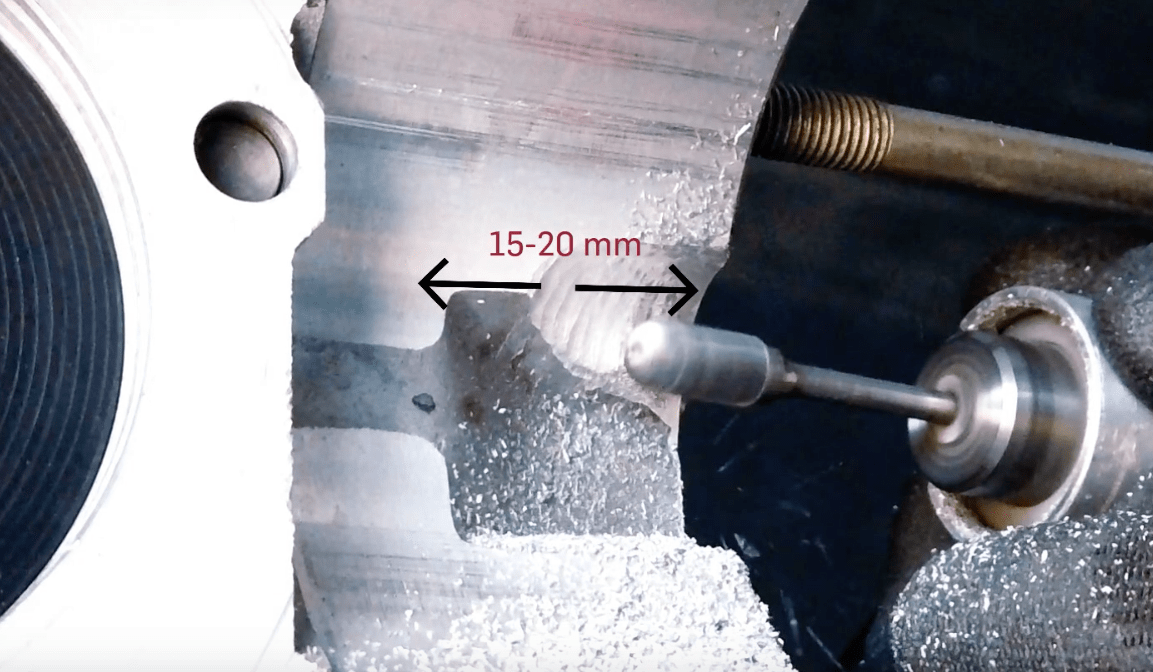
The easiest way to transfer the contour of the overcurrent ducts to the motor housing is to place the appropriate cylinder base seal on the housing and thus transfer the contour to the housing.
The sealing surface is best marked with a foil pen. Then, with the aid of the cylinder base gasket, the Contour of the overcurrent channels marked.
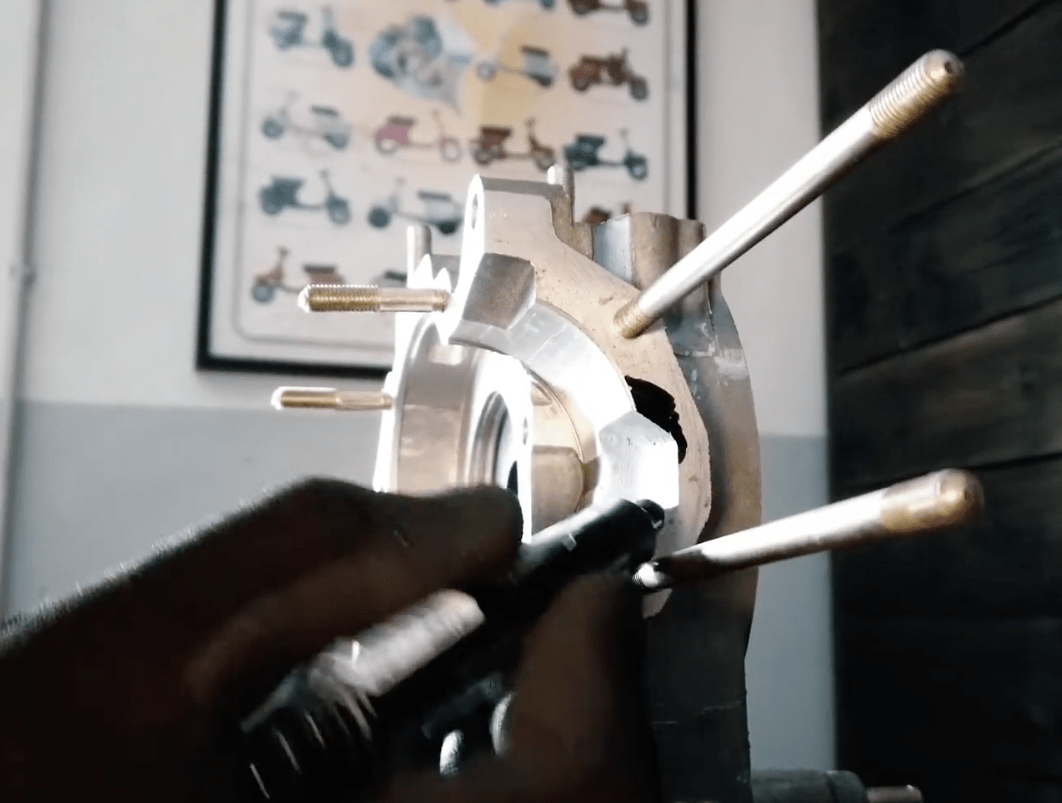
The contour in the motor housing is then adapted with a milling cutter. It is not necessary to mill the channel exactly as deep as in the original motor housing.
The BGM 177 cylinder is designed from the basic construction in such a way that the piston offers a sufficient cross-section.
The generated surface of the adapted channel can be milled and rough. No further polishing is necessary. As long as there are no rough corners and edges, a slightly roughened surface is perfect.
After the channels have been milled and the housing cleaned again, assembly continues ...

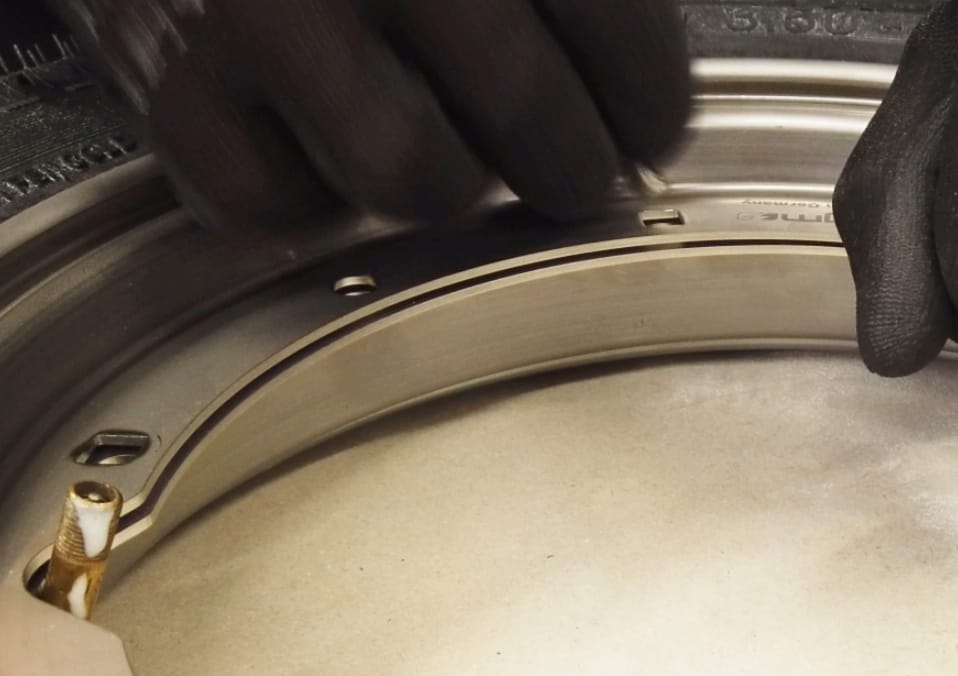
Using our example bgm Classic tires we show the correct assembly of the tire (split rim).
The inner tube is subject to flexing when the tire rolls and therefore it makes sense to cause friction inside talc to reduce.
The white powder reduces the friction between the tube and the tire and thus the wear and tear of the tube.
A small amount of talc is distributed inside the tire and the tube is filled with air just enough so that it does not expand and is also dusted with a little talc.
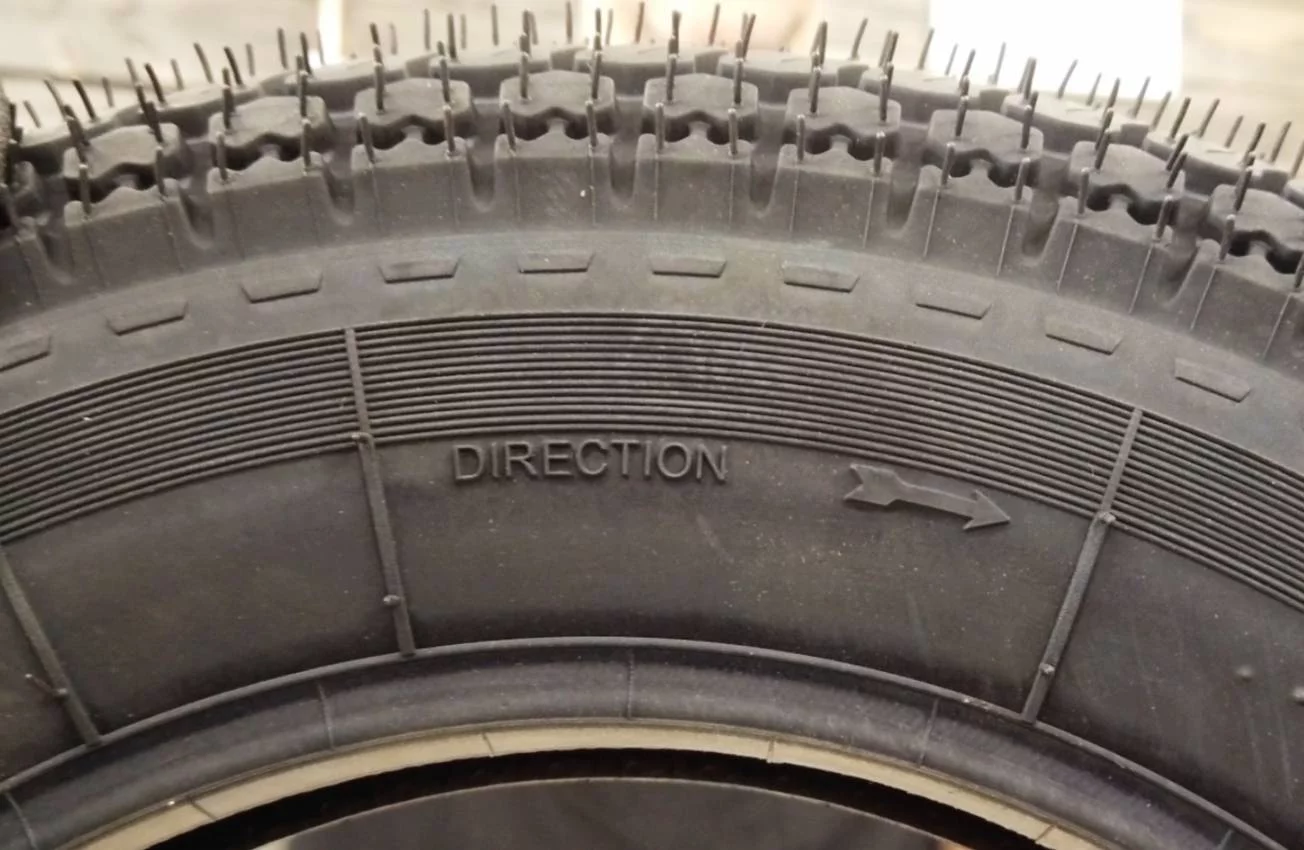
Before installing the tube, please first check whether the tire has a direction of rotation specified by the manufacturer.
This notice is with ours bgm Classic tires in the form of an arrow on a tire flank and indicates the direction of rotation of the tire when driving.
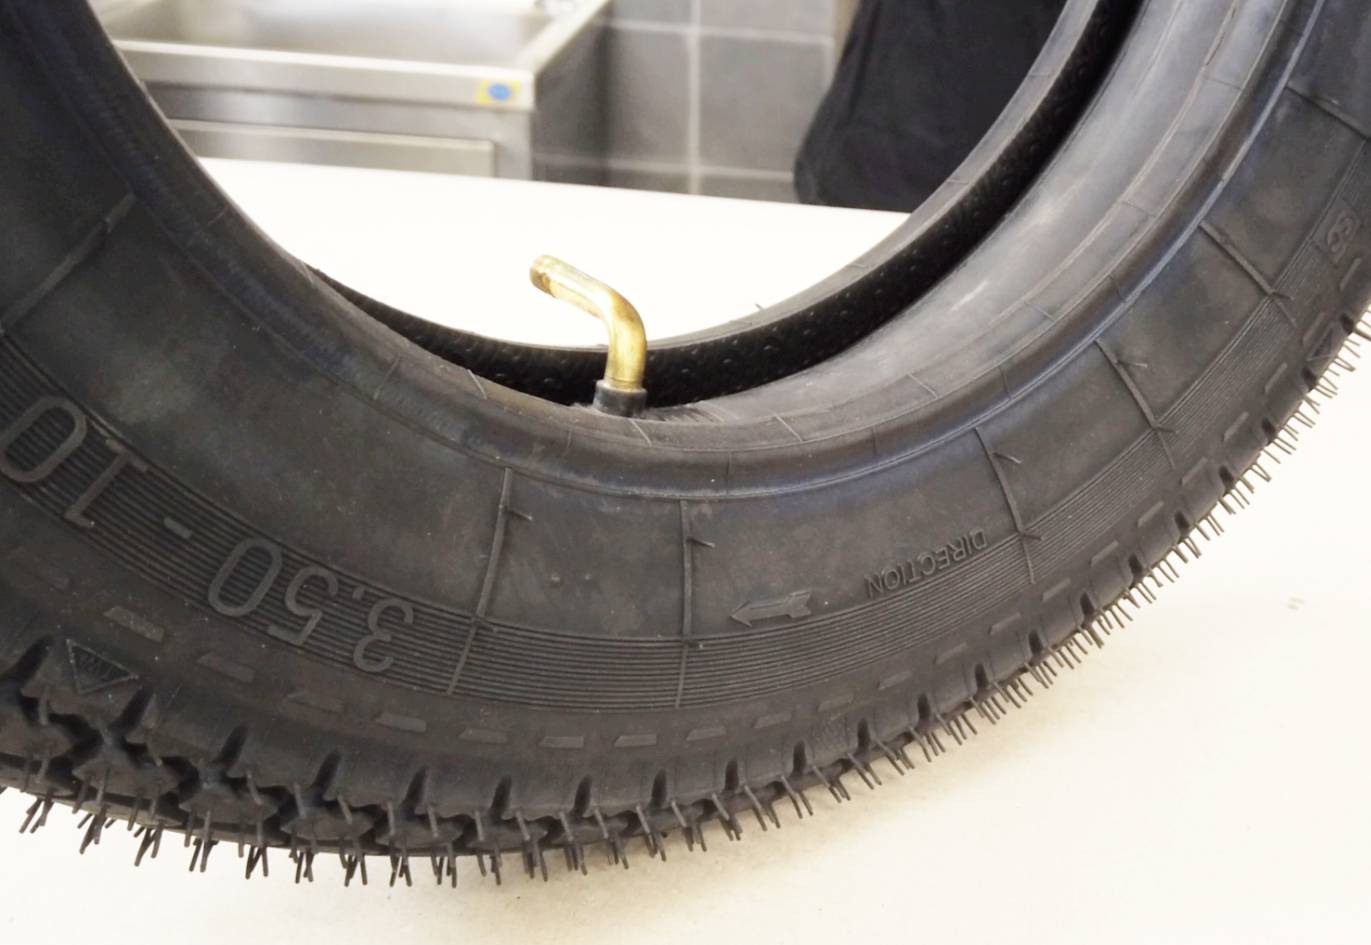
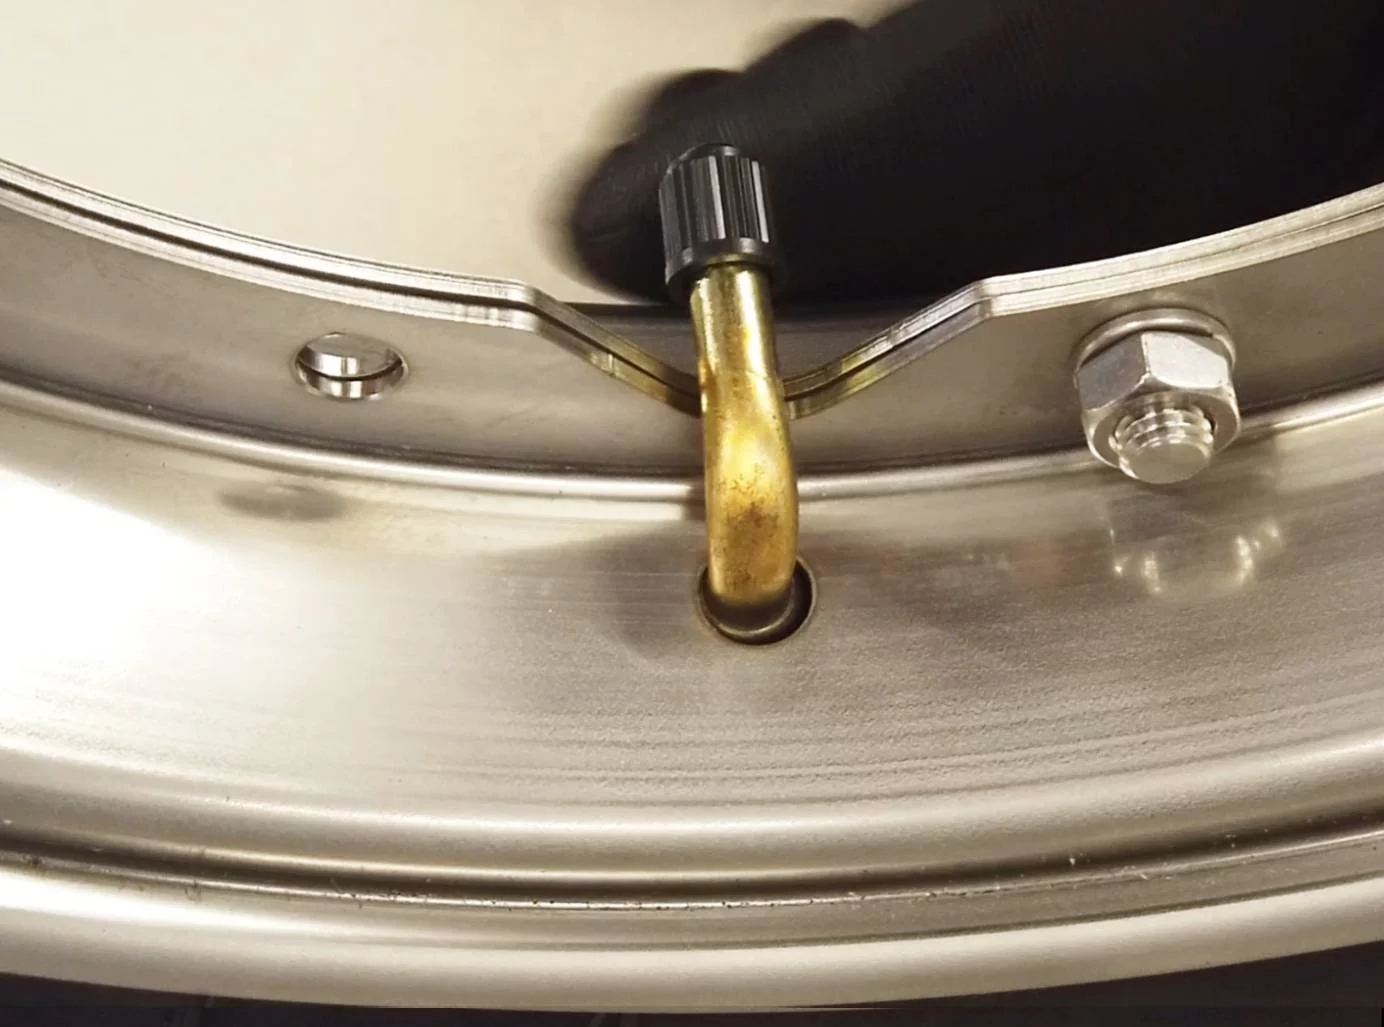
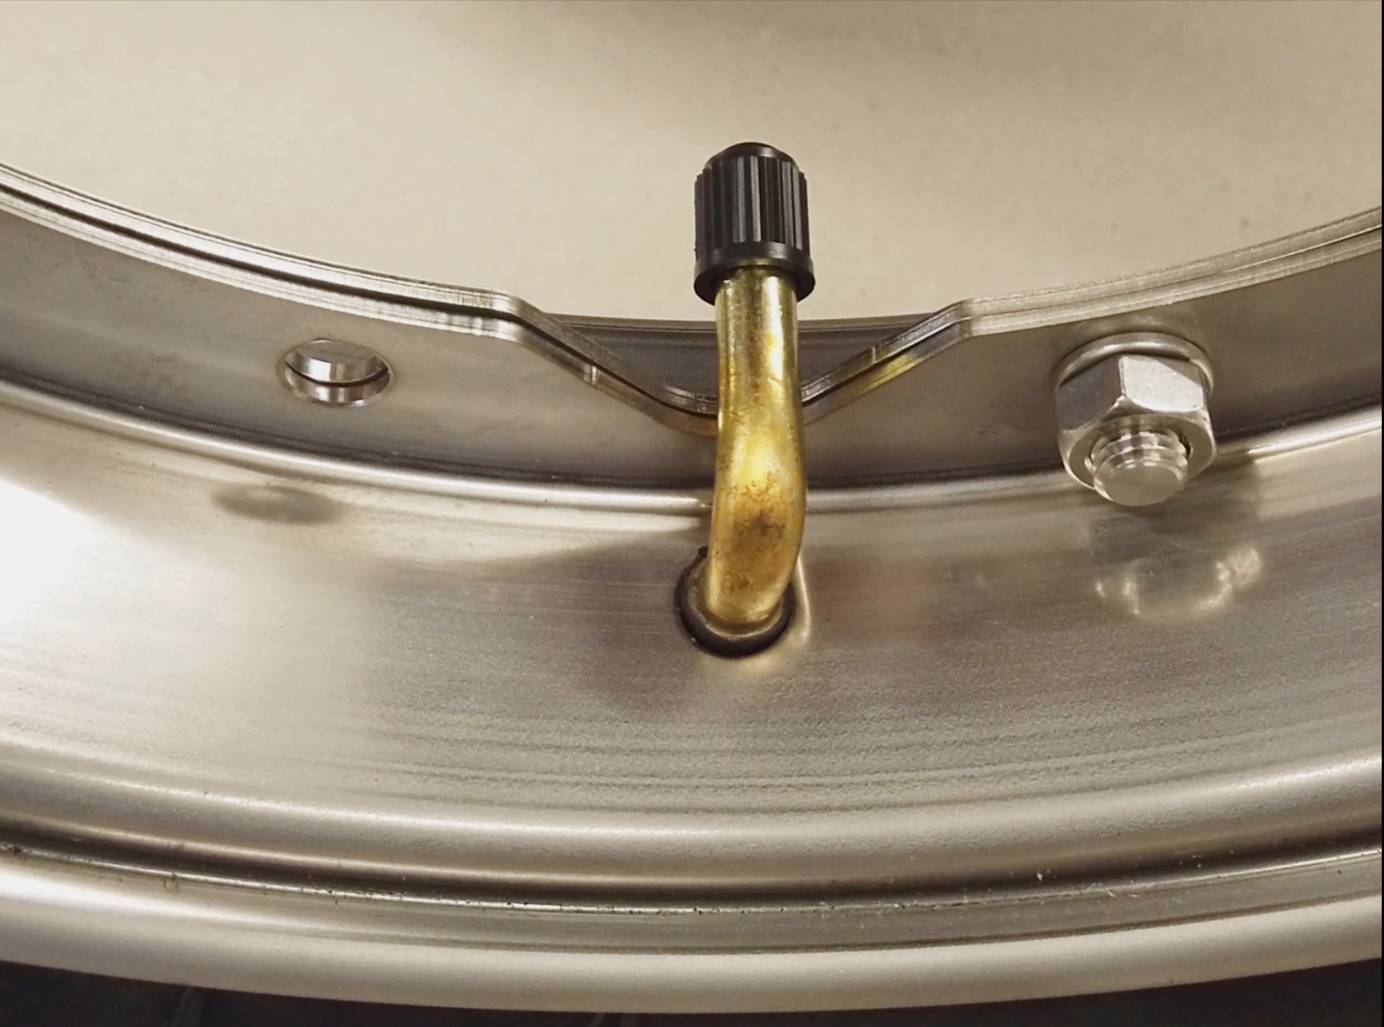
The tube is then inserted to match the direction of rotation of the tire, so that the valve, typical for Vespa, points to the left-hand side in the direction of travel.
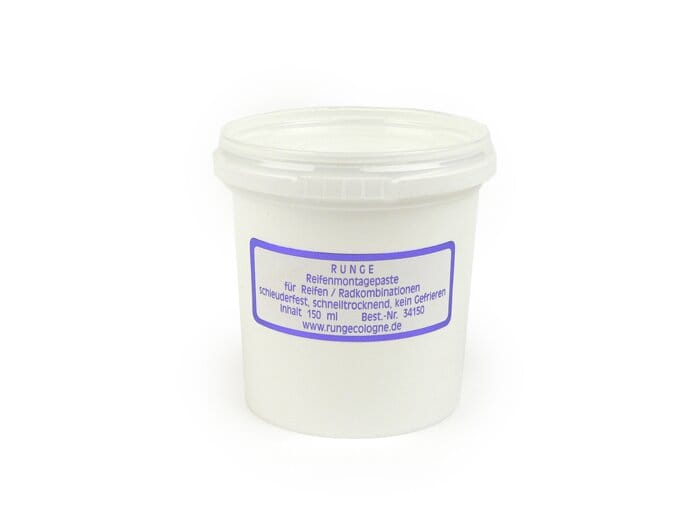
To mount the tire on the rim, the so-called Montagepaste a real help. This means that the tire can be pushed very far onto the rim. This makes screwing the two-part rim much easier.
First, the valve is inserted through the wide half of the rim and then pushed into the tire.
The narrow rim half also has an opening through which the valve is accessible. When inserting it into the tire, make sure that the clearance for the valve is congruent with that in the wide half of the rim.
Our bgm Stainless steel rims have replaceable bolts. During assembly, it is important to ensure that the head of the screw is inserted into the square to prevent rotation.
The five nuts of the rim halves will be crosswise with 16 - 18Nm attached. When attaching, make sure that the hose is not trapped between the rim halves.
Then the Inflate tires to 2 bar and check that the tire and valve are correctly seated in the rim.
Ready
Music: Rene Winkler from SC / NXT Level Amount: First one dub 4
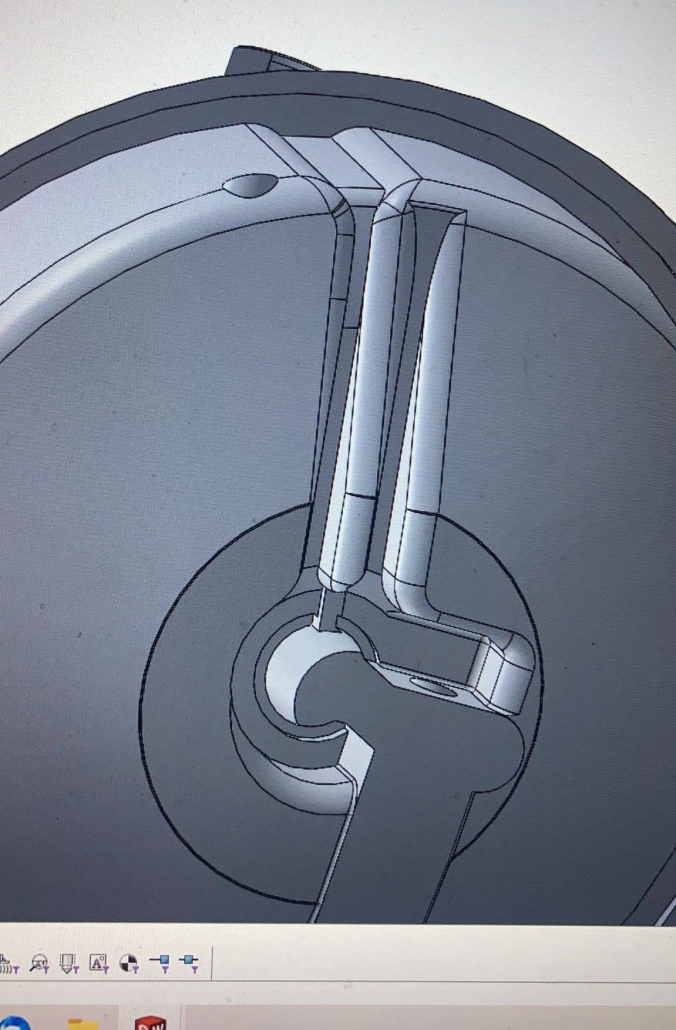
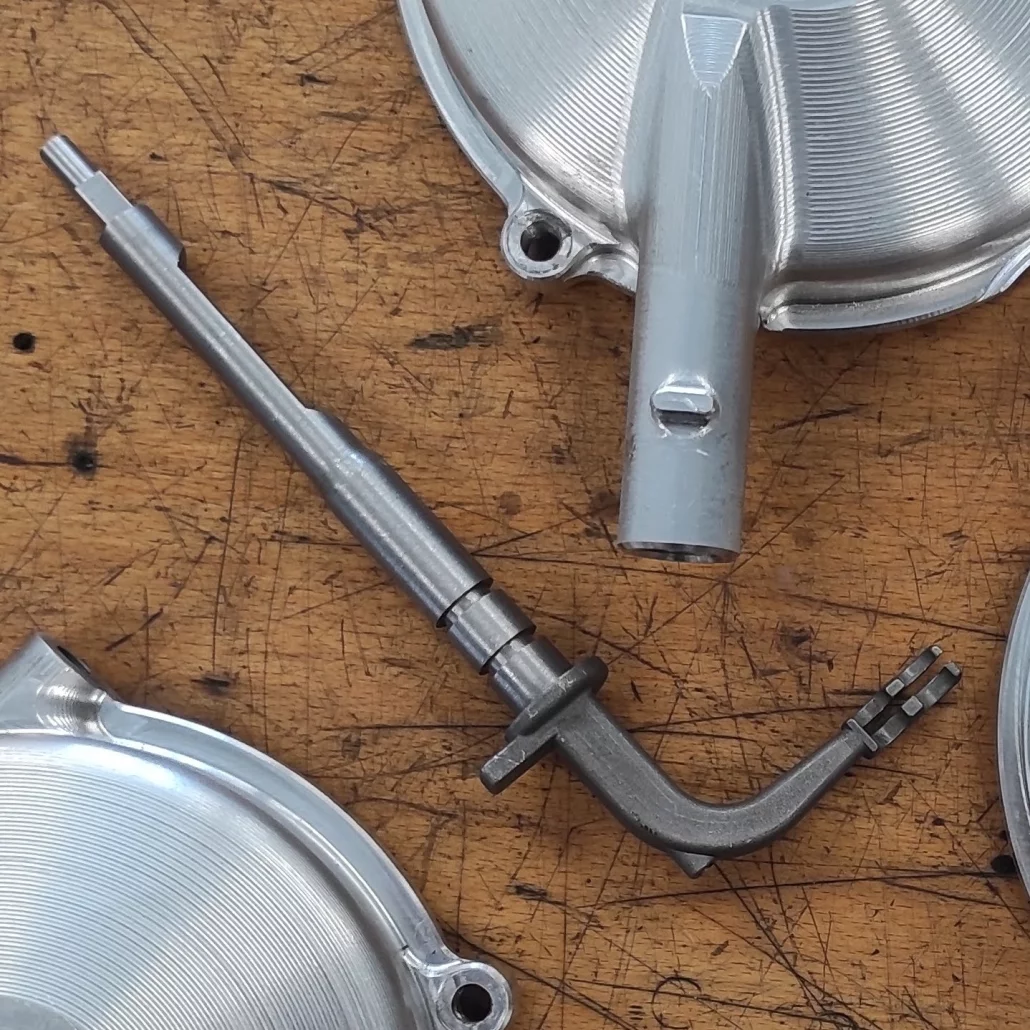
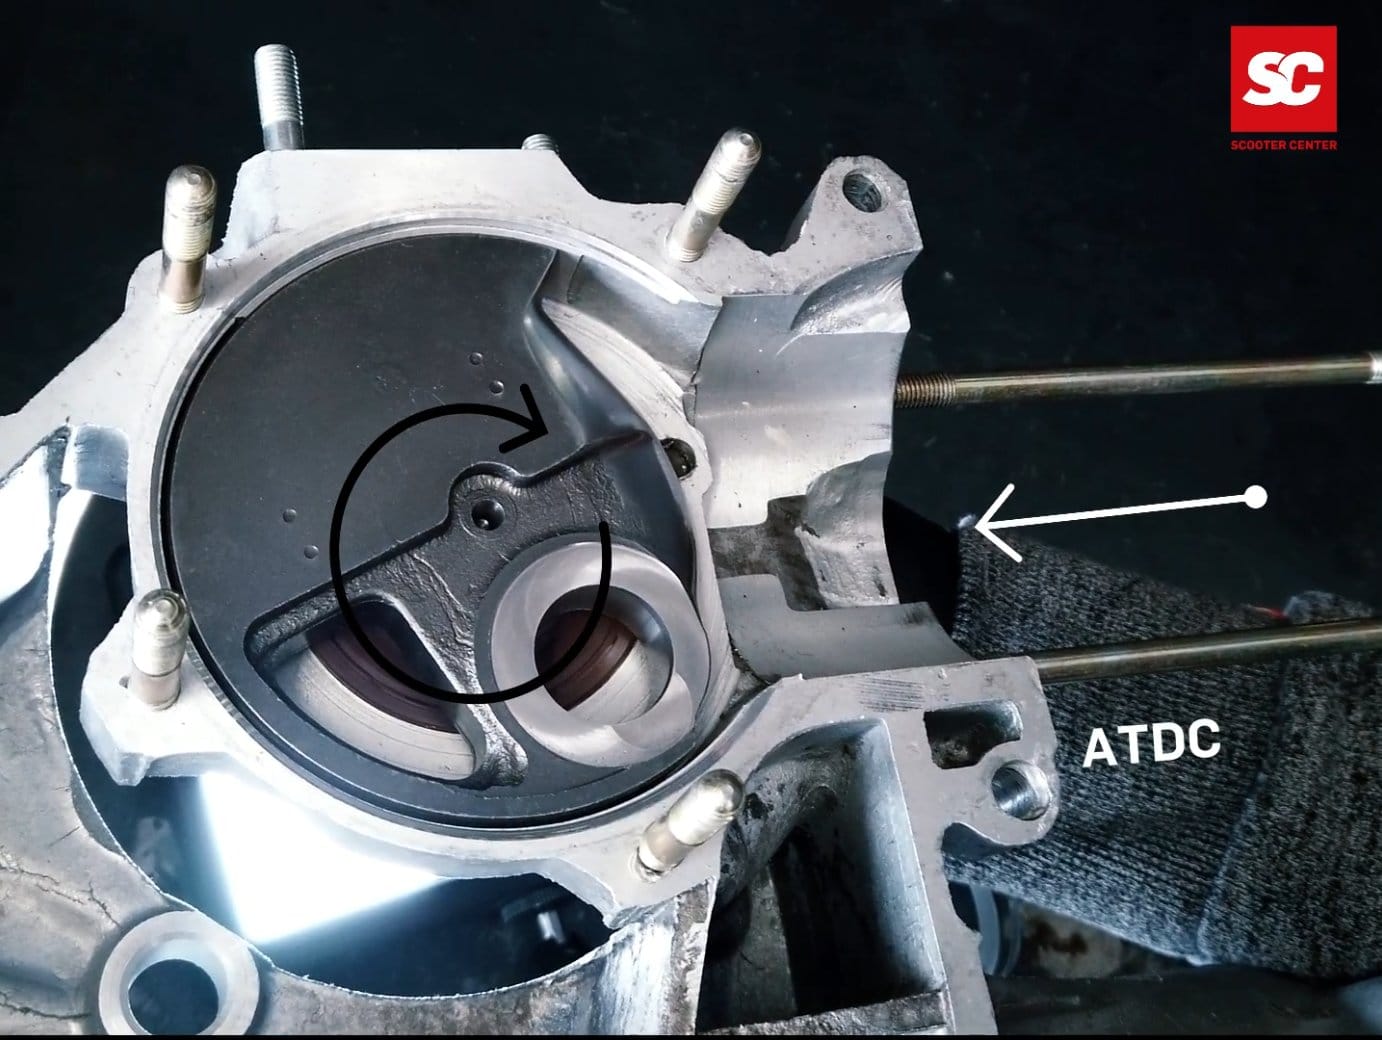
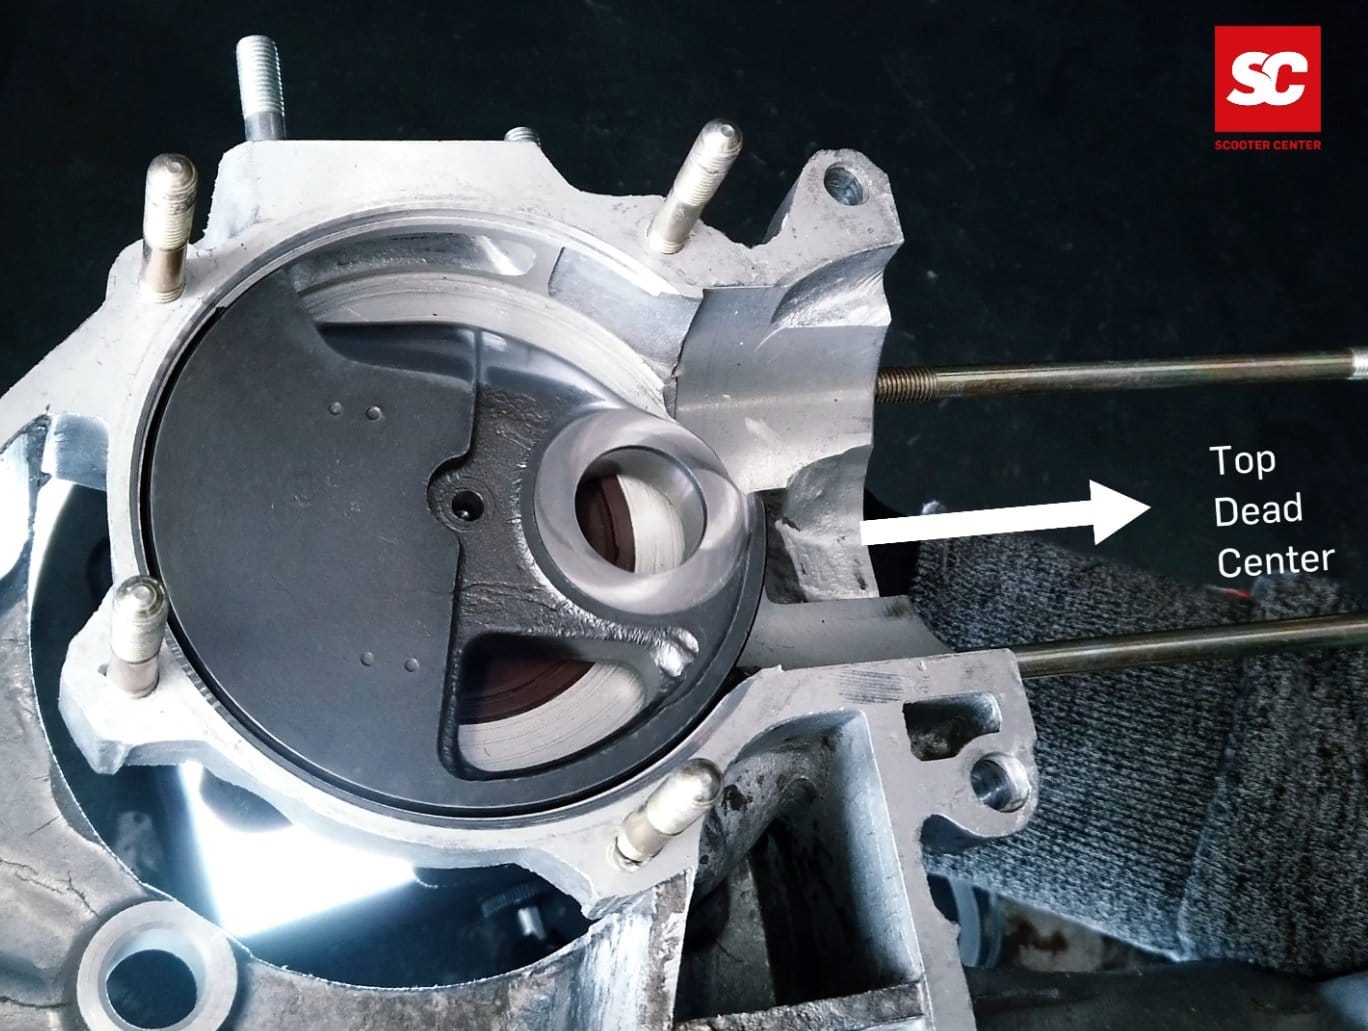
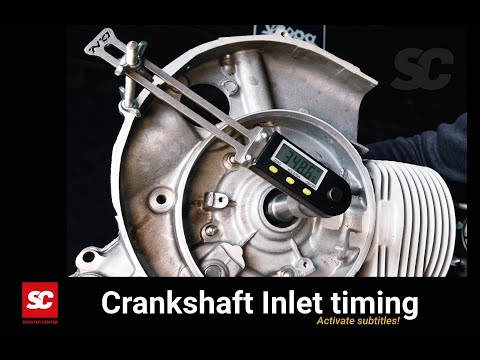
Our video and blog today is about measuring the inlet angle, also known as the inlet timing.
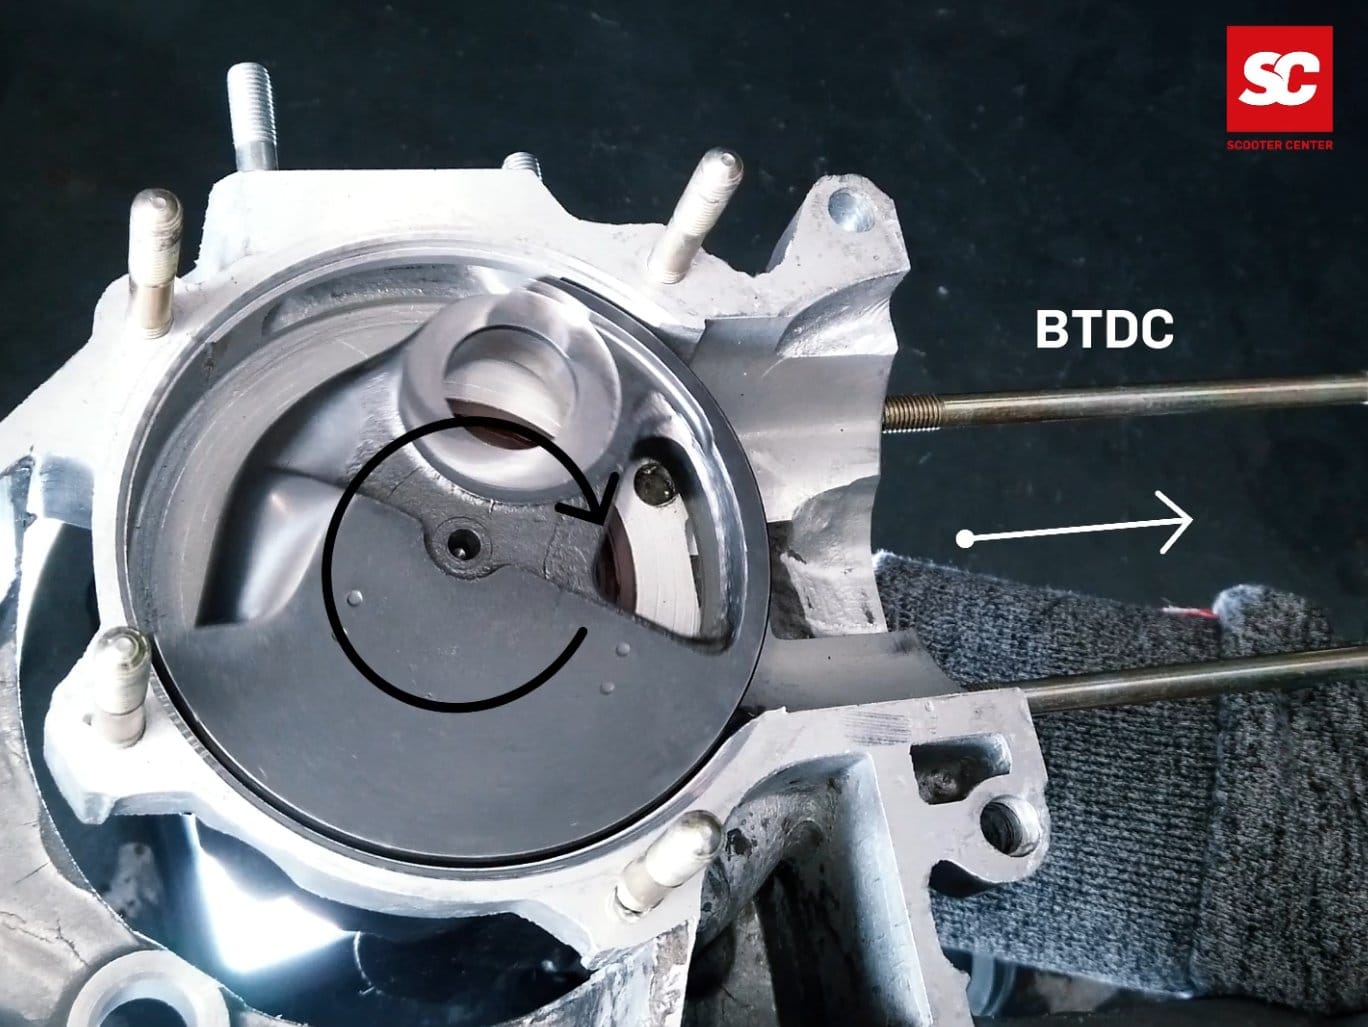
The inlet angle should move in a certain range which is given in degrees crankshaft. As a fixed point, the measurements always start from the top dead center, or TDC for short.
The inlet area is therefore divided into the values “before TDC” and “after TDC”, since the inlet is opened before top dead center and closed after passing through top dead center.
For a Vespa engine with rotary valve control, the values of approx. 100 ° before OT and 65 ° after OT have resulted for a good touring concept.
For very performance-oriented concepts that sometimes have to operate at a higher speed, the values can also be significantly higher. 120 ° from OT and up to 75 ° after OT can be found here. The inlet angles must always be selected to match the desired concept. Here the principle applies in favor of a simple tunability of the carburetor and a homogeneous power development to make the inlet area as large as necessary and as small as possible in order to achieve the desired values.
The two-stroke heart of Platonika should be a powerful aggregate and therefore the inlet should be in the range from 100 ° BCE to 65 ° BCE.
In order to determine the angle of incidence exactly, some tools and materials are required.
• Motor housing
• crankshaft
• cylinder and piston
• Bearing dummies
BGM PRO- 613912 (25x62x12mm) BGM PRO-NBI 253815 (25x38x15mm)
• Degree disc or similar measuring device
Since it is very likely that the inlet area in the motor housing will have to be machined in order to achieve the desired angle, the use of so-called bearing dummies is advisable.
With these dummies, the crankshaft can be removed from the engine housing for machining any number of times without the bearing seats of the crankshaft or engine housing being stressed each time and already experiencing wear before commissioning.
The bearing dummies are available for every size of the bearings commonly used in the Vespa and Lambretta range.
The first step is to insert the bearing dummies into the motor housing. Then the crankshaft is simply inserted into the bearing dummies and the motor housing is screwed into the stator housing using the stud bolts.
In order to determine the TDC, the cylinder and the piston are required. The piston is pushed into the cylinder without rings so that the work goes smoothly. The dial gauge is screwed onto the cylinder with the holder and the TDC of the crankshaft can be determined.
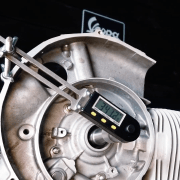
The alternator side of the crankshaft is provided with a degree disk or a digital protractor. A wide variety of options are available here. The easiest to use are digital measuring tools such as the Buzz Wangle Indicator that does not require a reference point to the motor housing.
If the crankshaft is in TDC, the degree disc, whether digital or analog, is set to "0" and then the crankshaft is rotated to start and close the inlet. The value read on the gauge then shows when the inlet is open or closed.
In order to bring the inlet to the desired level, the crankshaft is moved to the desired value and the position of the crank web is marked on the engine housing.
If this has happened for the value before and after TDC, the engine housing can be opened again and, thanks to the position dummies, the crankshaft can easily be removed again.
Care should be taken when working in the inlet area. The surfaces that seal the rotary valve must not be less than approx. 1mm overlap with the crankshaft on the sides.
Once the inlet has been machined to match the markings set and the crankcase has been cleaned of machining residues, the crankshaft is reinserted for inspection.
The measuring device is then used to check once again whether the desired control angle has been achieved or whether reworking is necessary.