

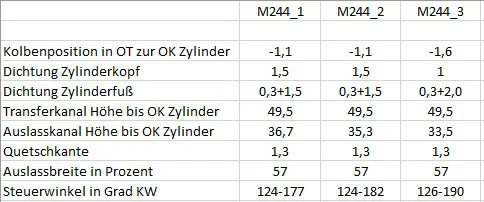
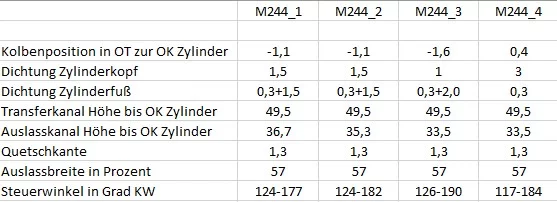
In the fourth part of our little blog series we make the following changes to our test engine:
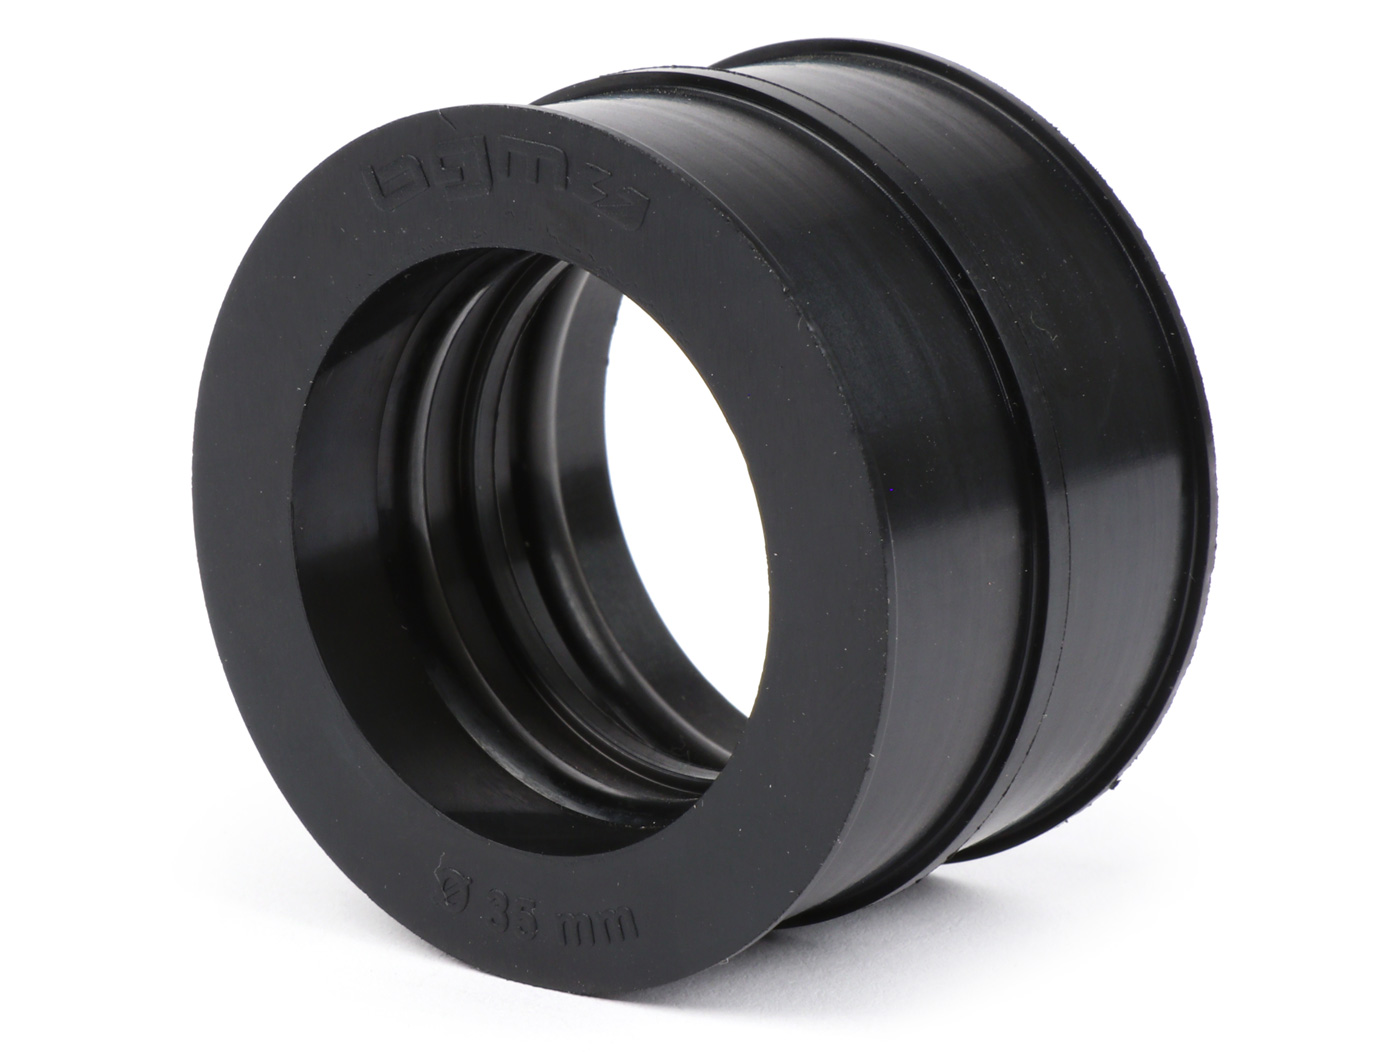
The cylinder is attached at the foot with two 1mm Spacers increased by a further 2mm compared to level 0.5. This changes the steering angle of the transfer channels from 124° to 126°. The outlet is adjusted to a control angle of 190° by milling. To do this, the outlet in the cylinder was raised by 1.8mm. The outlet width remains unchanged at 57%.
![]()
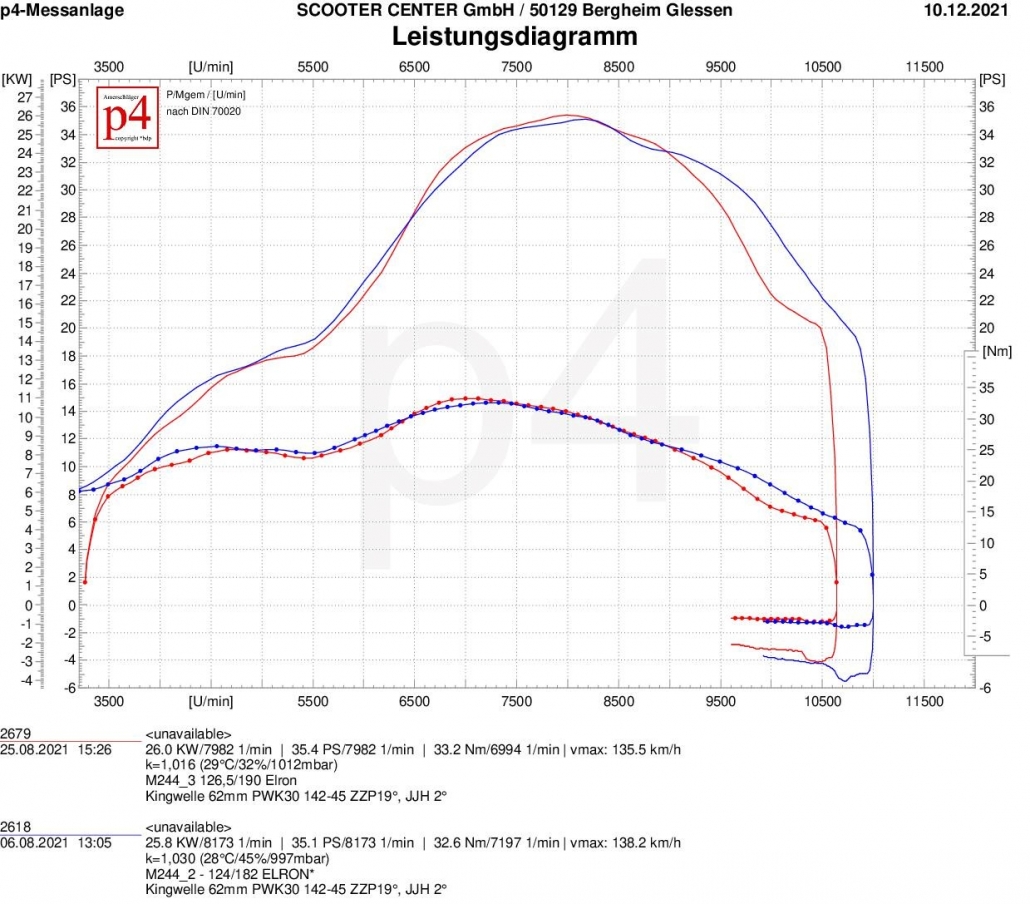
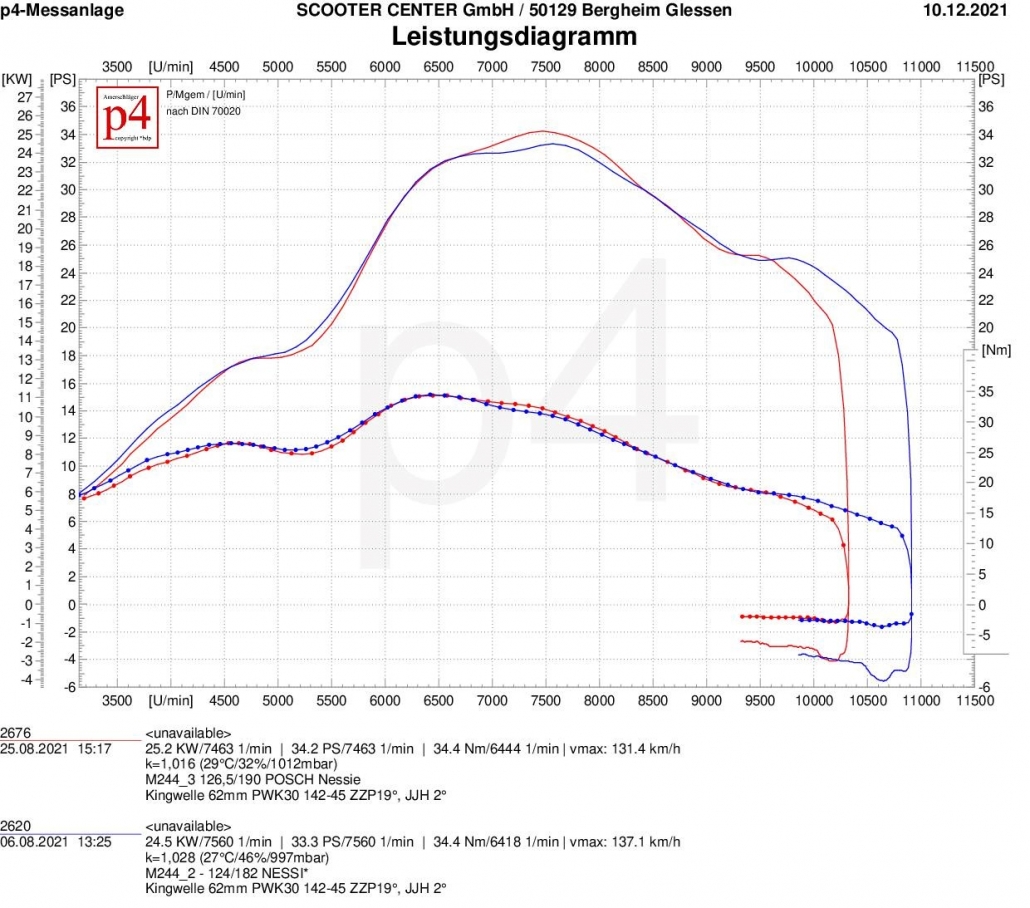
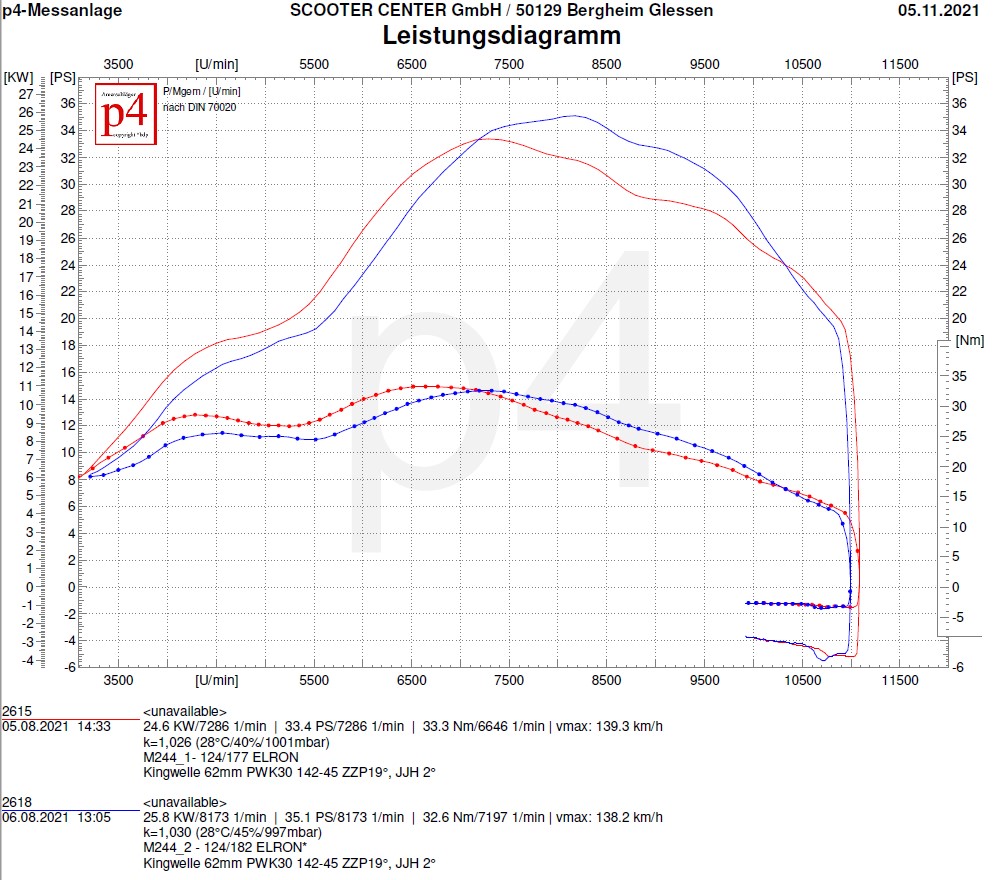
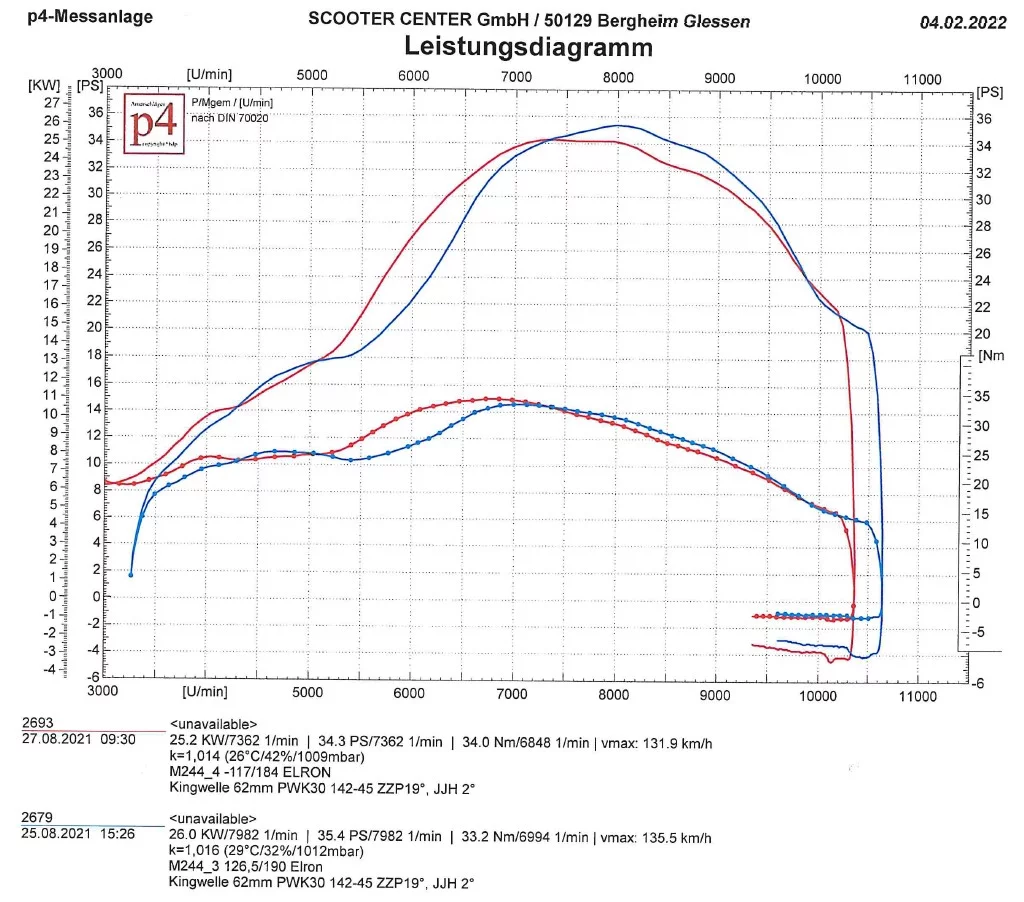
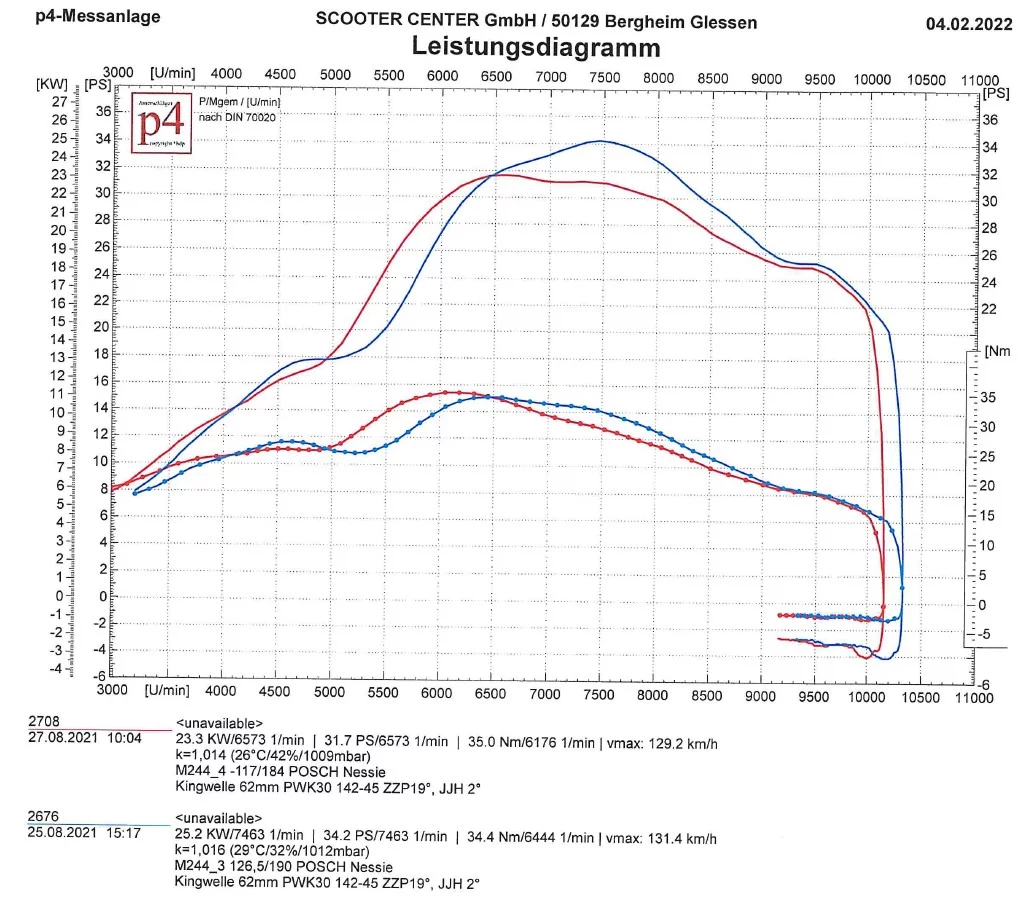
A little more nervous exhaust systems would show a clear shift in the direction of performance with the changes made, but the Elron is almost unimpressed by the specifications of the cylinder and retains control over the characteristics of the engine. A slight increase in the maximum values after the decimal point only indicates that the Elron has noticed that the cylinder is sending a clearer signal through the exhaust. However, the maximum torque remains at the same level as in the first construction stage.
The available speed range is reduced by 500 rpm to 3540 rpm.
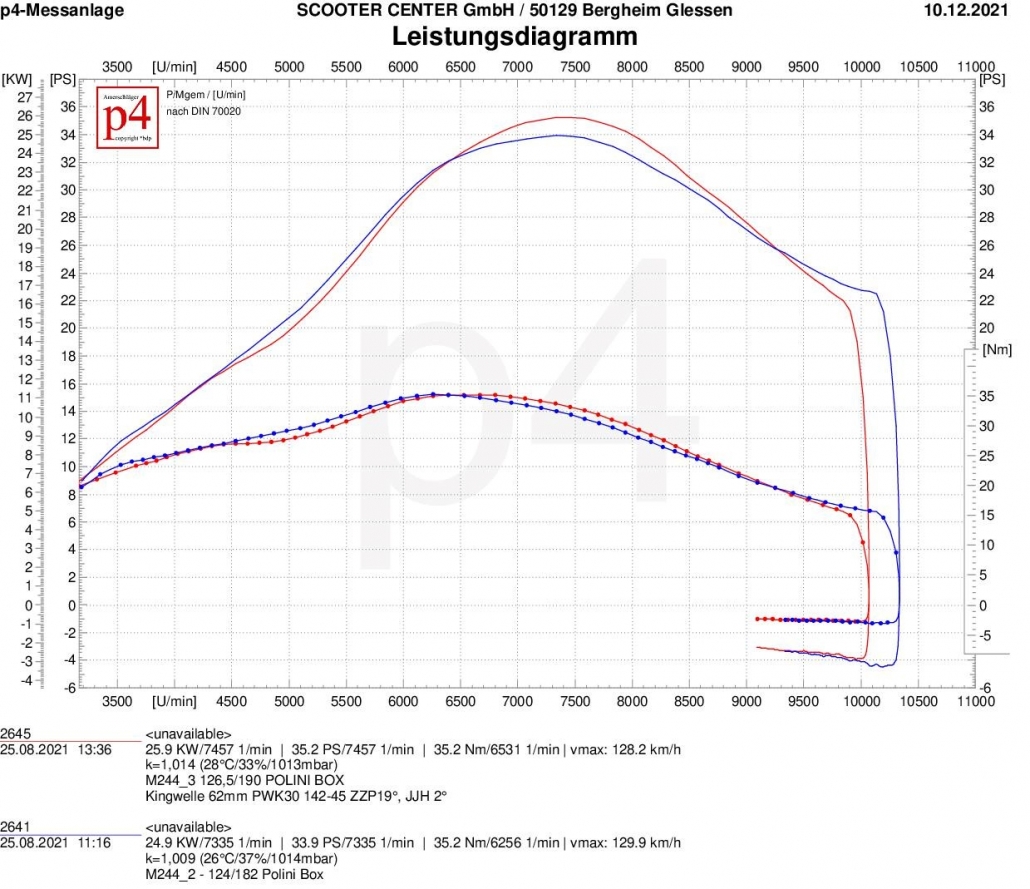
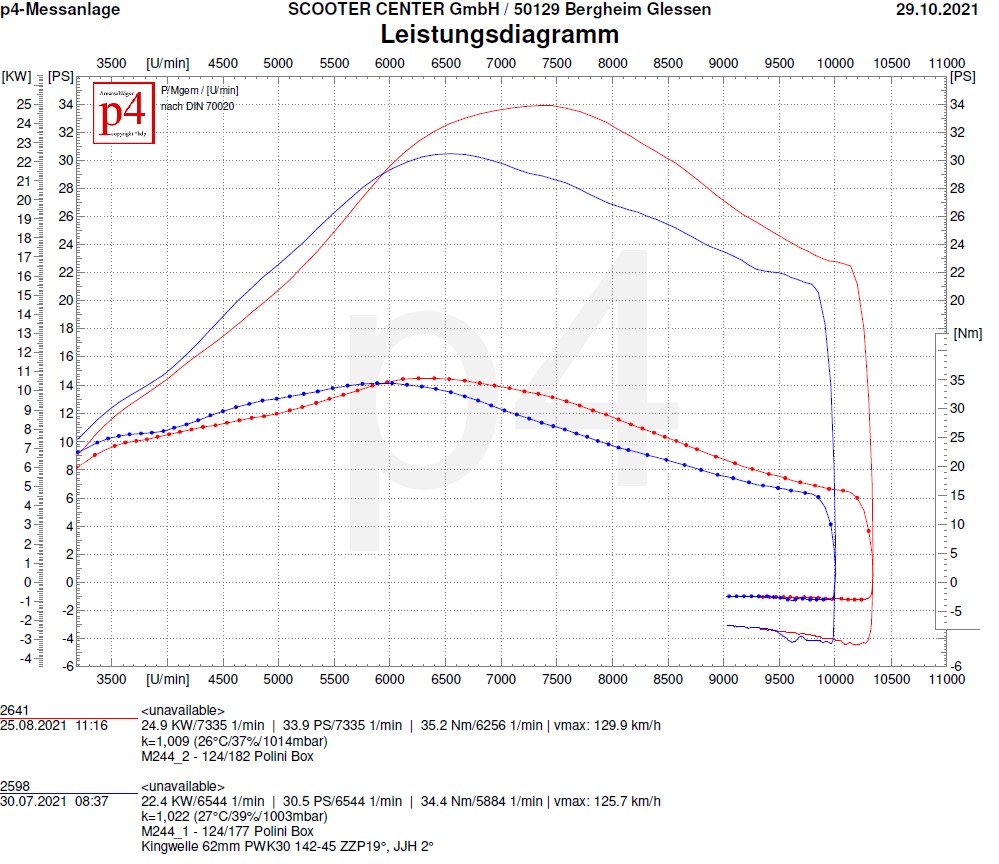
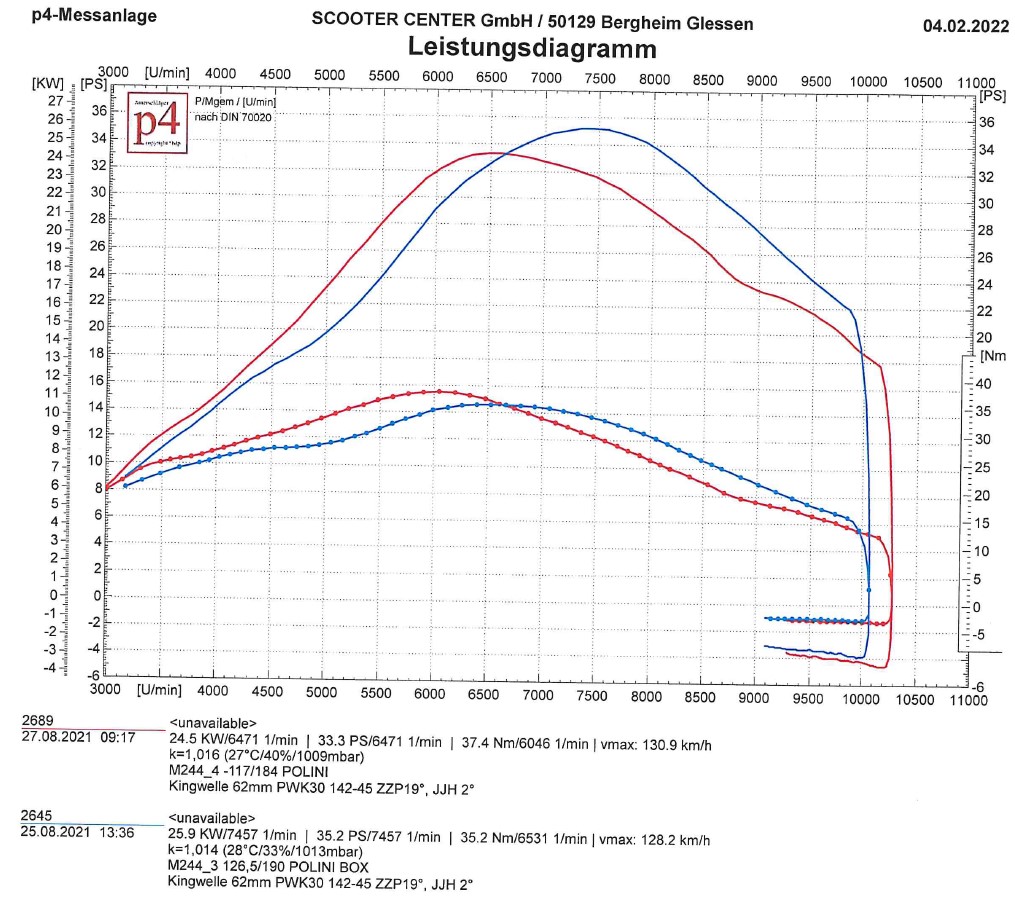
As a box exhaust, the Polini exhaust system reacts more as expected. Similar to the Elron, the can from Italy only shows small reactions. The lower effective compression makes the curve dip a bit in the rise between 4000 rpm and 6200 rpm. The system converts the slightly increased time cross-section at the outlet window with a gain of just over one horsepower at peak.
The maximum torque remains the same at 35.2Nm and is only shifted by a few hundred revolutions in the direction of higher speeds.
With a bandwidth of 3800 revolutions, the Polini system is slightly behind stage 2, but this test shows that the box does not necessarily prefer the very small steering angle. In a direct comparison to stage 1, the bandwidth and maximum values have increased significantly.
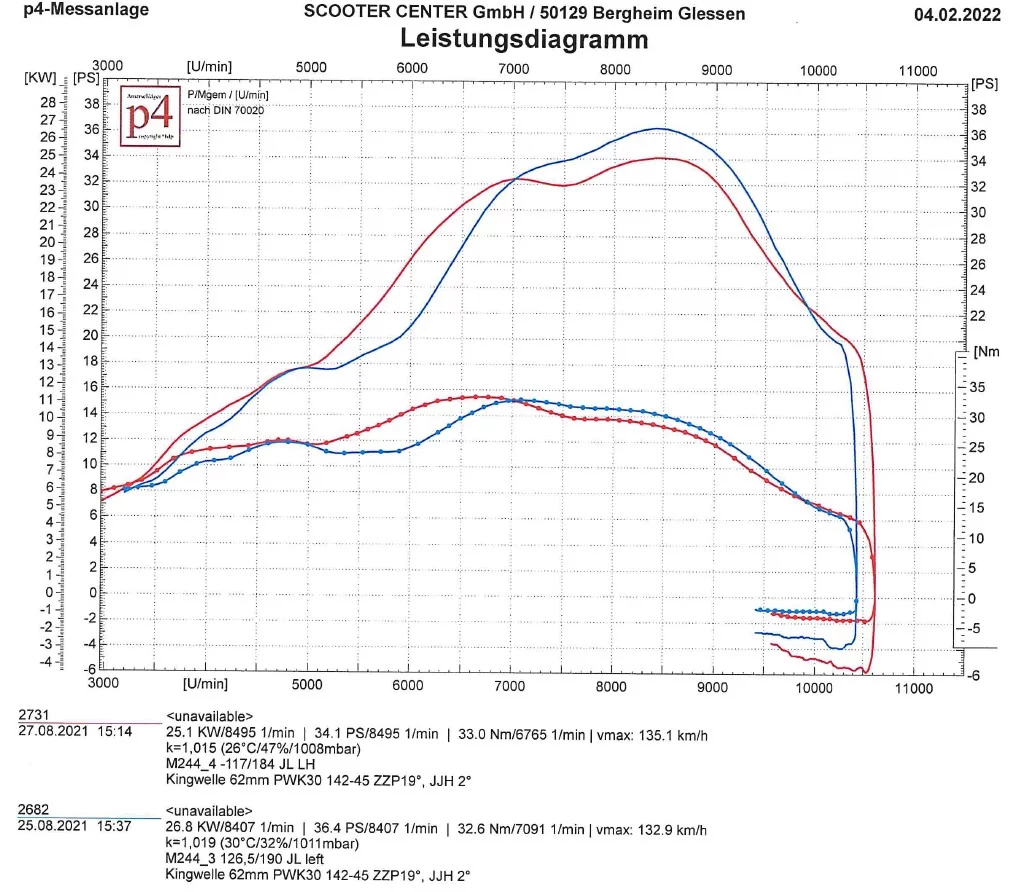
Our test subject had a short break in the previous construction stage due to appointments away from home; but now plays again in the third construction stage. So here is the comparison between levels 1 and 2.
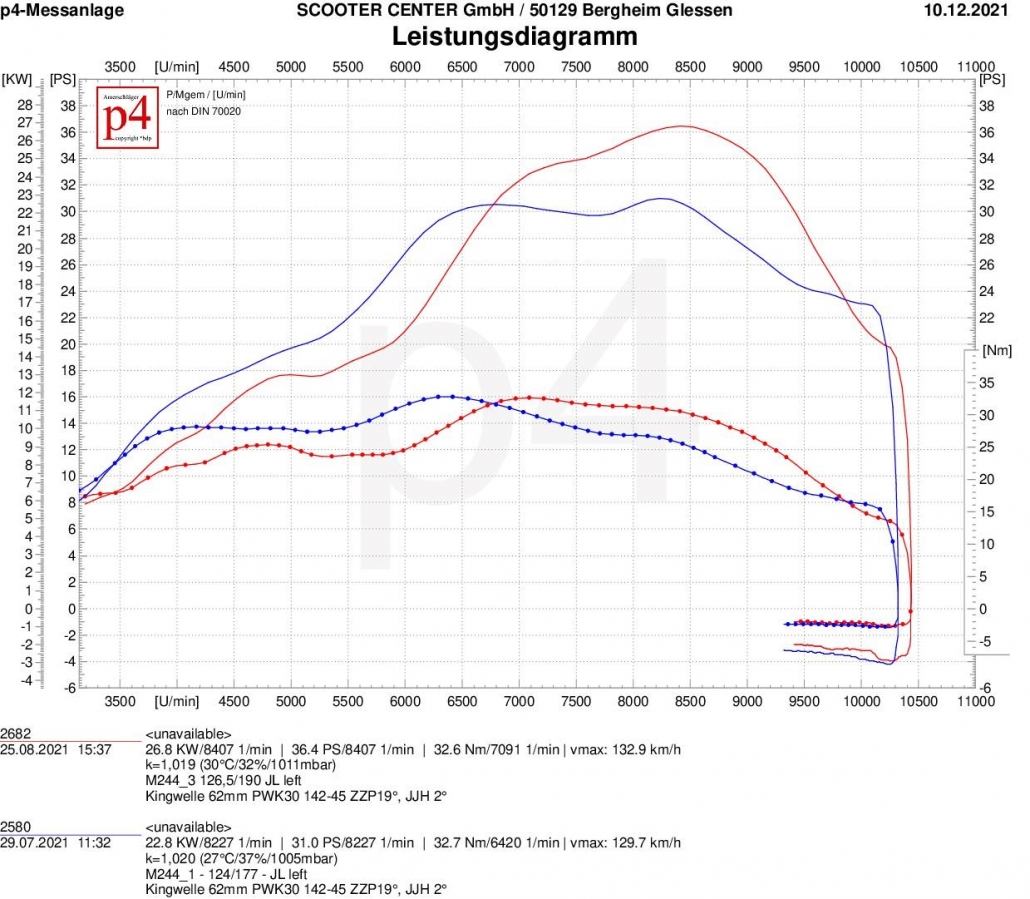
This also shows how clearly an exhaust can behave when it is operated from other steering angles. The JL, which is considered good-natured, turns out to be a very approachable partner in the search for performance.
At the top, the JL provides almost five and a half more horses and climbs over the 36PS line in the graph. The torque remains at 32.6Nm at the same level as in the first attempt. However, the torque extends over a much wider range - beyond 7000rpm. The performance peak is reached with 36.4PS at 8400rpm. The JL falls below the 25 HP line considered in the bandwidth only beyond 9600 rpm and can therefore not be described as a lazy speed. In general, the graph shifts significantly in the direction of higher speeds. With a bandwidth of only 3400 revolutions, the JL even lags behind the Elron and brings up the rear in terms of bandwidth in this construction stage.
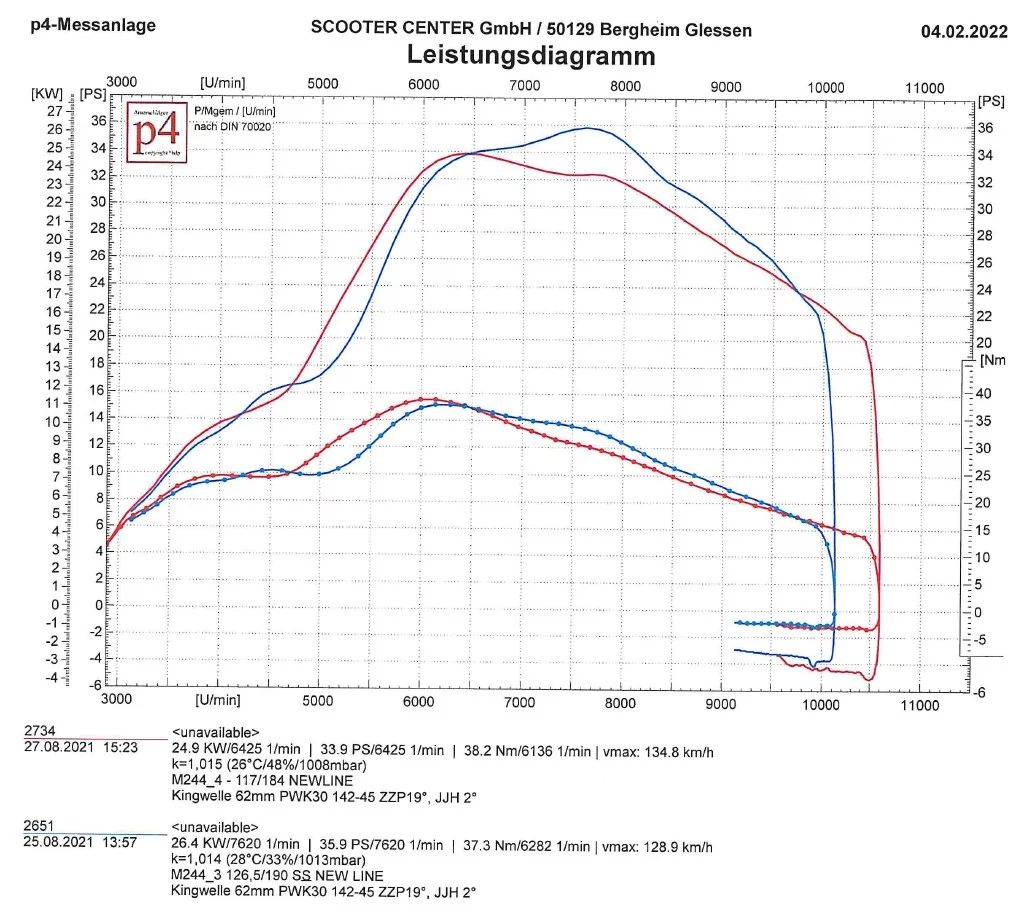
The edgy powerhouse from the north feels really comfortable in this expansion stage and takes two best values with it.
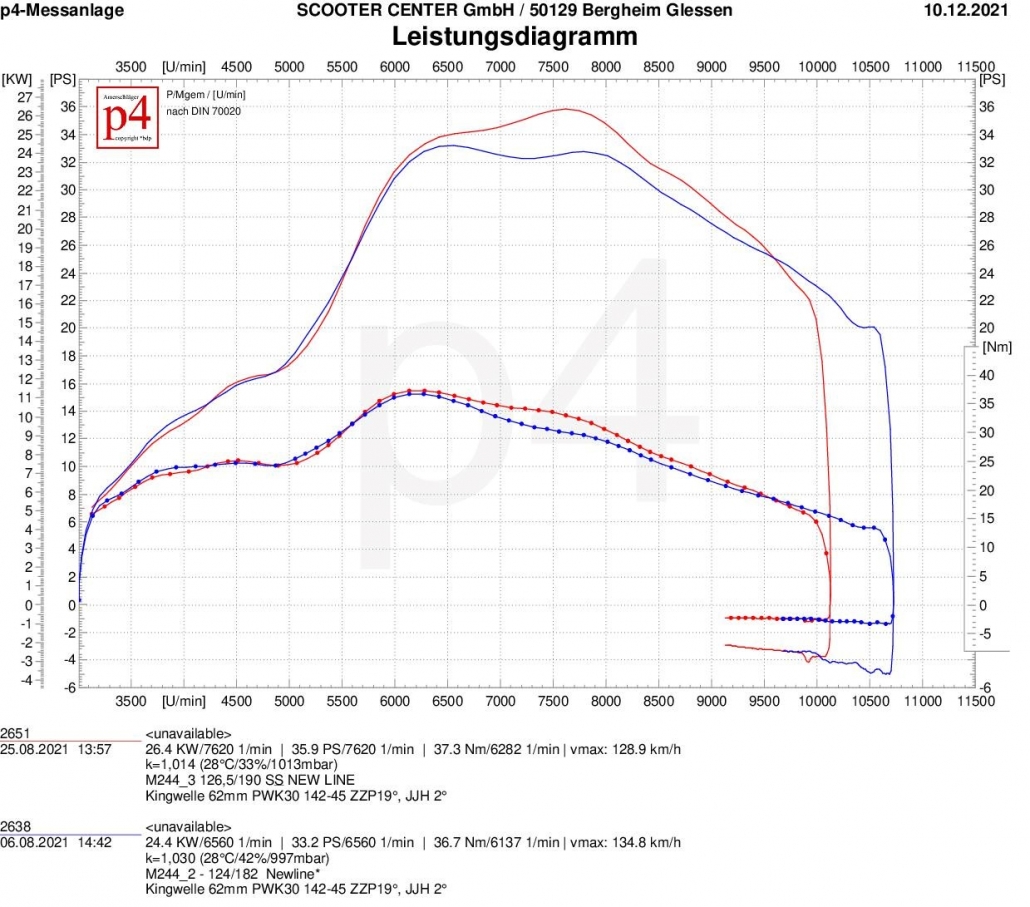
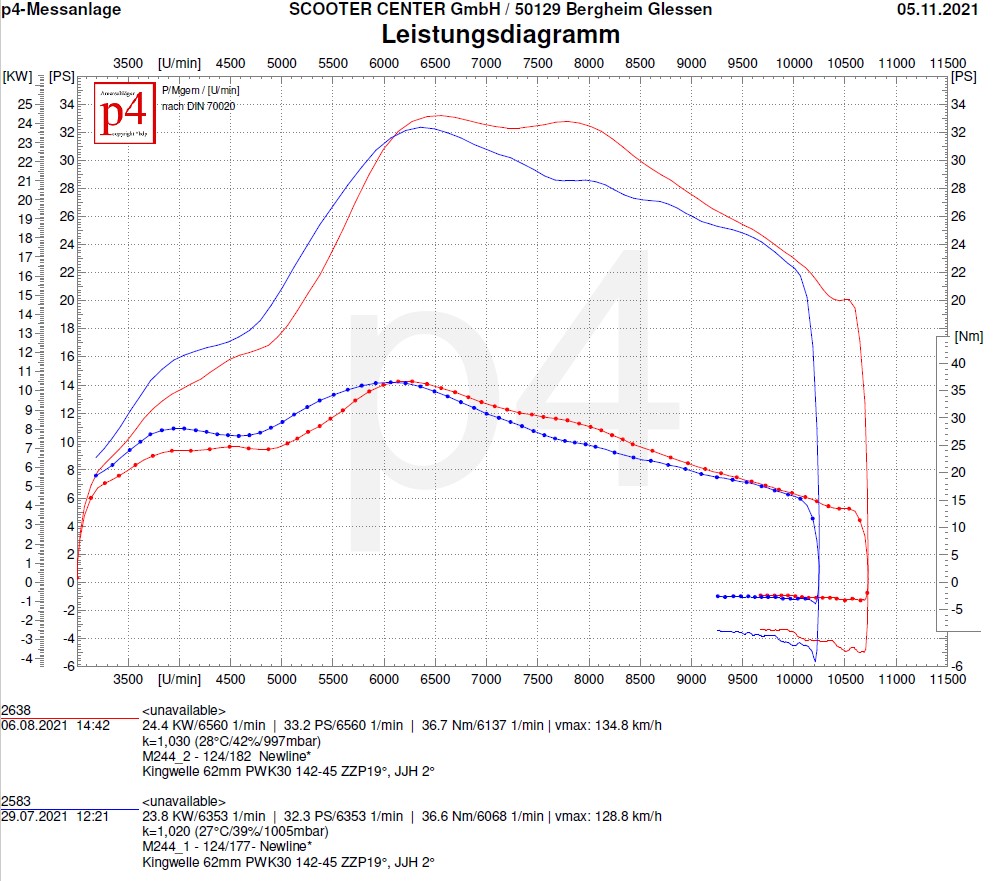
There are no notable changes in the rise in the newline, but it does quite a bit due to the larger advance angle in the engine speed range. With 37.3Nm, it takes the top position in terms of torque in the third construction stage. The available speed range is narrower compared to the previous tests, but here too the Newline achieves a range of 4000 revolutions. With these values, considerations germinate after a longer primary with 24-60 ...
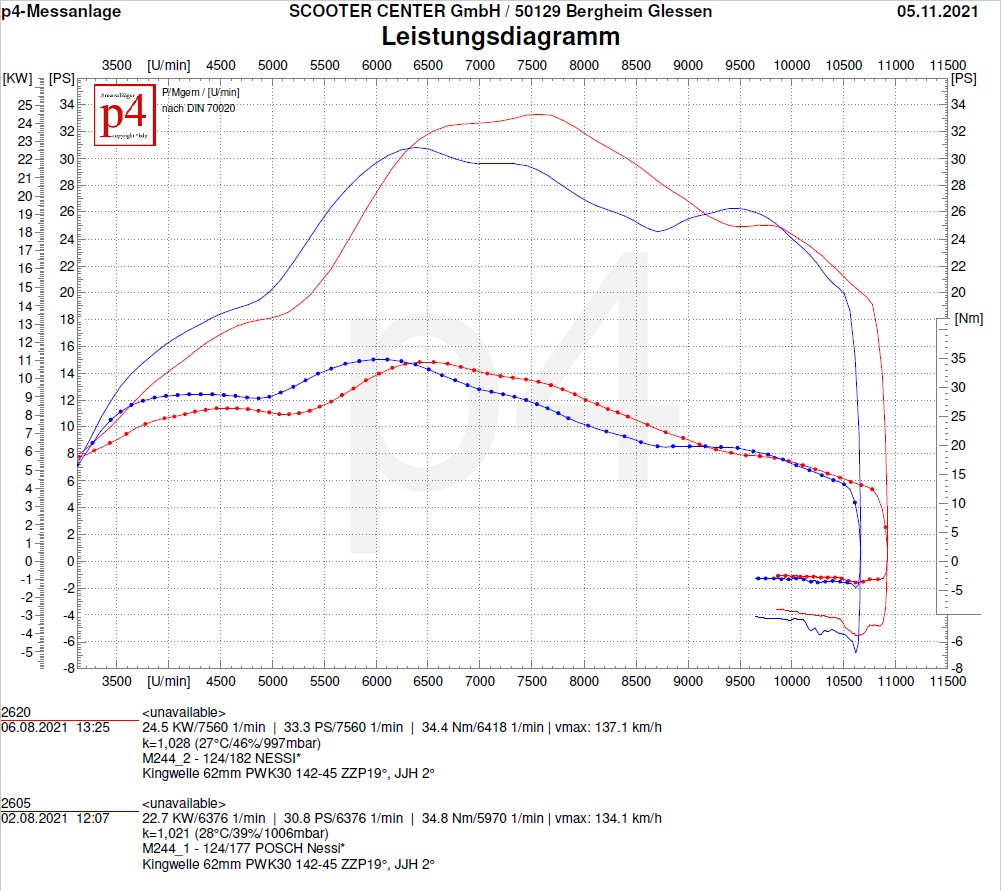
Like the Elron, the sea monster from Posch Performance is not quite sure what to do with the changed control angles. Maximum torque remains the same and peak power increases by one horsepower. While the Nessie was still way ahead in level 1 with 4300 rpm in terms of bandwidth, the available speed range in level three is a bit on the dip station and is in the upper midfield with 3700 rpm.
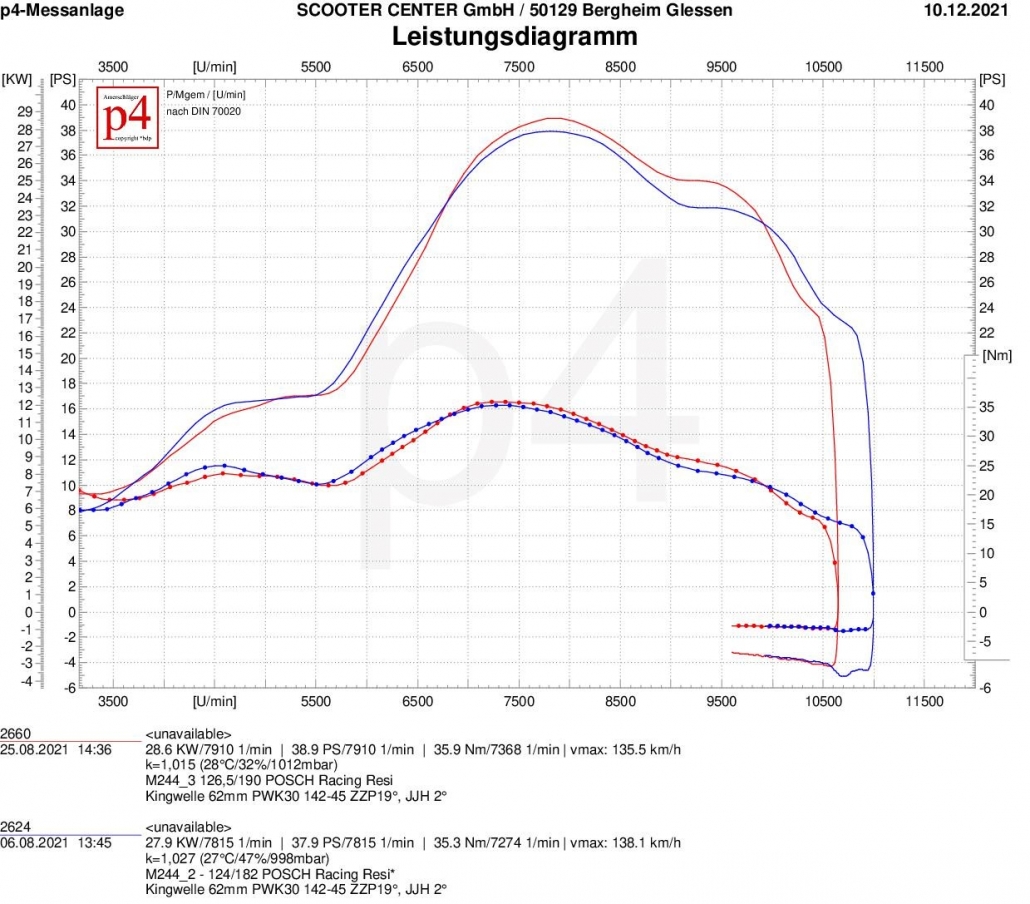
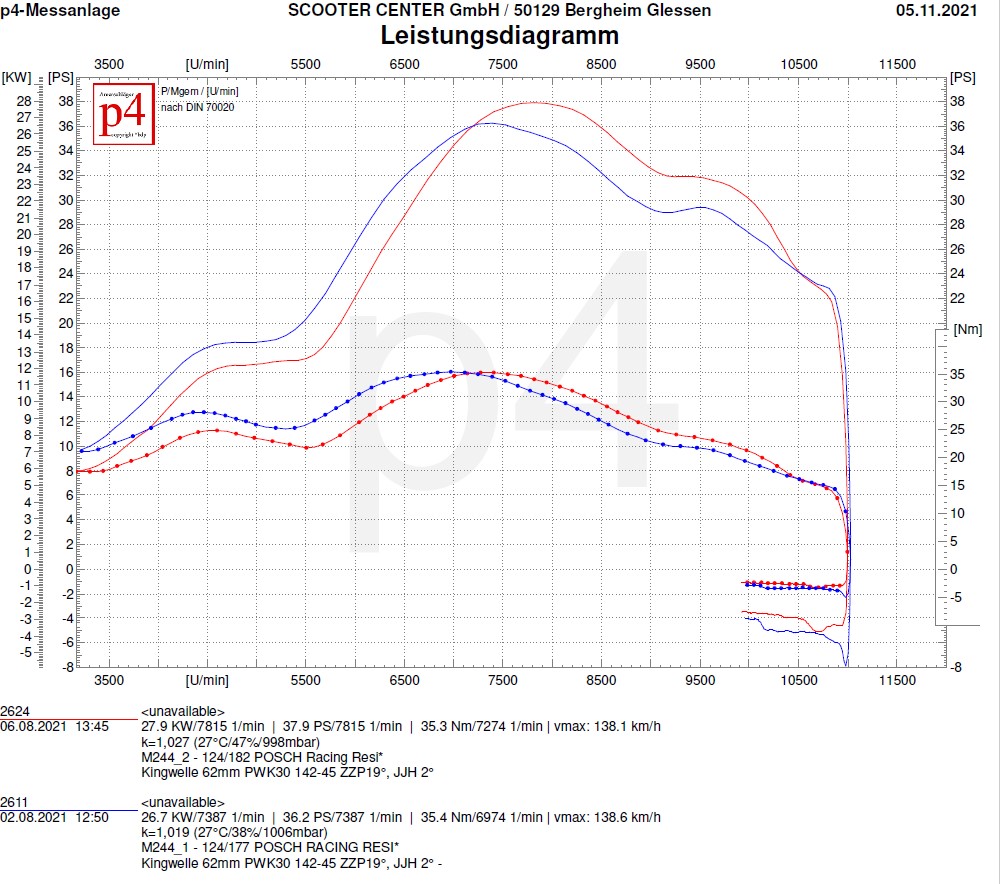
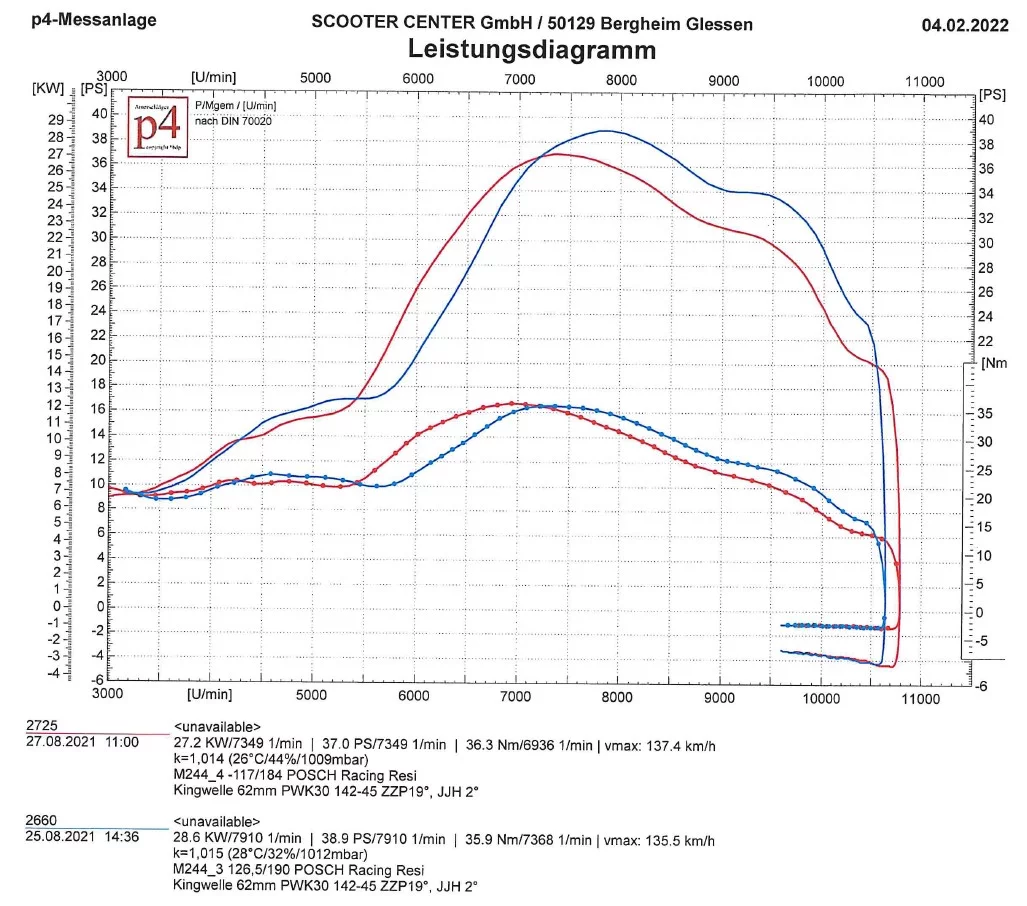
The Racing Resi taste the changes better. Rather devoted to the higher control angles, the Resi develops one more horsepower at the top and adds torque, which hardly affects the bandwidth on the 25hp line. In absolute terms, the Resi holds the position of the highest peak power with 38.9 hp in this level. We are slowly approaching the 40hp mark with the expansion stages.
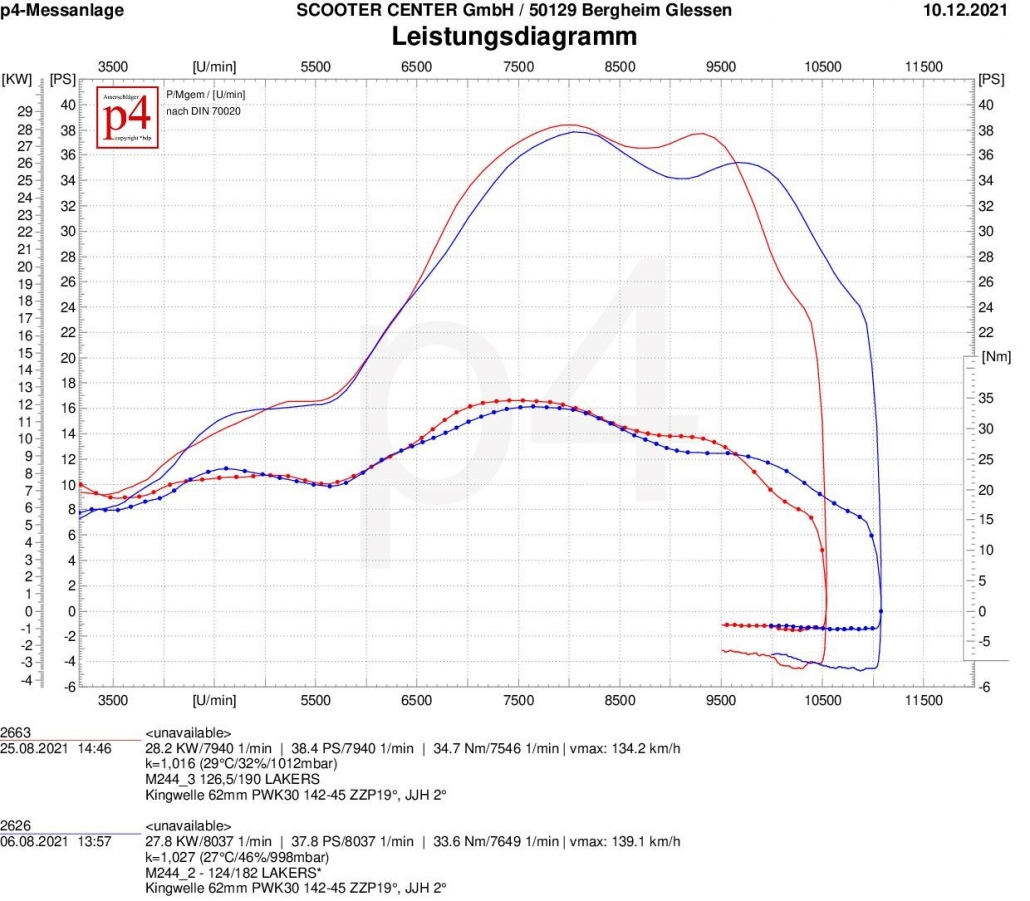
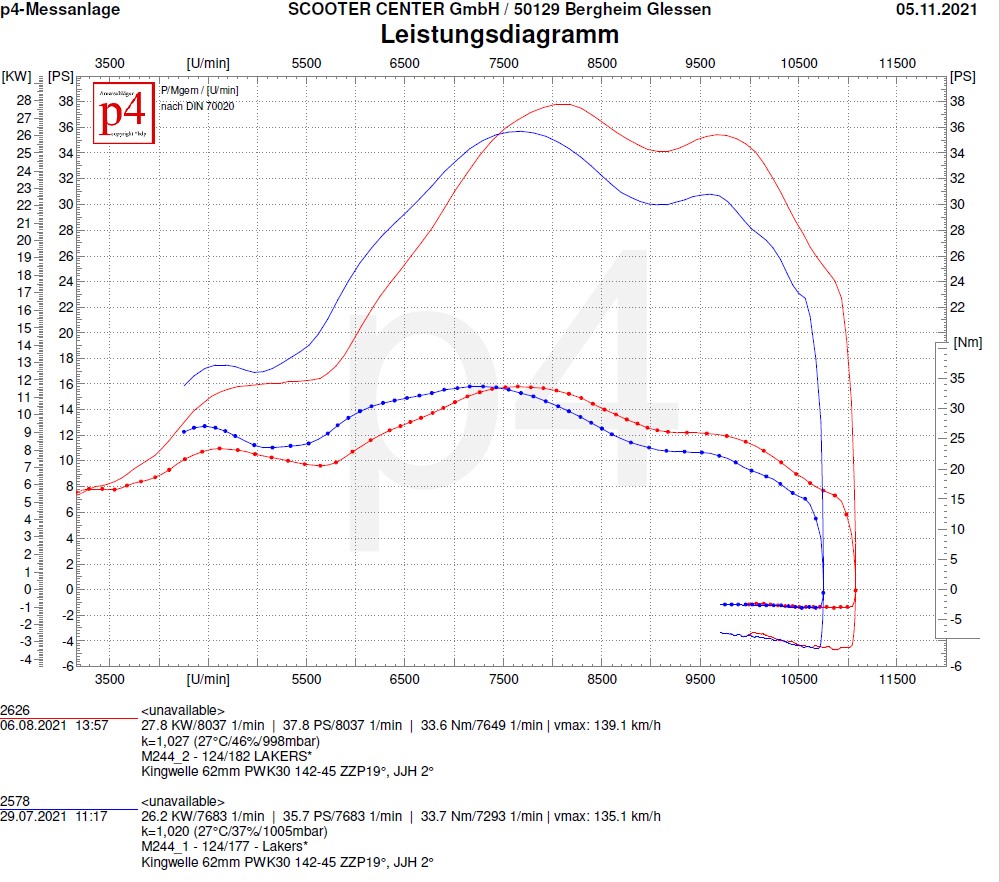
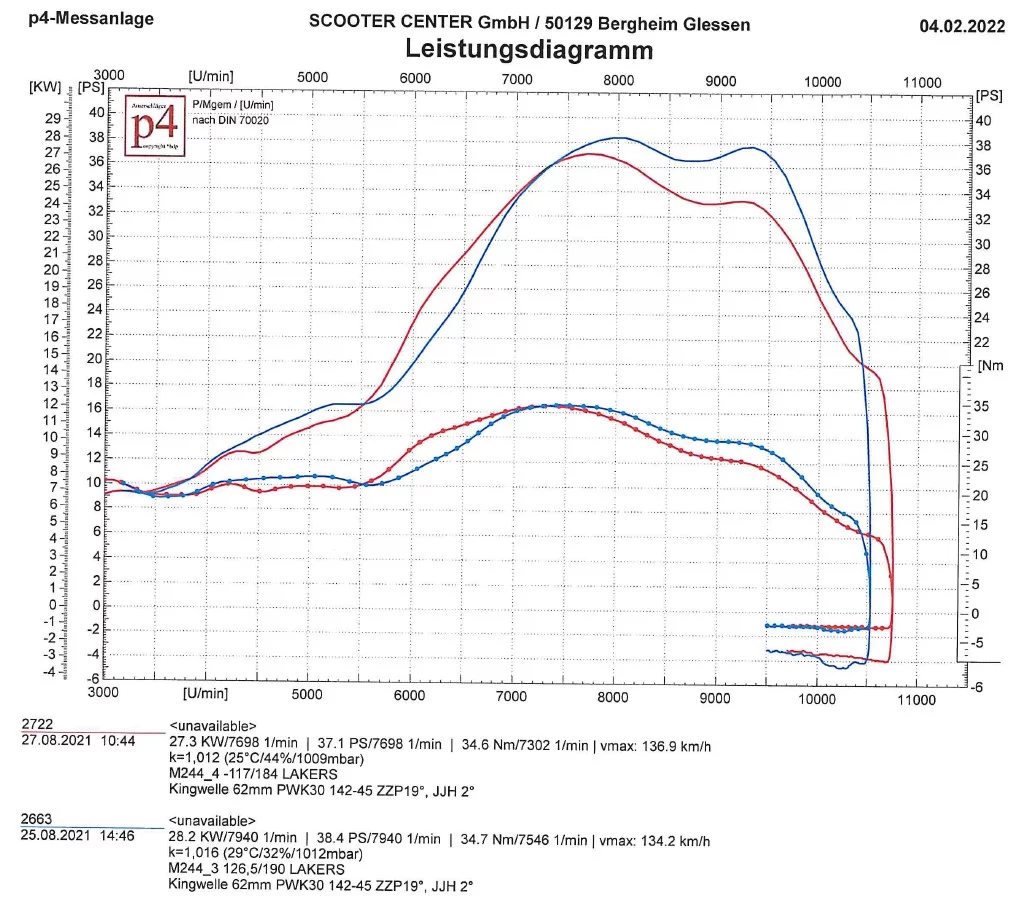
With 126° to 190°, the Lakers are not yet playing in their comfort zone. Although it also clearly converts the changed control angles into performance. With 38.4 hp at the top, it is only just behind the Resi. With a speed range of 3700 rpm, which already extends to 10.100 rpm, the Lakers shows where the journey can go with suitable peripherals.
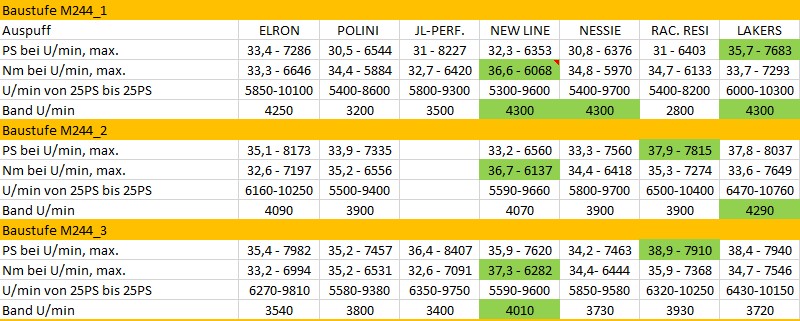
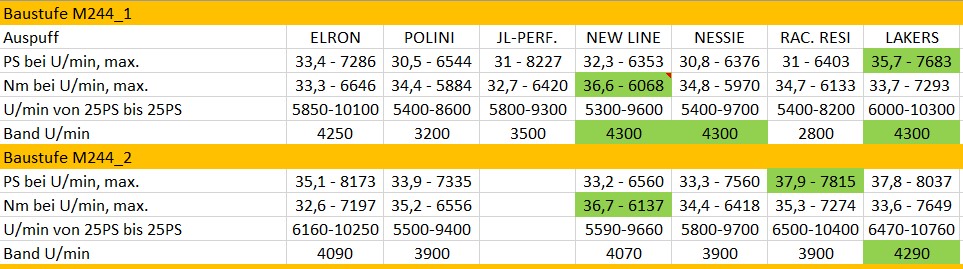
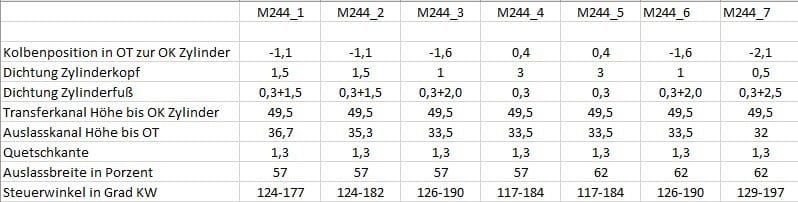
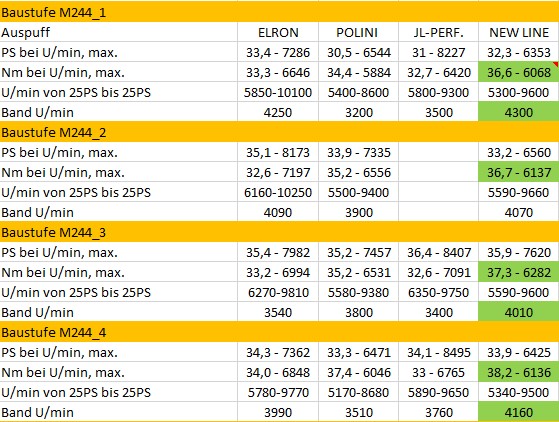
Here is an overview of the results. Best values are highlighted in green.
M244 - part 3
Im second part this Series we simply adapted the cylinder and the engine housing to each other and put the cylinder on the engine without further processing "Plug & Play".
This resulted in very moderate control angles:
Some exhaust systems get along well with these short steering angles and thus provide quite astonishing performance.
On the other hand, the exhaust systems, which are trimmed more for performance, require larger steering angles.
In the course of the test series, the character of the performance curve of one or the other exhaust system will change.
Therefore we remove some material from the M244 in the exhaust duct and set the upper edge of the exhaust to 182 °. The outlet width remains unaffected and remains at a chord dimension of around 57%.
As a spacer, we use 1.5 mm on the cylinder head and the cylinder base plus a 0.3 mm seal on the cylinder base. This means that the control angles remain at 124 °:

In the meantime we have also received a matching cylinder cooling hood from GRP specialist BSK. You can find the blog here -> QUATTRINI GRP CYLINDER HOOD
The Elron uses the larger steering angle rather cautiously. With a 1,7 HP increase in peak performance, a slight loss in torque and a little less band due to the 300 rpm later entry, the exhaust shows that it takes note of this requirement but does not yet represent the right playing field for the concept . However, the Elron takes this very calmly. Presumably, the exhaust will deliver a very pleasing performance curve even with significantly different control angles and thus the concept does not completely submit to the dictates of the control angle.
Test bench diagram as PDF: M244_1_2_ELRON
The Polini Box reacts very clearly to the small change in the outlet and provides a lot of power. The box adds over 3PS and not quite 1 Nm. The speed range is even wider by 700 rpm, whereby the graph does not even pass the 100 hp mark at 25 rpm until 5.500 rpm later and the output lasts significantly longer up to 9.400 rpm. The control angles of 124 ° to 182 ° seem to be clearly pleasant to the Polini Box.
Test bench diagram as PDF: VGL_M244_1_2_POLINI
The Newline generally shows a different character in terms of power increase at small steering angles than the Elron or the Polini Box.
Similar to the Elron is the rather unimpressed behavior on the changed exhaust control angle. The peak power increases by almost one hp, the maximum torque remains almost identical and the speed range becomes somewhat narrower, as with the Elron, due to the later start of resonance. Even in the second expansion stage, the Newline retains the top position when it comes to torque with 36,7 Nm at 6.137 rpm.
Test bench diagram as PDF: M244_1_2_NEWLINE
The Nessie, like the Newline, is intended for moderate control angles, and also shows the clear shift at the start of resonance. Viewed in absolute terms, the Nessie “only” adds 2,5 HP to the top, but in the range between 6.300 rpm and 9.000 rpm it can be clearly seen that the larger outlet angle significantly increases the performance over this range.
Test bench diagram as PDF: M244_1_2_NESSIE
The Racing Resi with its imposing, bulbous appearance already gives the impression of performance and the greed for steering angles. Therefore, the slightly increased outlet angle is not enough to achieve absolute top performance. Here, too, the start of the response is much later. At its peak, the Resi increases by 1,7 HP and this can use the slightly increased exhaust control angle between 7.300 rpm and 10.000 rpm to increase power and torque.
Test bench diagram as PDF: M244_1_2_RAC_RESI
The robust racing exhaust from Lake Constance has already shown on the plugged-in version of the M244 that it is also a good all-rounder. As with all other tested resonance systems, the speed range also shifts in the direction of higher speed, but without the bandwidth being affected. With a band of almost 4.300 rpm, it provides the largest bandwidth in this expansion stage. With 37,8 PS at its peak, the Lakers, at least in this expansion stage, has to admit defeat to the Resi with 37,9 PS - but we are only just warming up on the subject of the steering angle.
Test bench diagram as PDF: M244_1_2 LAKERS
Here again the results in tabular form. The best values are highlighted in green for each construction stage
Part 4 is already in progress ...
This is part 2 of this Quattrini M244 - Series. In this first construction stage, M244_1, we have the M244 without any further changes, only with spacers on the cylinder head and the cylinder base our engine eingerichtet.
We have entered the resulting control angles in the list for the test plan.
In terms of design, this setup is in the middle of the range of expansion stages.
First we send the all-purpose weapon from Polini into the race.

Test bench diagram POLINI BOX exhaust on Quattrini as PDF: M244_1_POLINI
The result is quite clear. Already at 4000rpm there are 15 HP and 26Nm on the rear wheel.
The maximum values are 30.5PS at 6500rpm and 34.4Nm at 5900rpm.
Even at 9500rpm there are still 22PS on the rear wheel. This constellation already calls for a longer primary translation.
The next test subject comes from FalkR and listen to the name Elron's.


Test bench diagram FALKR ELRON exhaust on Quattrini as PDF: M244_1_ELRON
With regard to the maximum values, the Elron ranks as real resonance exhaust already above the Polini Box. But the tide is turning only beyond the 6500rpm in favor of the Elron. In the range before 6500 rpm, the Polini Box has the lead here. After passing the 6500rpm mark, the Elron gains significantly and is above the Polini Box up to the end of revs beyond the 10500rpm.
Another old friend is that JL performance.

Test bench diagram JL-PERFORMANCE exhaust on Quattrini as PDF: M244_1_JL_LH
The somewhat outdated concept of the JL still delivers reliable values today. The JL does not cope with the first stage of the engine quite as well as the Elron. With 31PS at 8200rpm, that's something like suffering at a high level. The rather gentle entry and a good performance of 16PS at 4000rpm make the JL a very drivable exhaust with a good start in Reso optics.
The Newline exhaust from Scooter & Service is with us in Scooter Center Shop .

Test bench diagram NEWLINE exhaust on Quattrini as PDF: M244_1_NEW_LINE
The new line from Scooters and Service from Hamburg already delivers its maximum power of 6300PS at 32rpm. Even if the playing field doesn't quite fit the Newline, which would like to see a little more steering angle, the manual work from Hamburg delivers a remarkable 6000Nm already at 36rpm. The torque beast in this expansion stage
As the first representative of the "Performance" department, we let Nessie from Posch Performance work on the M244.


Test bench diagram NESSIE - POSCH exhaust on Quattrini as PDF: M244_1_POSCH_NESSIE
Until just before 6500rpm, the world is pretty fine for the Nessie. Then the curve takes a course that suggests that the Nessie would like to see significantly more outlet angles.
Nevertheless, the Nessie with 34.8Nm at approx. 6000 rpm can be counted among the clearly high-torque systems.
Of course we also tested the Racing Resi from Posch Performance.


Test bench diagram RACING RESI- POSCH exhaust on Quattrini as PDF: M244_1_POSCH_RAC_RESI
The Racing Resi from the same manufacturer runs very similar to the Nessie and also requires more ventilation over longer control angles. With almost 35Nm at 6100rpm, the Resi is also well ahead in the league of absolute torque animals.
The Lakers as a thoroughbred racing exhaust, stands well in the feed despite the high performance and engine speeds to be expected with the low control angles.
Test bench diagram KINGWELLE LAKERS exhaust on Quattrini as PDF: M244_1_LAKERS
With almost 36PS at 7700rpm, it is the front runner in terms of performance in this expansion stage.
In the later expansion stages, when higher control angles and a wider outlet come into play, this exhaust can probably live out much better.
Quattrini cylinder M244 in the first construction stage, M244_1 "Plug & Play" without further changes only with spacers on the cylinder head and on the cylinder base on the Malossi engine and Kingshaft crankshaft adapted.

Be curious to see how the second expansion stage will continue ...
Towards the end of 2015, rumors grew that Max Quatrini launches a potent cylinder for the PX200.
The time has come at the beginning of 2016. The M232 and the big brother M244 are available on the market.
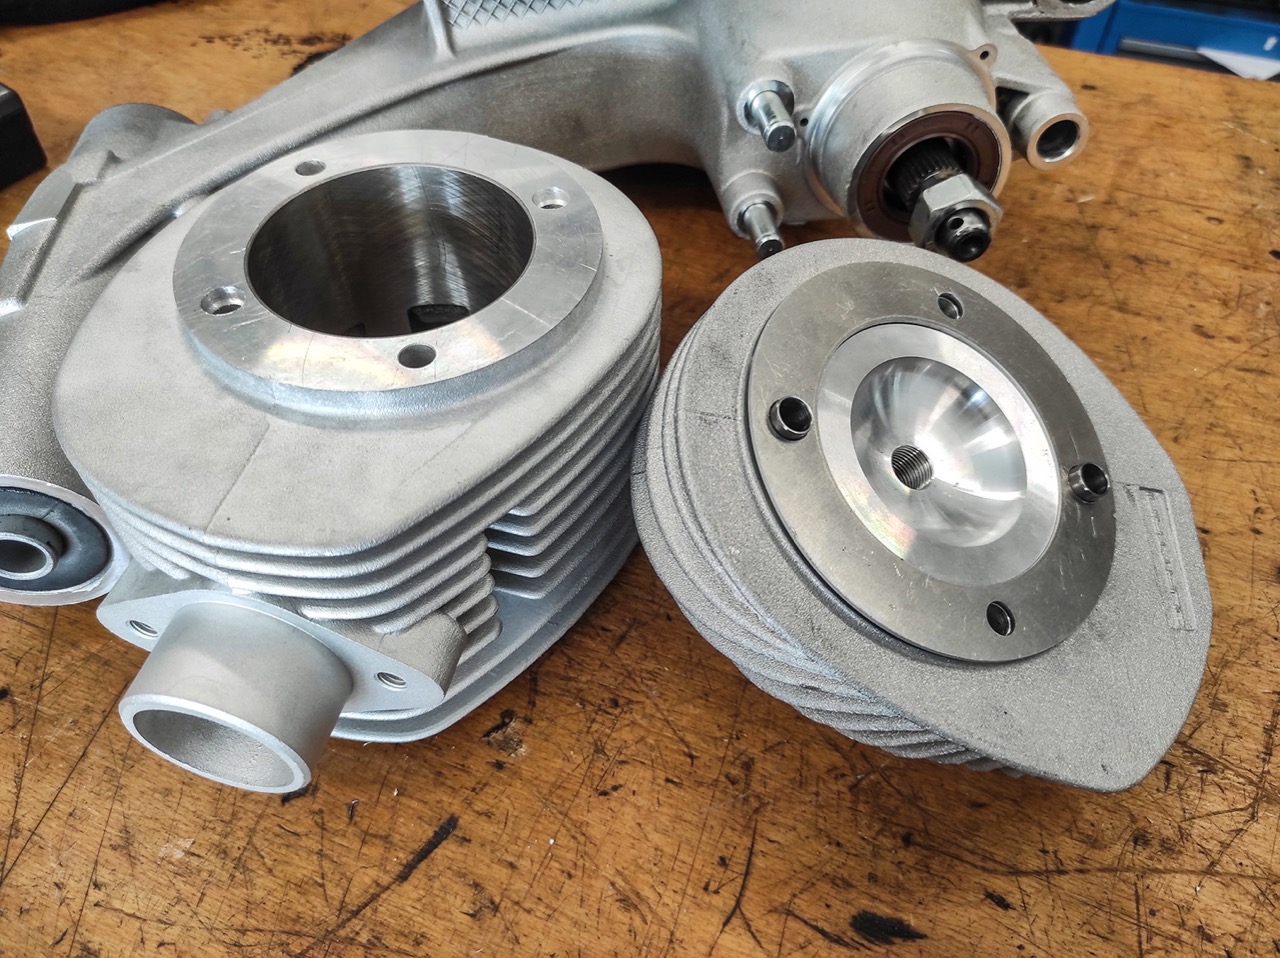
A construction that took some getting used to seemed to follow the concept, a cylinder with a maximum bore of 72mm in the M244 and without a supporting cylinder base.
Due to the design of the crankshaft by Quattrini, with a connecting rod of 126mm, which is rather long for the Vespa engines, the piston does not work so deep in the engine housing and therefore does not need a long, classic cylinder base.
Today, in 2021, the cylinder is enjoying increasing popularity due to its very high torque values and the smooth-running design thanks to the long connecting rod of the Quattrini crankshaft.
Reason enough for us to build an engine with it and play through many possible scenarios for you and see what comes out of it. We have tested exhaust systems and carburettors for you in various stages of expansion.
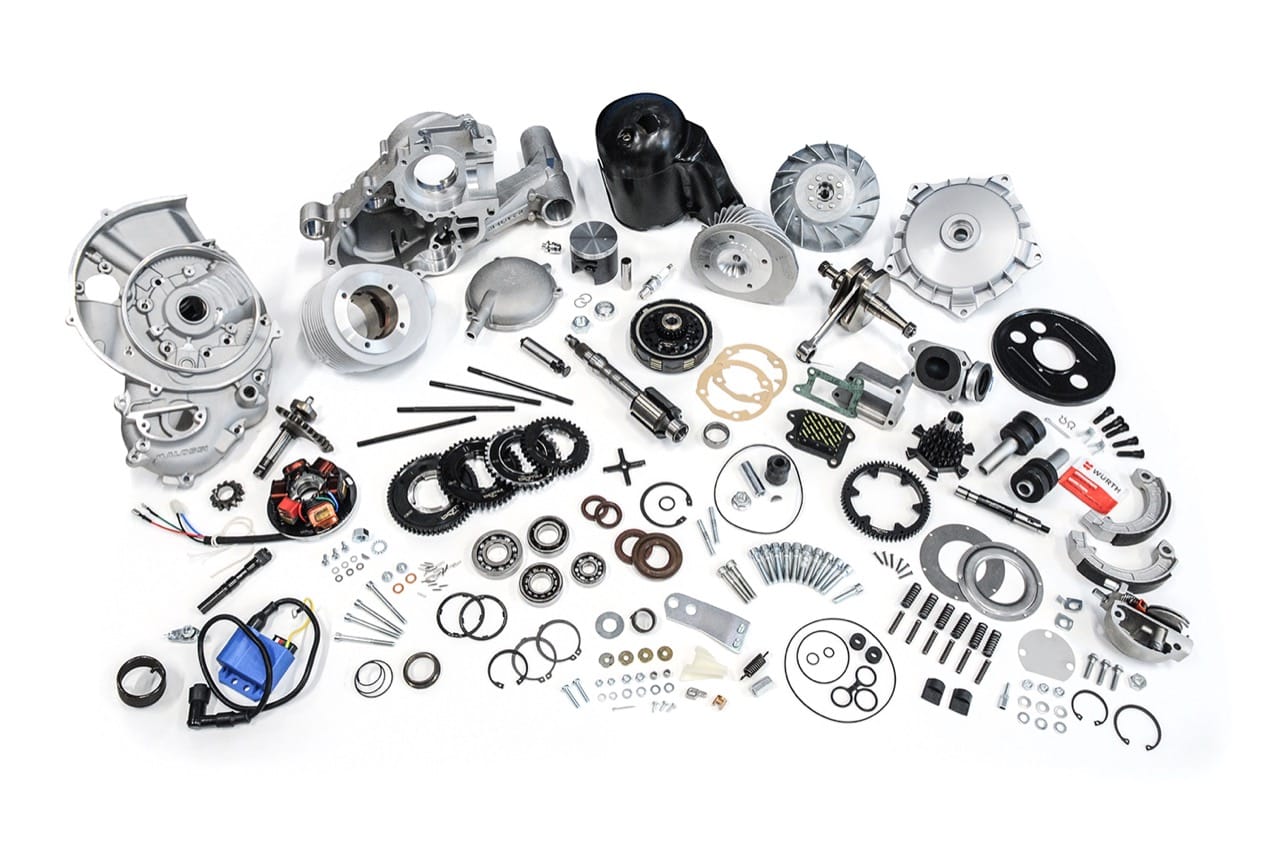
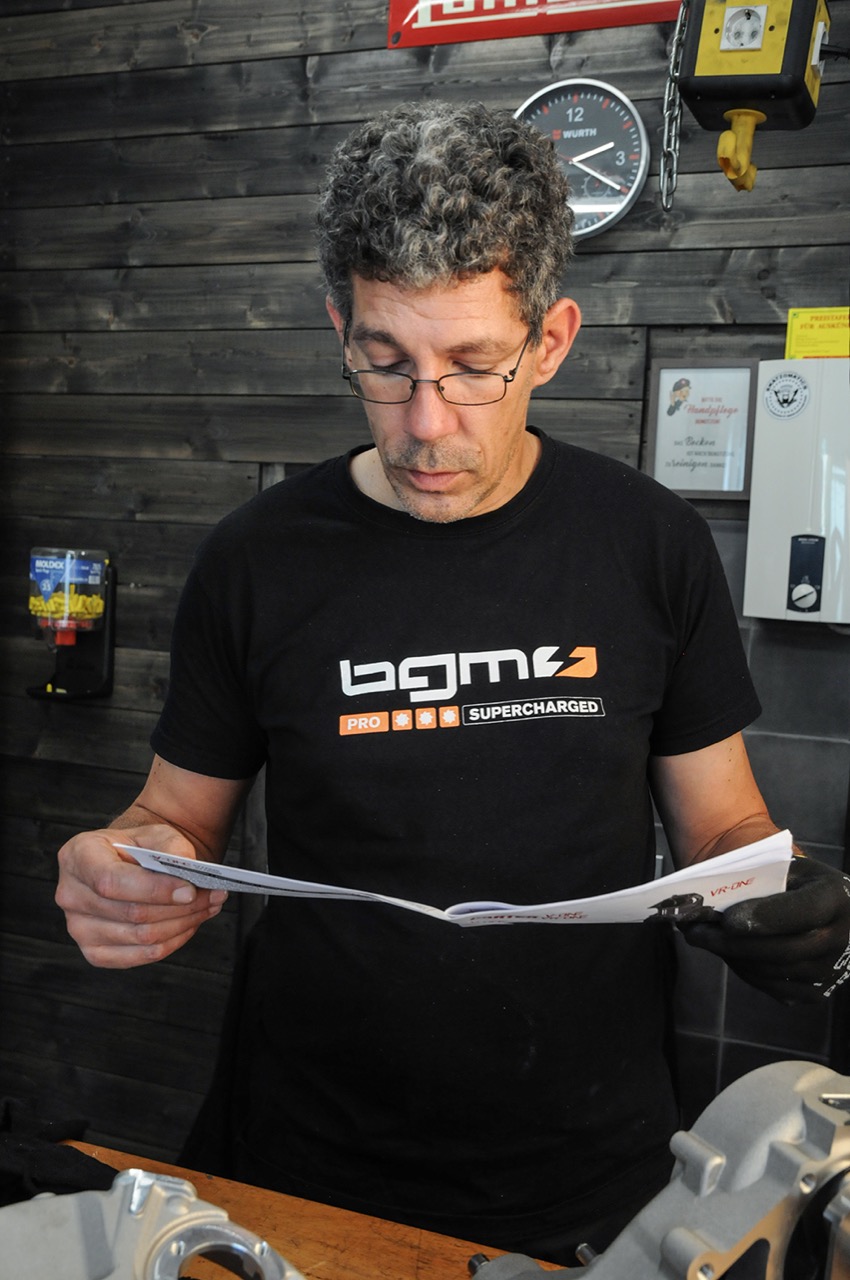
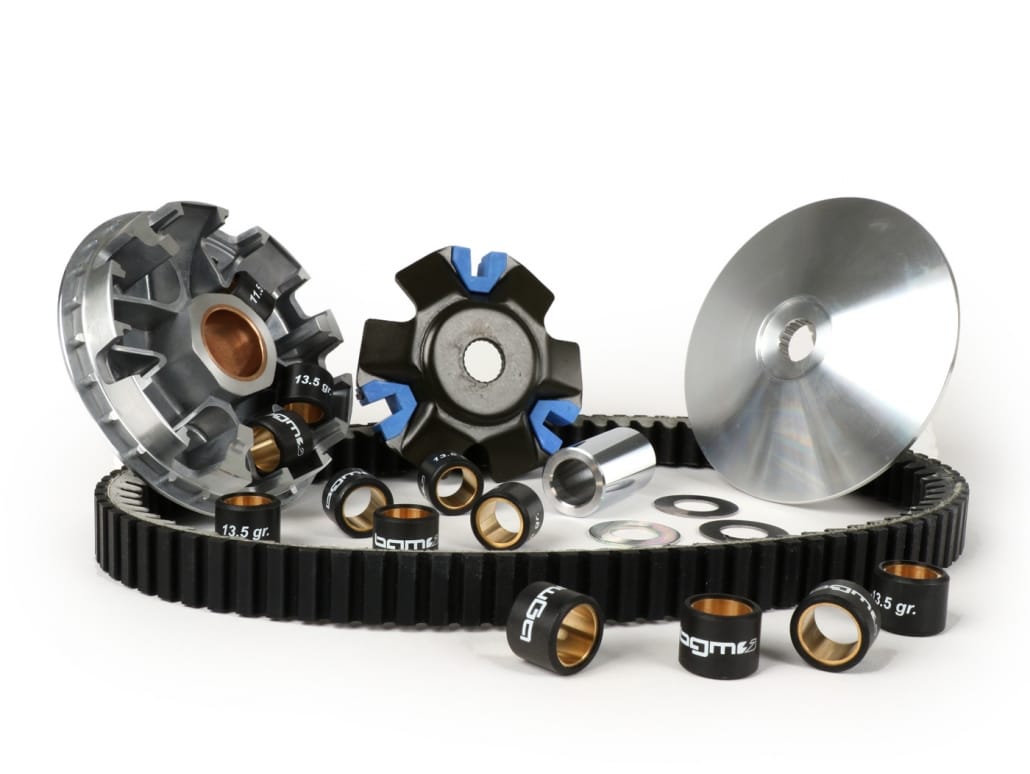
In the delivery note attached here for our technology department, you will find all the components that we have used for this engine and that, in our opinion, function permanently with this concept.
In total, we have over 200 test runs with the Quattrini M244 Completed on our P4 test bench with various engine expansion stages. We have more than 50km measured runs documented and almost 20 liters of fuel burned.
We would like to share the experiences gained from this test with you in this blog series.
The expected high torques of the M244 speak in any case for a reinforced motor housing.
The experience from many kilometers on the road with our own scooters has taught us that engines in the range from 22 to 25 HP can be implemented as "durable" in conjunction with a Piaggio engine housing.
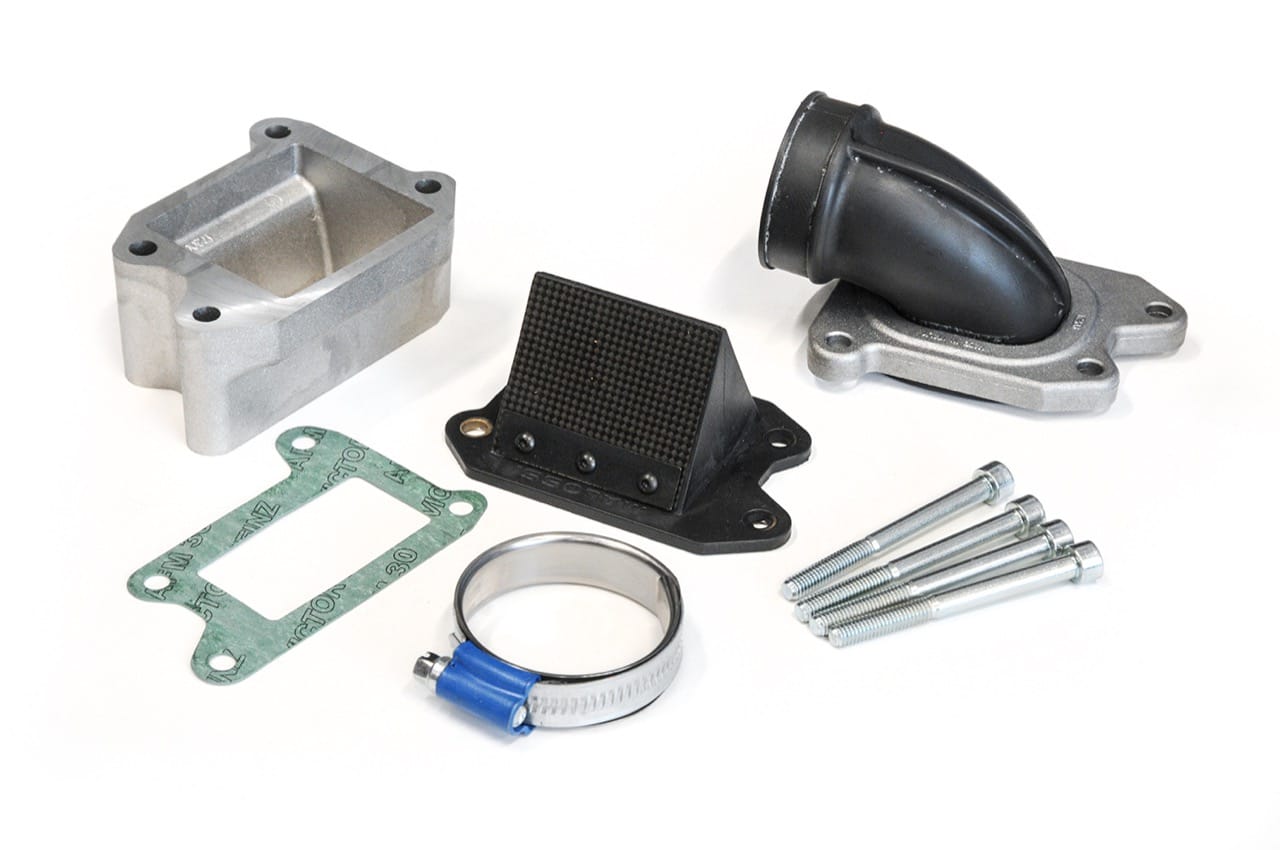
Our M244 Quattrini cylinder but should be expanded a bit in the course of the test. This is why the choice here is a motor housing from Malossi with membrane inlet.
An Displacement of over 220ccm at erhigher engine speed, can no longer be supplied with sufficient fresh gas via a classic rotary valve on the narrow Vespa crankshaft. That's why we choose this Malossi motor housing with membrane control .
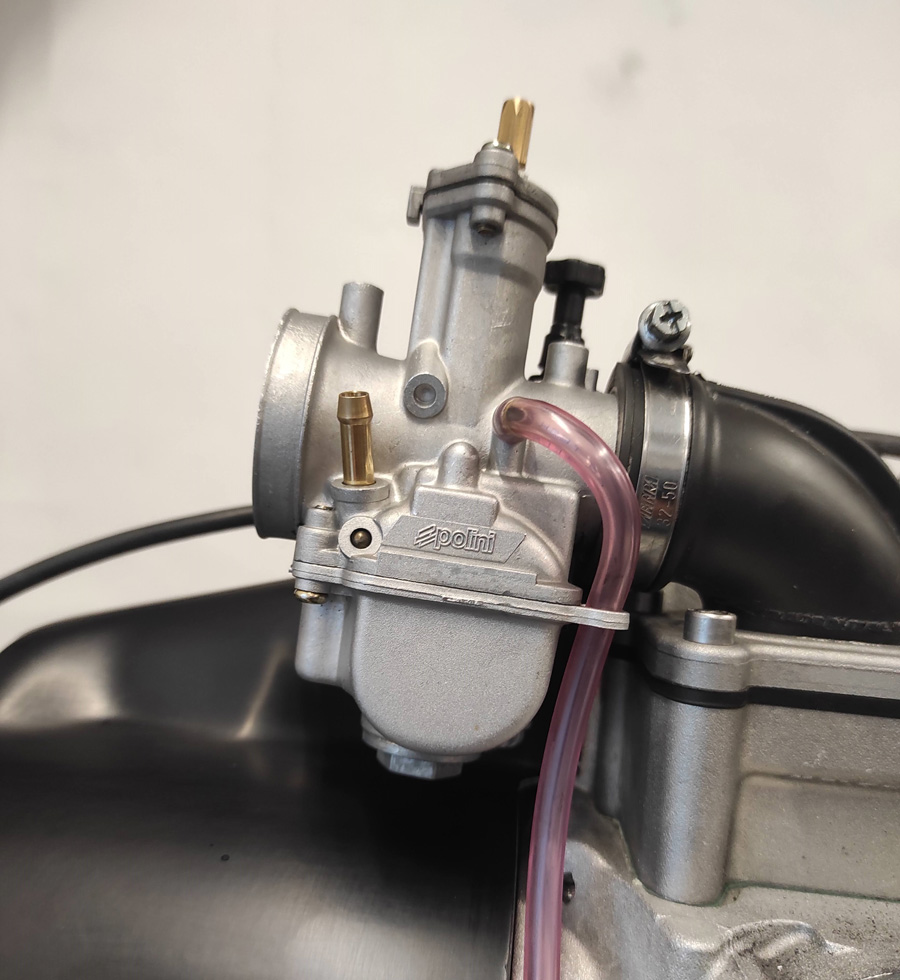
To make the fuel mixture we have one Polini 30mm carburetor used. In this experiment he stands for one Carburettor with 30mm bore. In the course of the tests, we also tried a PHBH30 in a counter-test. We will present the result of this in the following part of this blog series.
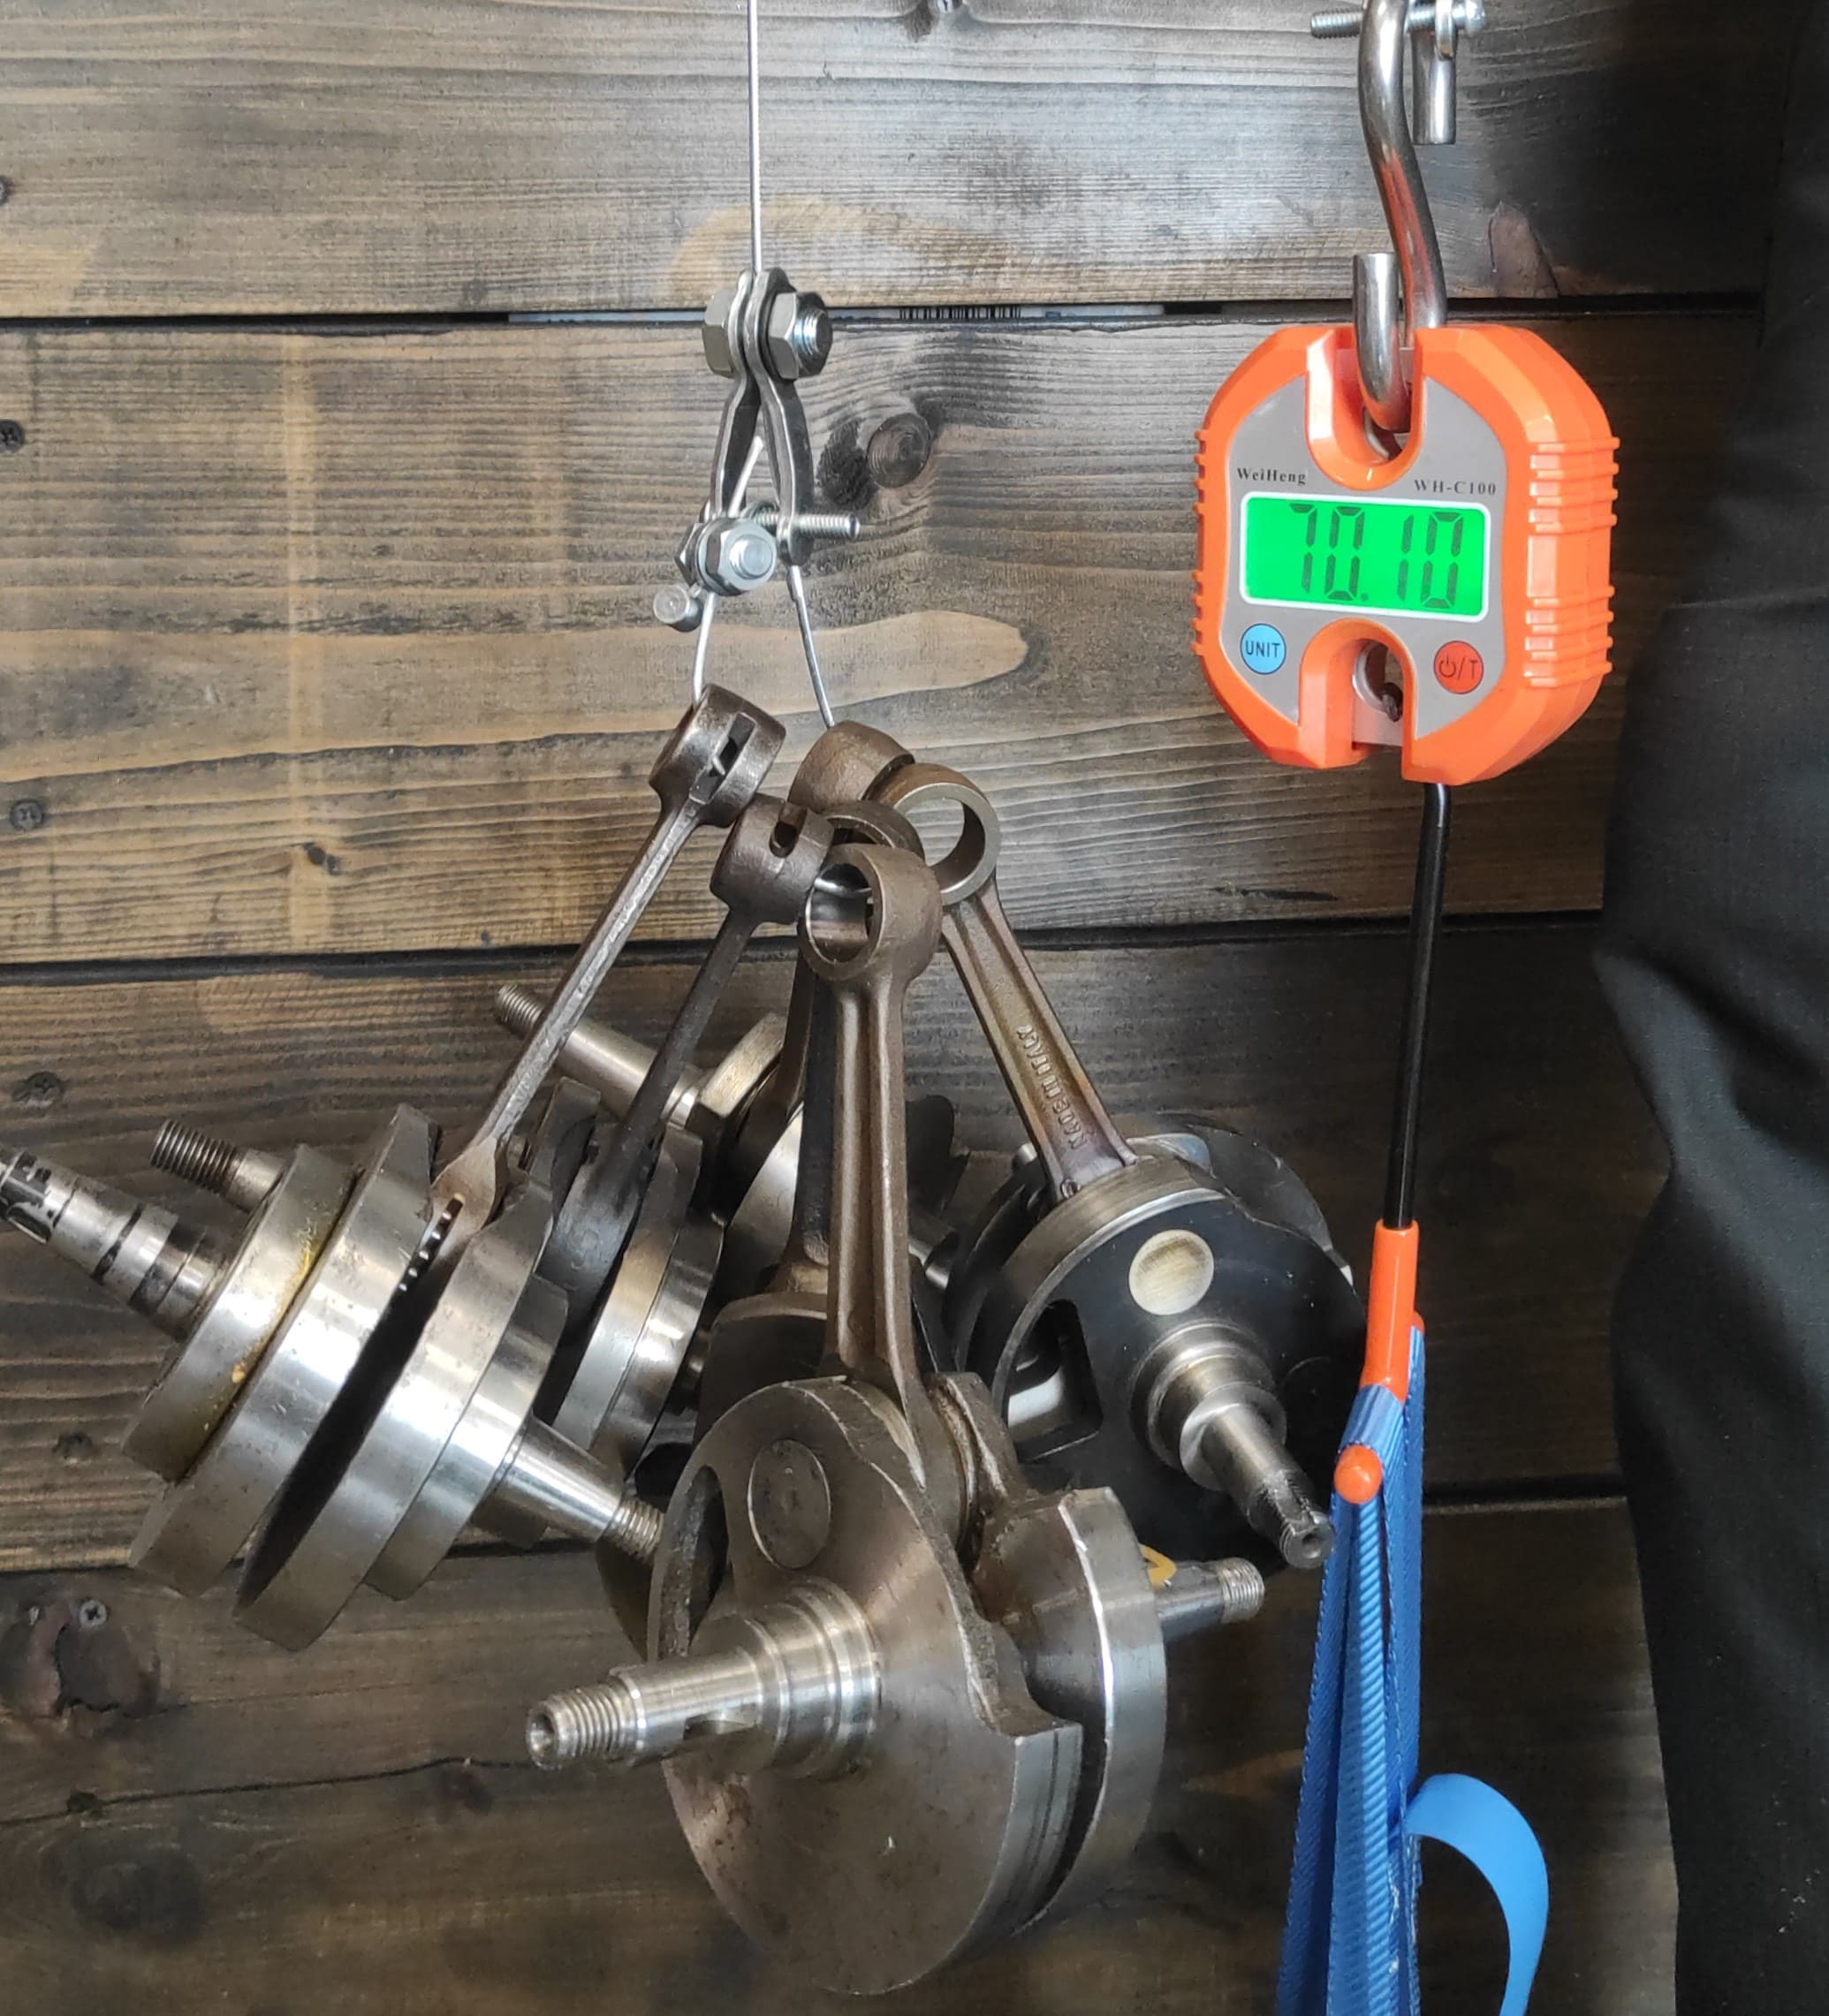
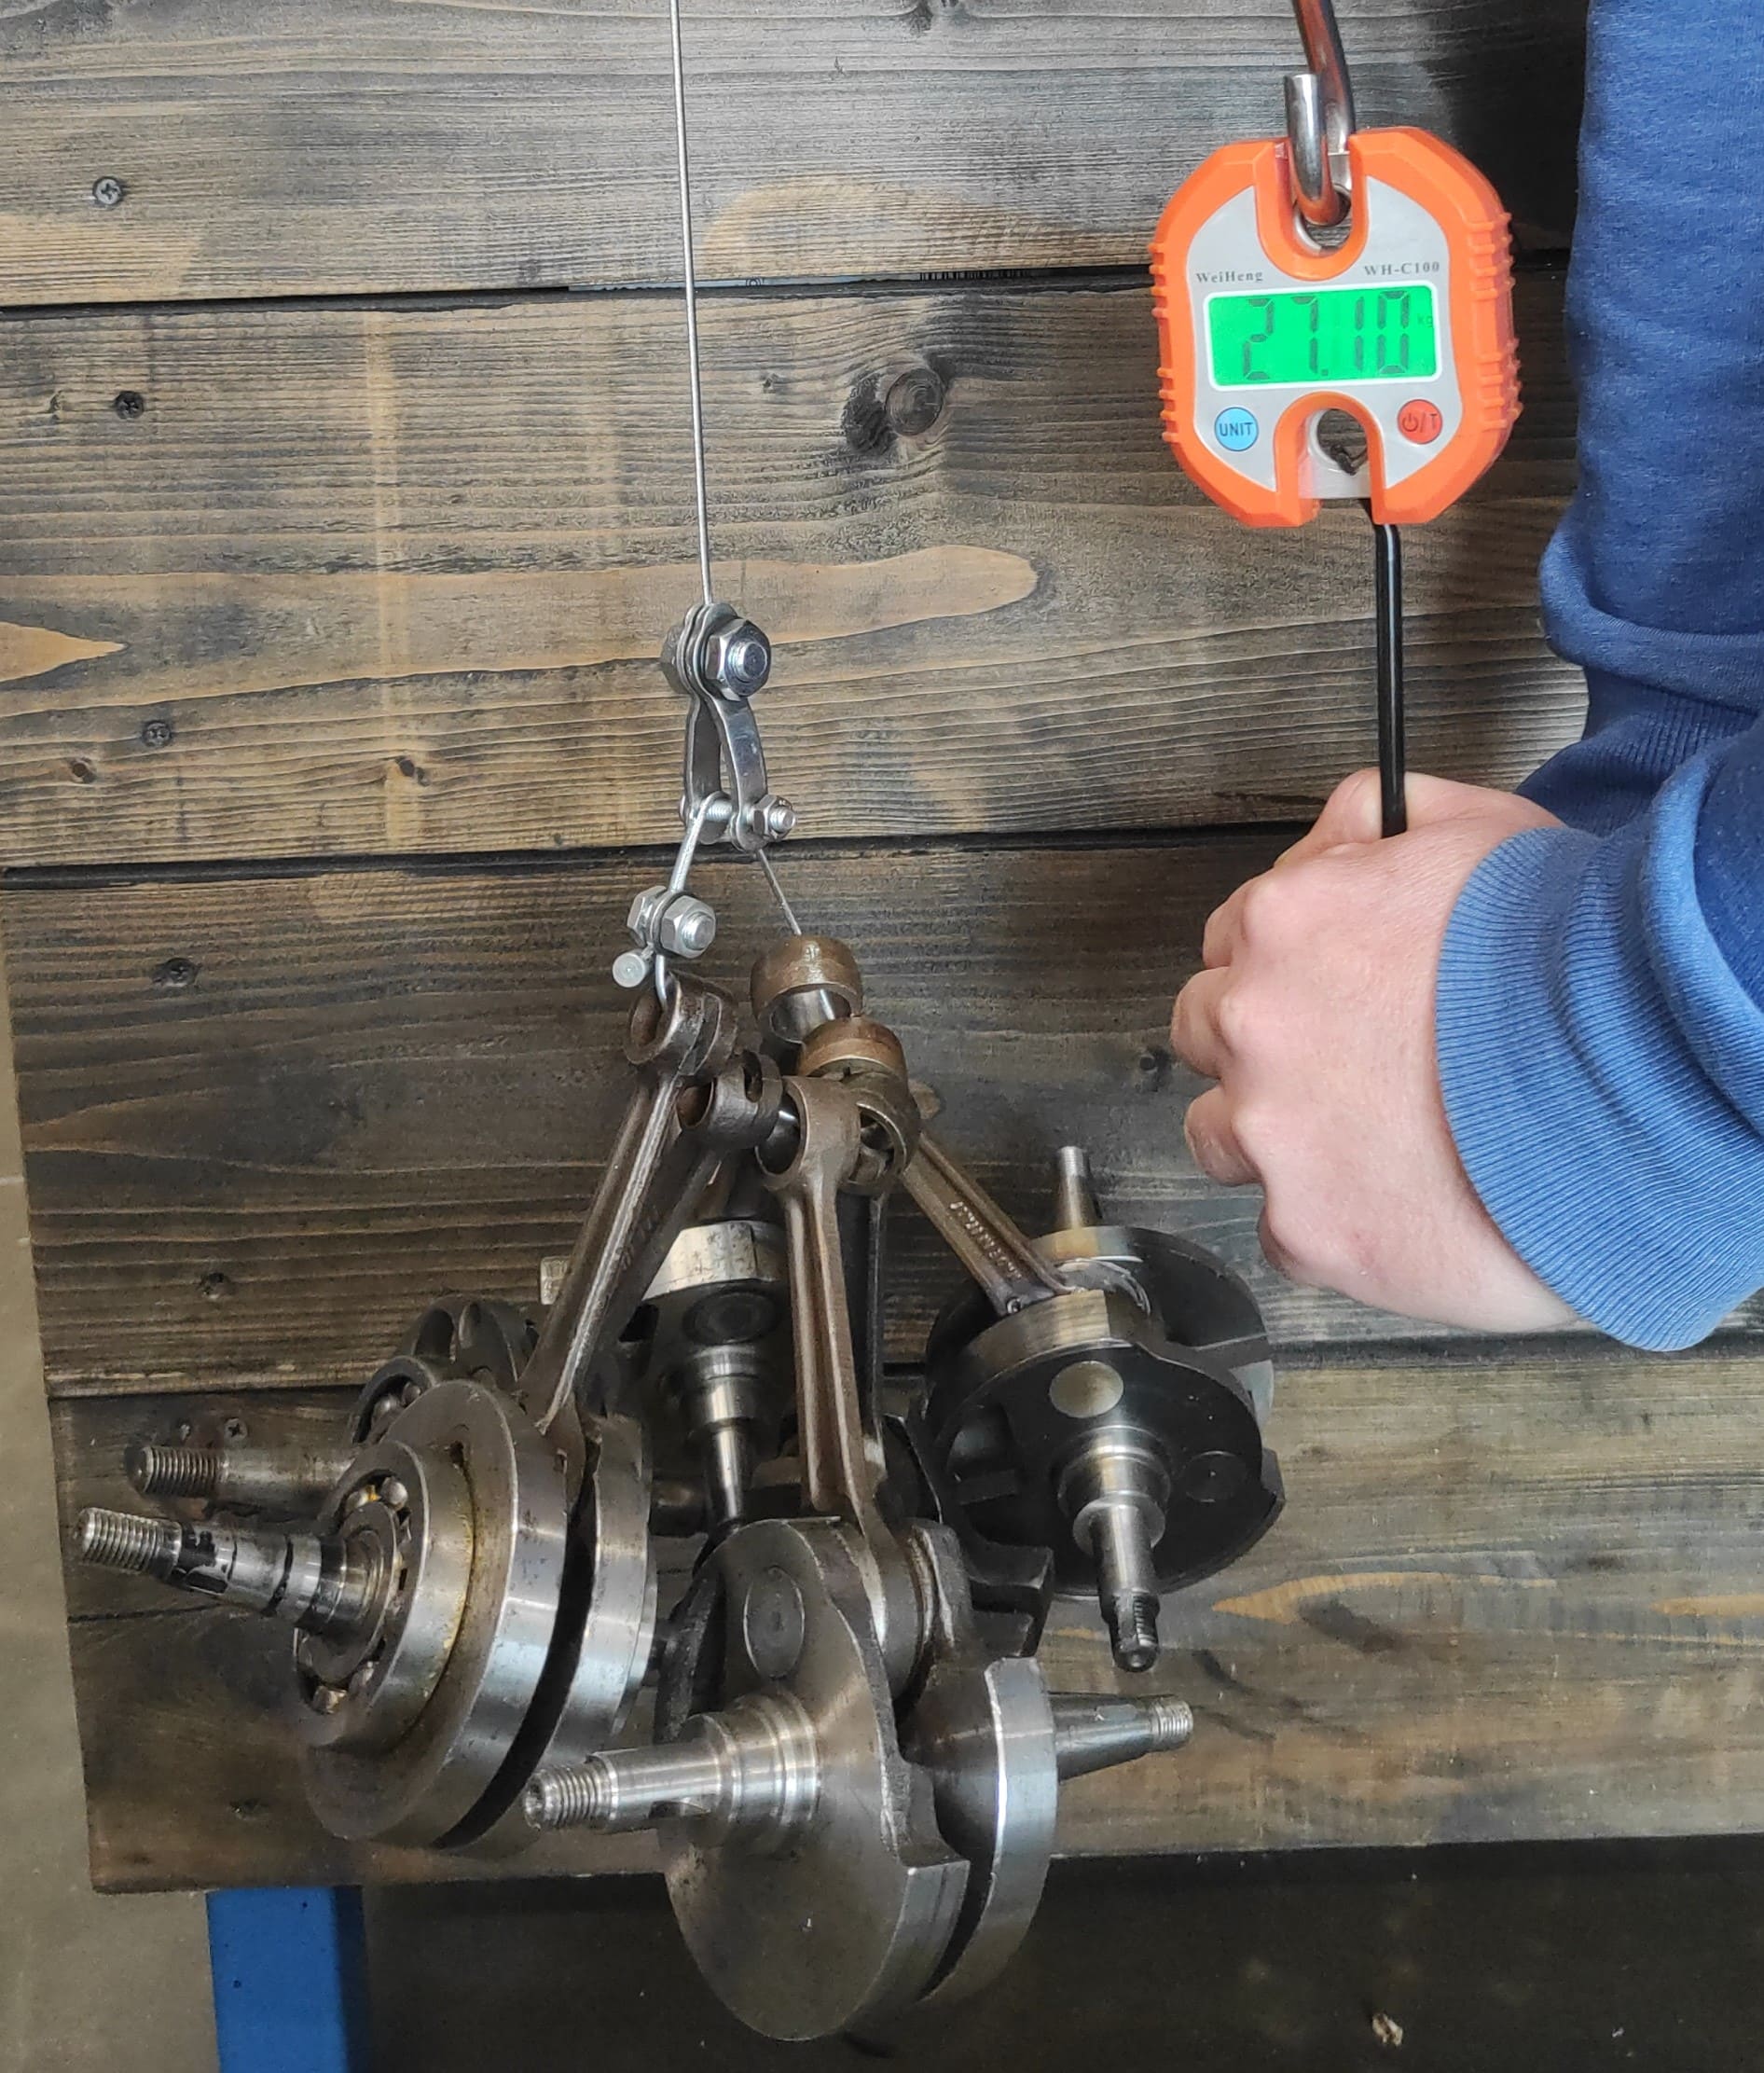
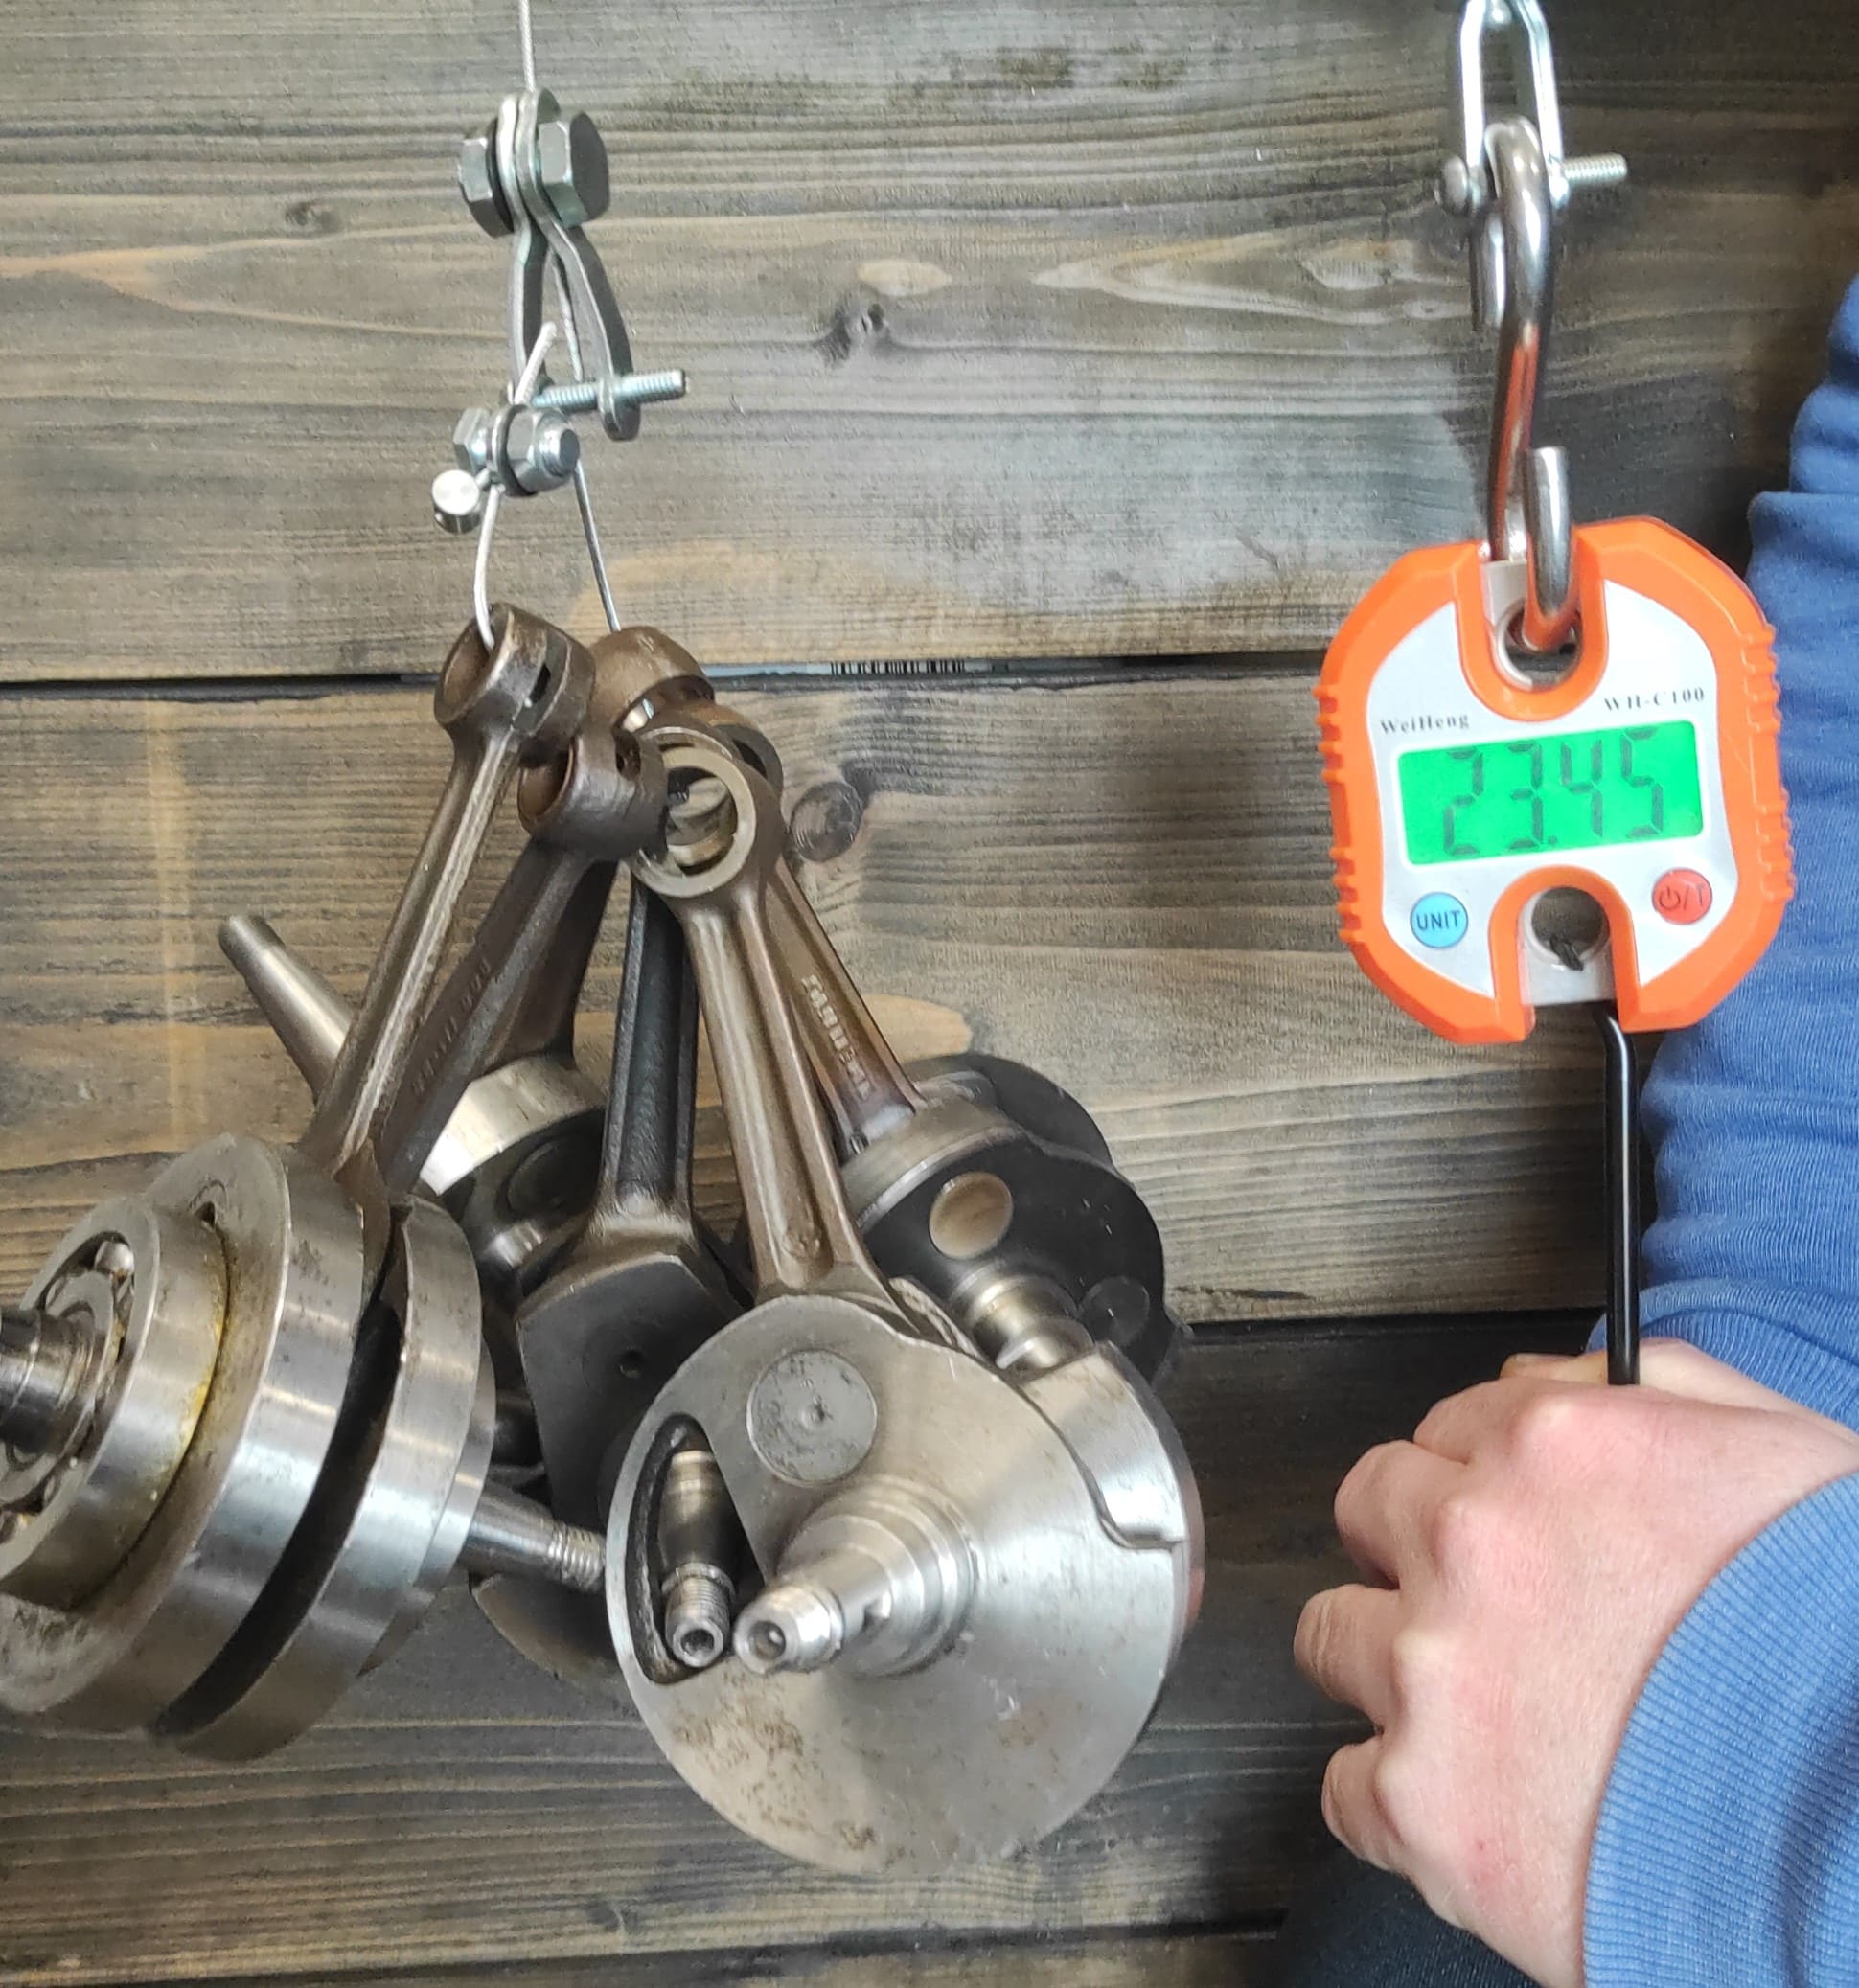
On the topic crankshaft we trust king wave. Here we find exactly what we are looking for to build a high-torque, smooth-running and durable engine.
The choice falls on one king wave with 62mm stroke and 128mm connecting rod. Due to the 2mm longer connecting rod and increased stroke, we have the opportunity to work with the control angles by moving the cylinder using spacers on the cylinder head and the cylinder base in the stroke direction. The longer connecting rod in connection with the weighty crankshaft also brings a significant plus in smoothness.
The stroke of 62mm results Cubic capacity 252,4ccm - already very promising to build a torque-oriented engine.
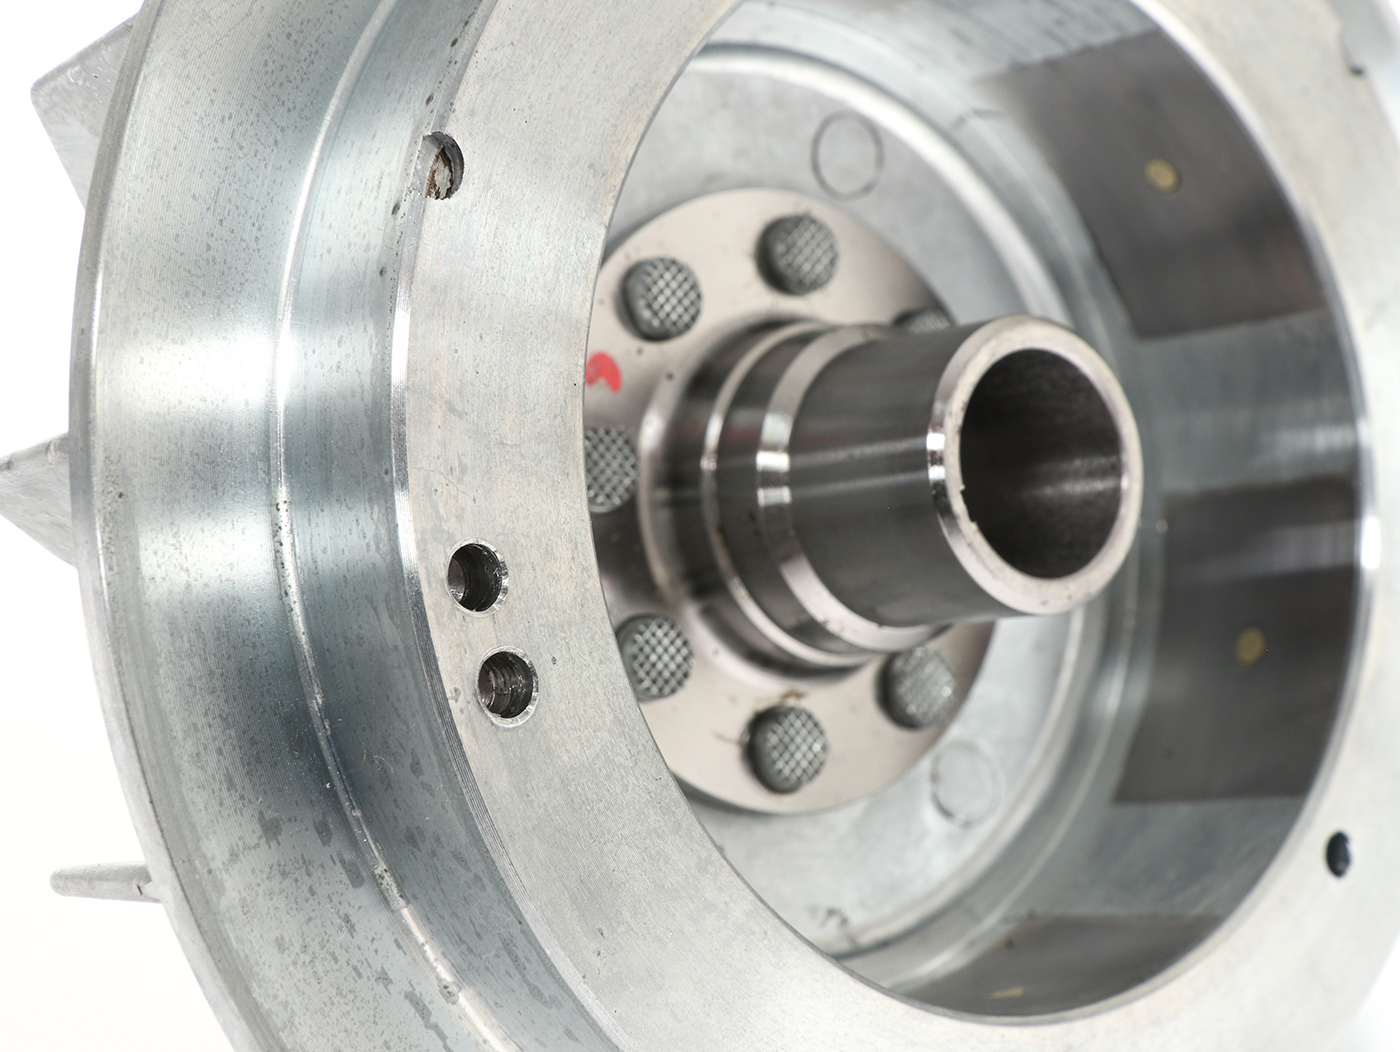
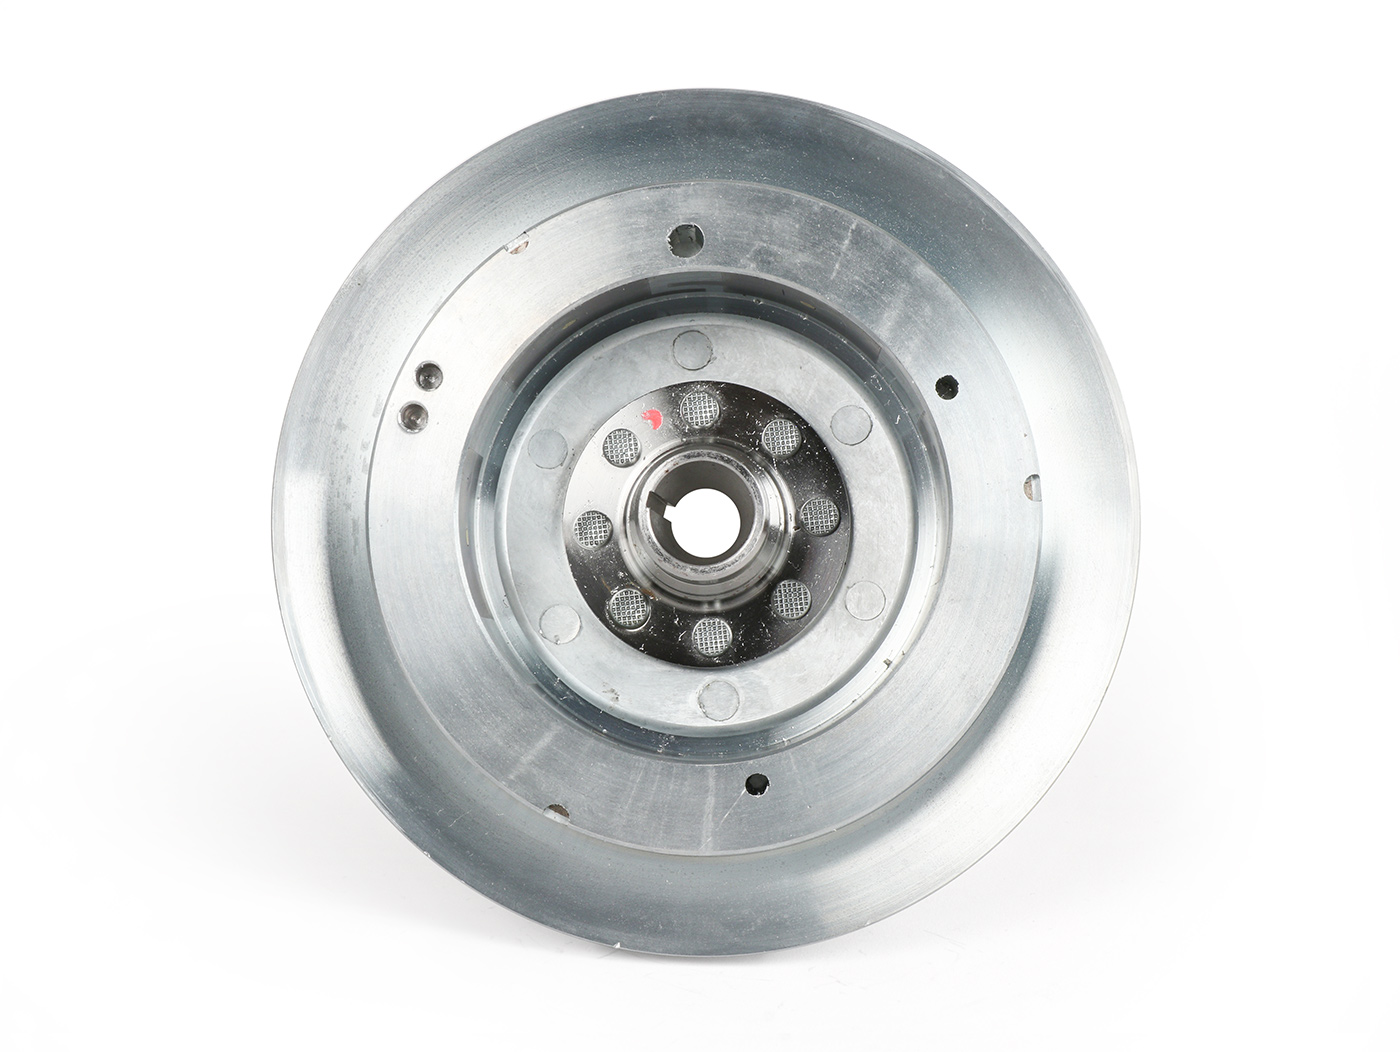
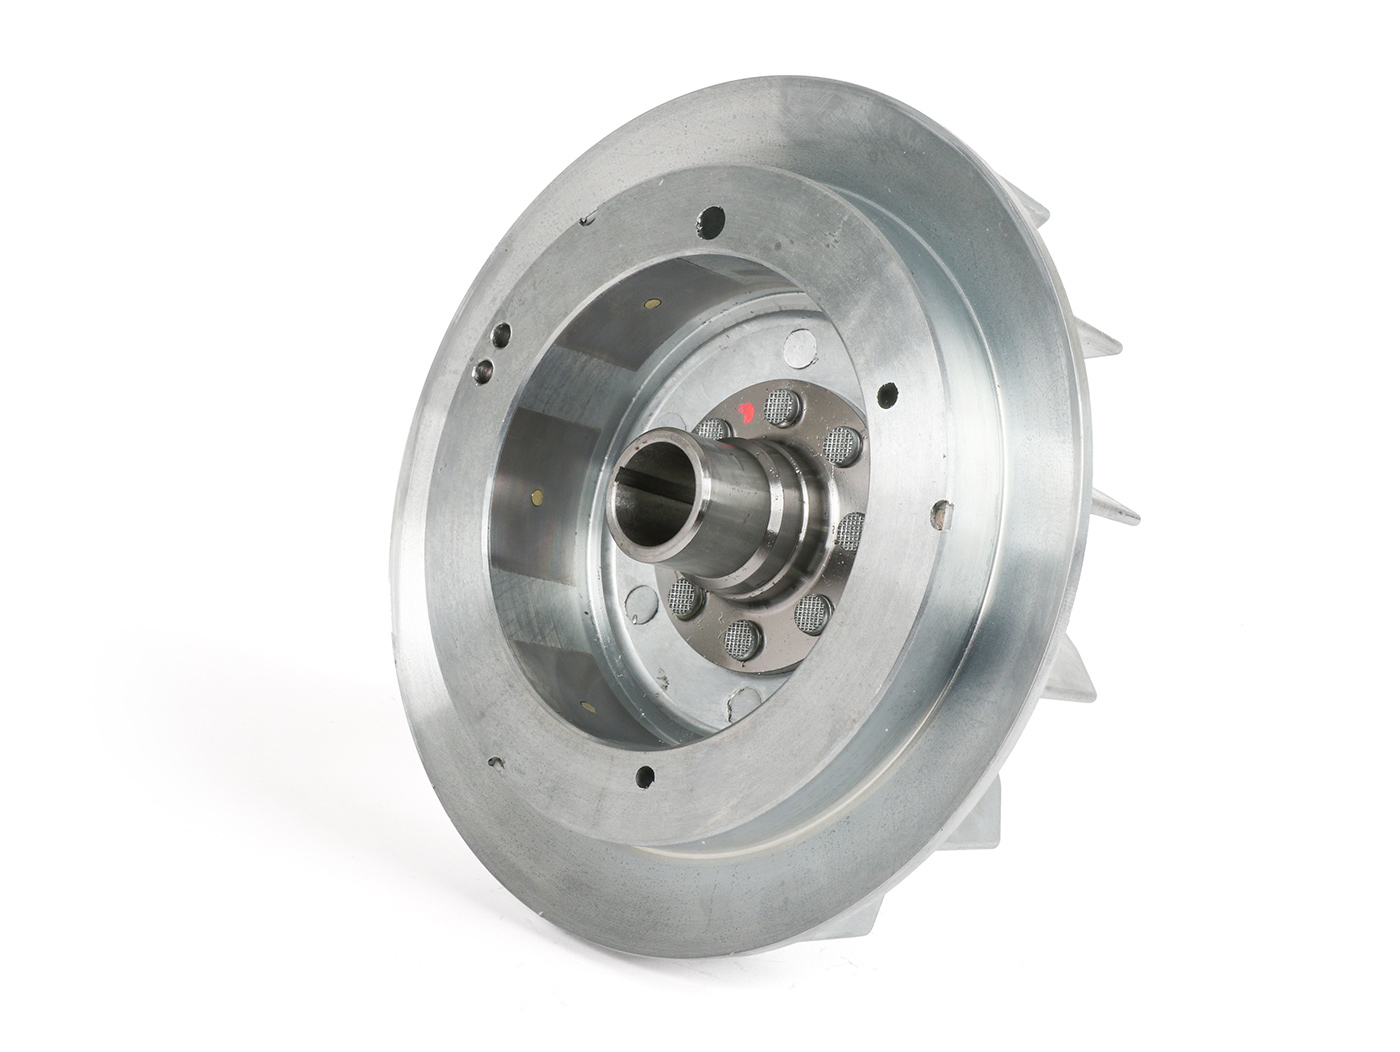
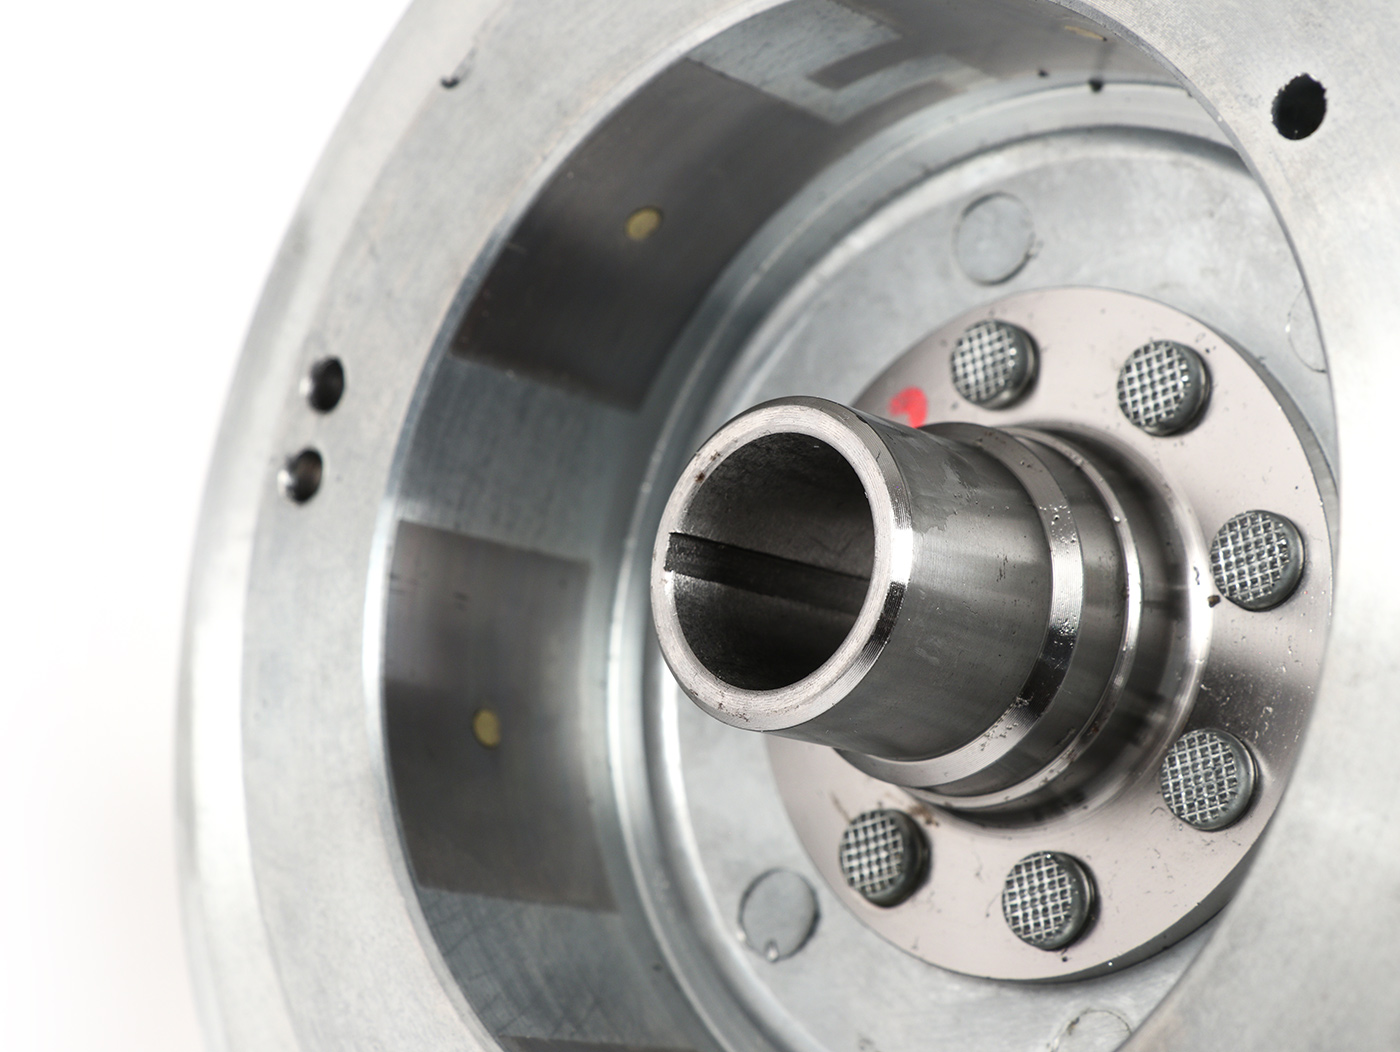
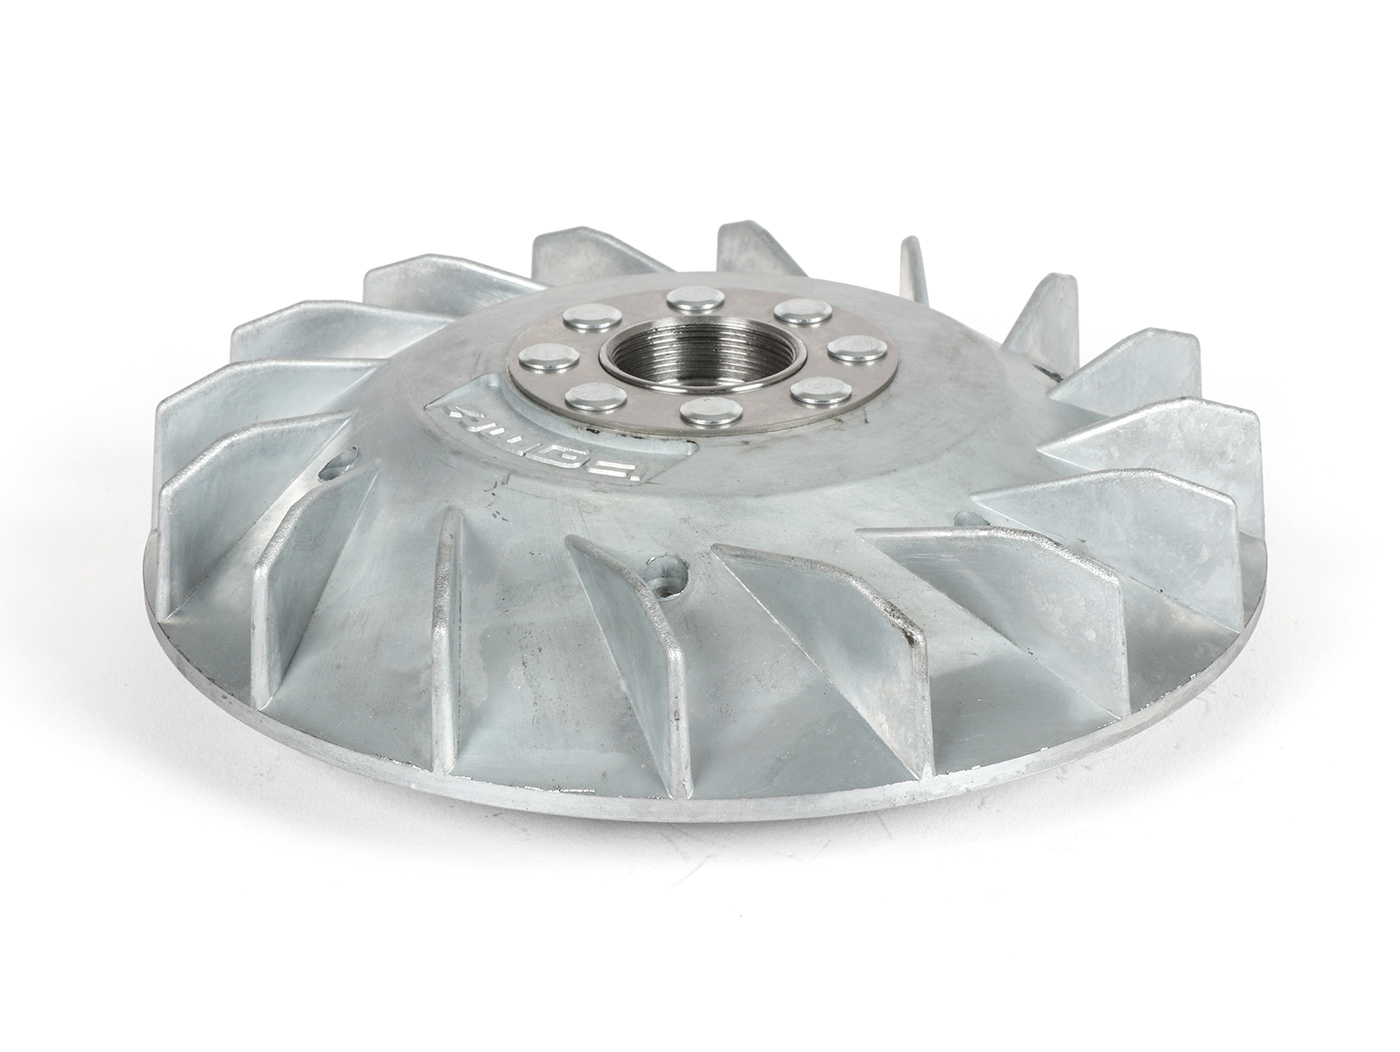
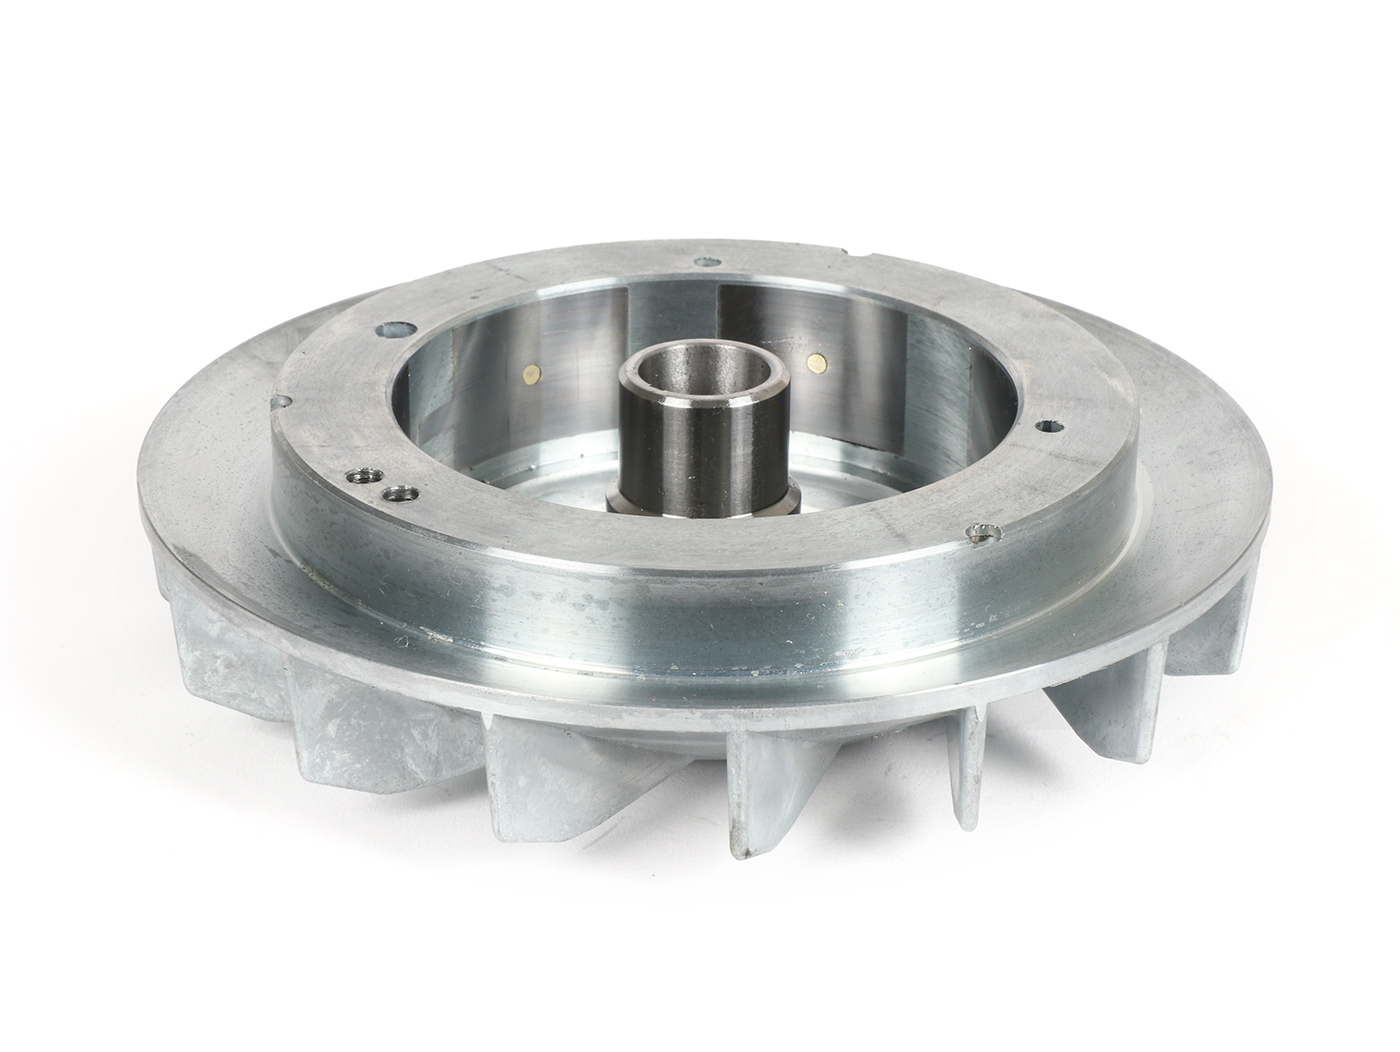
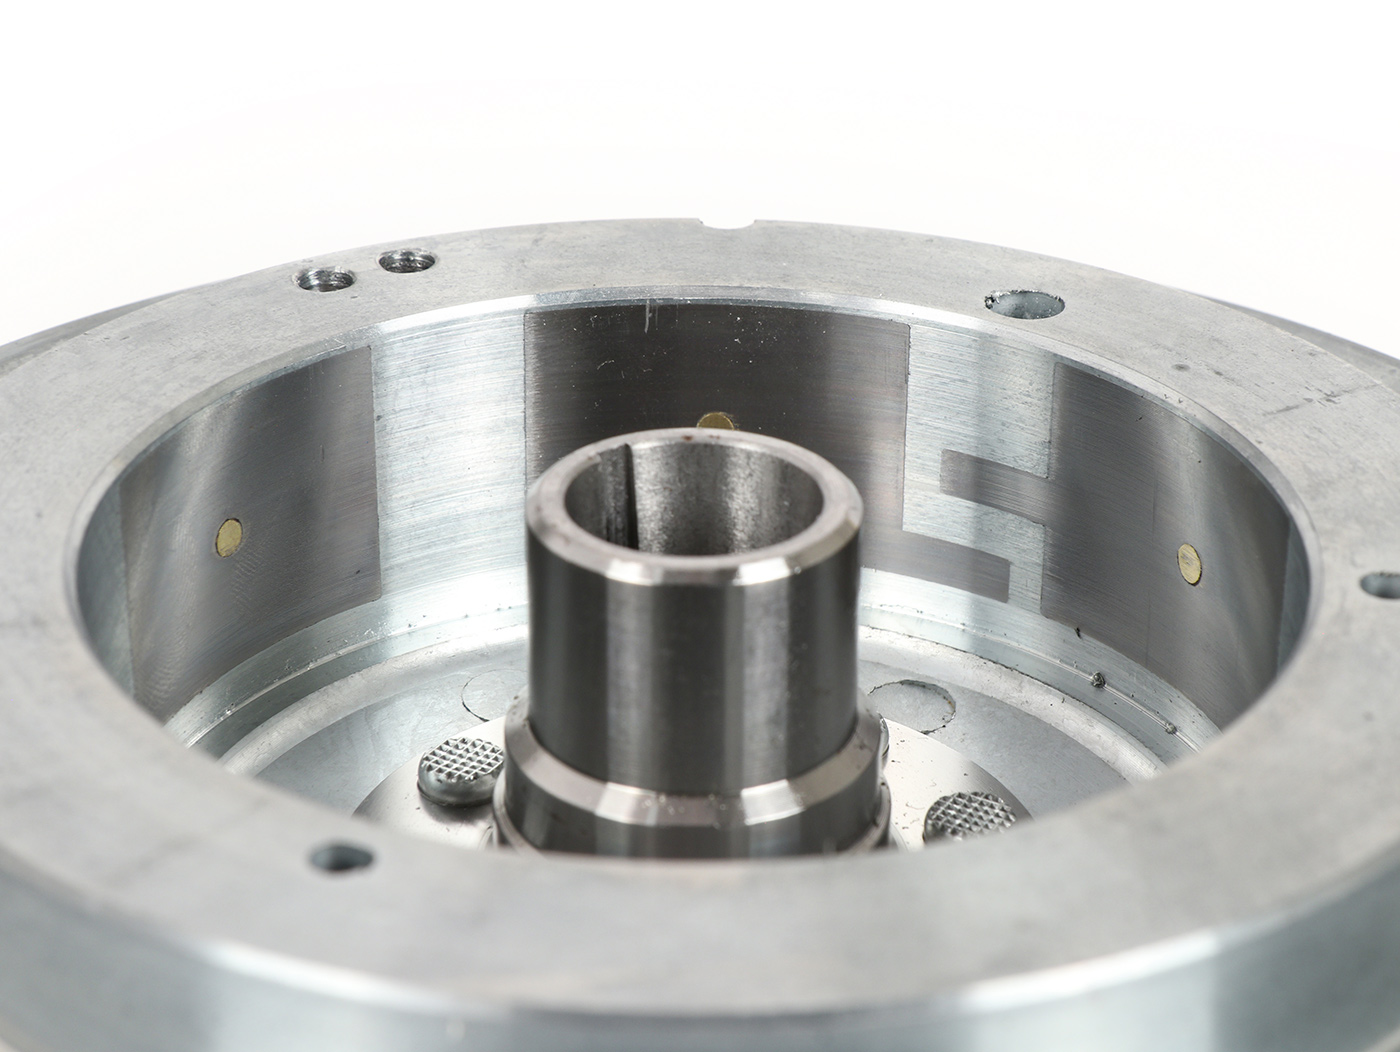
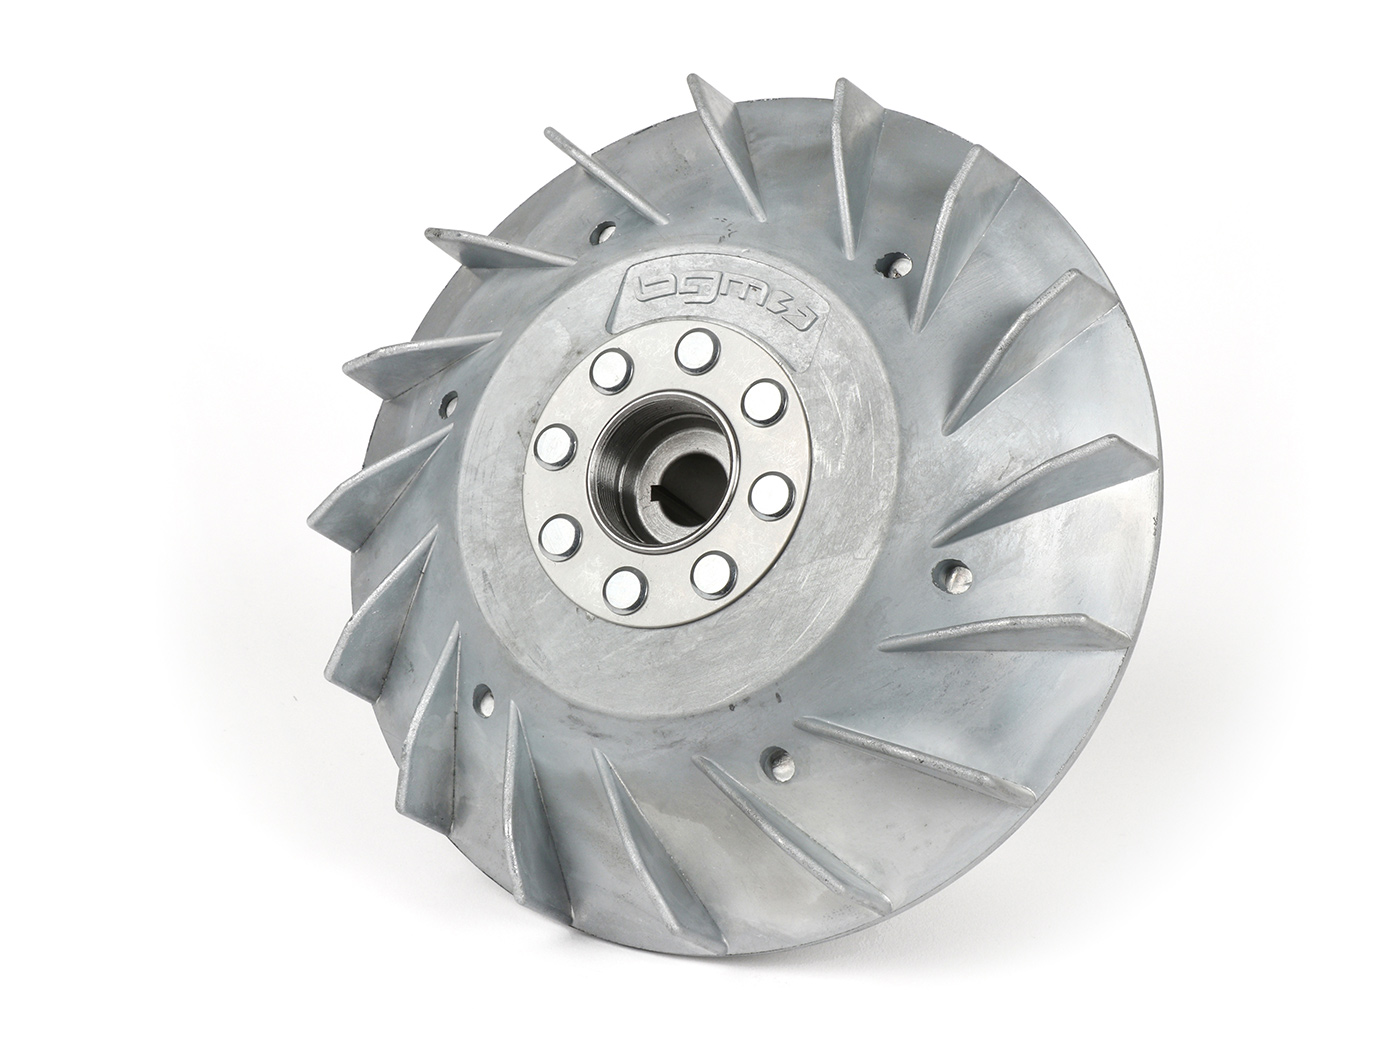
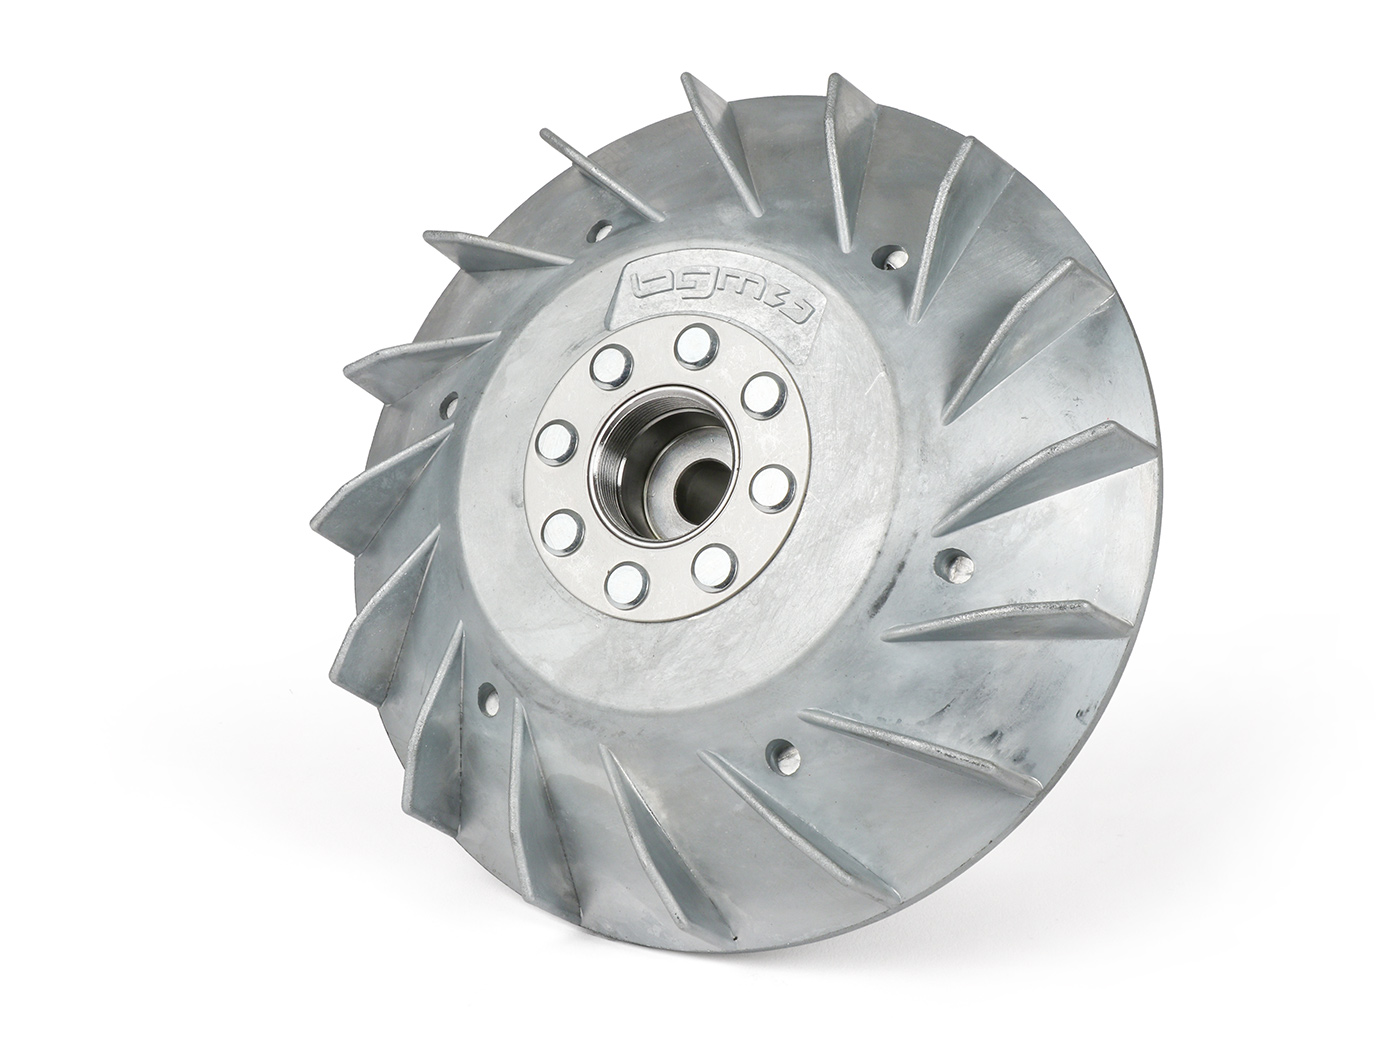
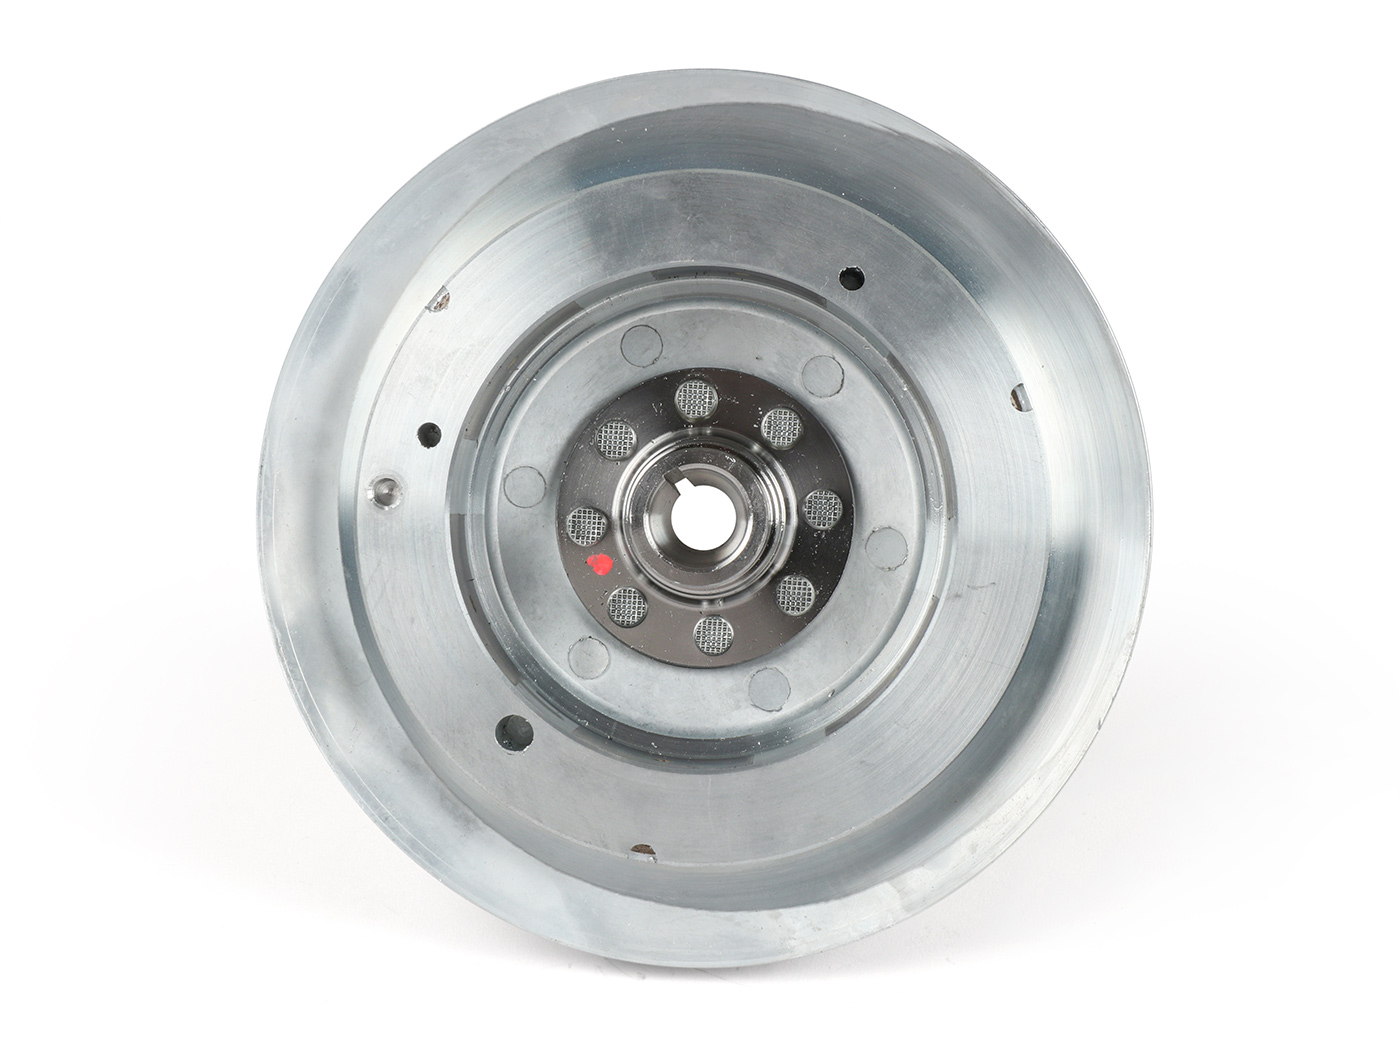
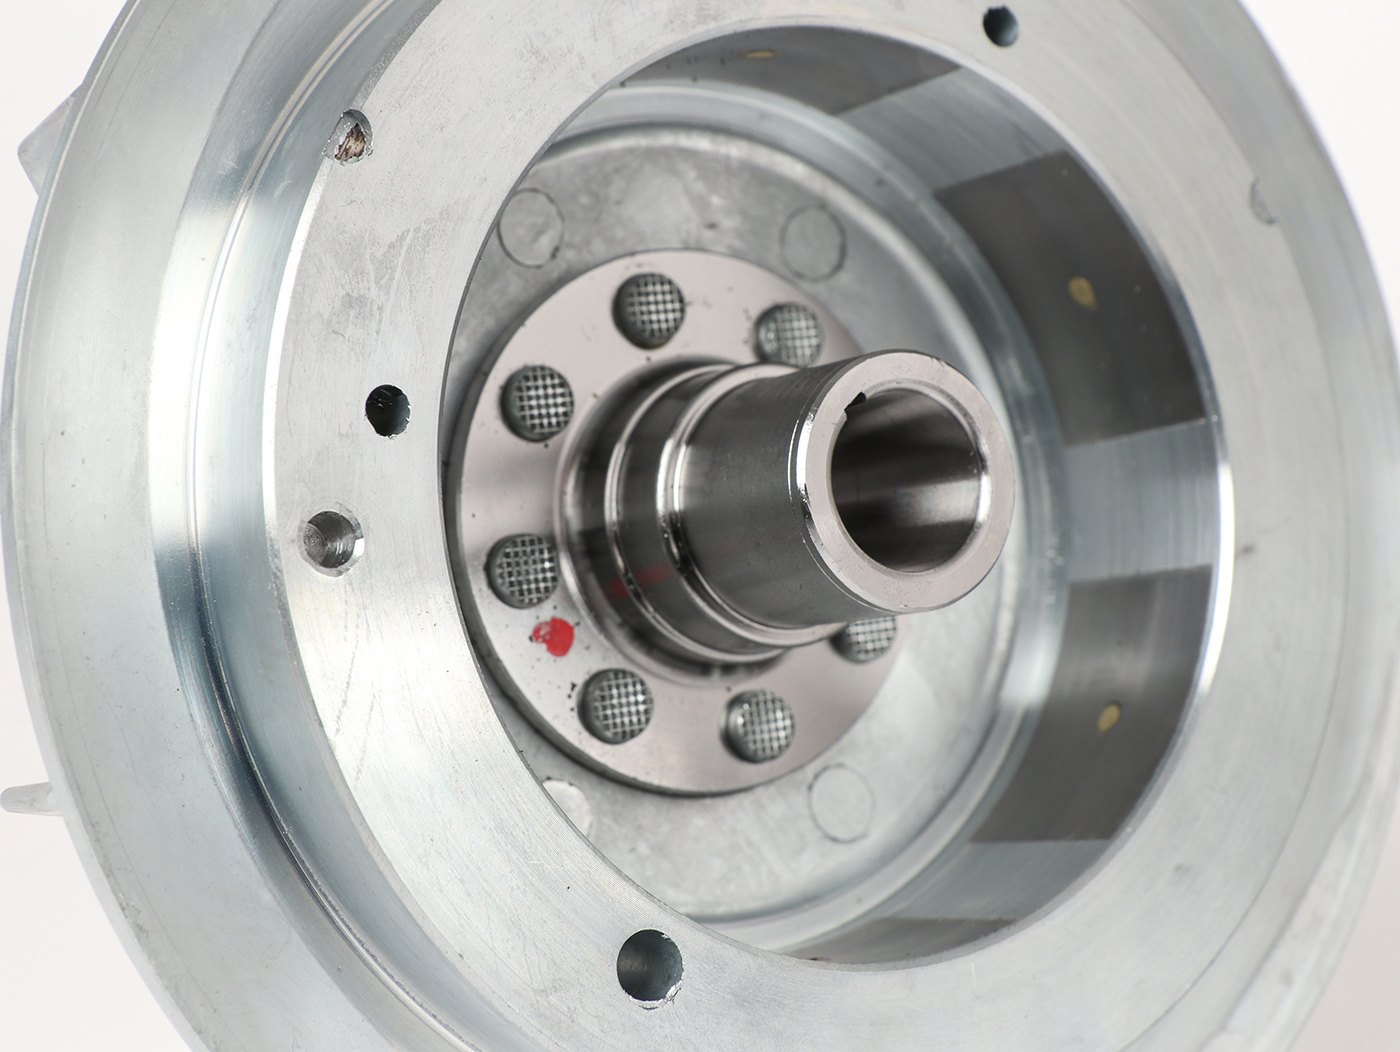
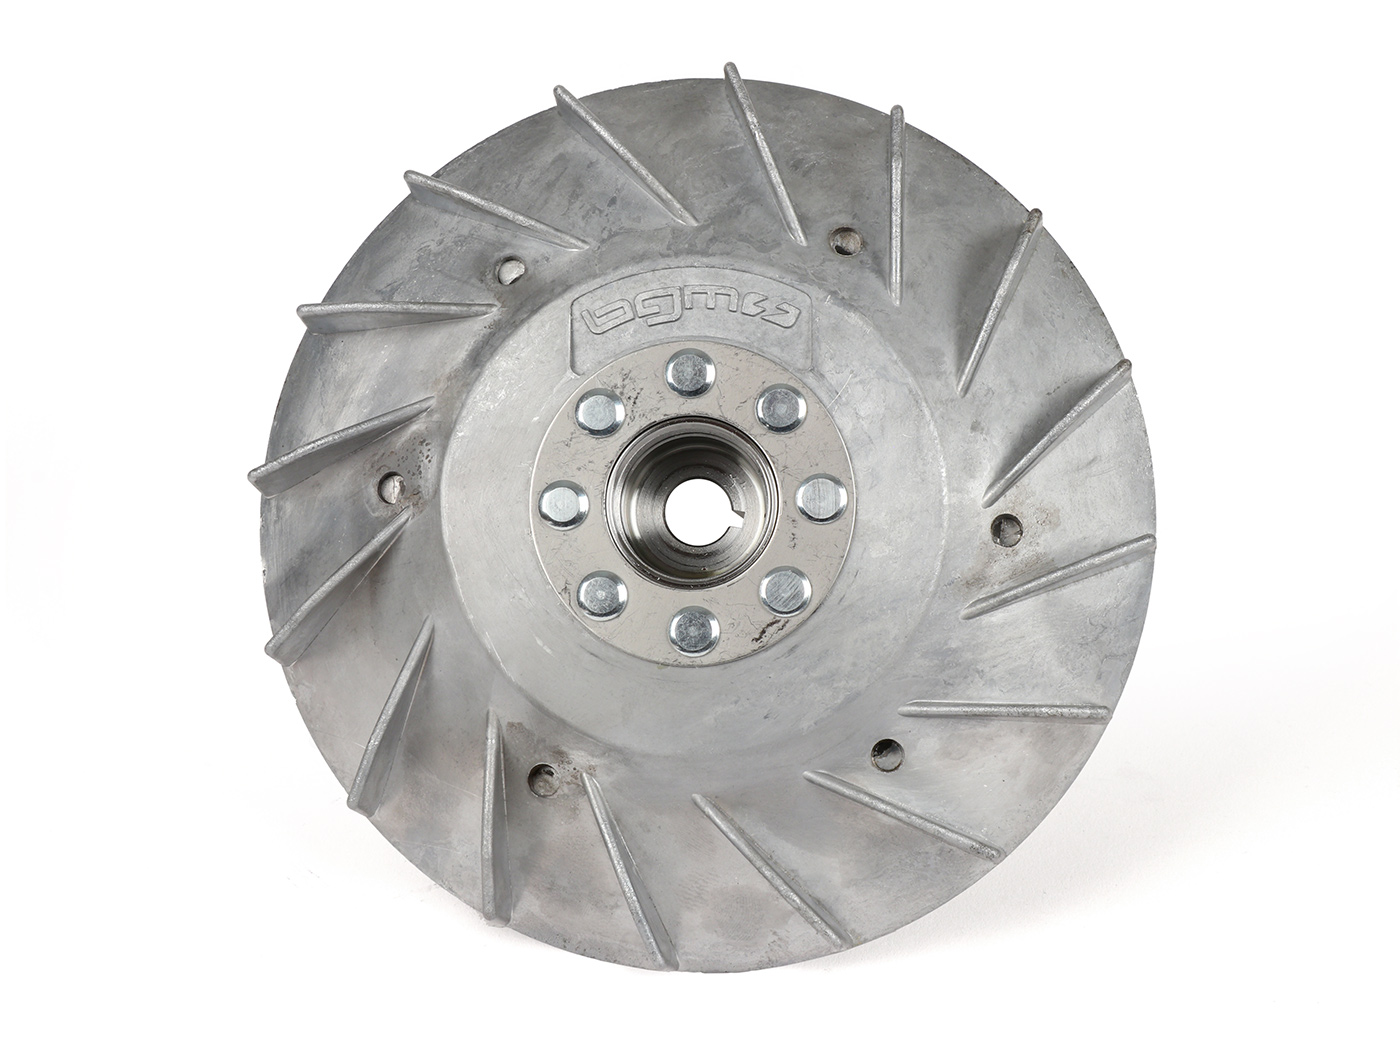
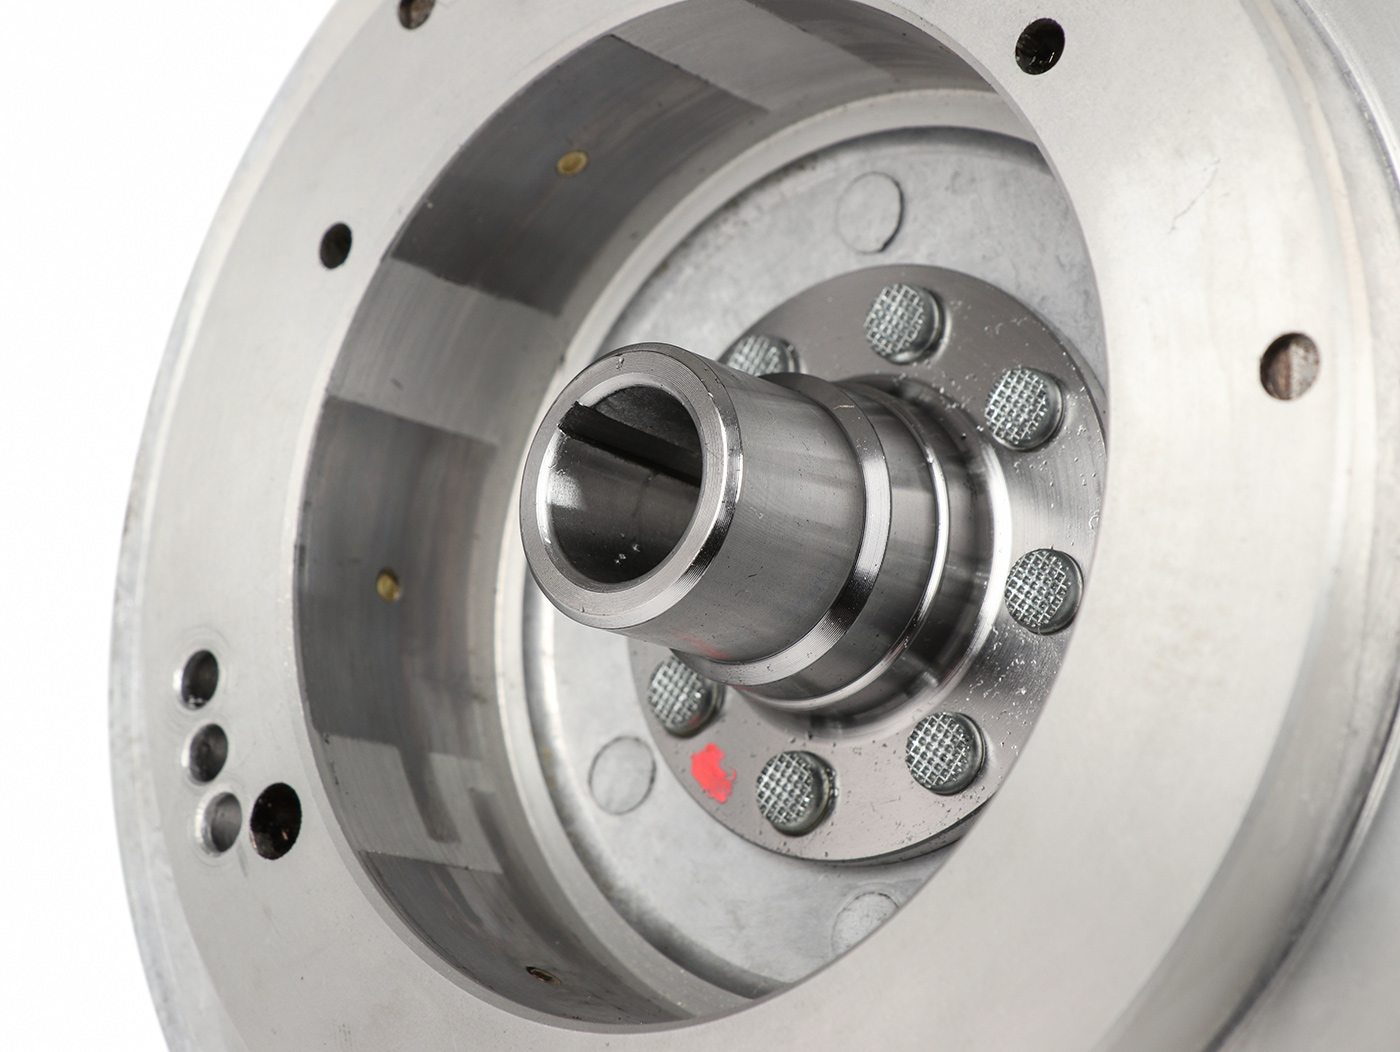
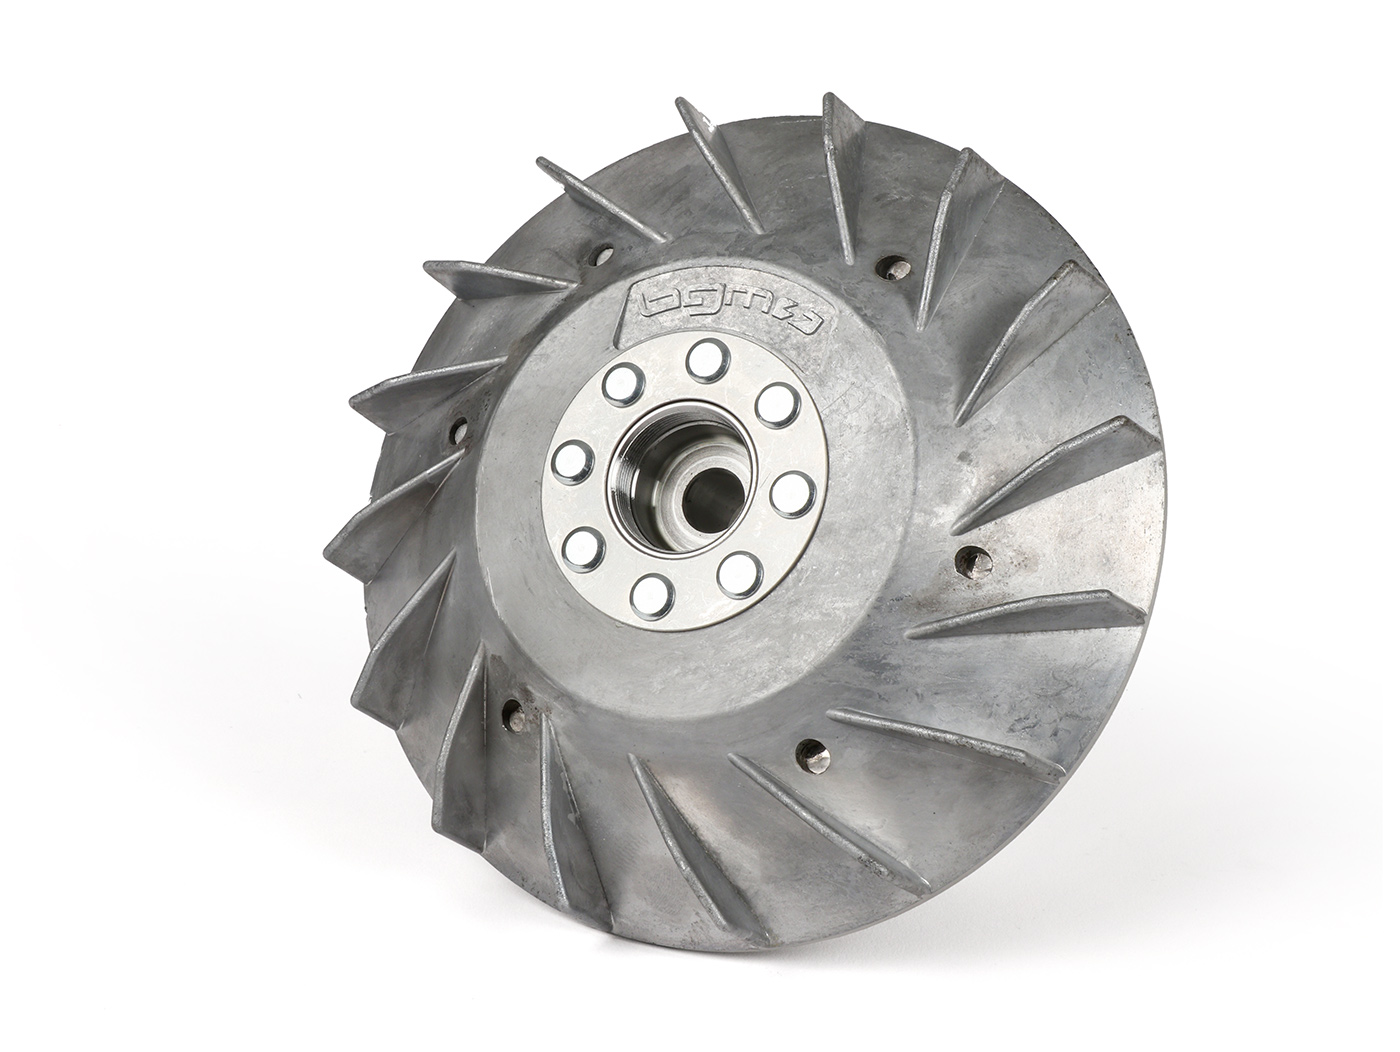
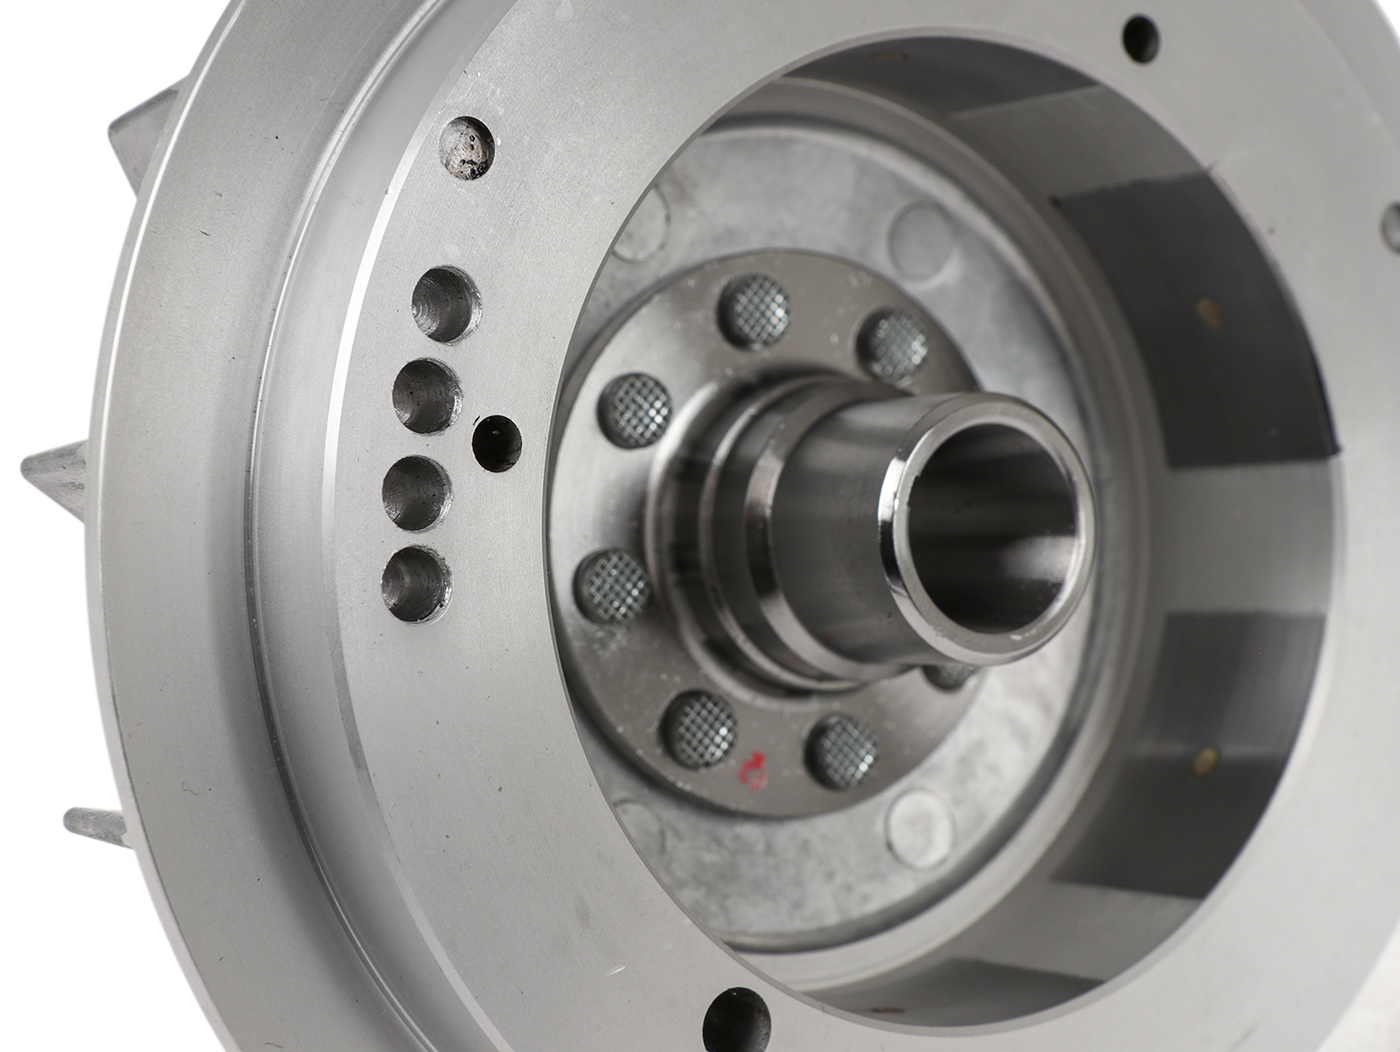
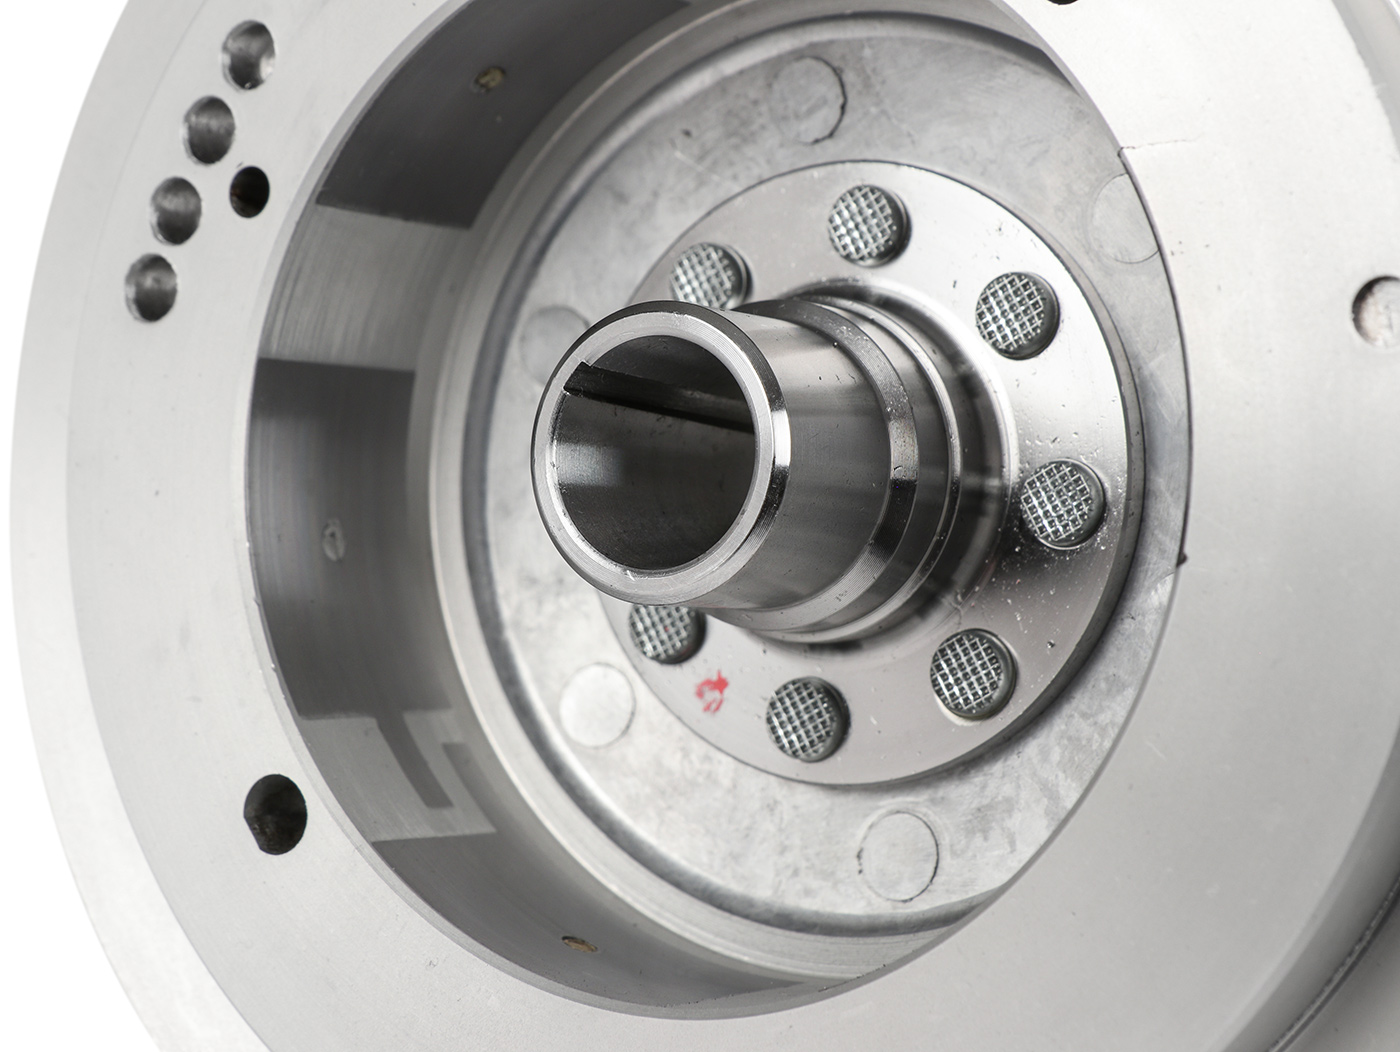
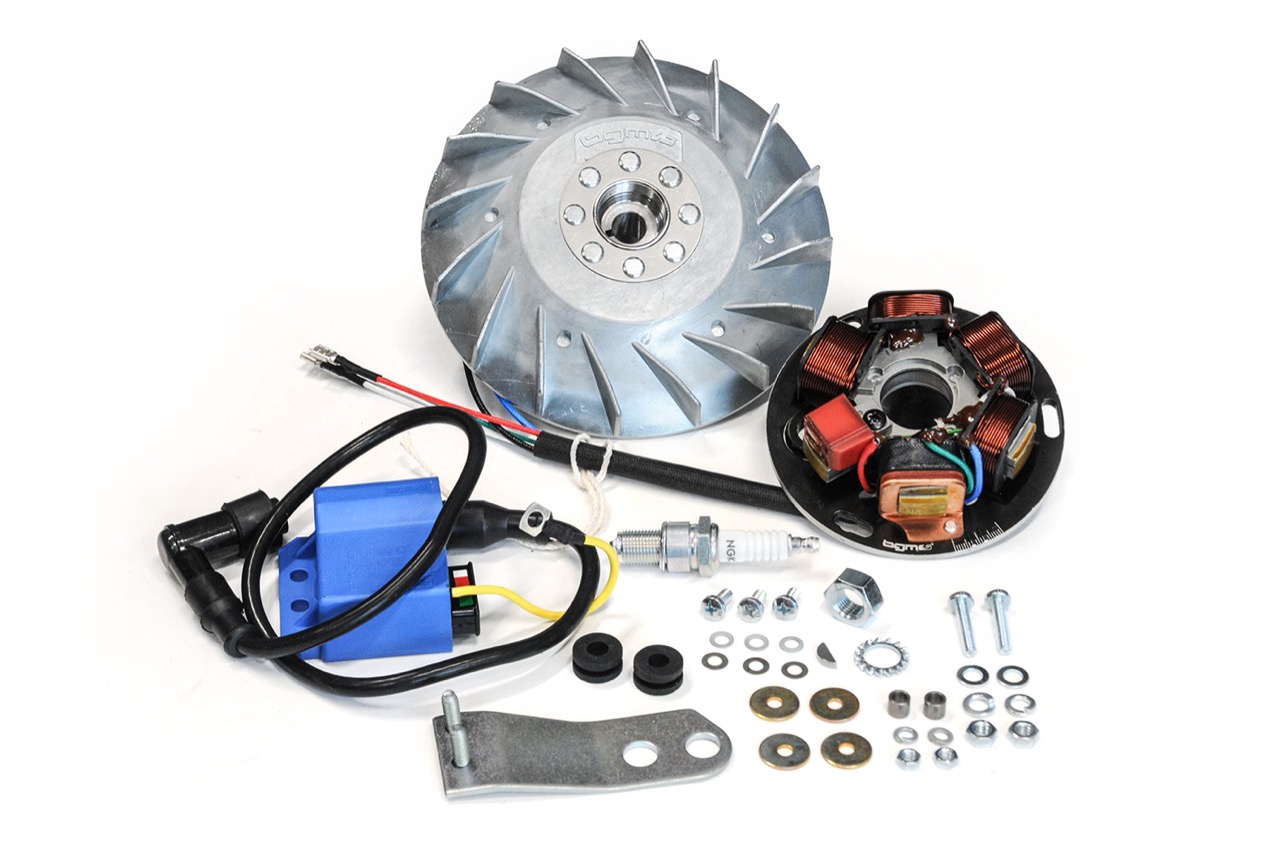
The ignition should keep our tourer running smoothly, so we chose the one here bgm ignition with the PX pole wheel with a mass of 2300g.
The performance of the 252ccm unit is controlled by a bgm superstrong Clutch, the bgm primary 25-62 and one bgm Transmission with the graduation 12-13-17-20 passed on to the rear wheel. The short, fourth gear on the auxiliary shaft keeps the most frequently used gear more stable. With one tooth less in fourth gear, the teeth become significantly wider in the tooth base and thus offer a significantly higher load capacity than the variant with a gear wheel with one more tooth.
The requirement for the test setup is that we work from a rather good-natured touring design to a sporty design. Just to be able to depict a section through the possible variants. As a starting point for the test series, we set a basis with small control angles in order to be able to test as many sensible variants as possible later
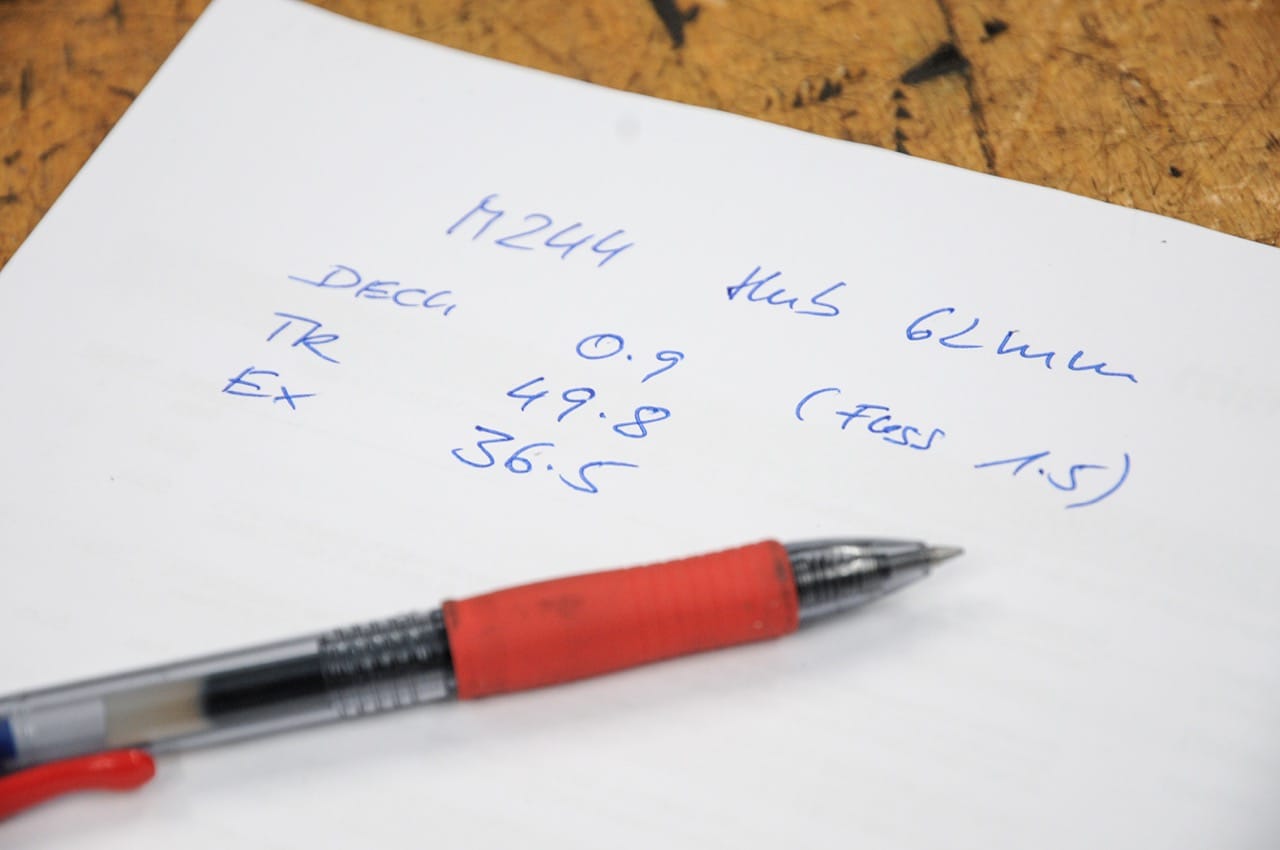
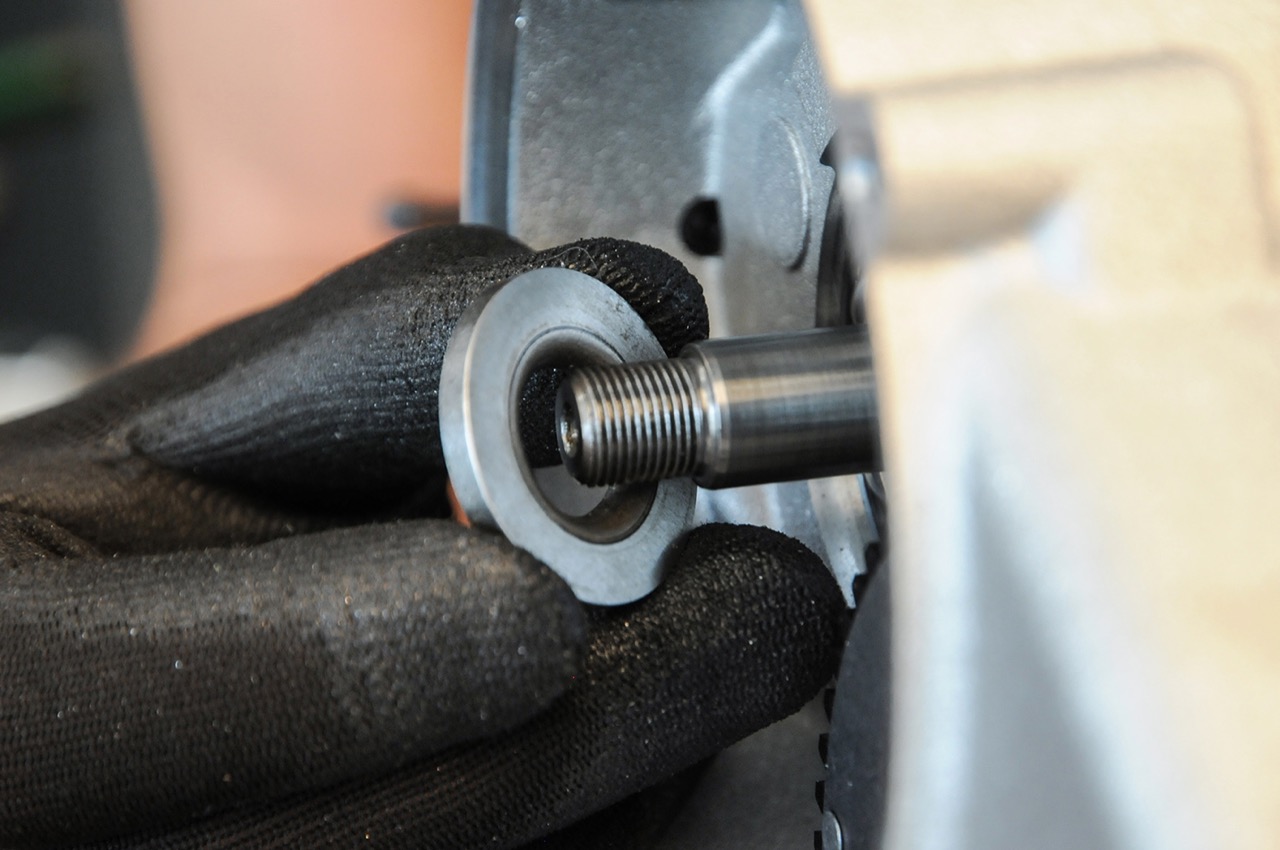
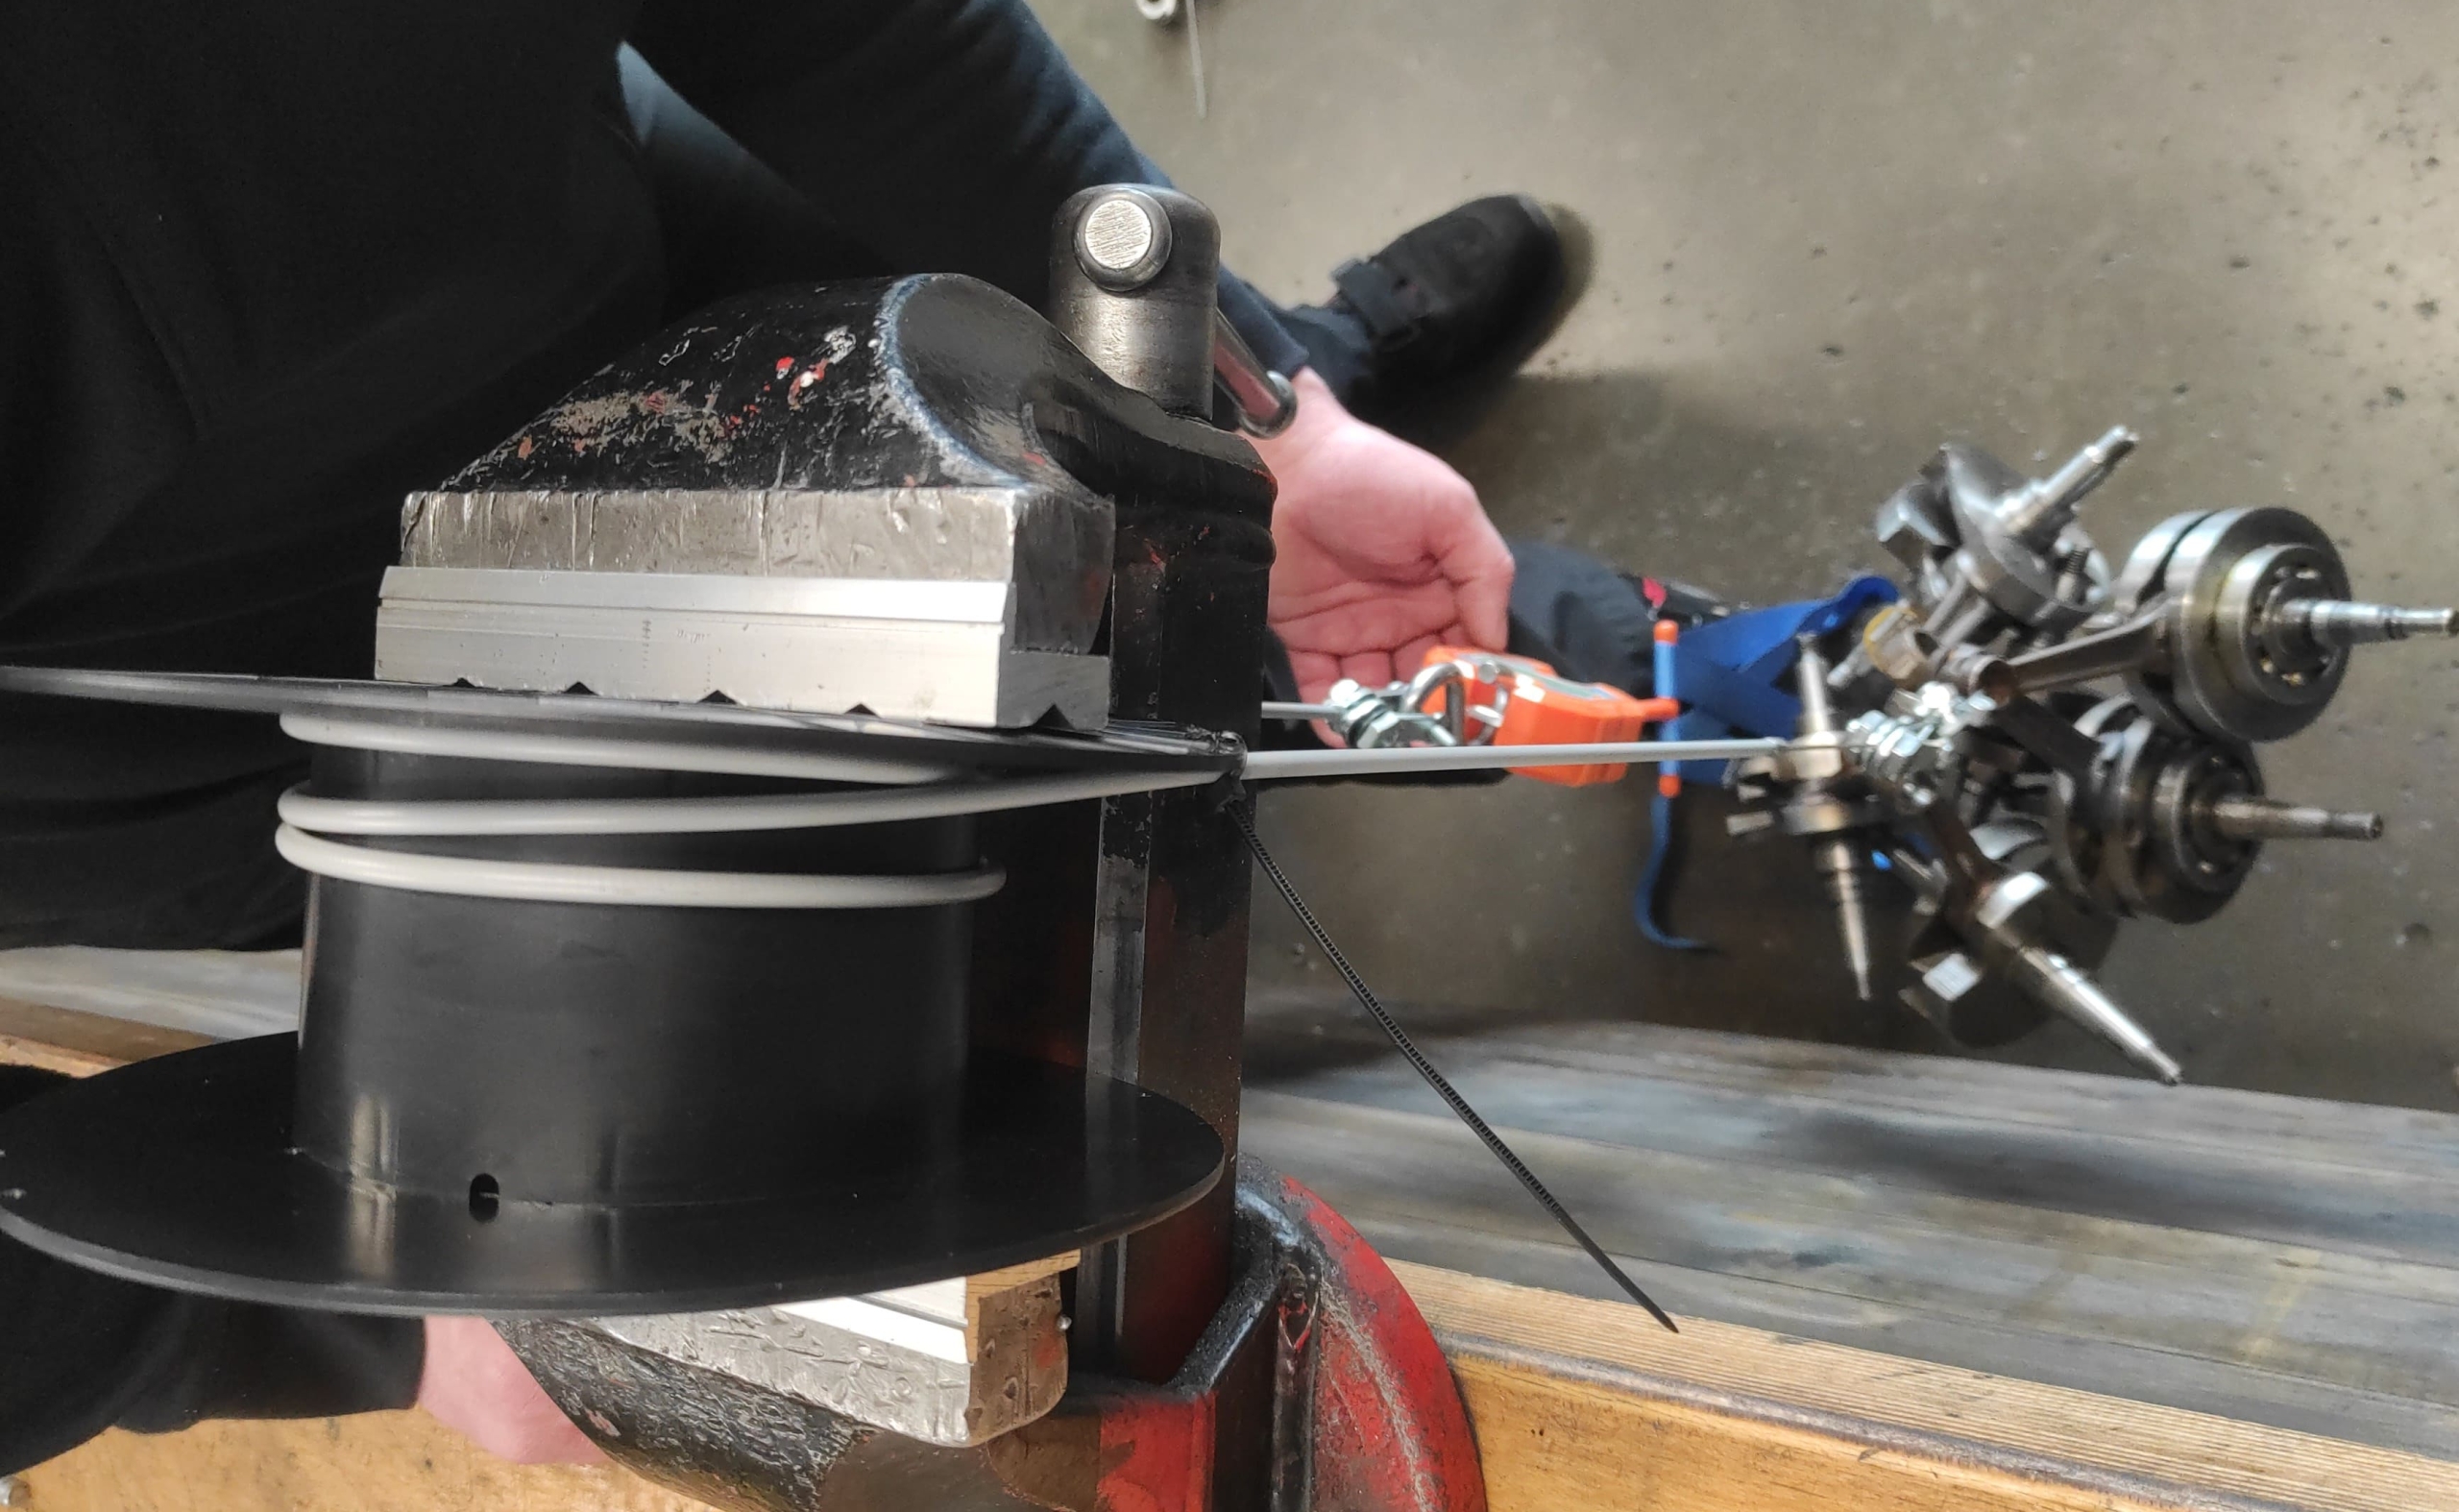
To determine a starting point, the crankshaft is mounted with bearing dummies and the cylinder is attached to determine the control angle.
Based on this initial data, we can consider to what extent we can sensibly set up the cylinder with spacers and work on the outlet in later stages of expansion.
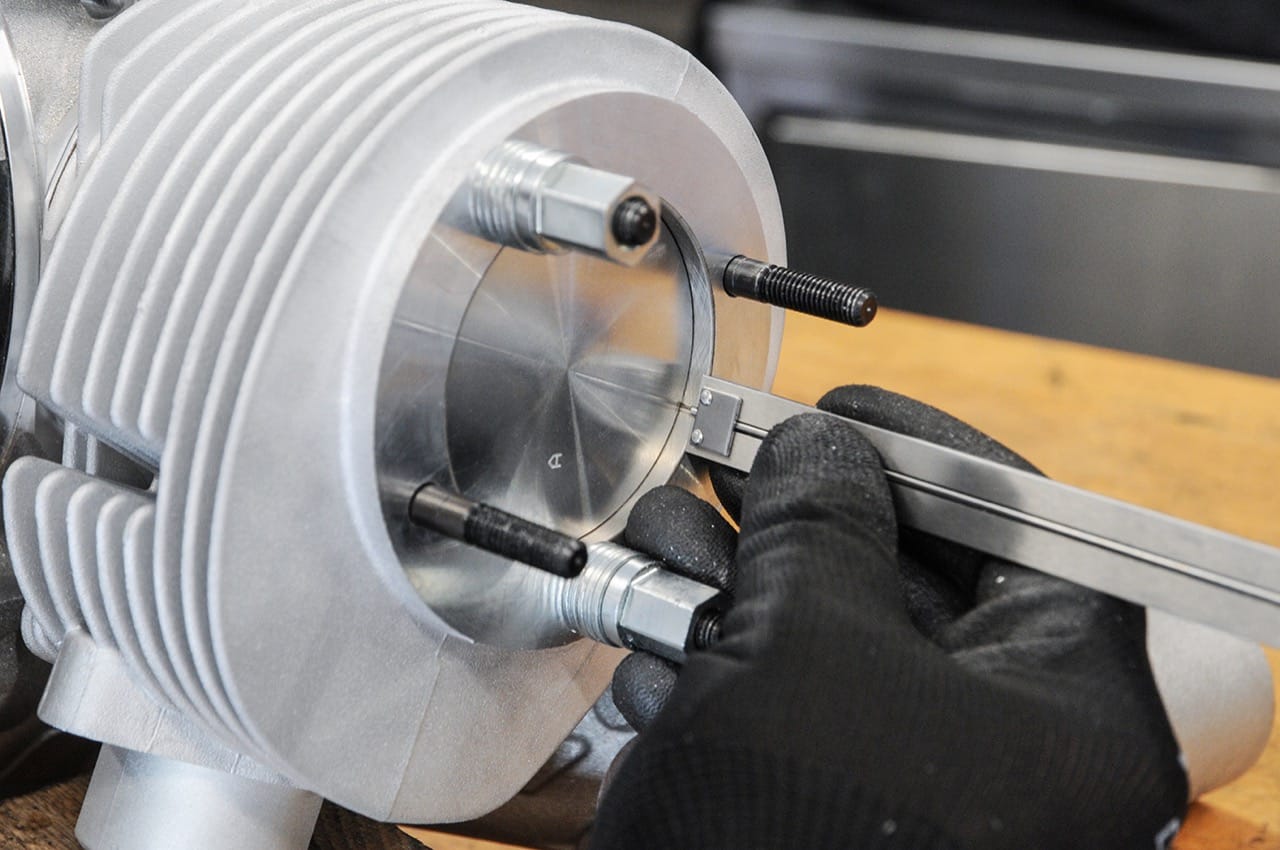
After measuring back and forth a bit, we decide to start from the middle position of the control angle with one Transfer angle of 124 ° and a Outlet angle of 177 °.
The factory new Malossi motor housing will be finished by king wave for the crankshaft with 62mm stroke and the enlarged diameter of the crank webs with 99,4mm. The bearing seat for the bearing on the alternator side is also checked and reworked in individual cases, as the bearing seat is manufactured by Malossi with a very tight tolerance.
We also offer the completely machined housing with a high-quality crankshaft from Kingwelle as a set. We use the set for this engine KWM46228.
The one attached by Malossi Bearing Kingwelle does not recommend 6205 for the alternator side. We follow Kingwelle's recommendation and use a here NU205.
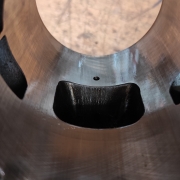
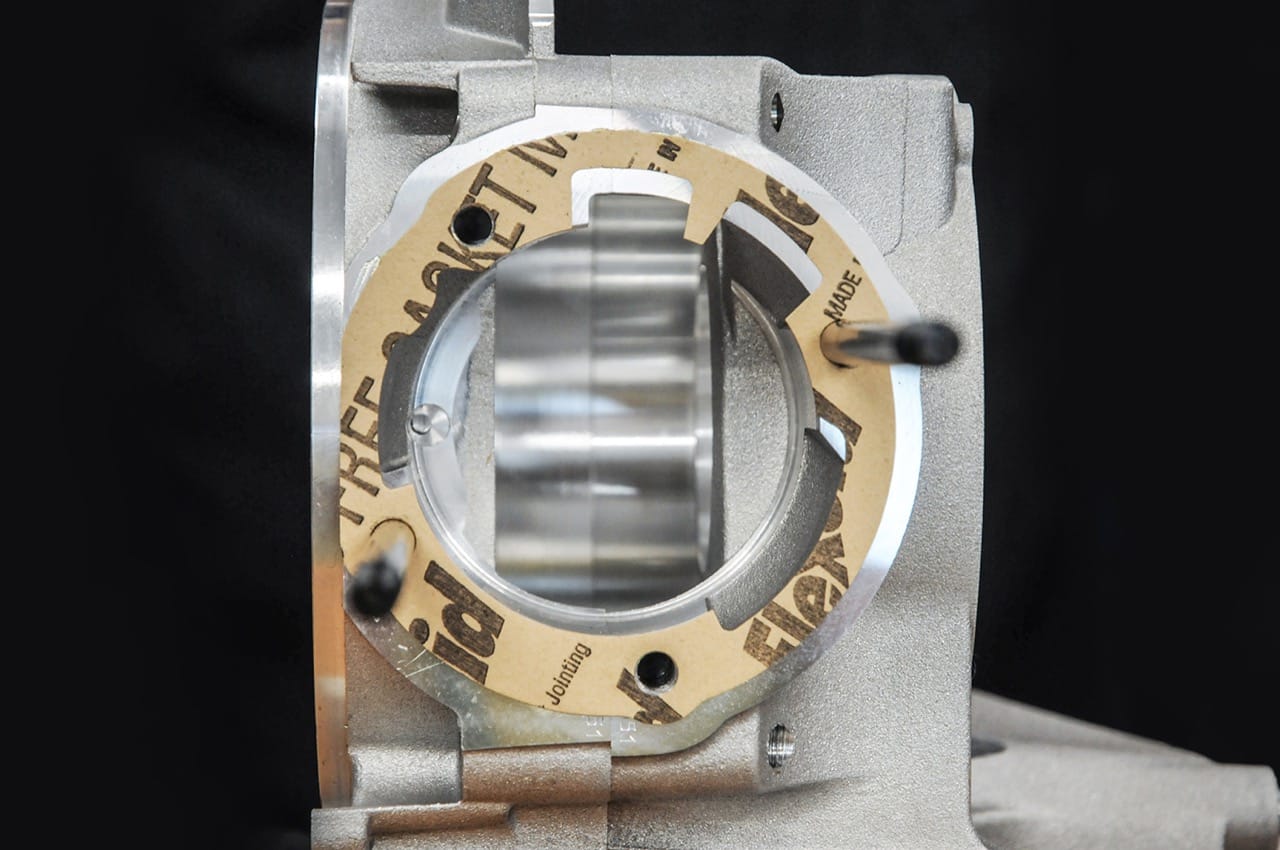
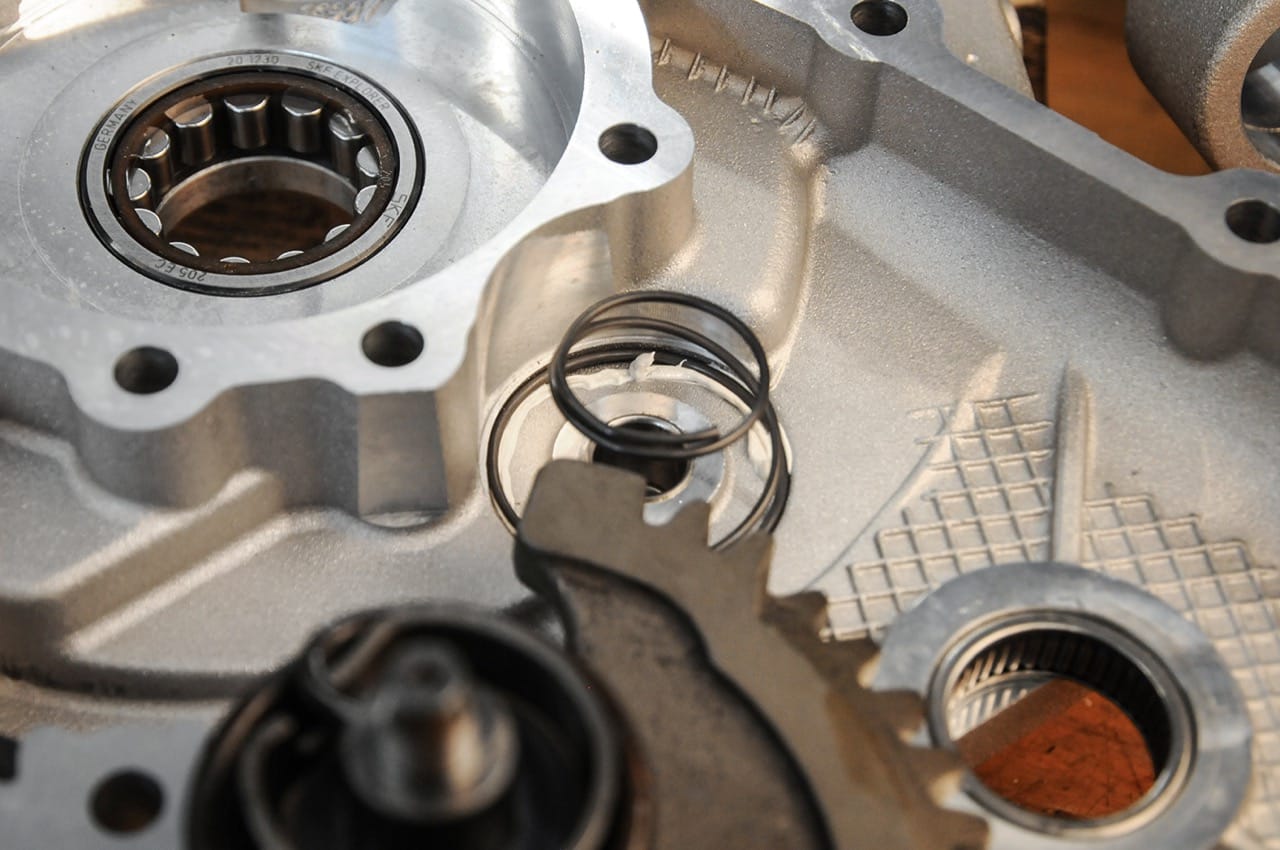
Before inserting the bearings, we process the motor housing and adapt the cylinder and the overcurrent ducts to each other. On a Piaggio engine case, this tends to degenerate into an evening event. The Malossi housing is already designed for the channels of the Malossi Sport and MHR cylinders and requires little rework for the Quattrini M244. Most of the work goes into removing the sealing surface on the cylinder base, which allows the M244 to be used on Piaggio engine housings.

Adjusting the transfer channels to the motor housing is done quite easily. The cylinder base seal shows how little needs to be adjusted here.
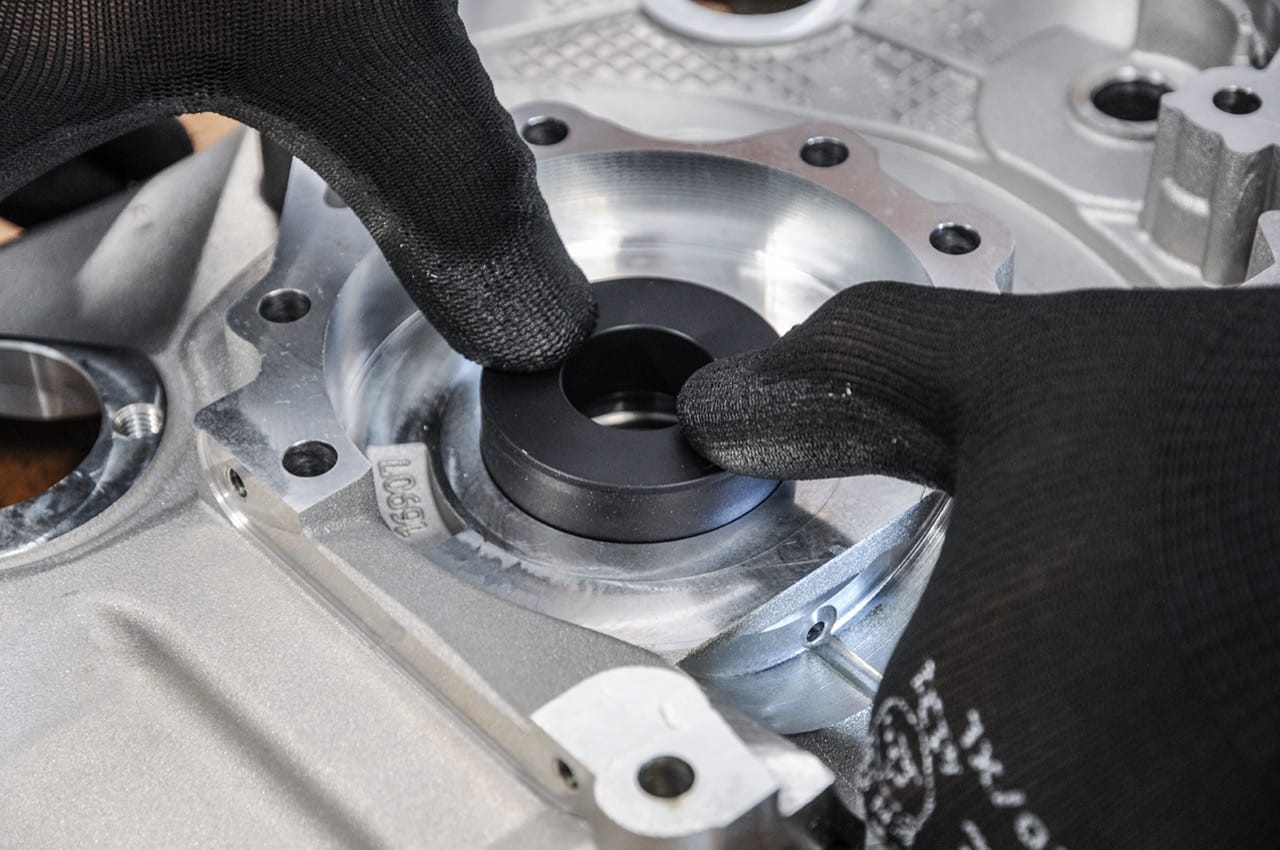
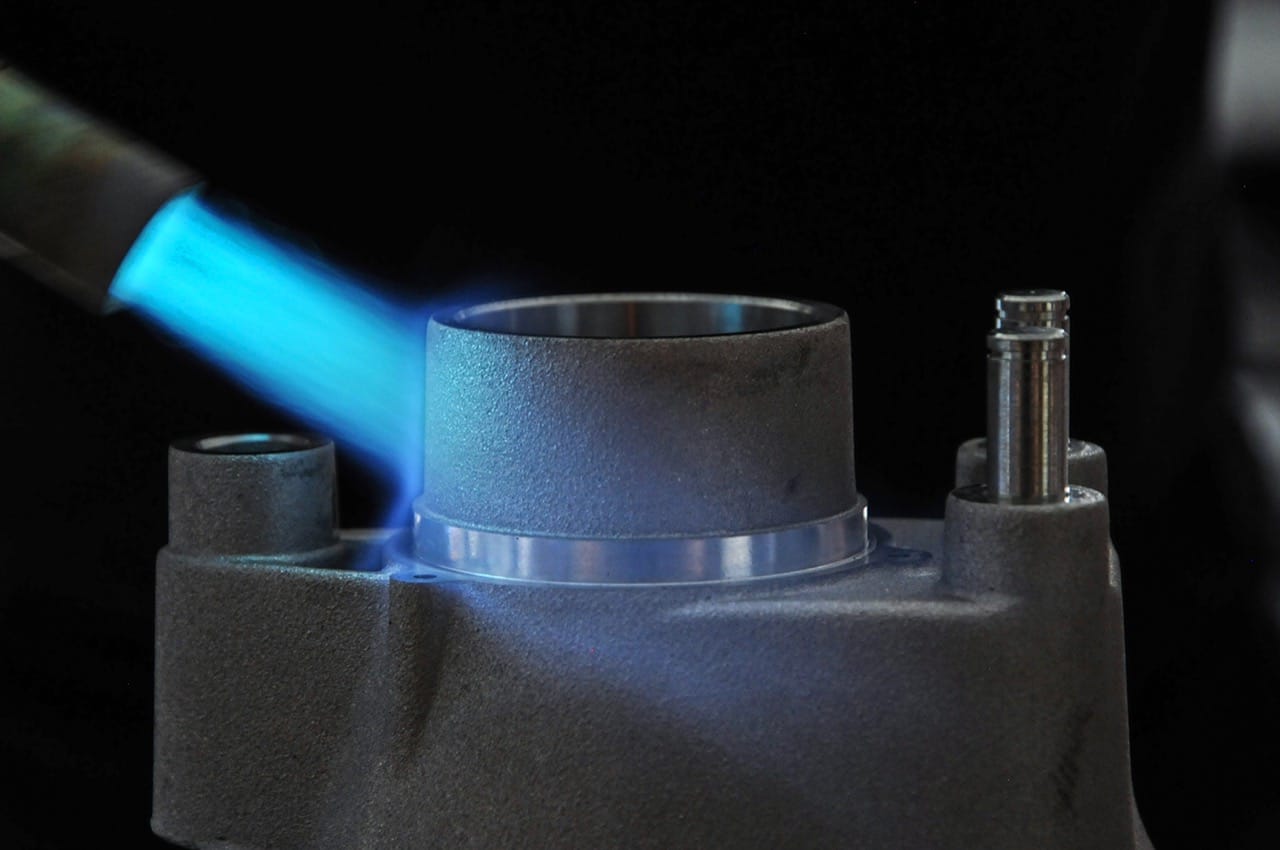
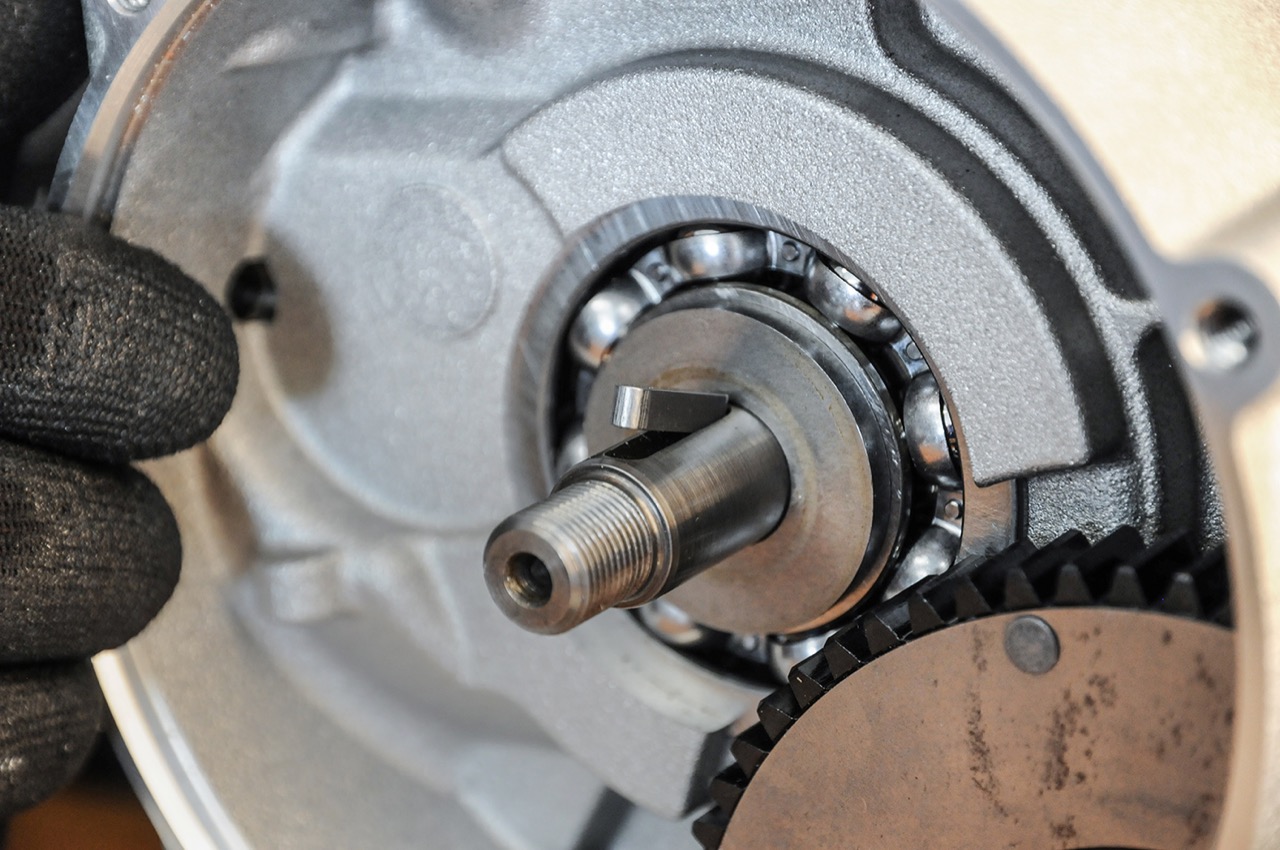
All bearings are traditionally used by shrinking in order to avoid damage to the bearing seats by simply pulling in the bearings. The shrinking or cold / warm process offers the advantage that no mechanical stress acts on the surface of the bearing seats and the seat is not widened as a result.
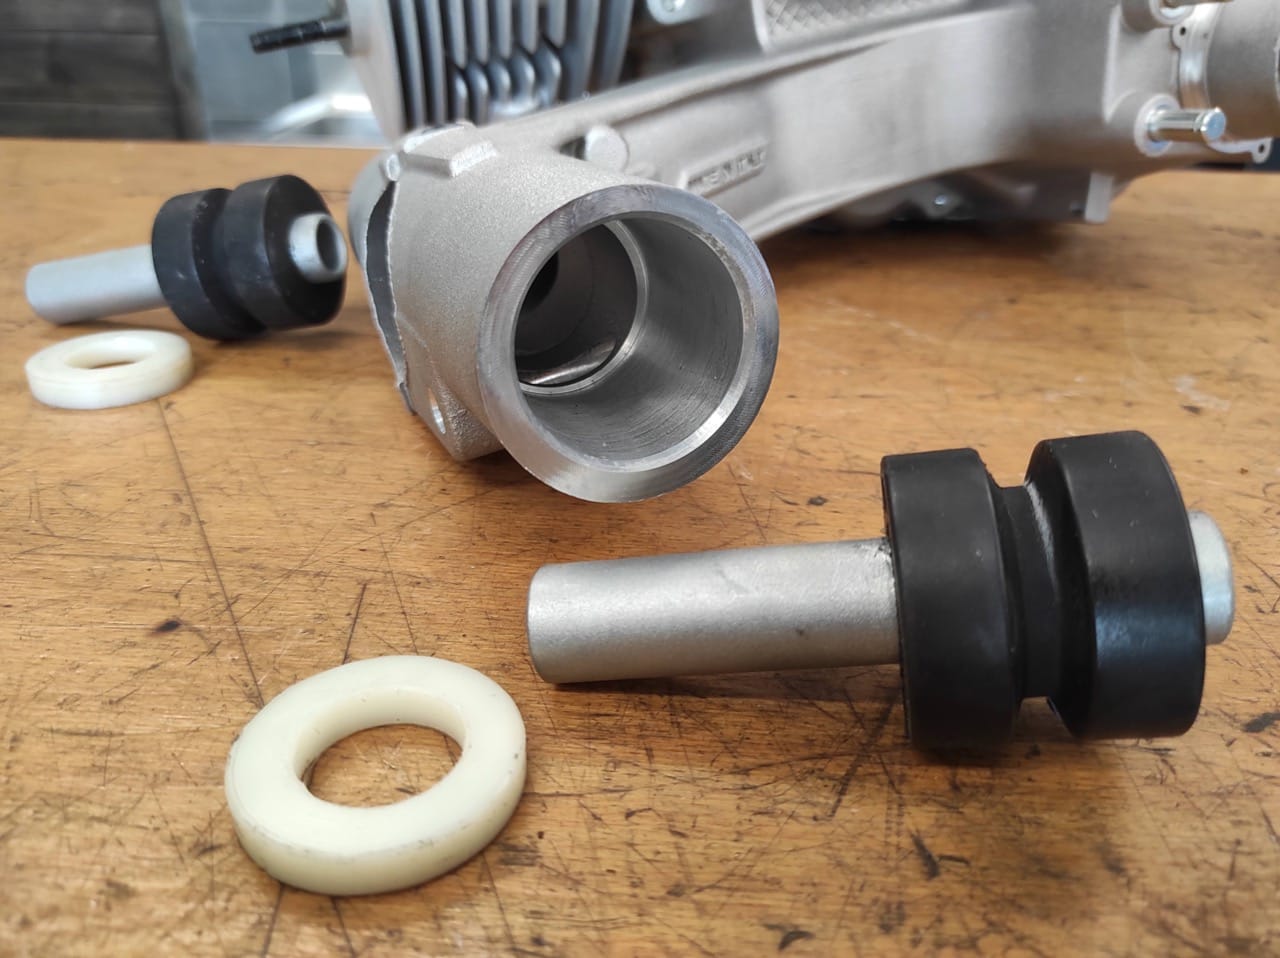
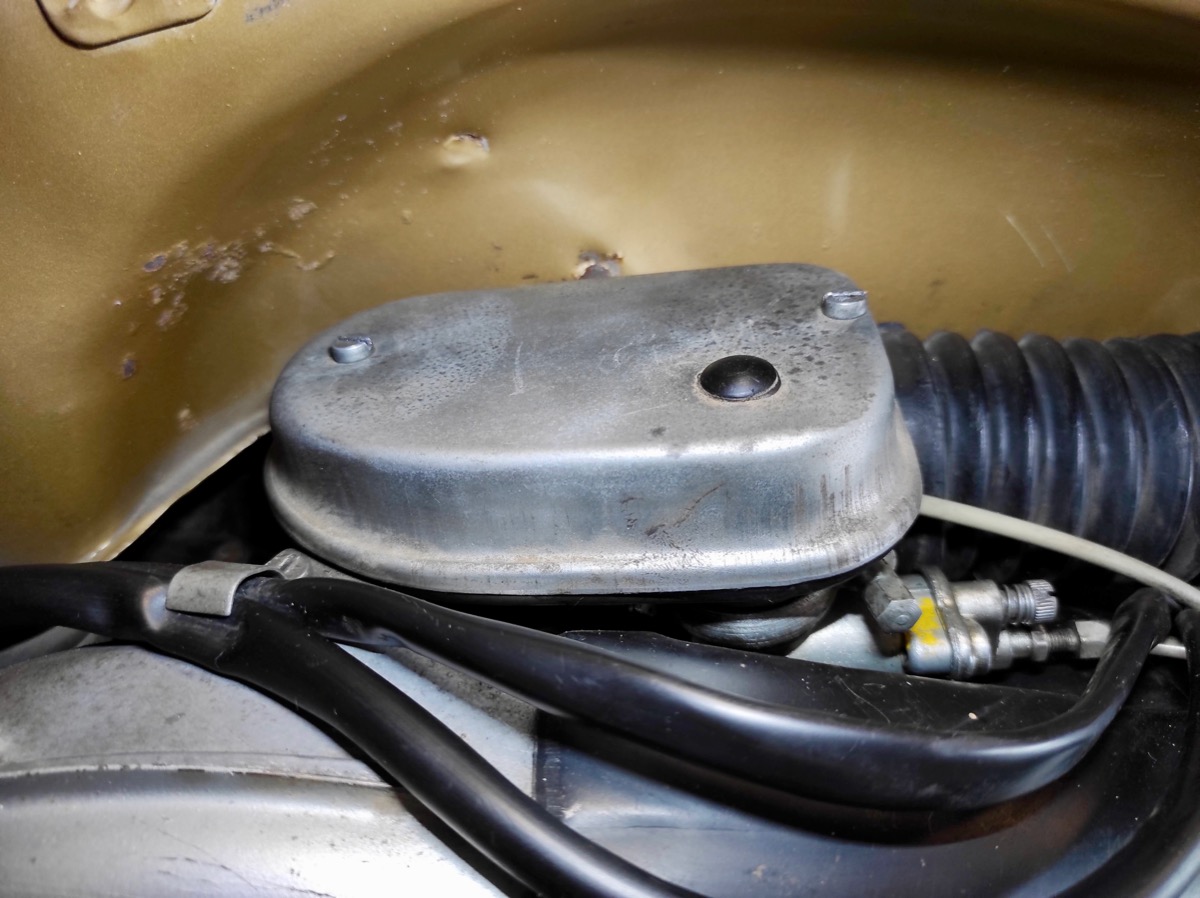
Another peculiarity of the Malossi motor housing is that the supplied original silent rubbers are too narrow for the motor housing. Or rather, here Malossi has simply oriented the seats for the silent rubbers deeper in the housing than was originally the case. This allows the motor housing to move over the silent rubbers in the direction of the frame.
We have been here with one quite a while ago Spacer set BGM7952SP A remedy was created for the silent rubbers and thus ensured a secure fit of the silent rubbers in the correct position.
The M244 with a 62mm stroke of the king shaft brought to 252ccm, will transfer a lot of torque to the rear wheel. A guarantee to achieve a high cruising speed at a reduced speed. That enables the primary. Starting from a massive and early onset of torque mountain, the primary can be selected to be long or even very long. With 25 to 62 teeth, we use the longest primary offered by bgm. The reinforced primary repair kit from bgm creates a durable primary drive.
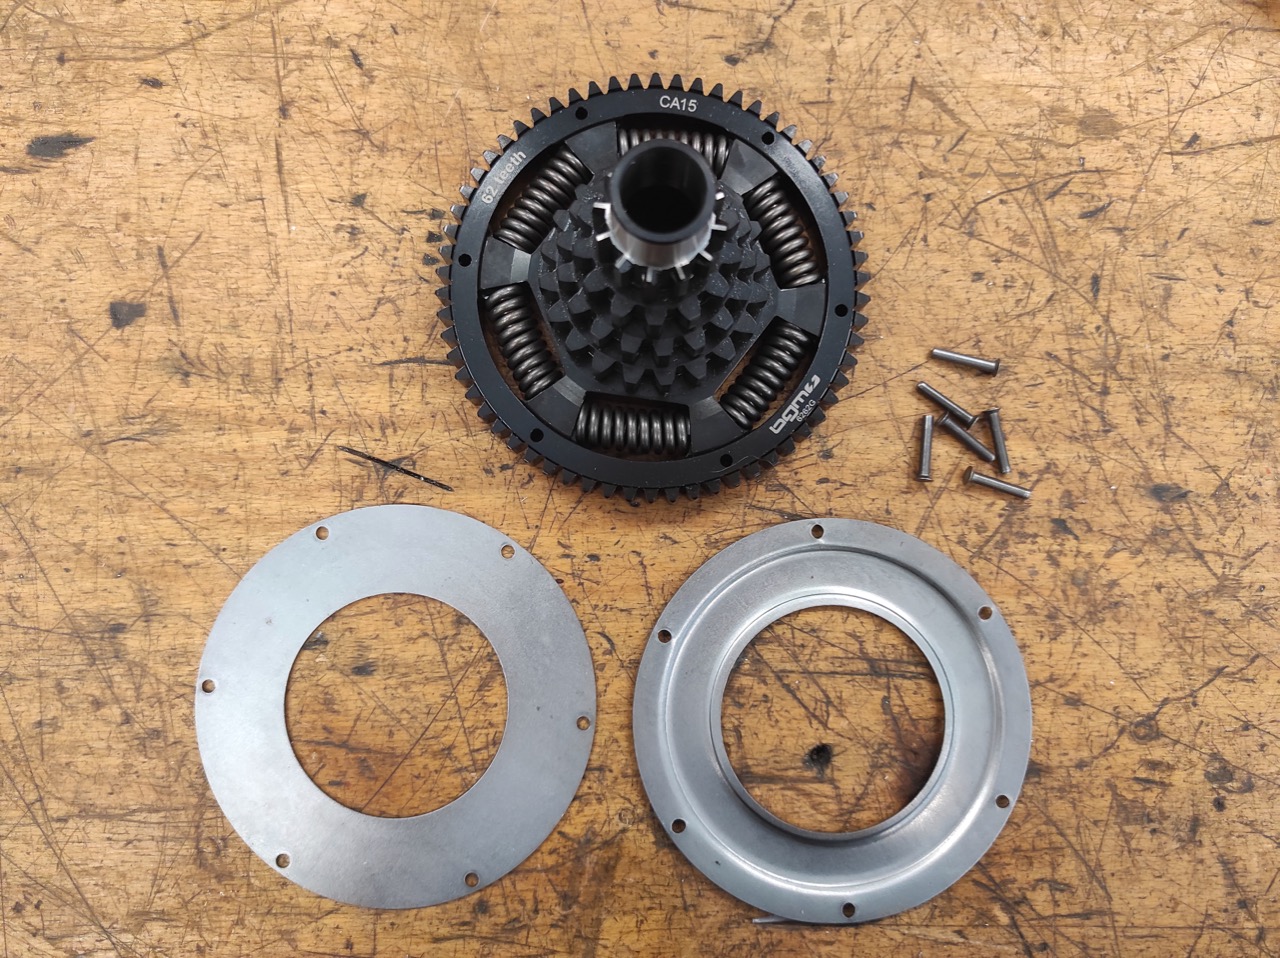
Shift pins and crossbar are included threadlocking assembled.

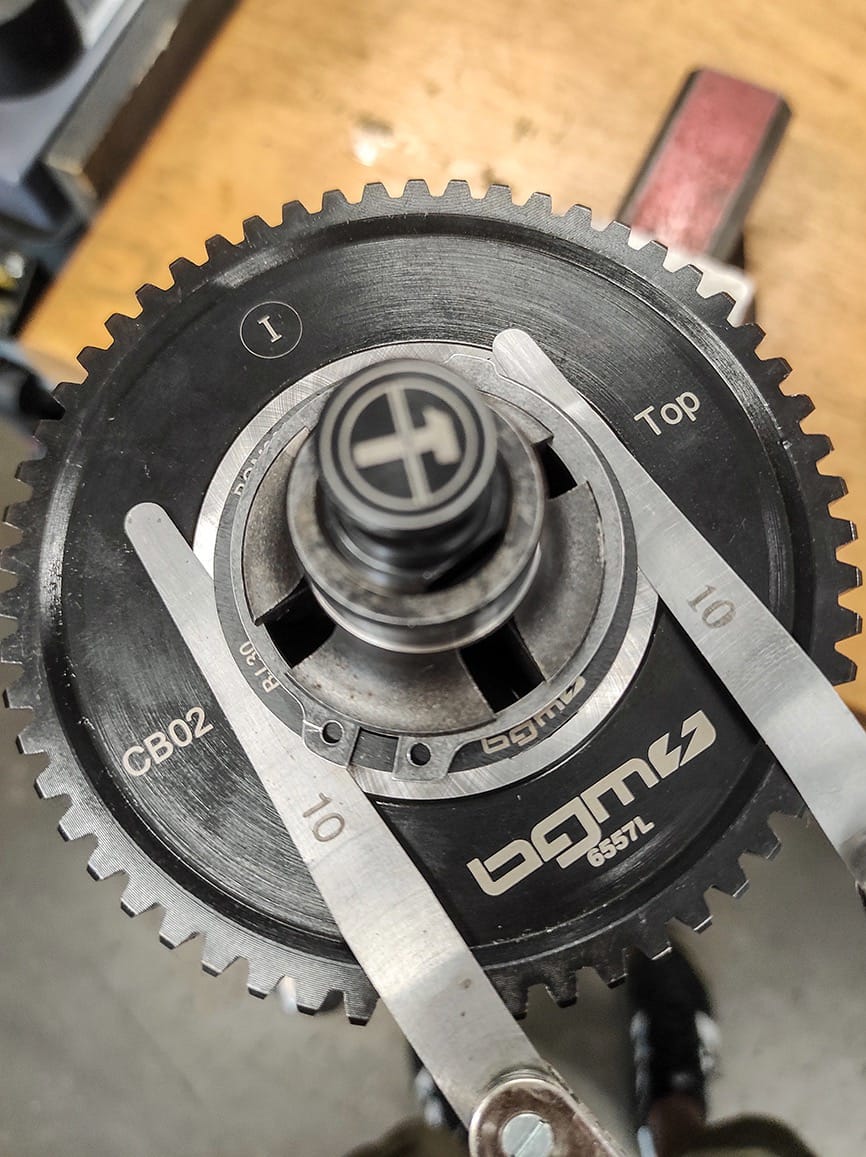
The bgm secondary gear is set with the smallest possible clearance with the bgm shoulder rings.
Further adjustments to the motor housing are no longer necessary and all other innards find their way into their place.


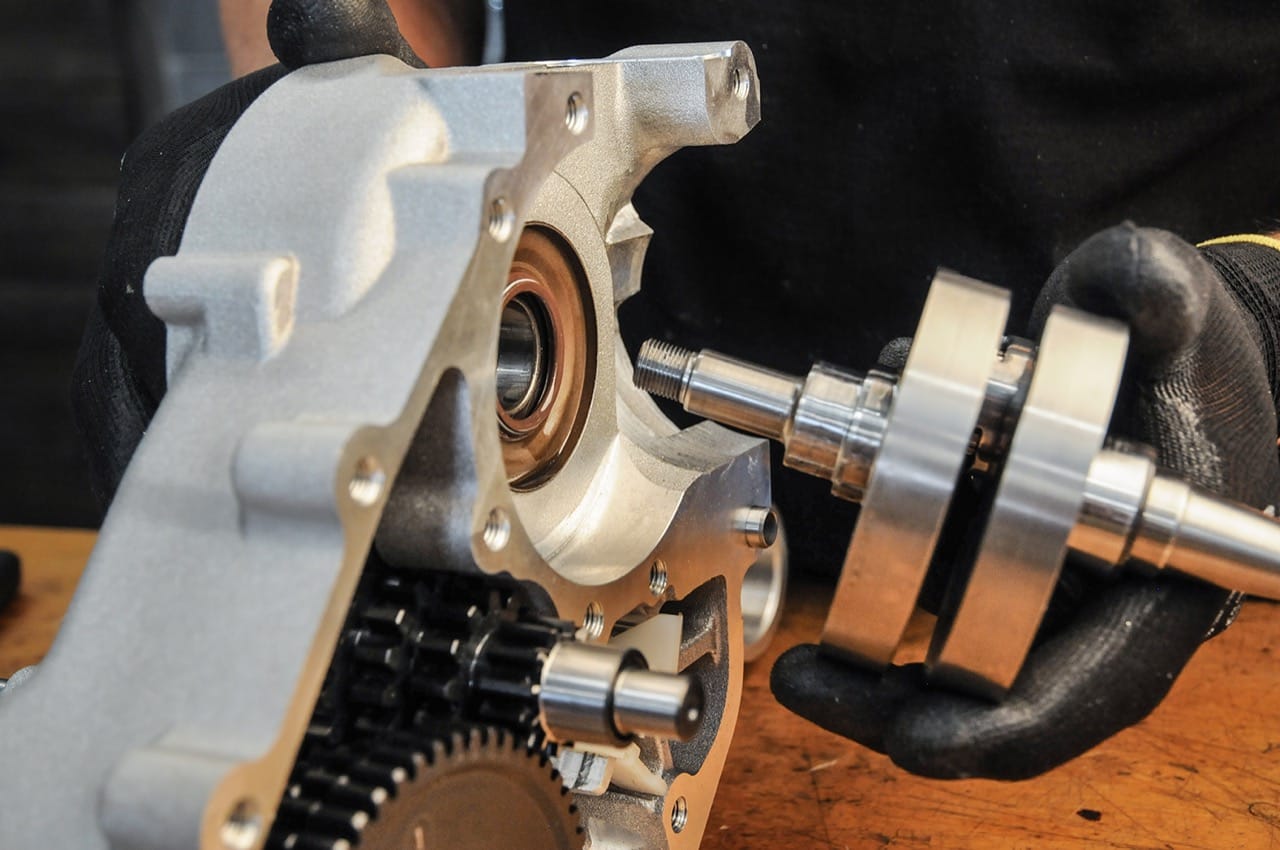
To assemble the crankshaft, the shaft sealing ring is moistened with a little oil so that the sealing lips slide cleanly onto the crankshaft and are not damaged.
The Malossi engine case, contrary to the Piaggio engine case, is without a solid seal composed. Instead of the paper seal, as in a modern engine concept, the housing is Surface seal sealed.
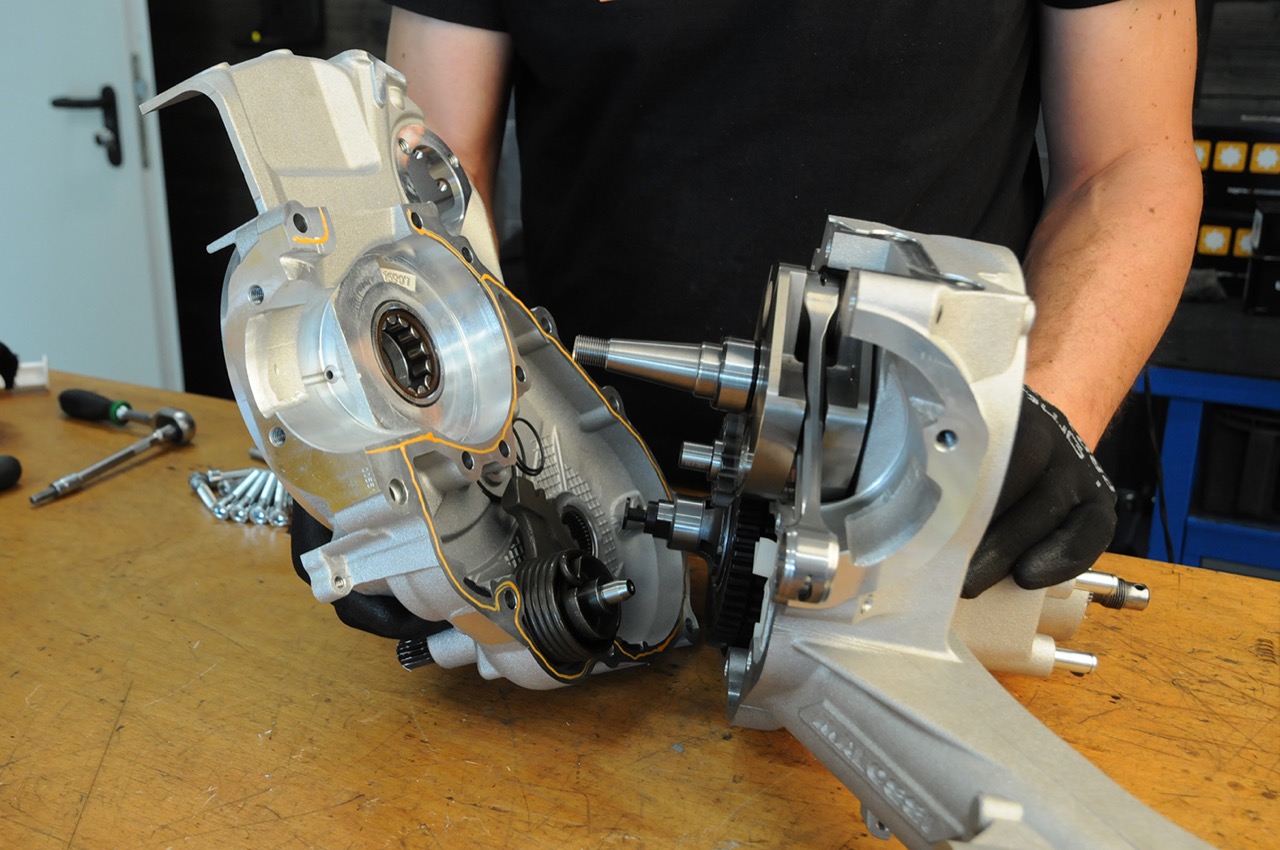
To connect the housing halves, Malossi uses M8 hexagon socket screws. Due to the different lengths of the screws used, a look at the Application listto find the correct attachment point.

The King Shaft is supplied with its own thrust washer and special key. The thrust washer has a clear radius that fits exactly to the radius of the crankshaft. A breaking thrust washer is almost impossible.
The Kingwelle has a special feather key on the drive side, which is specially manufactured for Kingwelle and fits exactly into the groove of the coupling hub.
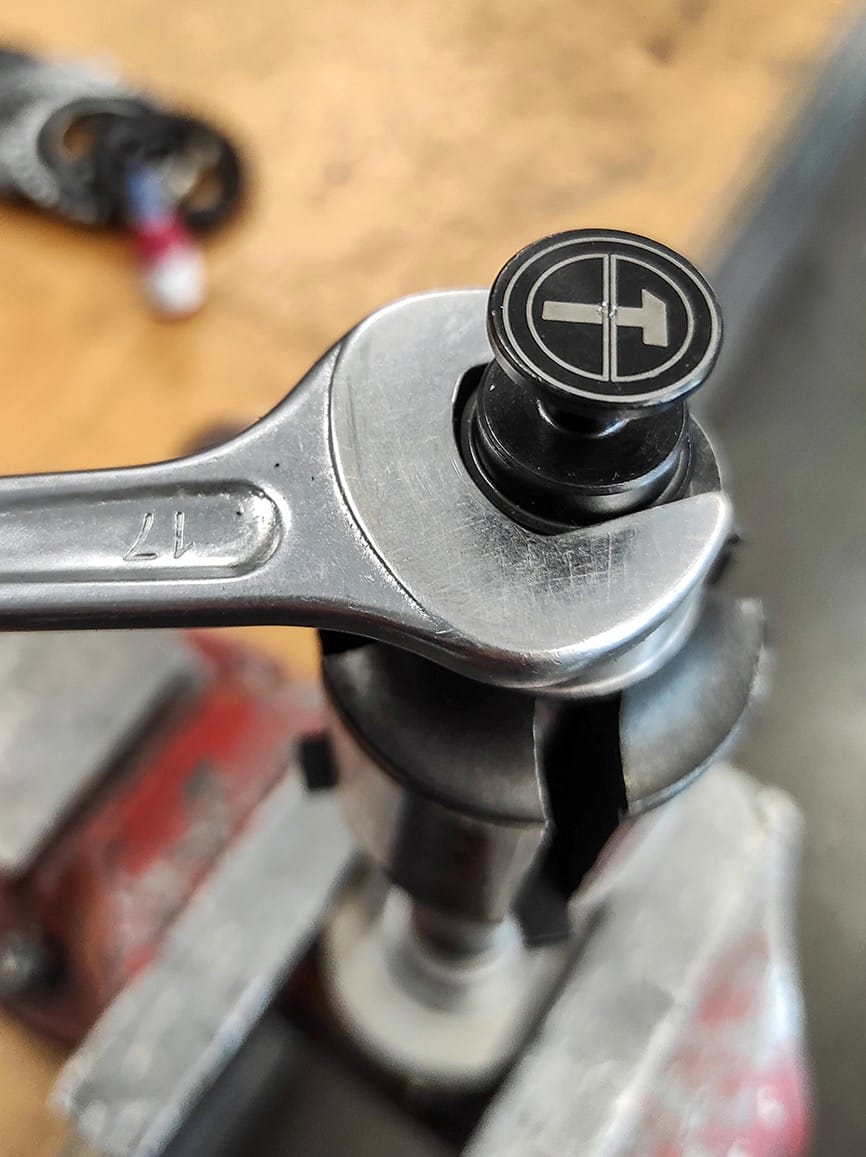
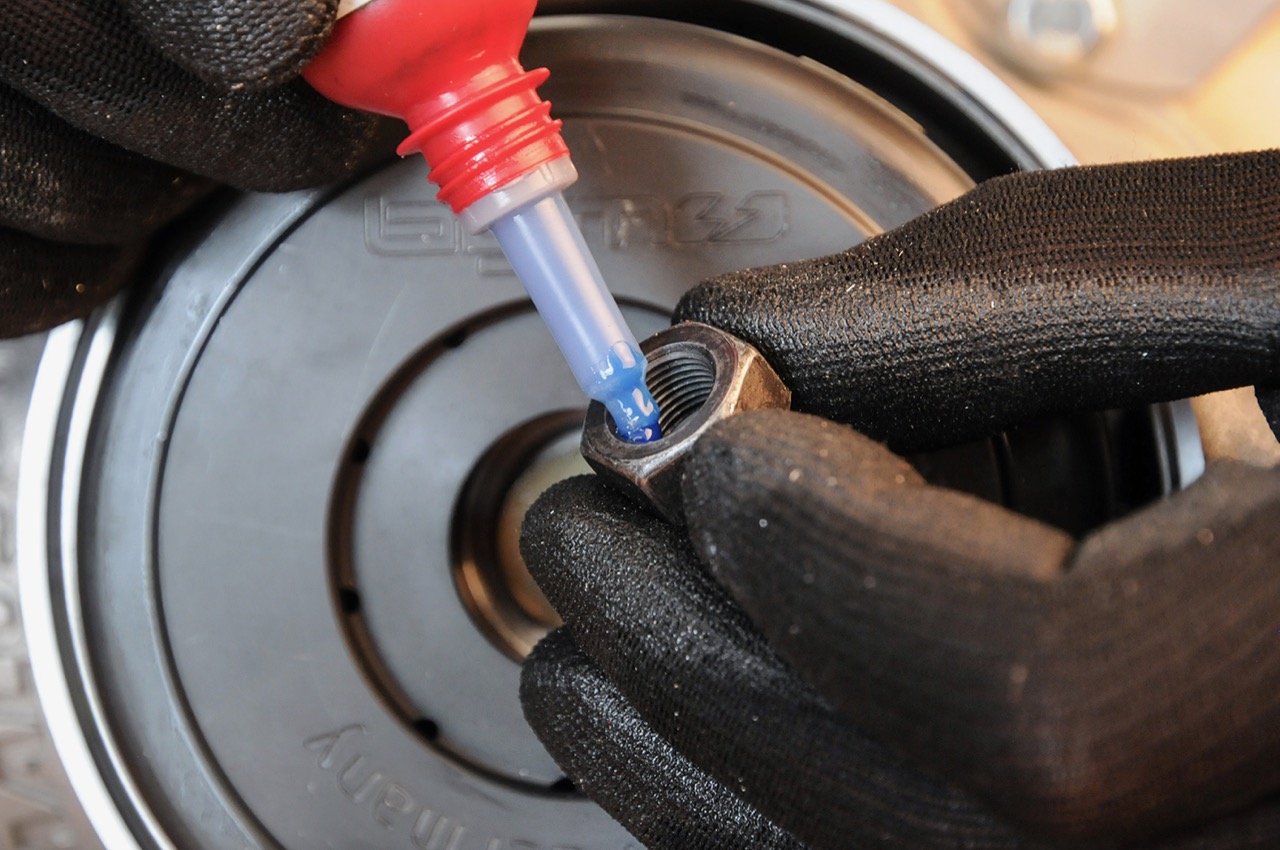
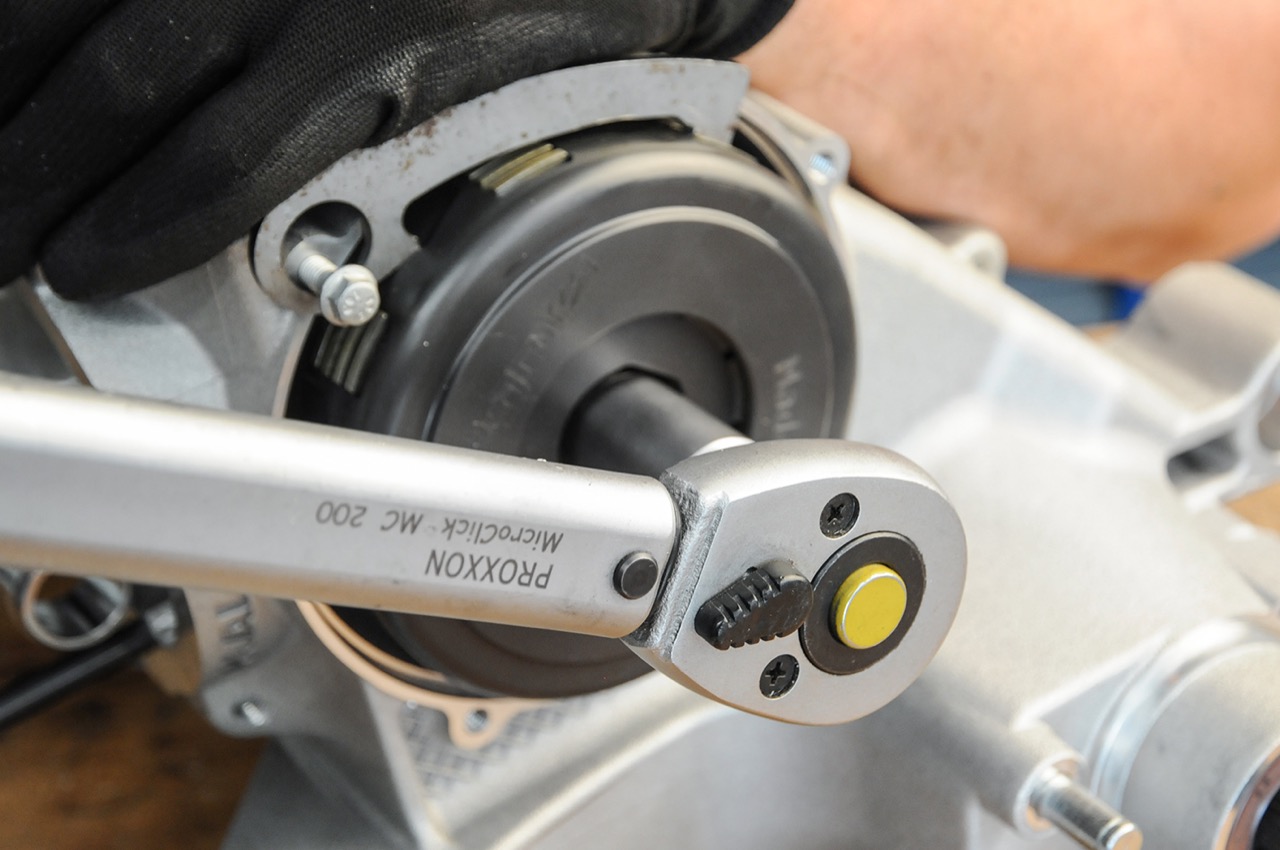
We use one as a coupling bgm Superstrong CR a. With the standard equipment, 10 bgm springs XL, the CR clutch manages a reliable transmission of power up to 40hp. The king shaft coupling nut has a fine thread of the dimension M12x1. The nut comes with screw lock and a Tightening torque of 70Nm attached.
The engine is then completed with the rest of the components.
Intake manifold with the Malossi 2-valve membrane. Clutch cover, switch latch, cover for the starter motor and the bgm ignition system with static ignition timing.

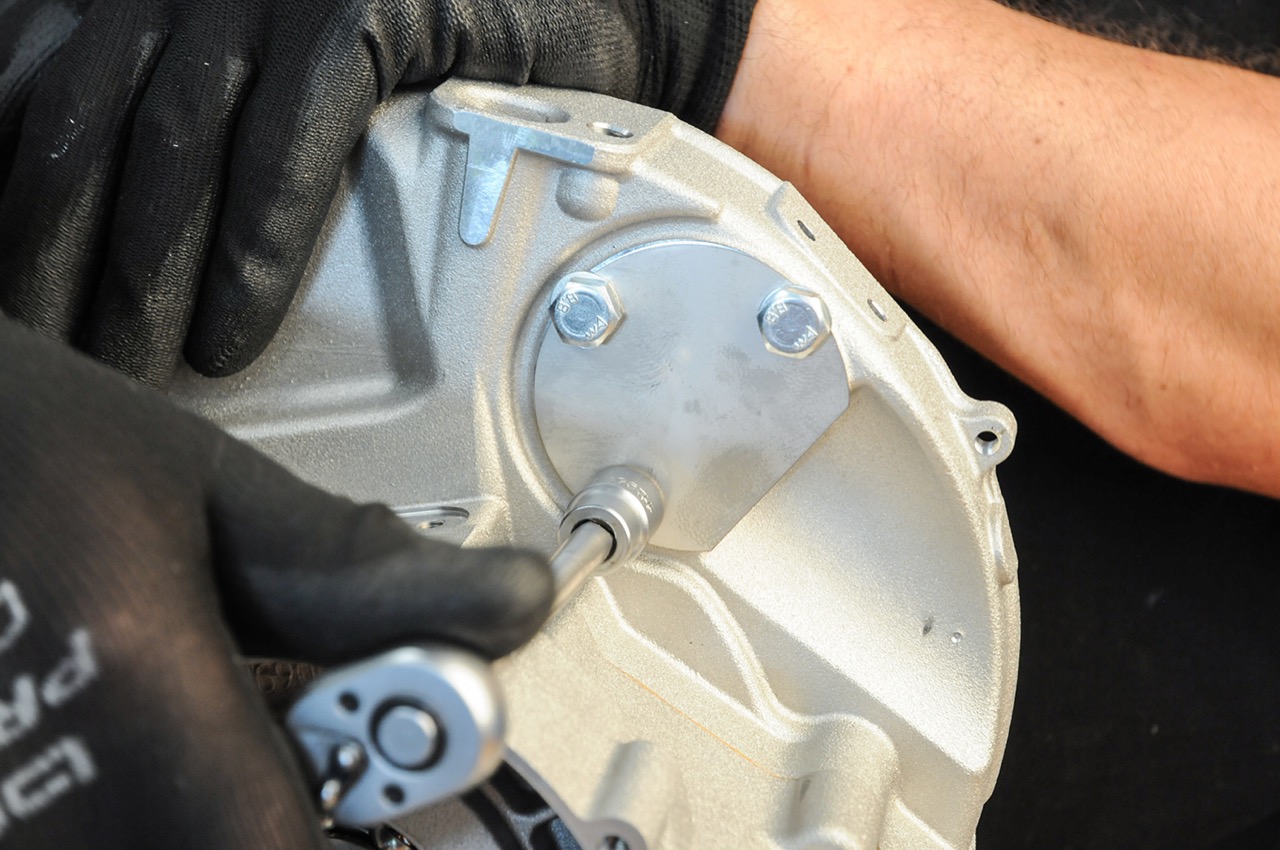
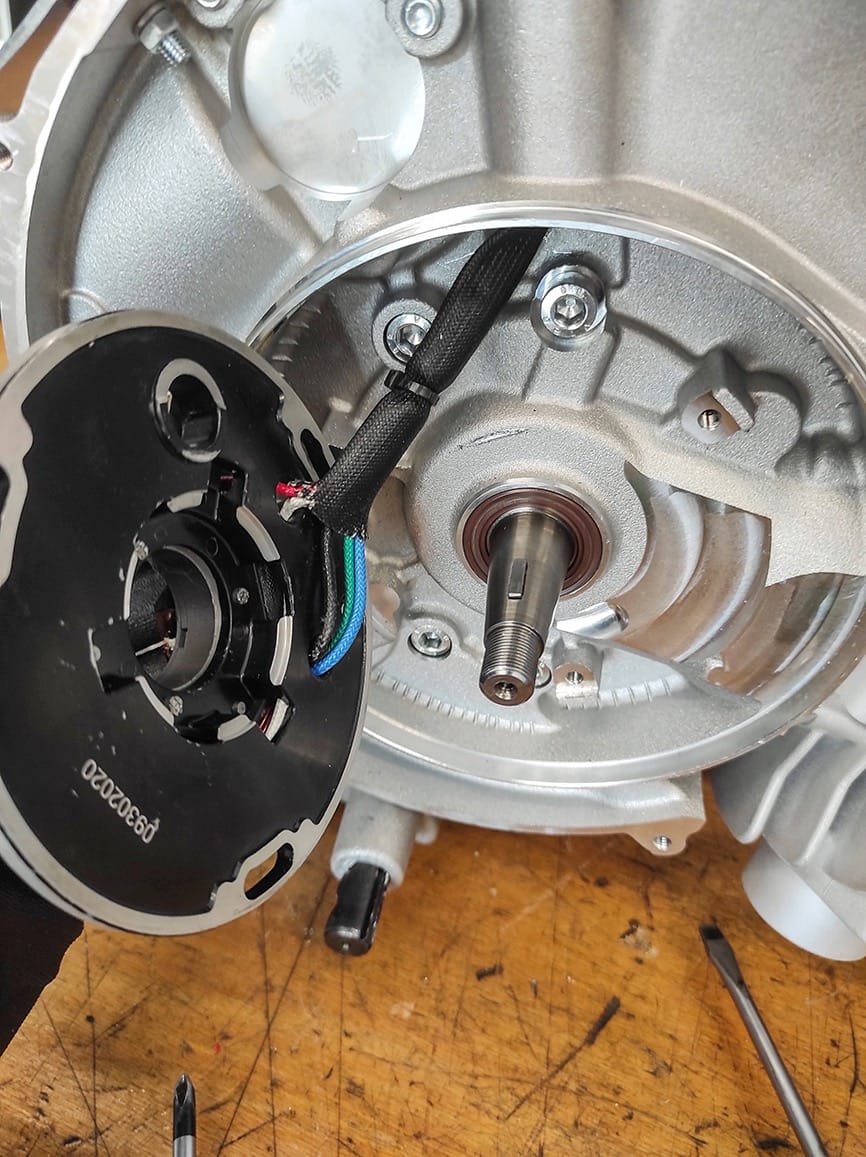
The Malossi motor housing is reinforced in many places. This can lead to contact between the base plate and the bearing seat when the ignition is installed. The base plate of the ignition must sit tension-free in the centering, so in individual cases the base plate and / or the motor housing must be slightly reworked to ensure a tension-free fit of the base plate.
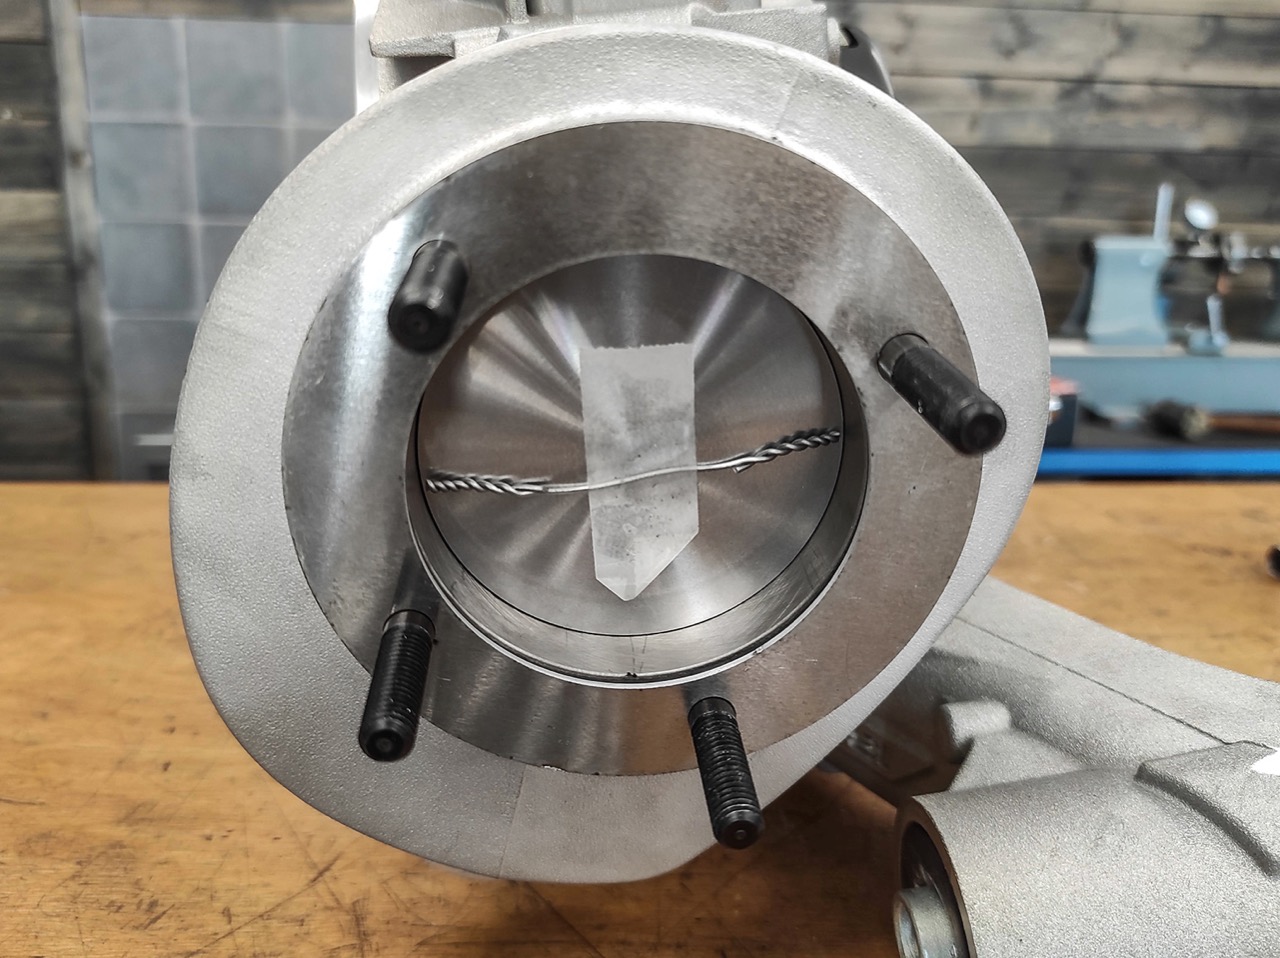
Before the final assembly of the cylinder, we check the pinch size using solder.
Due to the increased stroke, we aim for the squeeze dimension in the range from 1.3mm to 1.4mm and set this using the enclosed cylinder base seals.
By compensating for the larger stroke, there is no need for centering on the cylinder head. For this reason, holes for fitting sleeves are made in the cylinder head and cylinder. The adapter sleeves prevent the spacers used for the cylinder head in the course of the test from protruding into the combustion chamber and causing unwanted damage there.
For the test runs, we set the ignition to 19 ° BTDC.
The runs of the first expansion stage We will introduce M244_1 to you in the next blog post before…
Just a quick note - none of the runs were below the 30PS Mark on the unprocessed M244

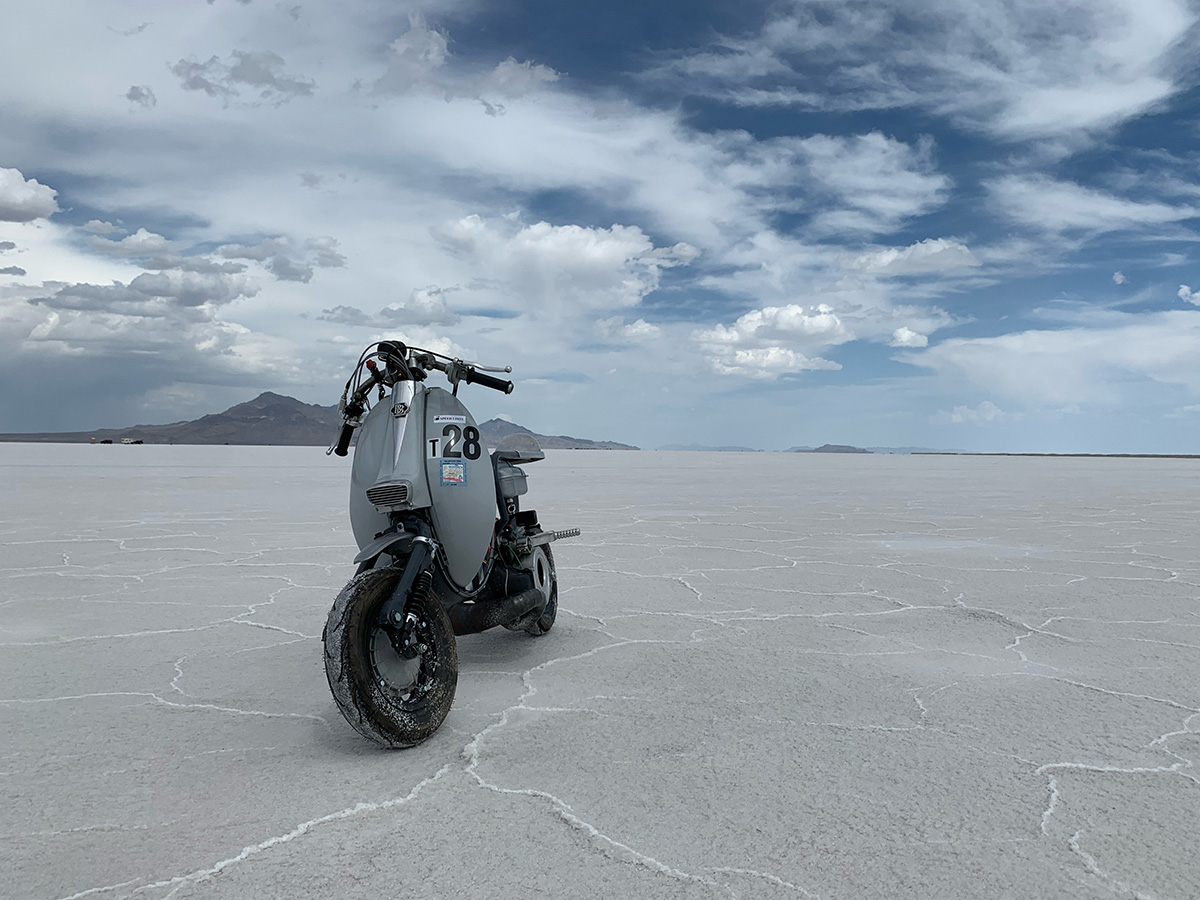
Our customer Todd Rogers from the USA set out with his 225 Lambretta to hunt for records in Bonneville.
Do you still remember the film "with heart and soul" with Anthony Hopkins? Burt Munro (Anthony Hopkins) travels to Bonneville with his Indian Scout to take part in the annual high-speed race on the Utah Salt Flats. One of my favorite films, below you can find a teaser for the film.
So our customer Todd Rogers has set off for Utah with his Lambretta World of Speed made. Here in Bonneville he wants to set a record with his Lambretta on the salt slope.

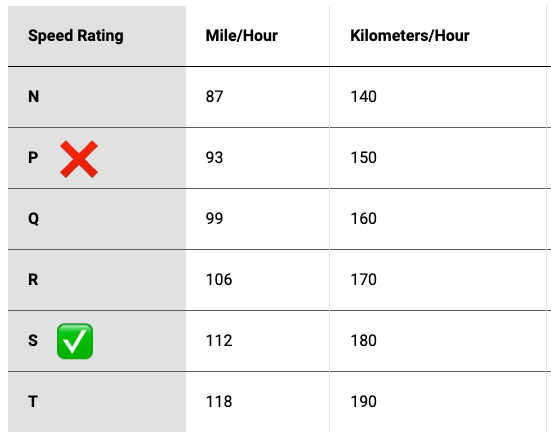
During the preparations for the record attempt, there were problems with the tires. Todd has so far ridden tires with a “P approval” on his Lambretta.
But P corresponds to only 93 mph or 150 km / h and with these tires he would not have received approval for an official record attempt at over 100 mph.
Choosing the perfect tire was then relatively easy, after all, ours are ours bgm PRO SPORT tires, the only 10 x 3.50 tires with a Approval of 180km / h or 112 mph! In addition, Todd did not want to expose himself to any risk and so relied on the bgm PRO Quality tires MADE IN GERMANY.
Todd drove his 225 Lambretta (not a Streamliner !!), a very impressive 100,4203 mph, which corresponds to about 162 km / h. Todd holds the record for the fastest Lambretta in Bonneville!
Congratulations from all Scooter Center & bgm - team!

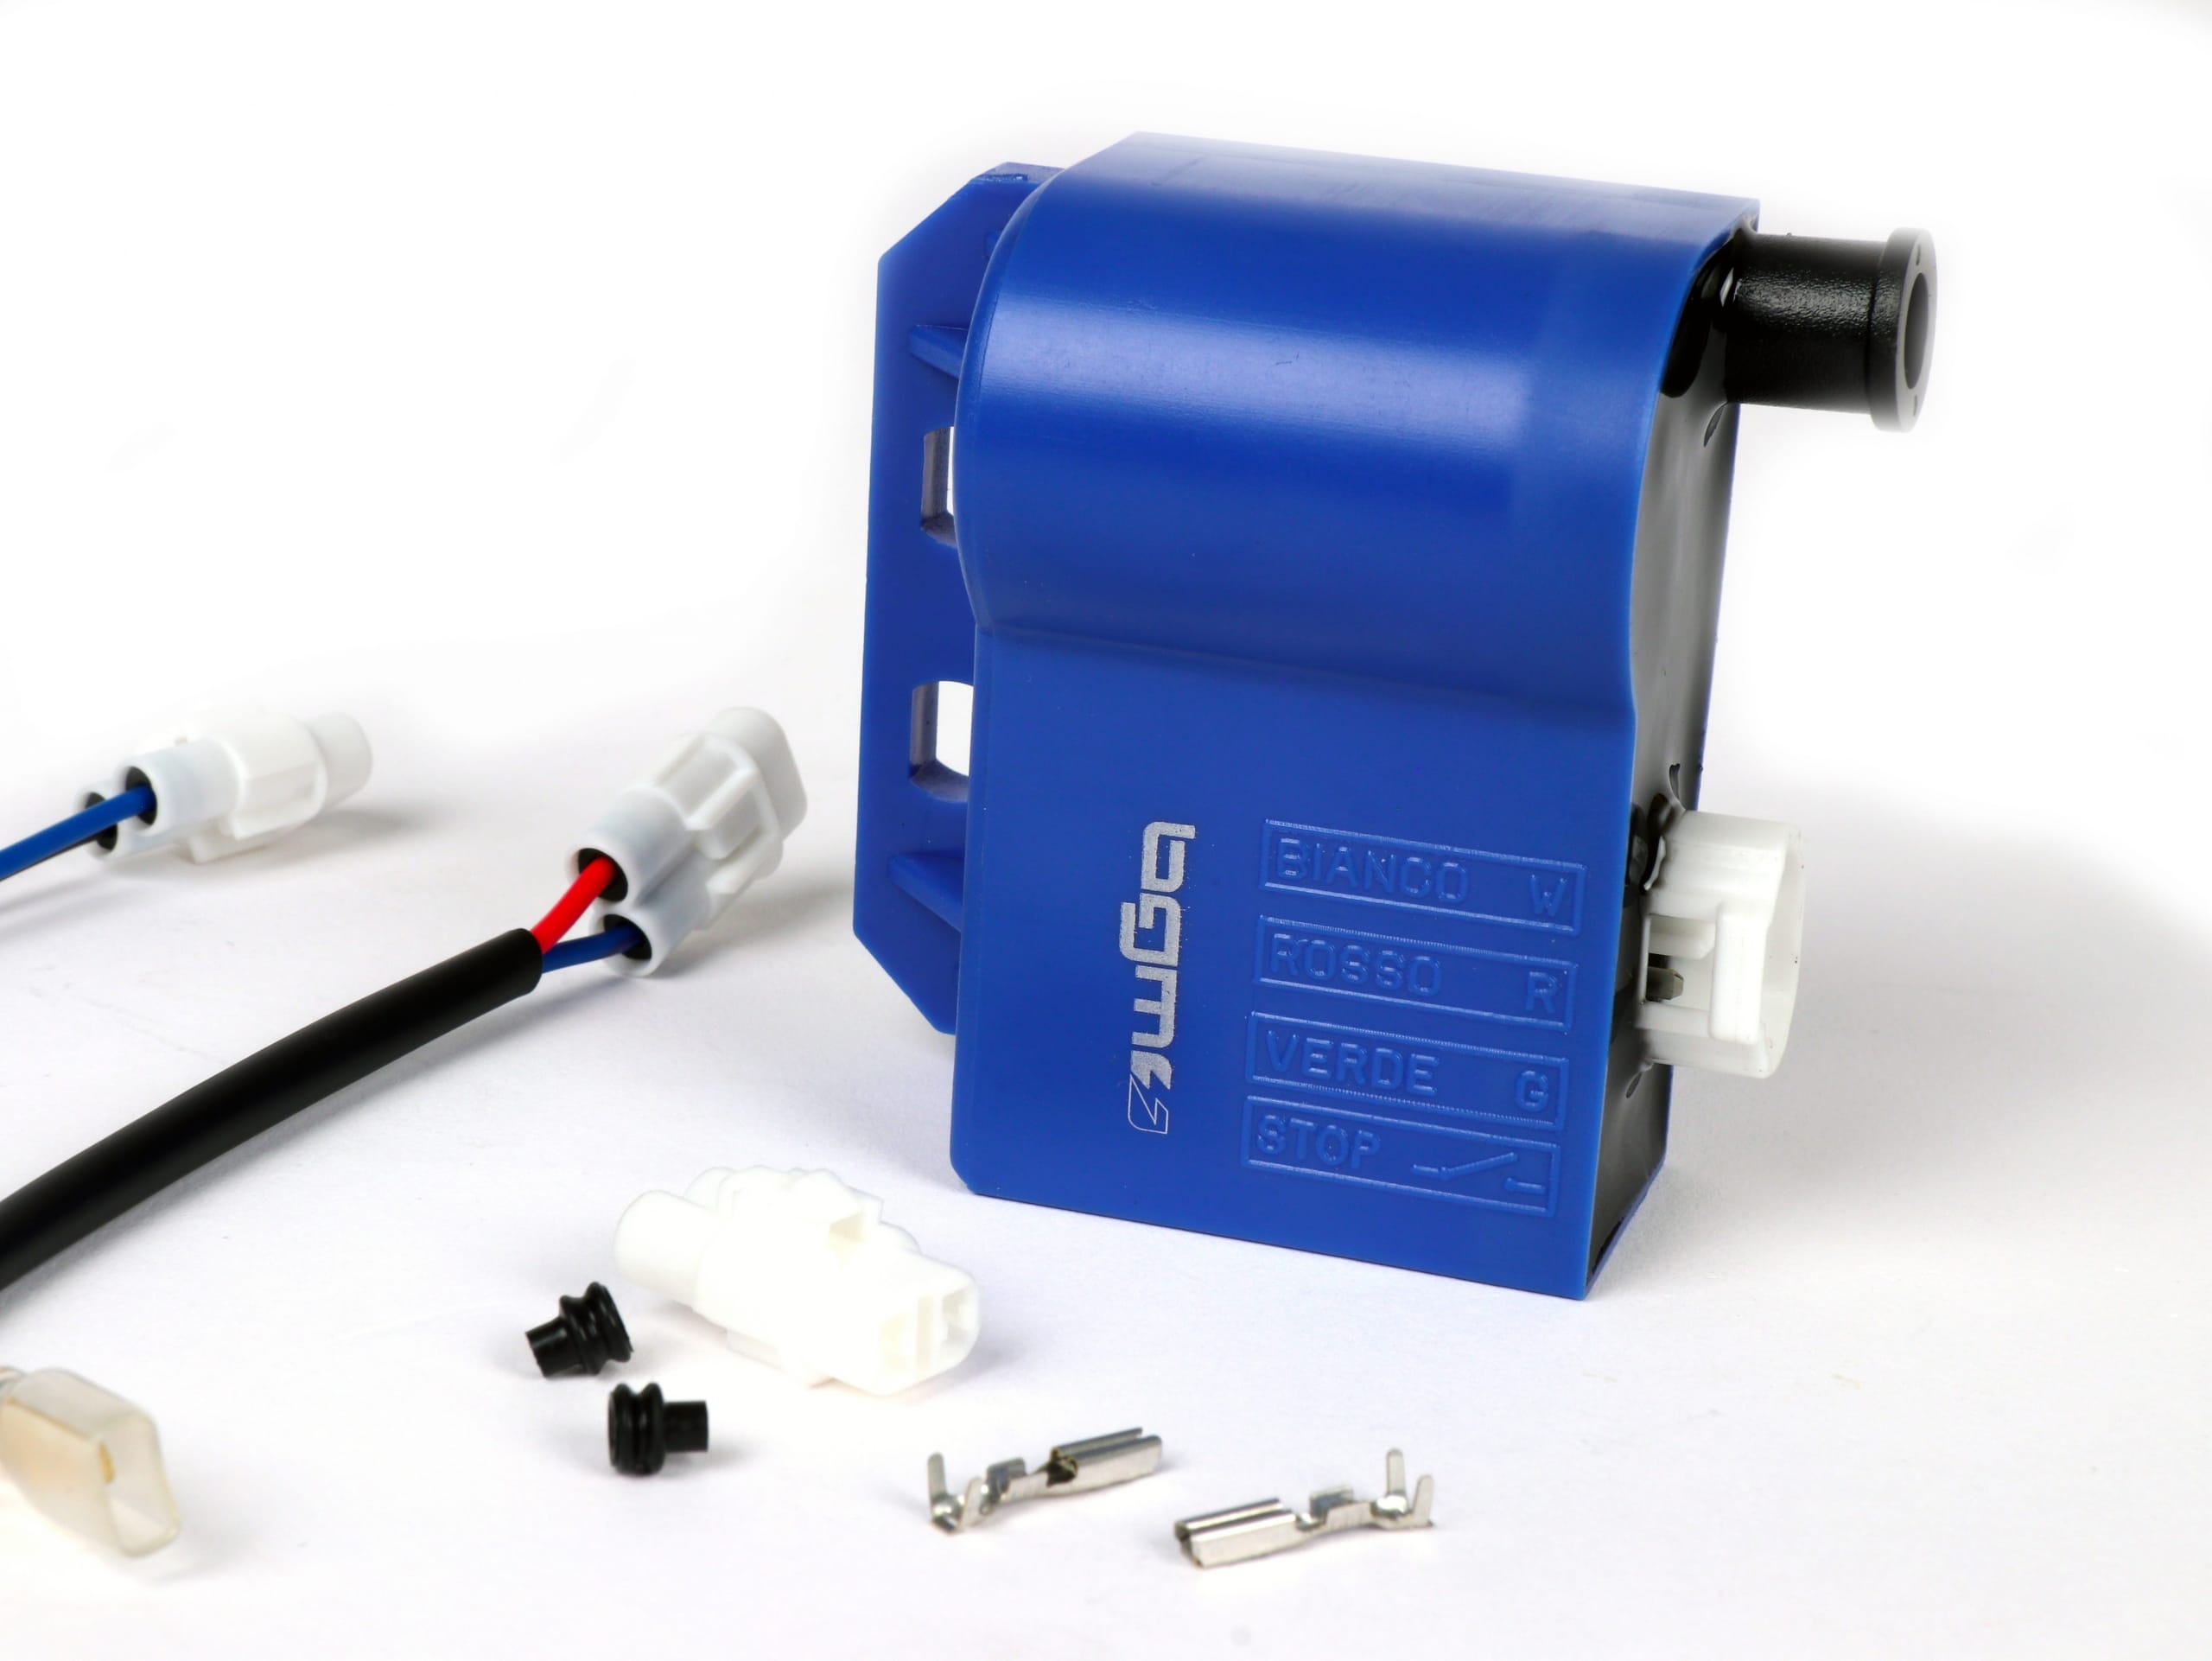
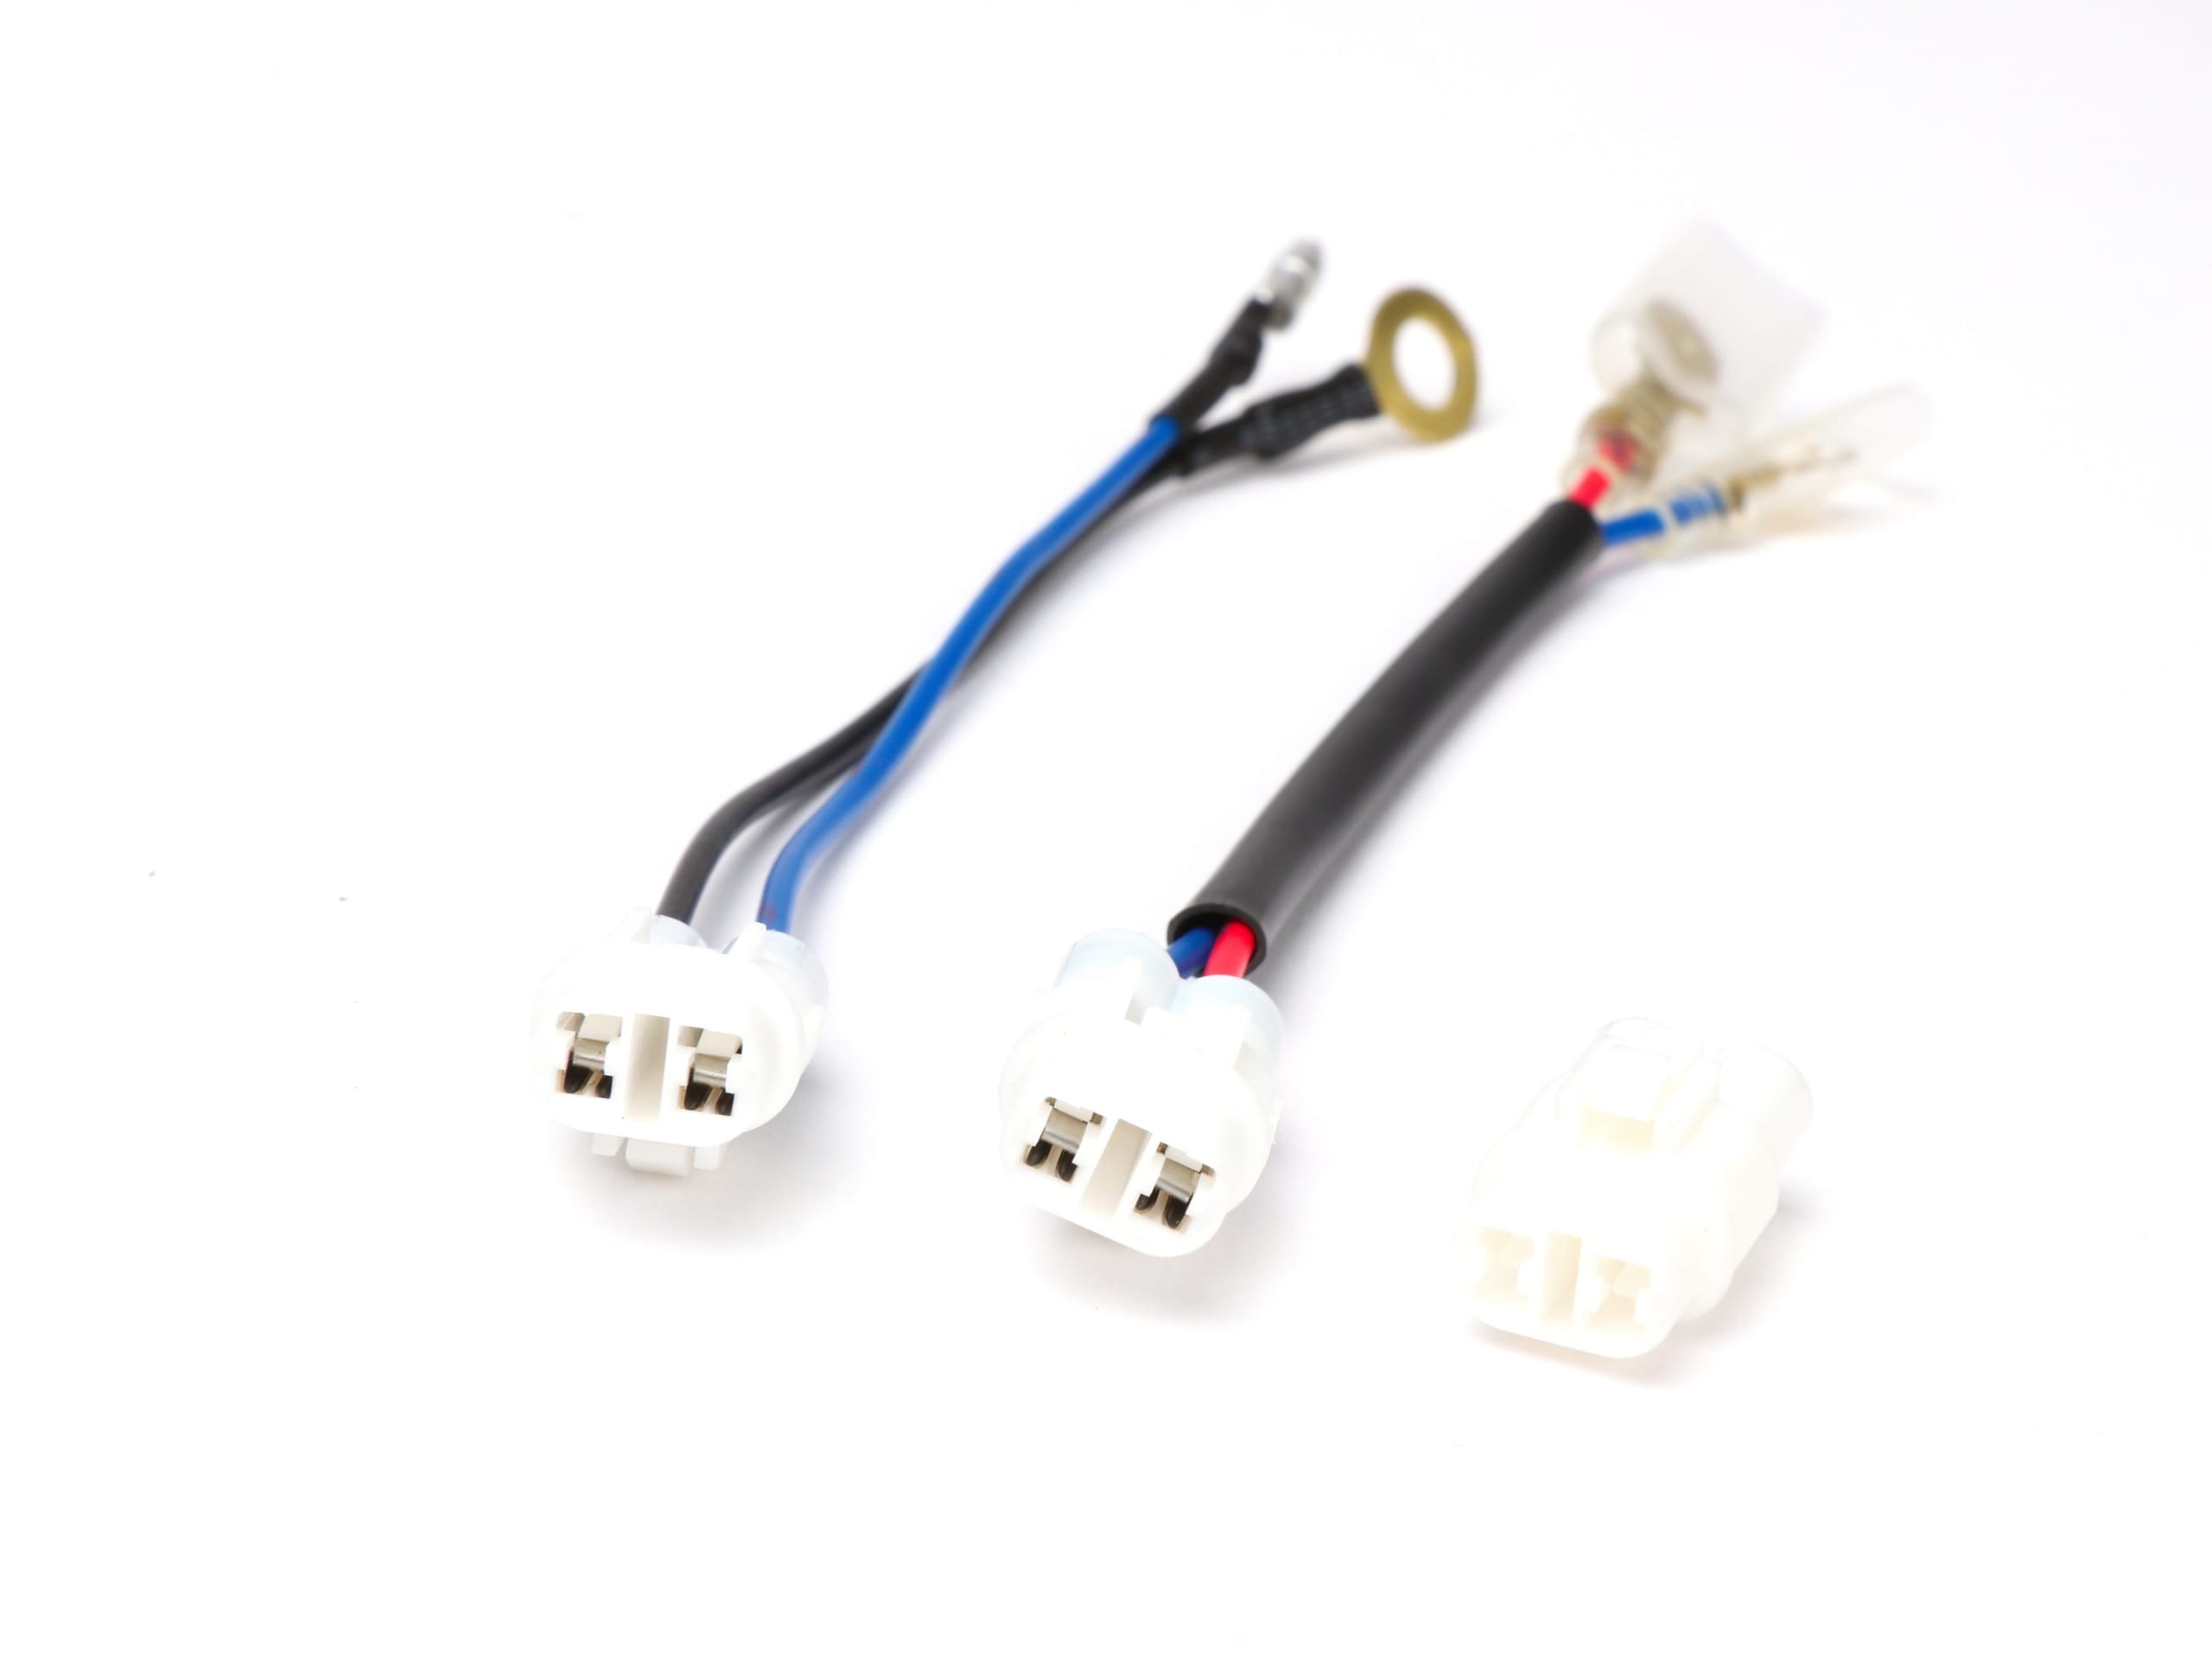
-Original optics in conjunction with a optimized ignition curve for Vespa and Lambretta touring engines-
Use all IDM based ignitions (Vespatronic, Malossi VesPower, Polini IDM, Varitronic, Pinasco Flytech, Parmakit etc.) the same CDI.
The ignition curve of this CDI is based on high performance engines with a late use of power and high speeds designed.
On touring engines, with an early and high torque, this ignition curve is rather counterproductive. Here it often leads to engine jerks in the partial load range due to an ignition point that is too early for the low engine speed.
However, due to the large adjustment range (8 °) of the original CDI, the ignition point must be selected early. Otherwise, the performance in the upper speed range suffers, as the CDI already reduces the ignition point significantly here. We have addressed this problem and a solution developed:
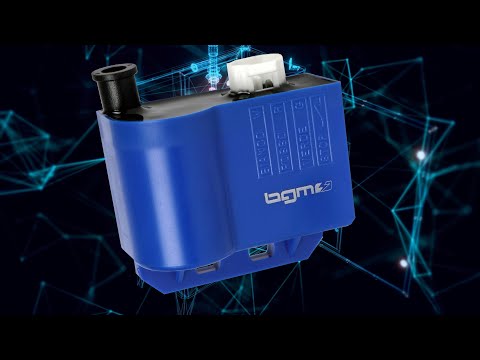
The bgm PRO CDI has a modified, optimized ignition curve. It offers high-torque touring engines that have a similar power / torque curve as an original engine, ideal working conditions. The adjustment of the ignition point is significantly less, the engine runs quieter and smoother and also develops more efficient, especially in the area above the peak performance (Overrev). As a result, you have an engine that much more tour-friendly is and usually something faster Is on the way.
Power measurement diagram as PDF
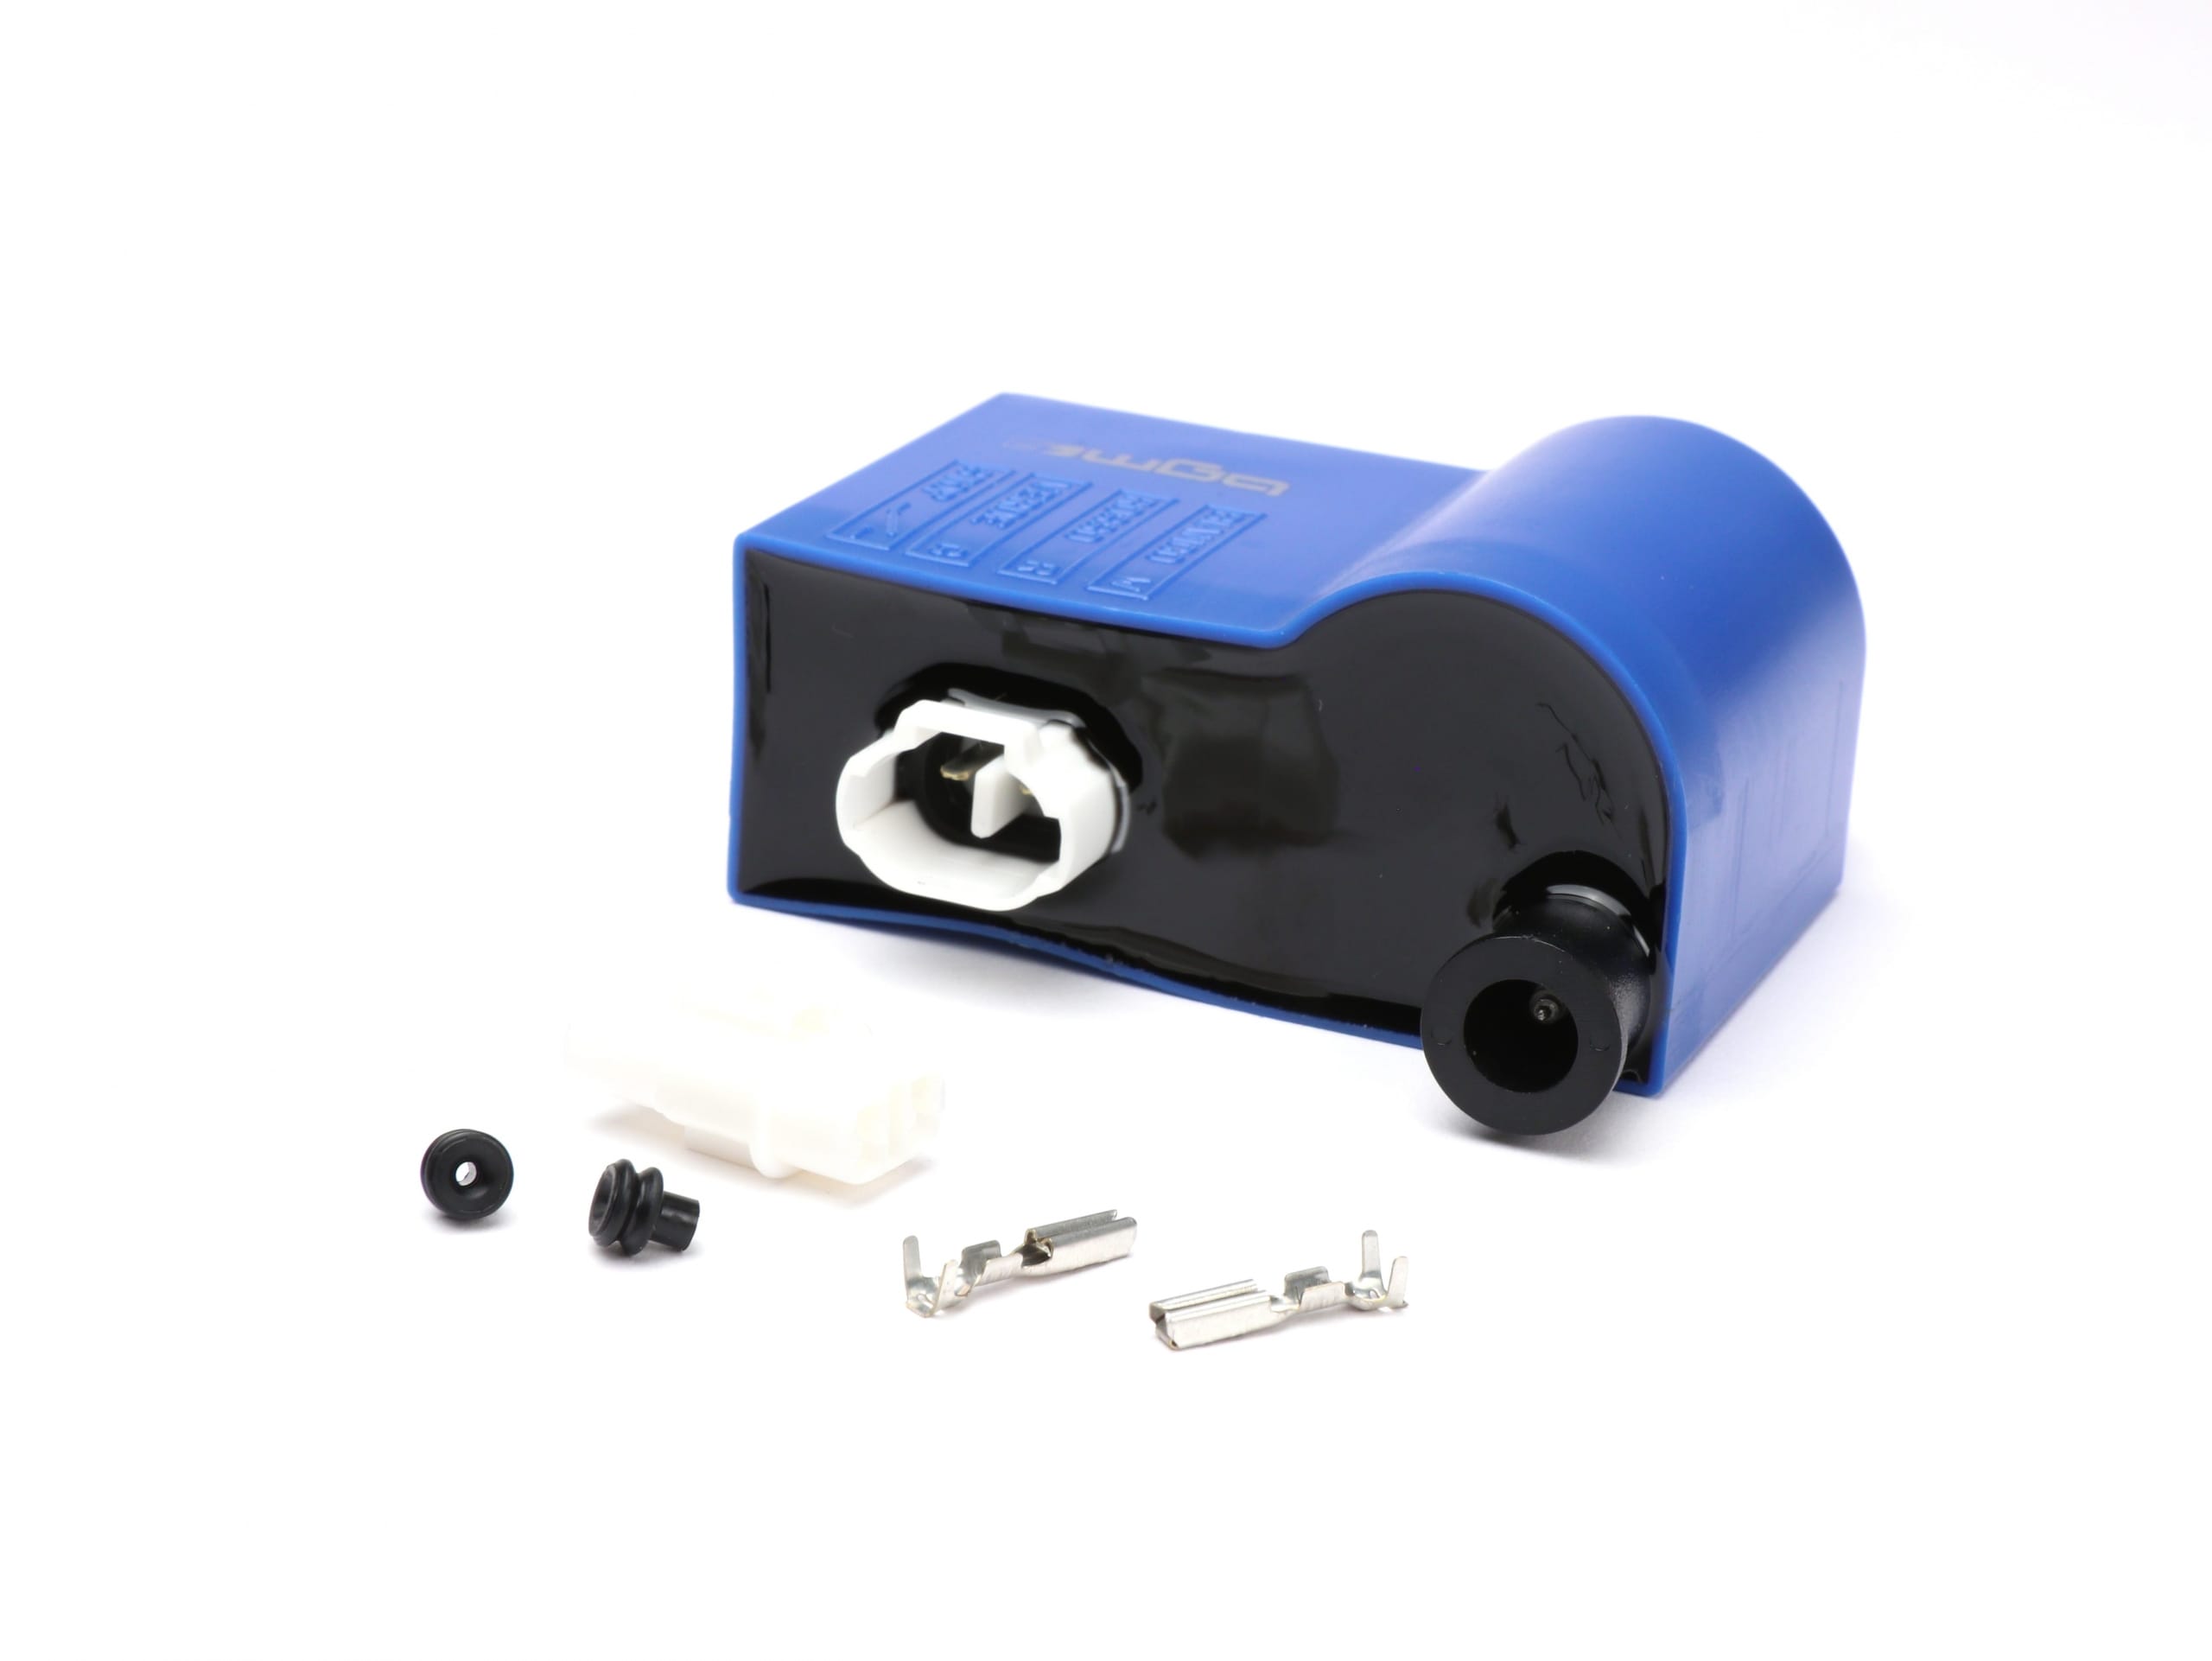
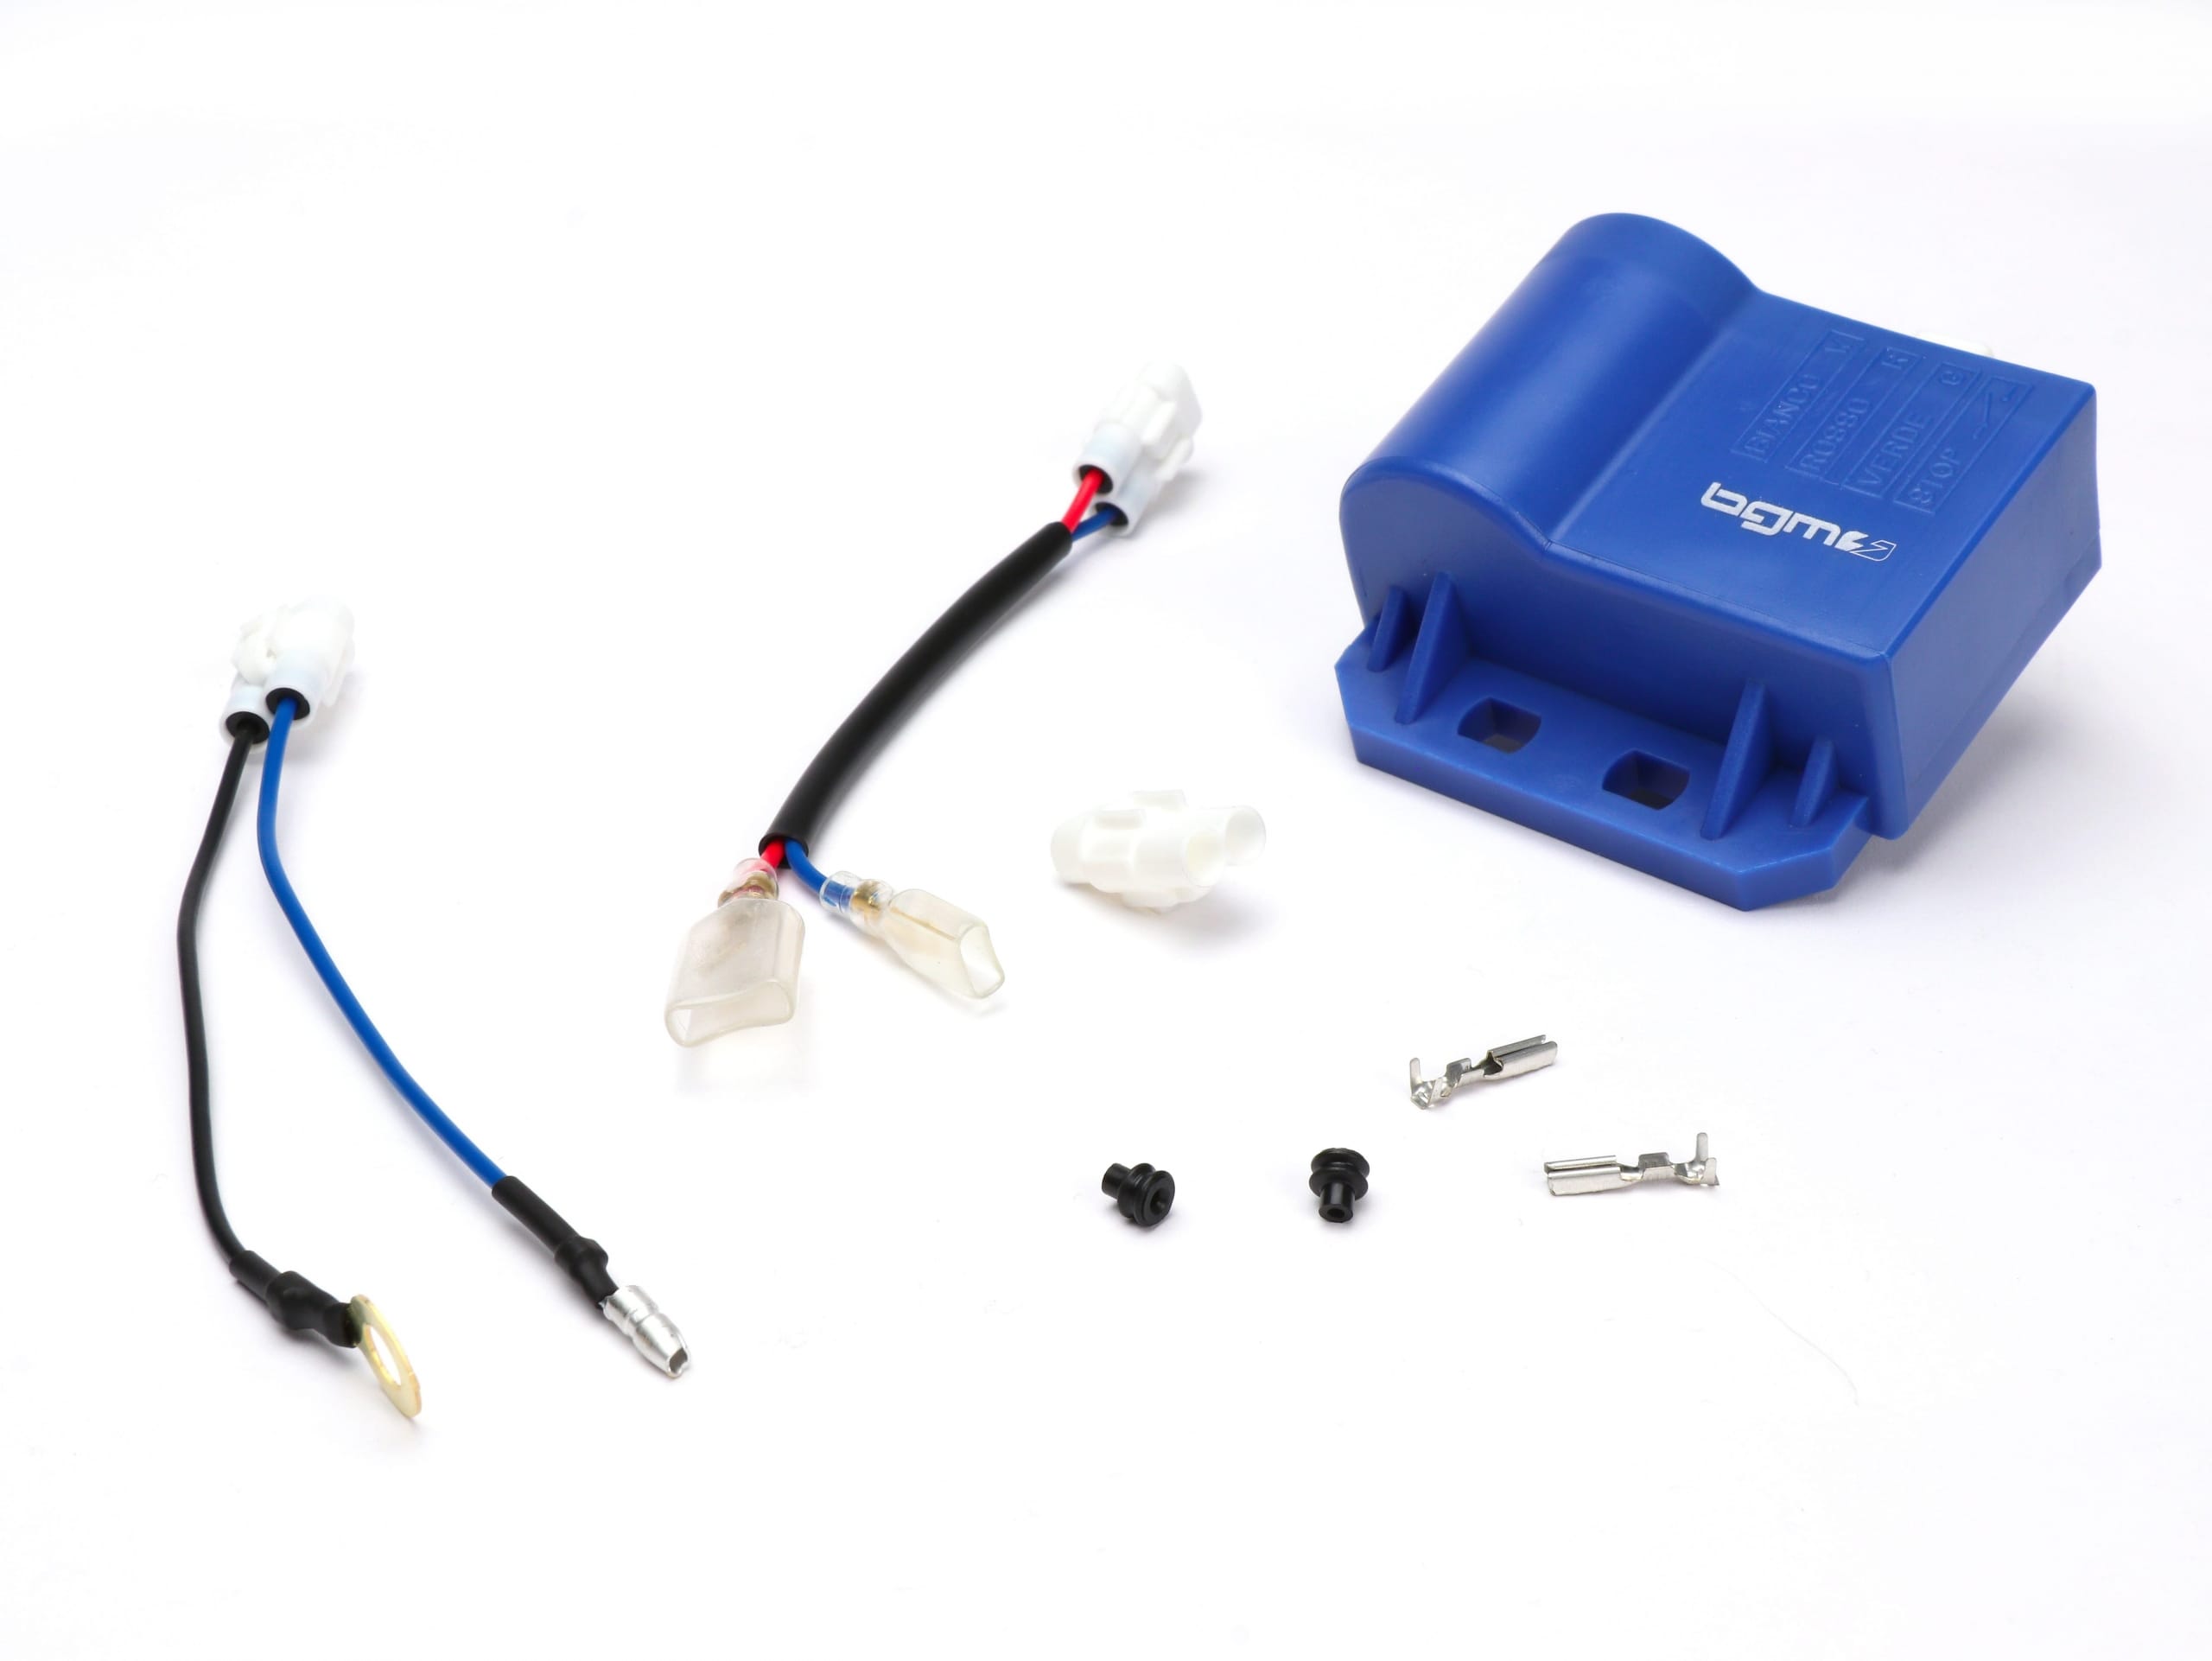
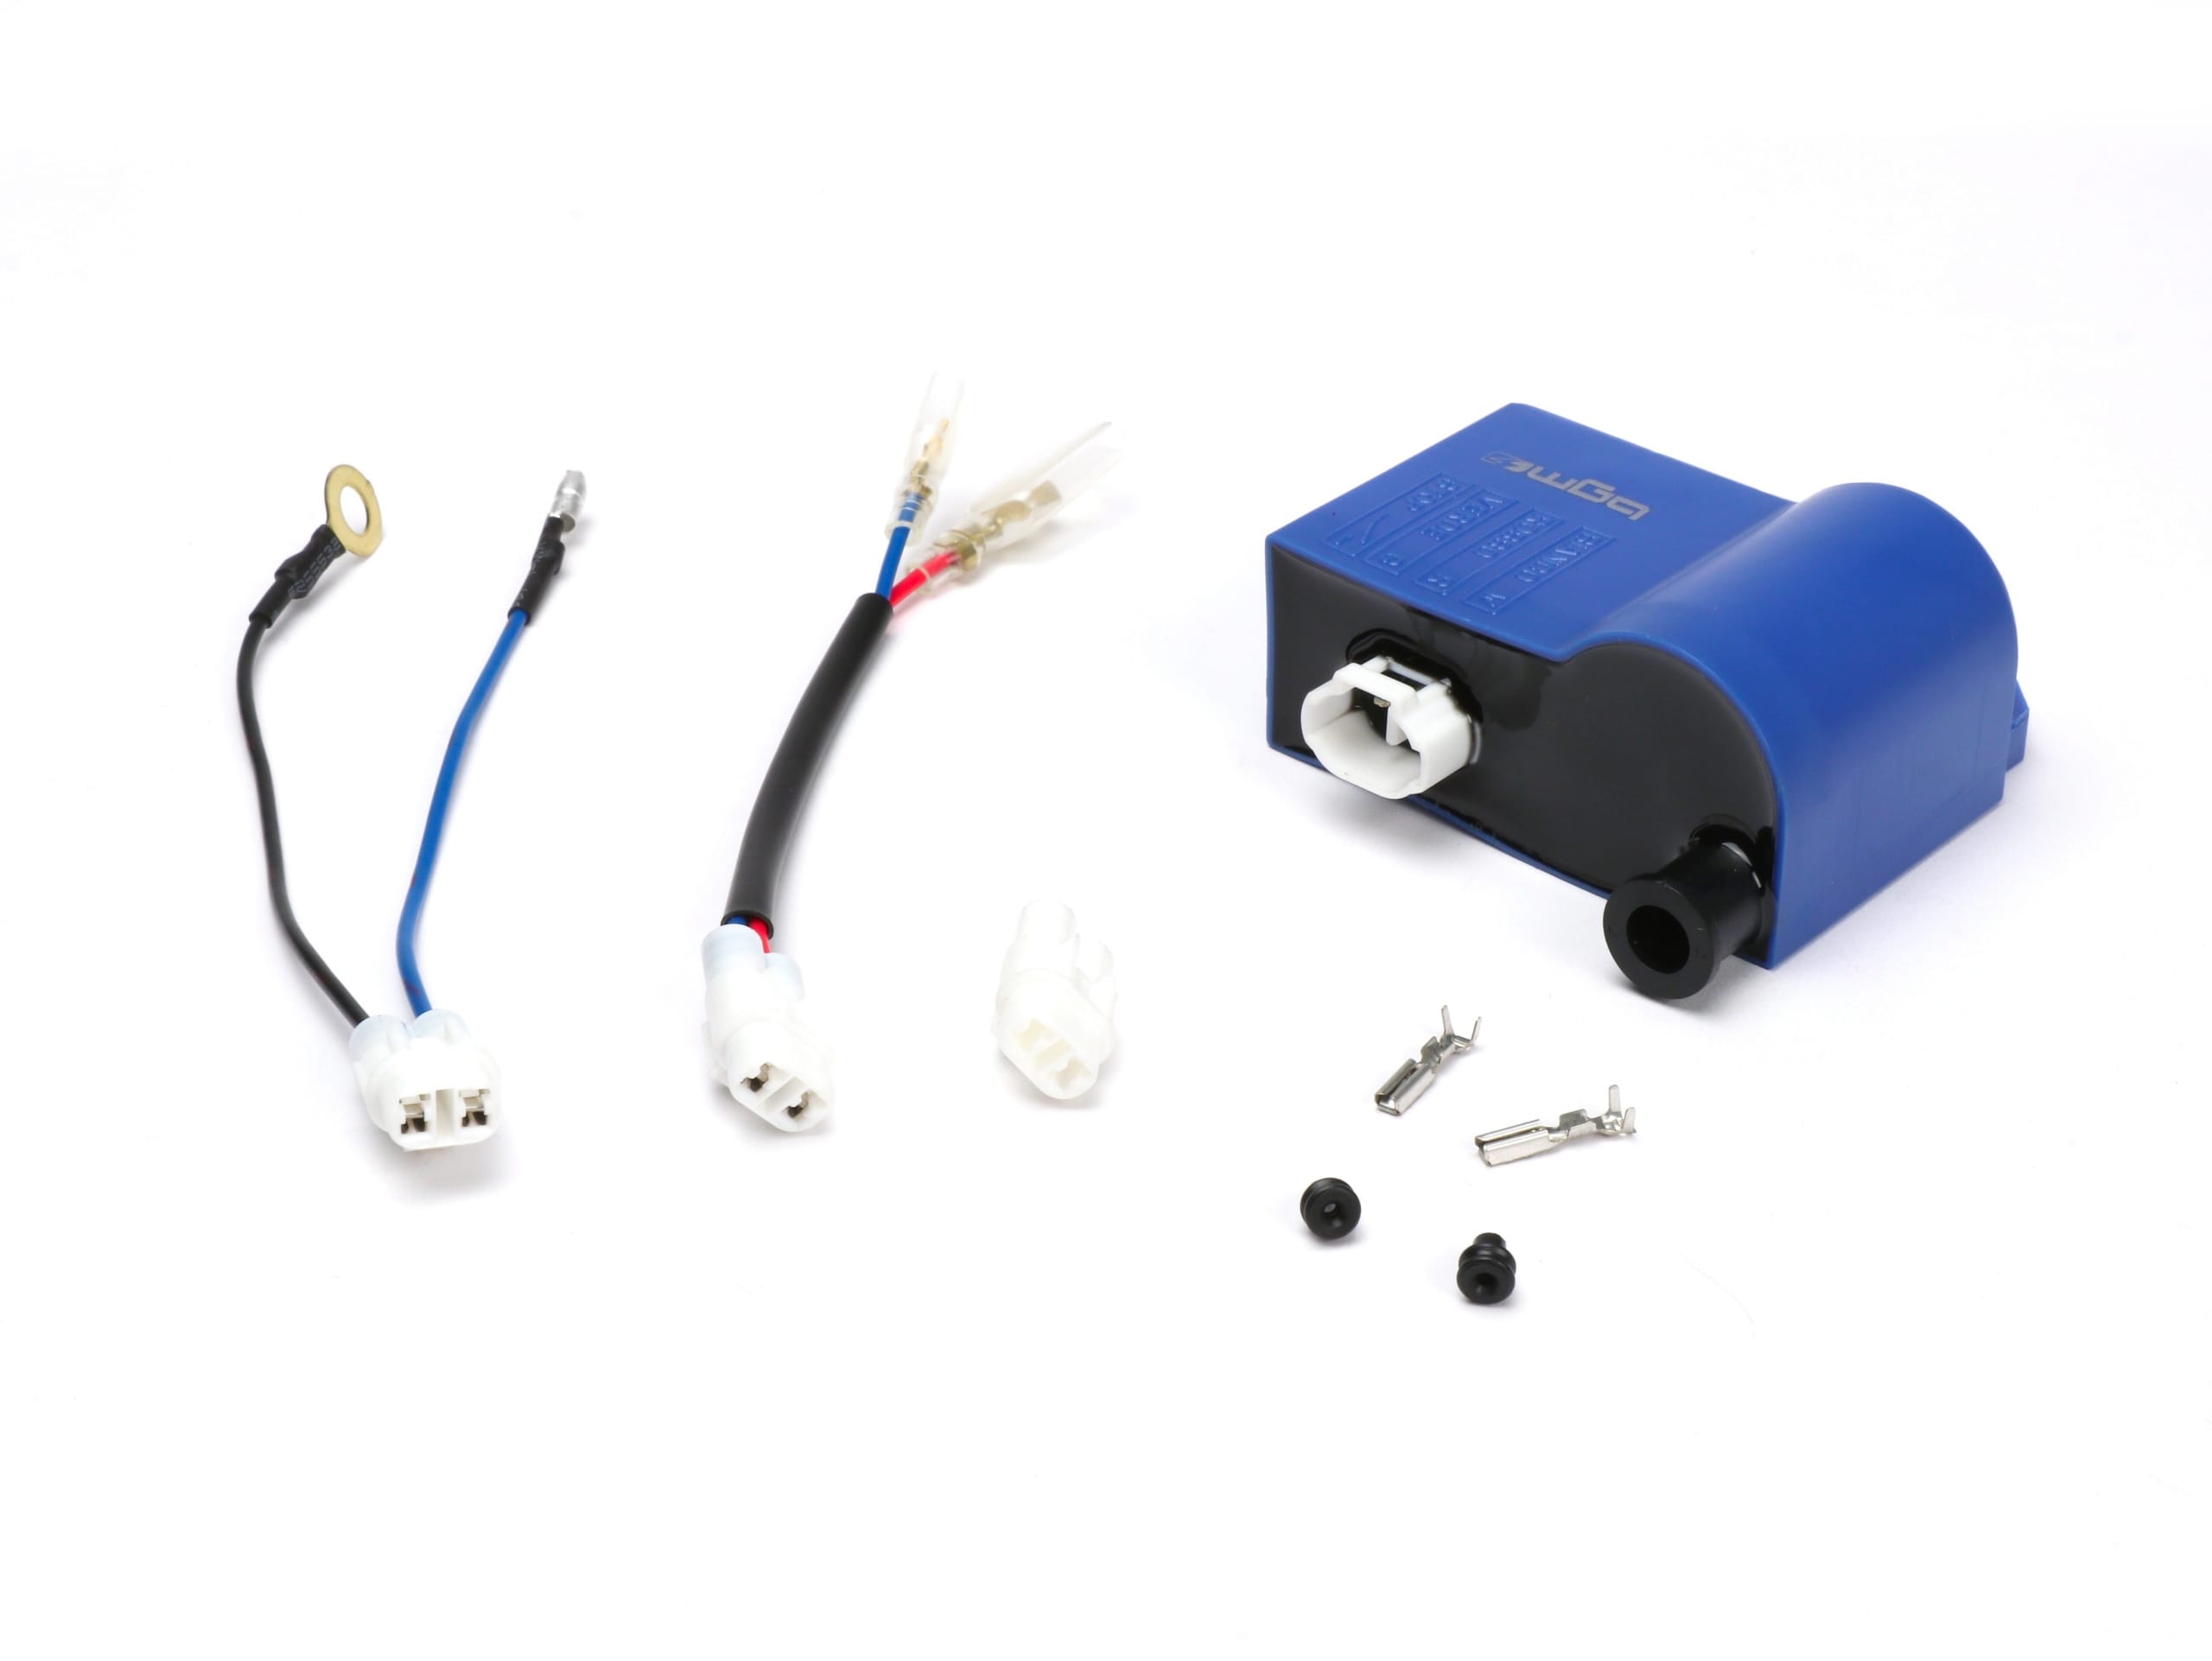
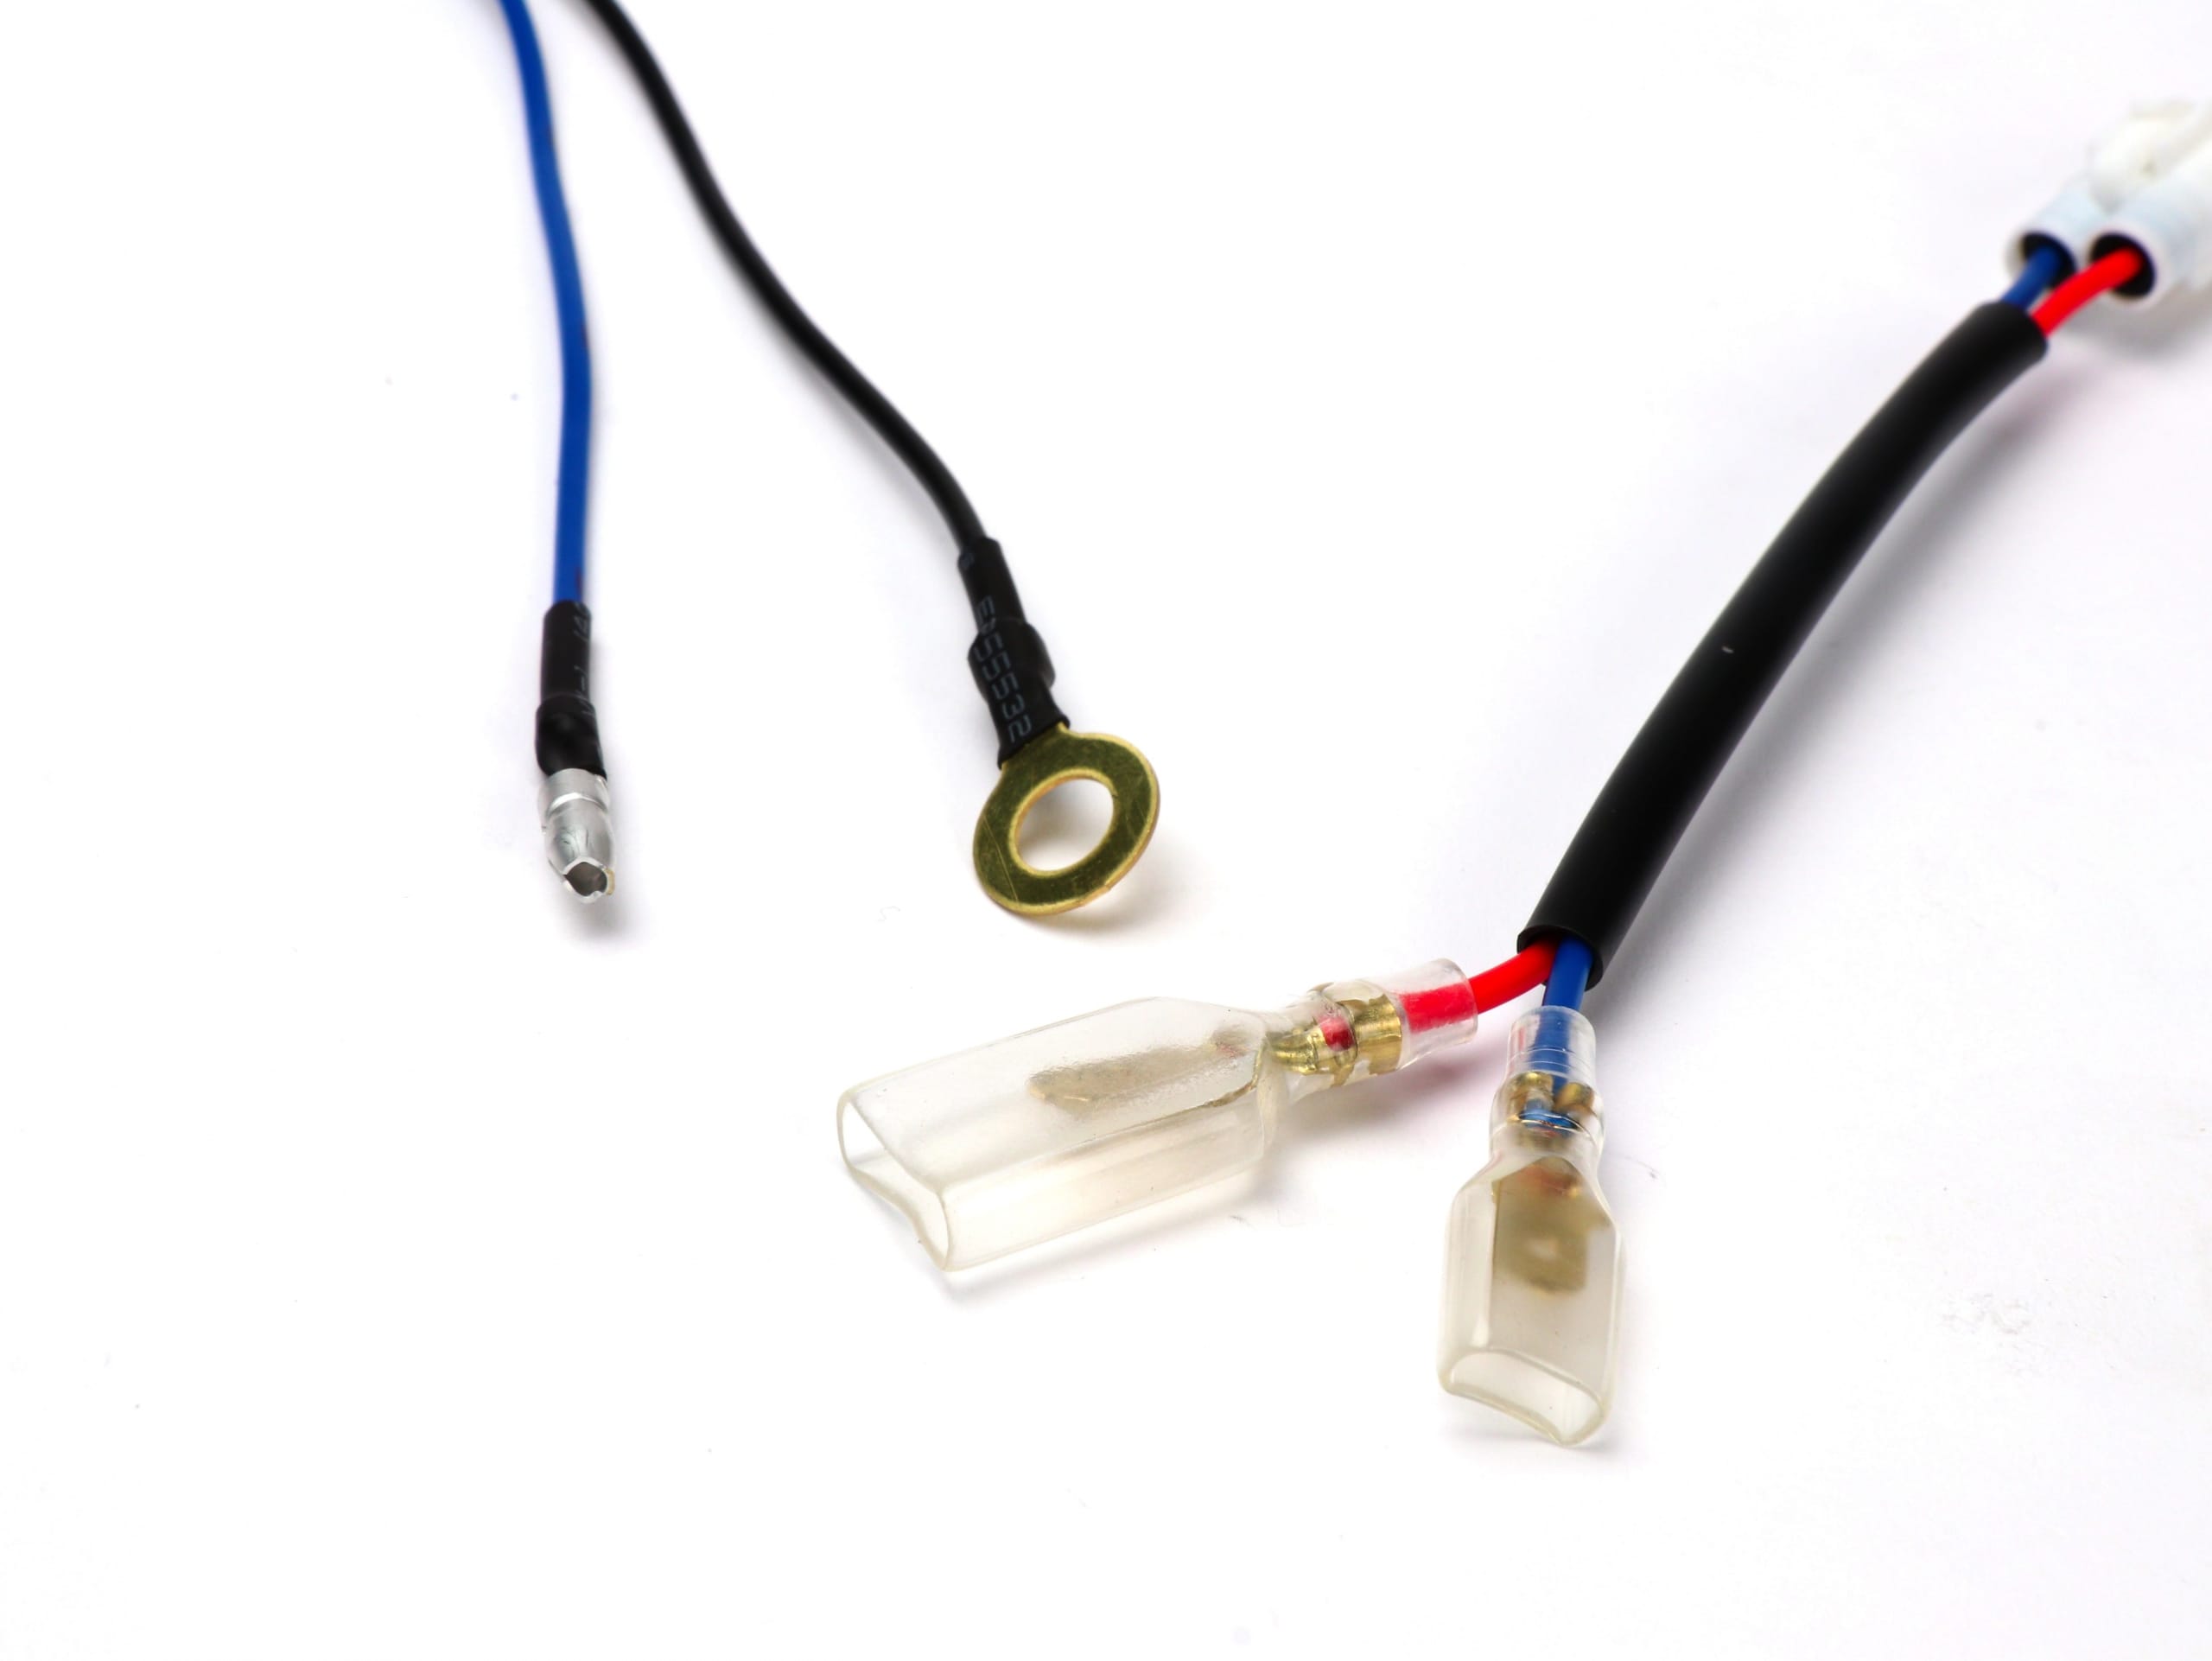
The technology of the bgm PRO CDI is housed in the vehicle-specific ignition coil housing from the time it was built. This means that the beautiful old look for classic Vespa and Lambretta is retained despite modern technology.
Compared to an original IDM CDI, that is Ignition cable can be screwed in. Ideal if the CDI should be positioned differently or simply the ignition cable should be replaced.
The perfect addition to high-torque tuning motors that are supposed to get even better.

For the Setting the ignition there are now excellent tools like that buzzwangle or Walthat allow a precise ignition position and make work extremely easy. Adjusting the carburetor, on the other hand, is the most difficult part of tuning a scooter for many.
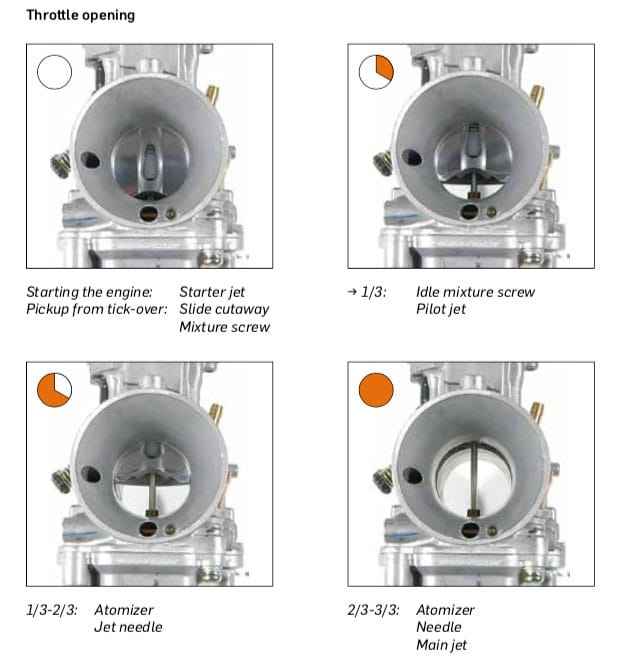
If setting the air mixture and the idle gas is still child's play, it becomes more time-consuming to determine the correct nozzle sizes for the individual engine setup. Here, the carburetor needles, nozzle assembly, main and auxiliary nozzles interact and, perfectly coordinated, result in a clean setup.
If you choose a nozzle that is too small, the engine runs too lean, gets too hot and major damage is inevitable.
Too large a nozzle and too rich adjustment can lead to engine damage. Quite apart from the fact that the capacity of the engine is not exhausted and working time and money for elaborate tuning literally fizzle out.
As an example for a Lambretta, we have prepared the PDF, which is described in detail and illustrated, with suggestions for the setup for you.
Free download here: Lambretta carb jetting by Scooter Center
From the tutorial - when does which nozzle come into play?
DellOrto nozzles, for example, are stamped with a number that refers to the size of the hole. A 100 nozzle has a diameter of 1 mm, a 115 nozzle is 1,15 mm (!!) only a tiny amount 0,15 mm larger!
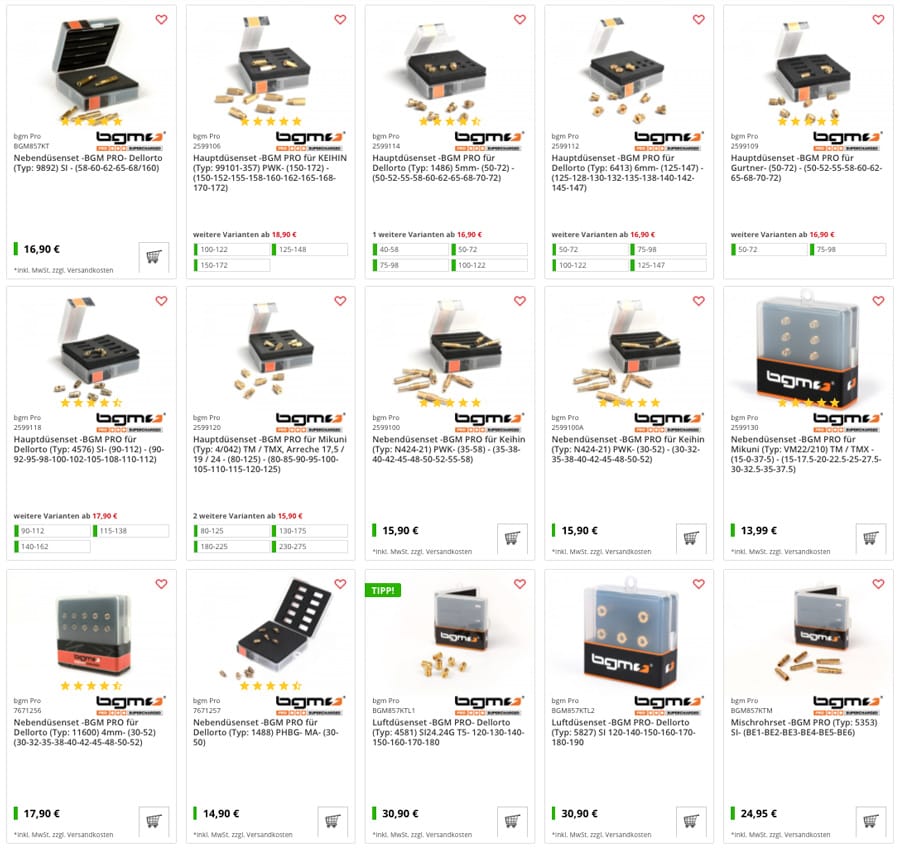
If you want to be on the safe side here and rely on high-precision tuning, we recommend using the nozzles bgm PRO or KMT to fall back on. These nozzle sets are characterized by
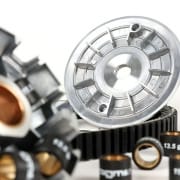
You have invested a lot of love, time and money in your engine tuning. But the most expensive and complex tuning, with the best components, is of little value if the engine does not run smoothly or if a poorly adjusted carburetor does not allow optimal combustion. In order to be able to tune the engine correctly, high-precision carburetor nozzles are a very important prerequisite and make adjustment a lot easier!
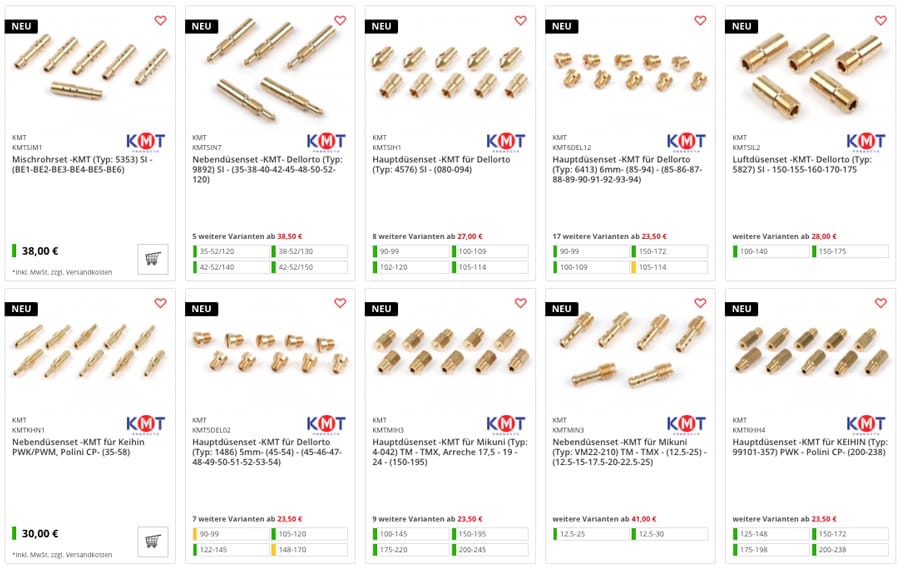
We had the new bgm PRO carburetor nozzles checked at an institute. Here is a glimpse into a 118 nozzle, with a dimension of 1,1779 mm, the bore is in the green area with a deviation of only a thousandth of a millimeter and is therefore OK!

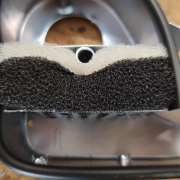
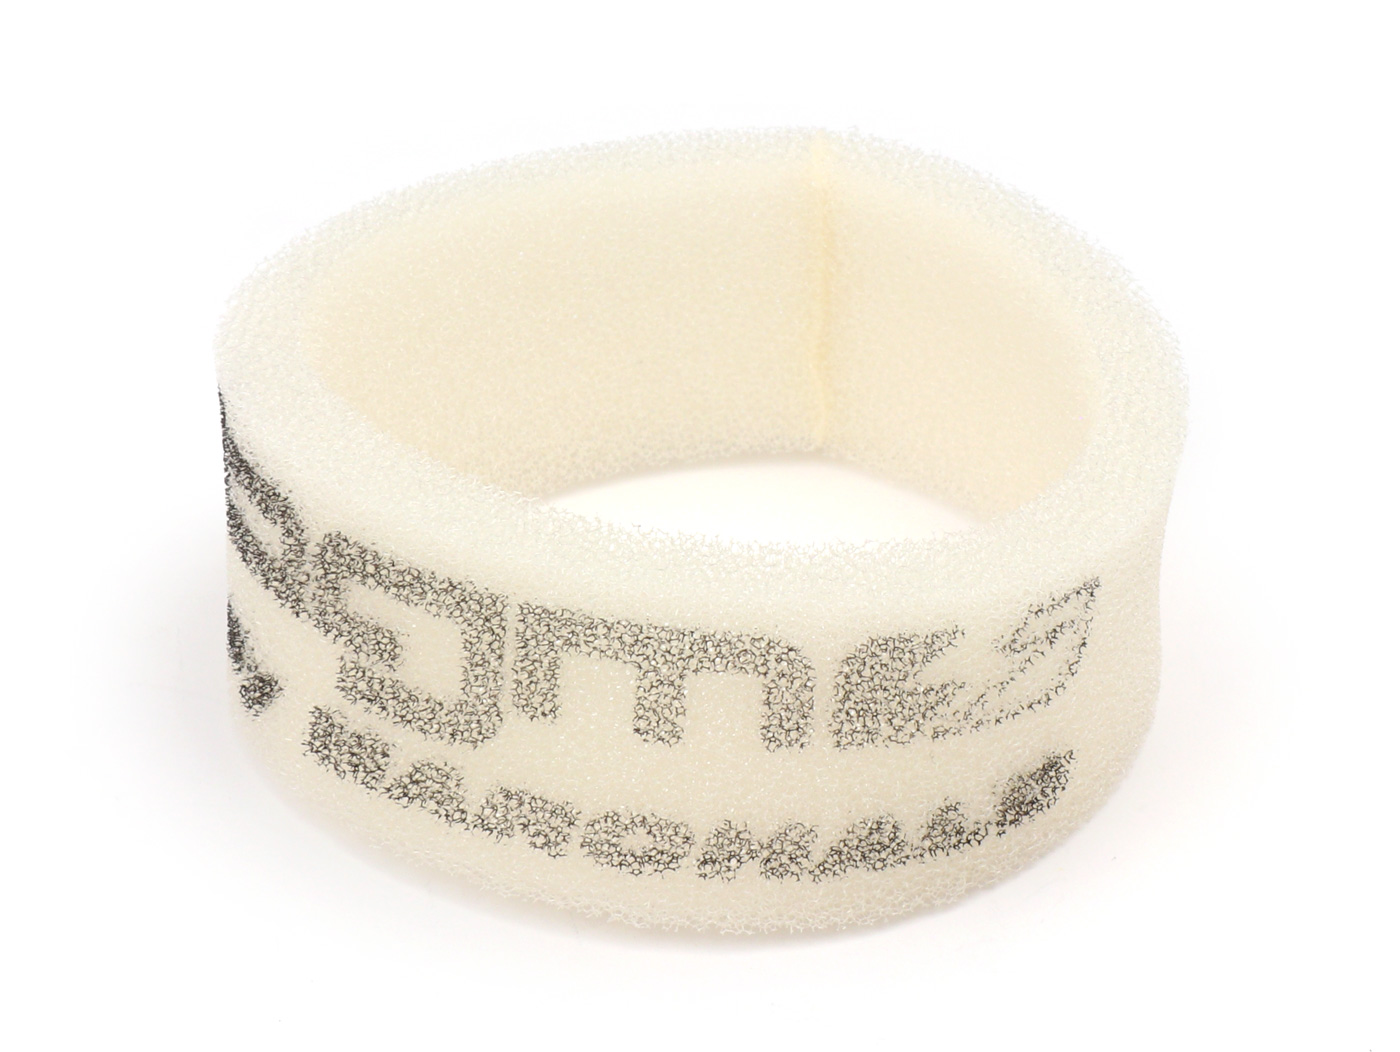
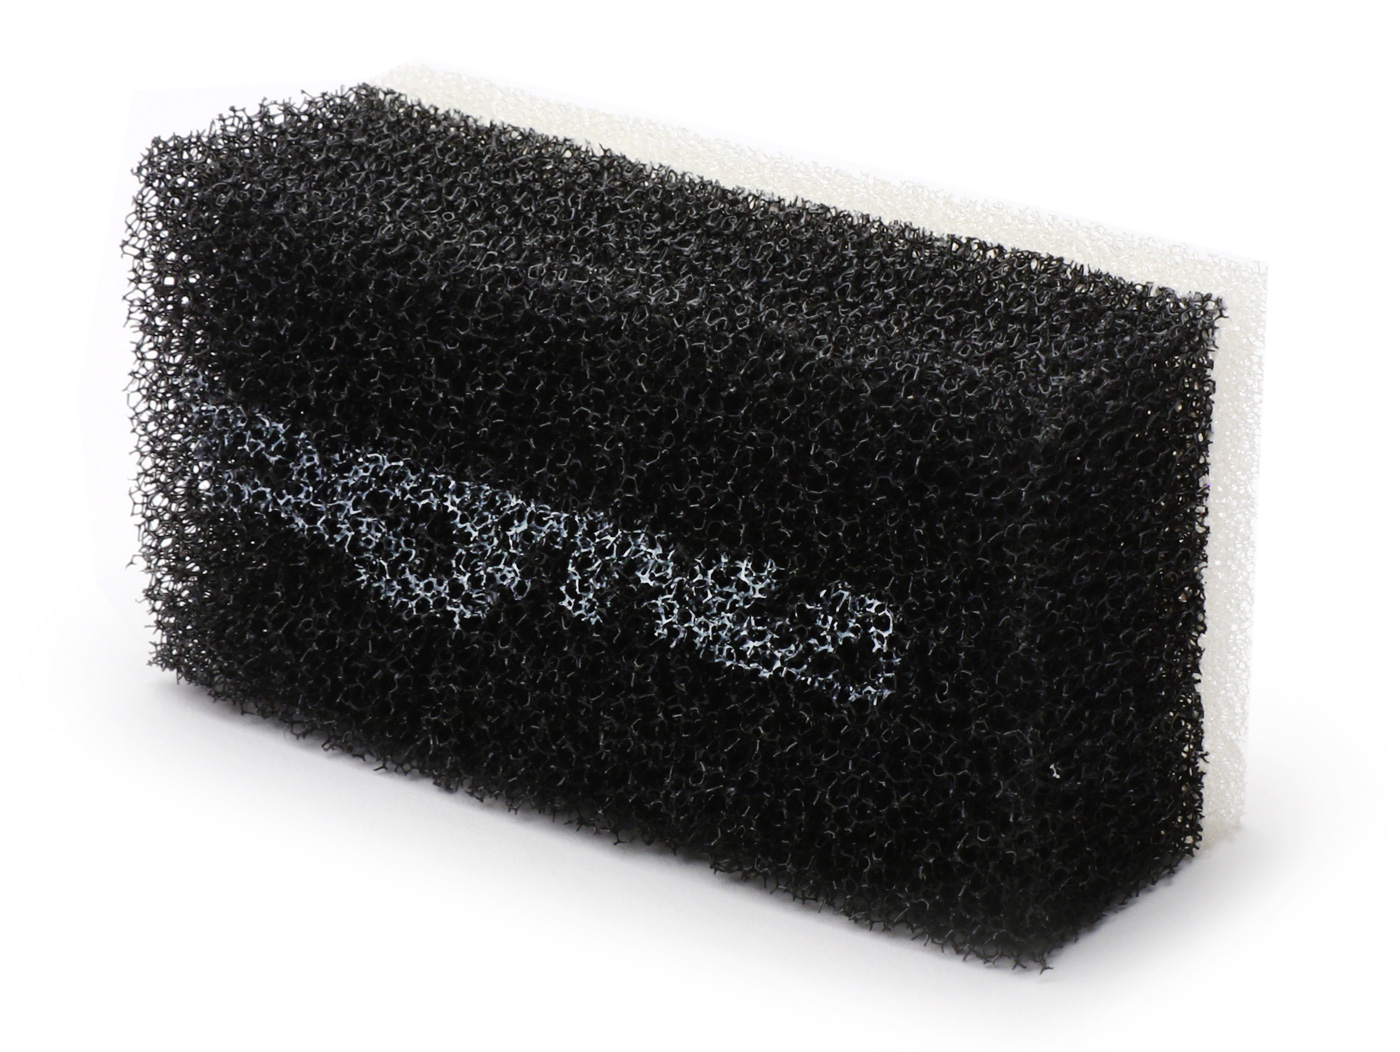
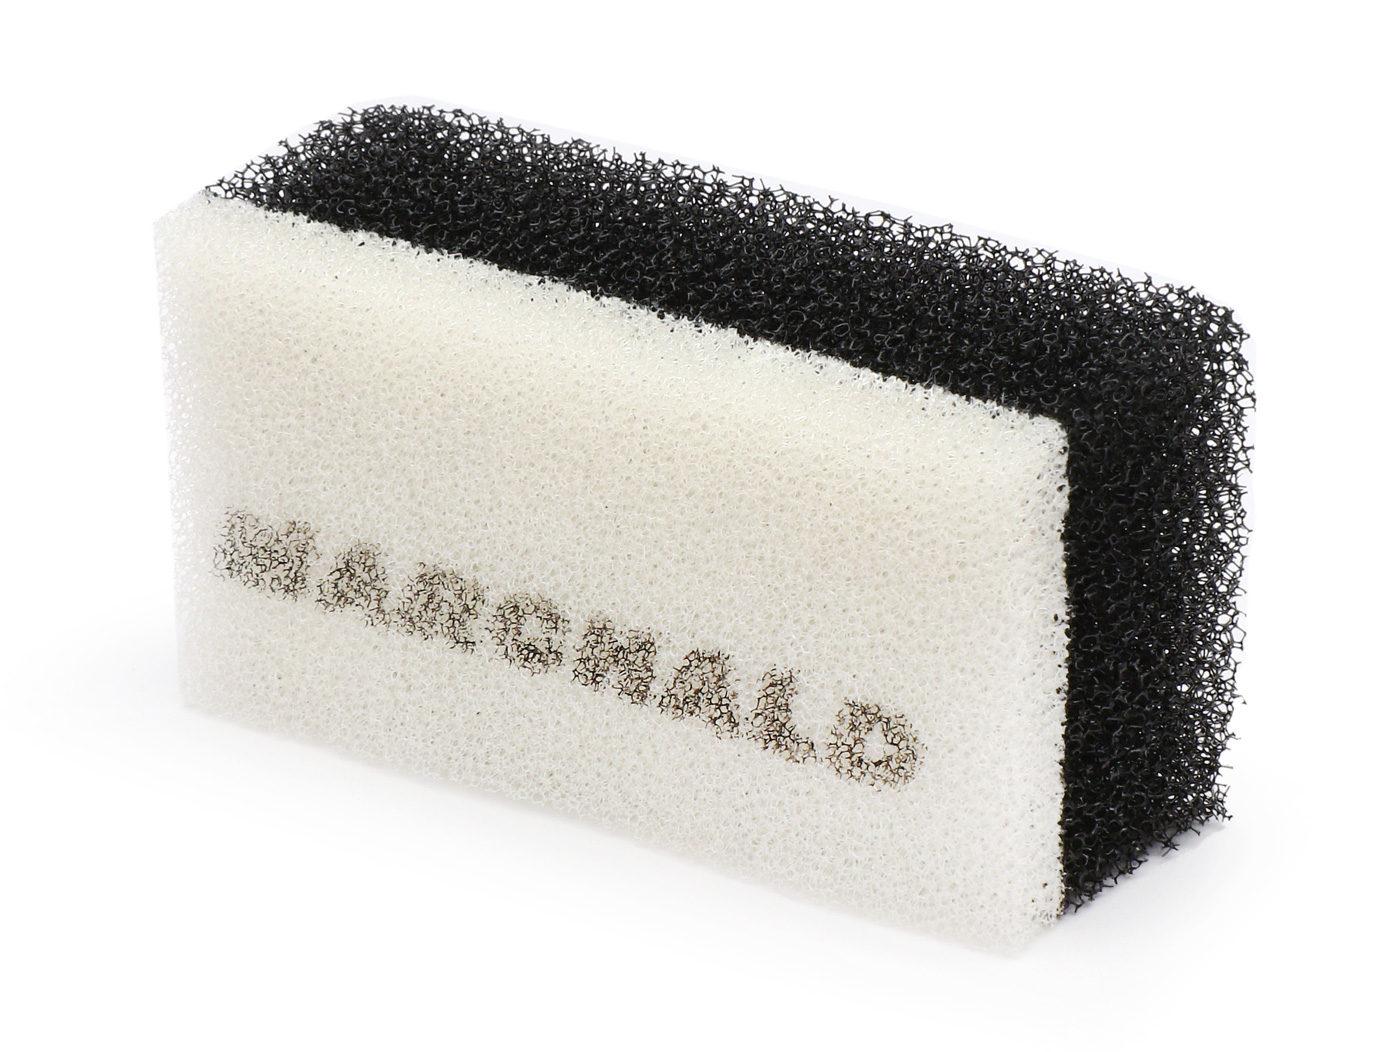
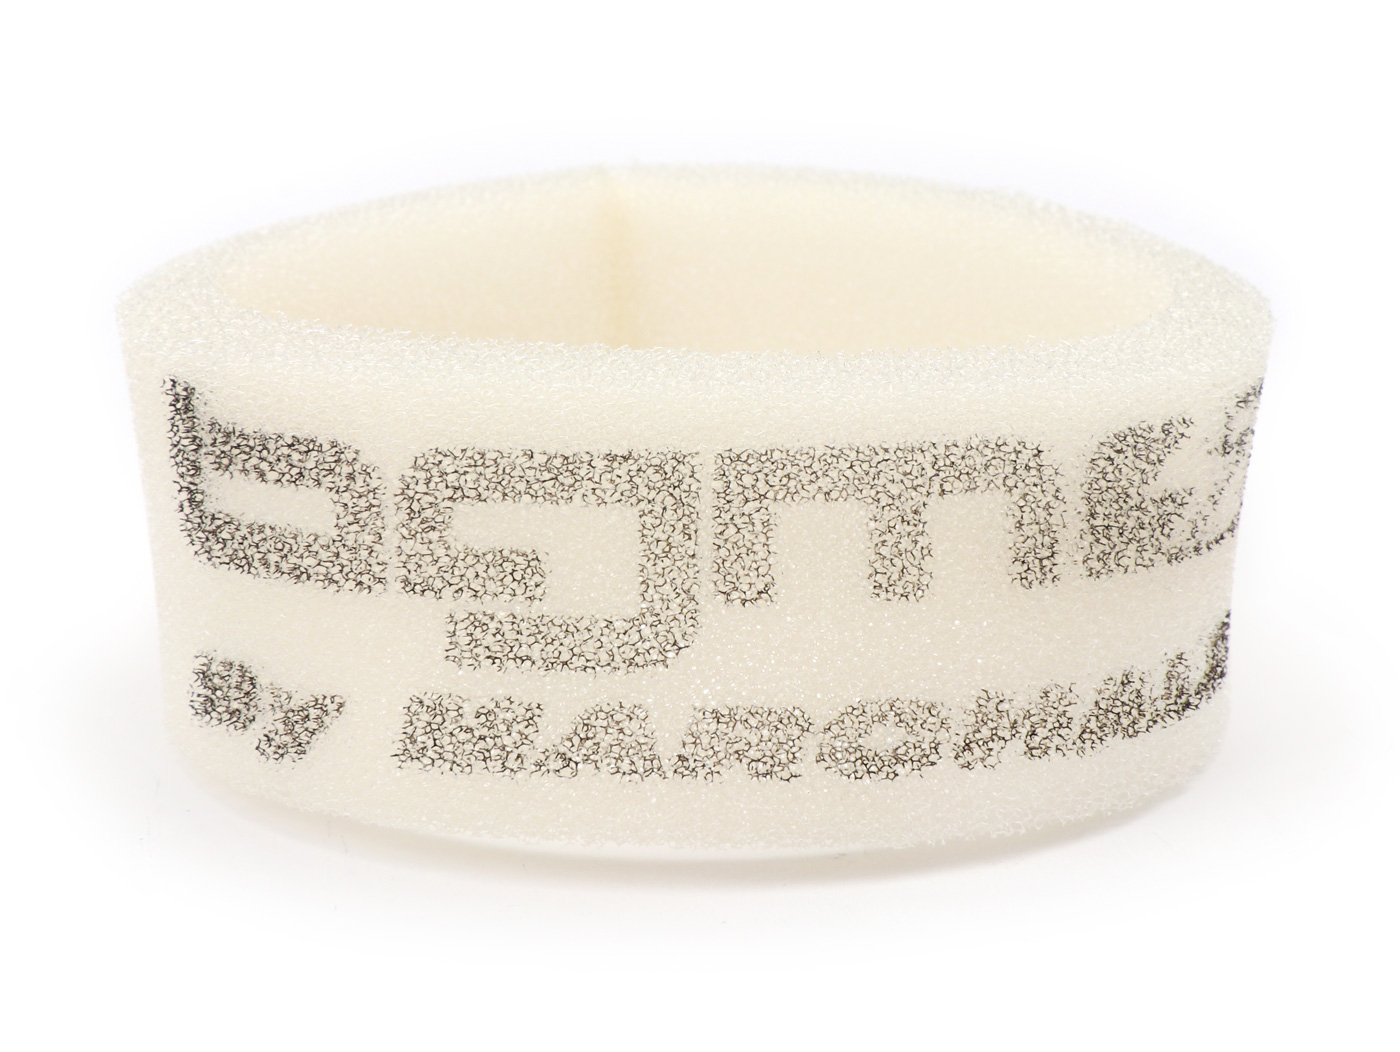
For the Vespa SmallframeModels with DellOrto SHB carburetor we have a high quality Filter fleece from bgm PRO developed. Made in Italia by Marchald.
The new bgm PRO air filter element replaces on all Vespa Smallframe-Motors with sheet metal air filter box use the original wire mesh and can be exchanged 1: 1 easily, quickly and safely.
The sheet metal air filter box of the Vespa is held together with two split pins. On the back of the air filter box, the ends of the split pins are bent over as a safety device.
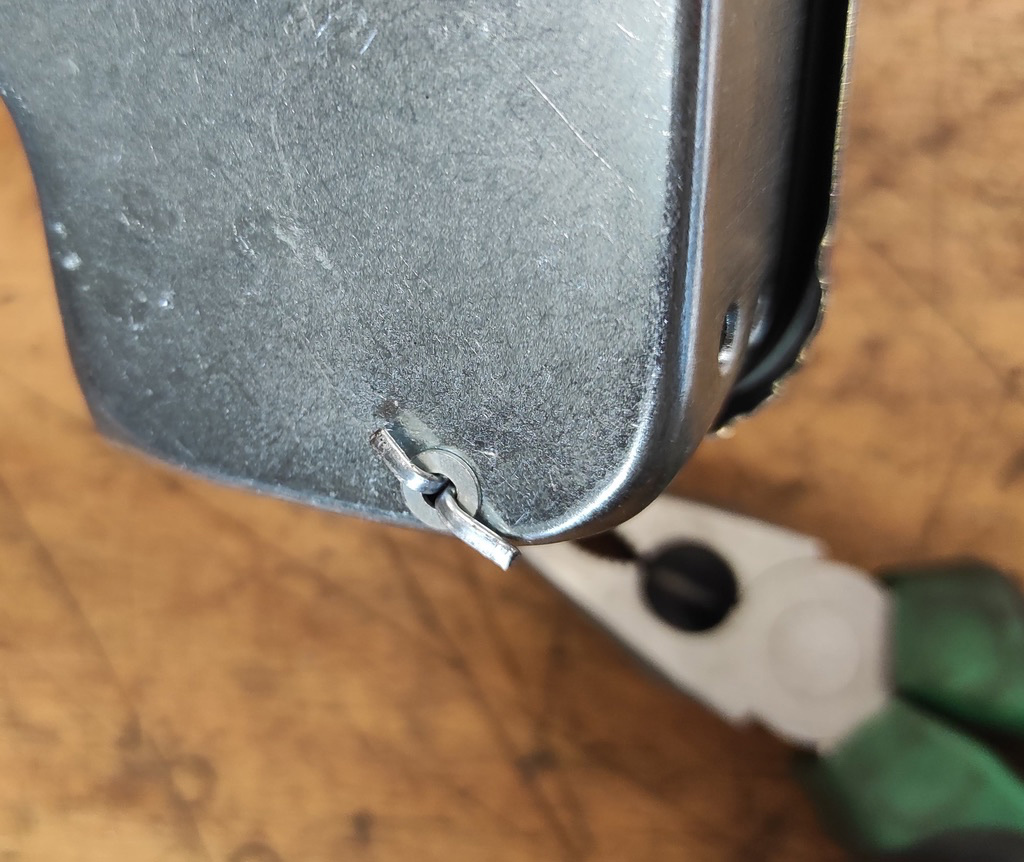
Use suitable pliers to straighten the ends of the two split pins and pull out the split pins. Pay attention to the location of the washers.
The lid can now be easily removed and the original wire mesh, the air filter, becomes visible.
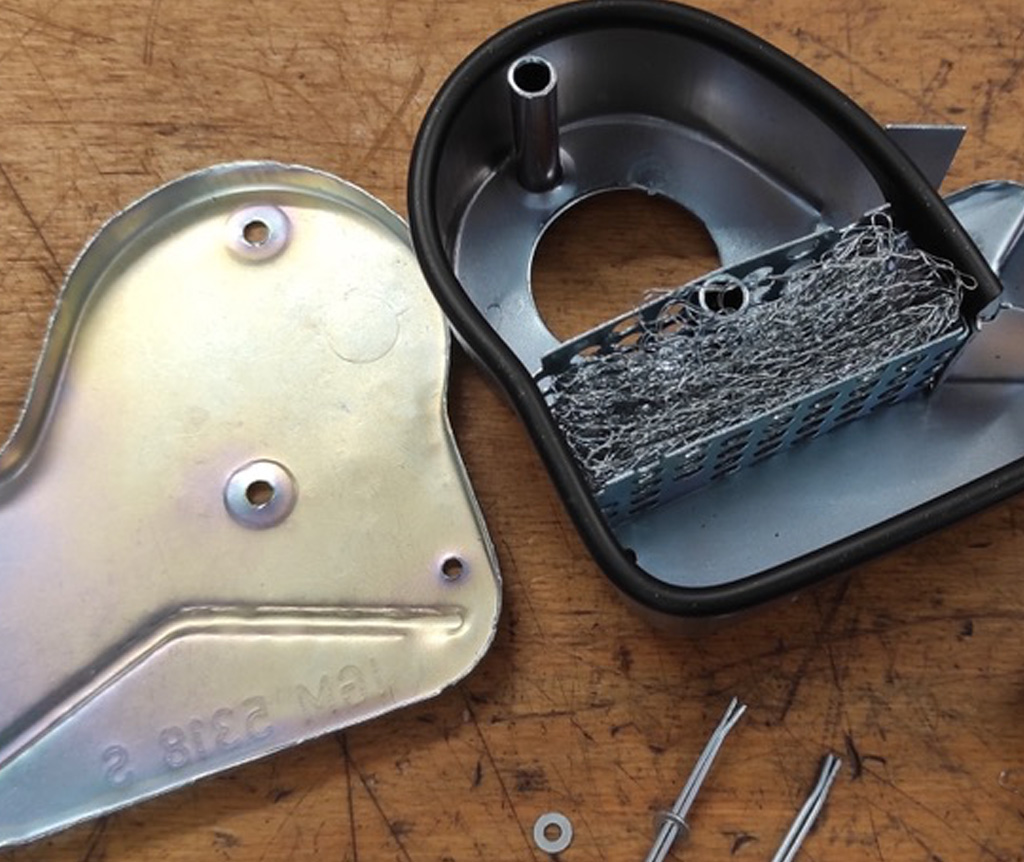
Simply pull the old wire mesh out of its compartment and clean the air filter box.
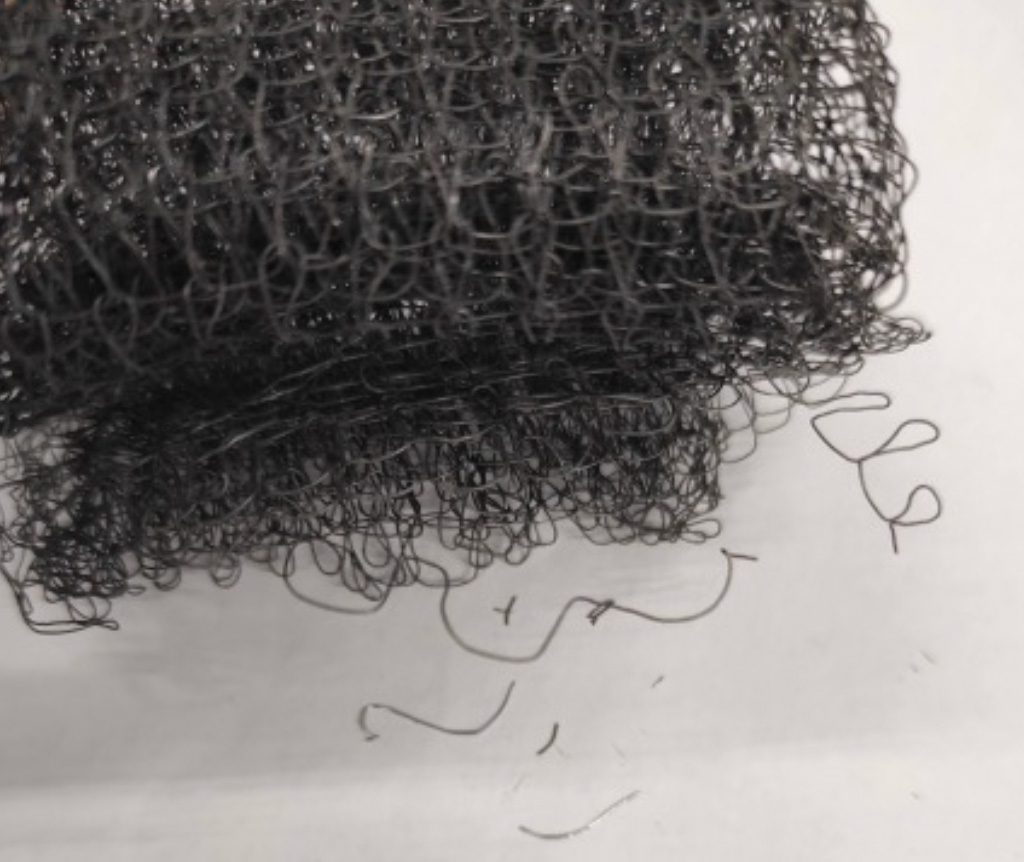
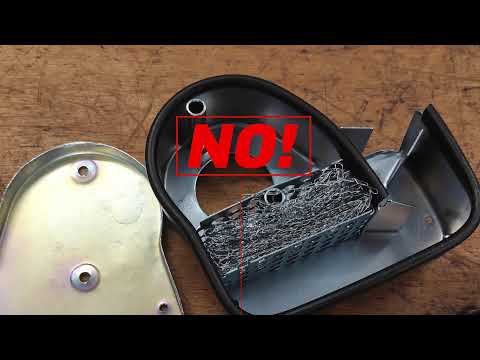
Due to aging and vibrations, the original wire air filter has a tendency to break the individual wires. These fragments are then loosely in the air filter box and can be sucked in by the engine.
After you have cleaned the box well and freed it from the dangerous wire residues, you can now insert the bgm air filter insert into the compartment of the air filter box. Position the fleece in such a way that there is sufficient protrusion for sealing in the direction of the air filter box cover.
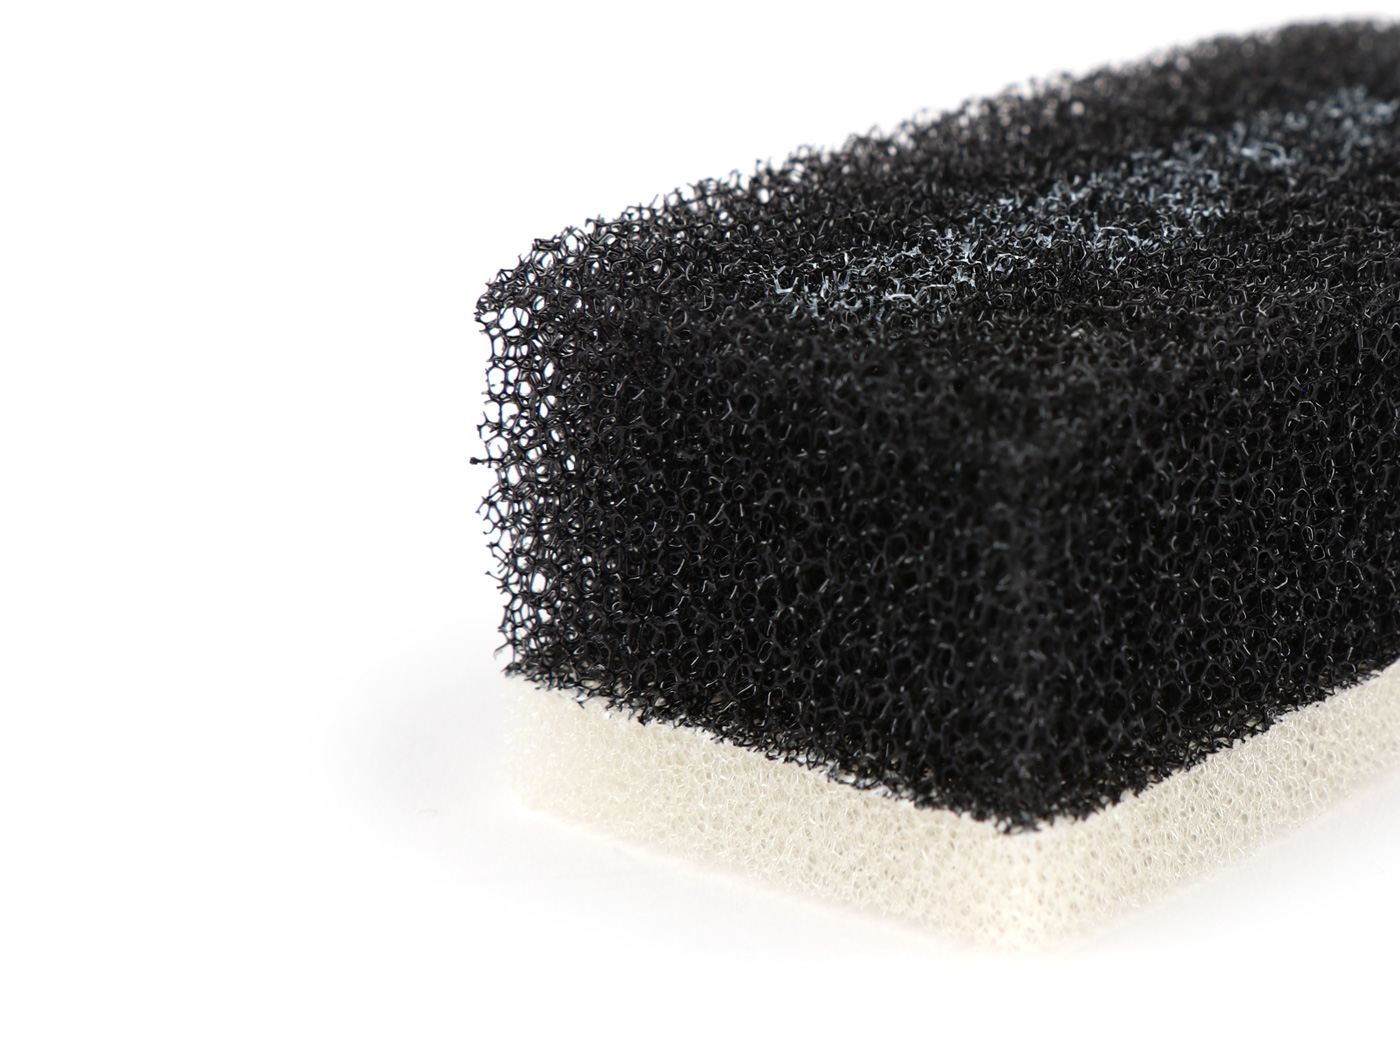
When inserting the air filter insert, make sure that the black, coarse part of the filter mat points in the suction direction, i.e. downwards.
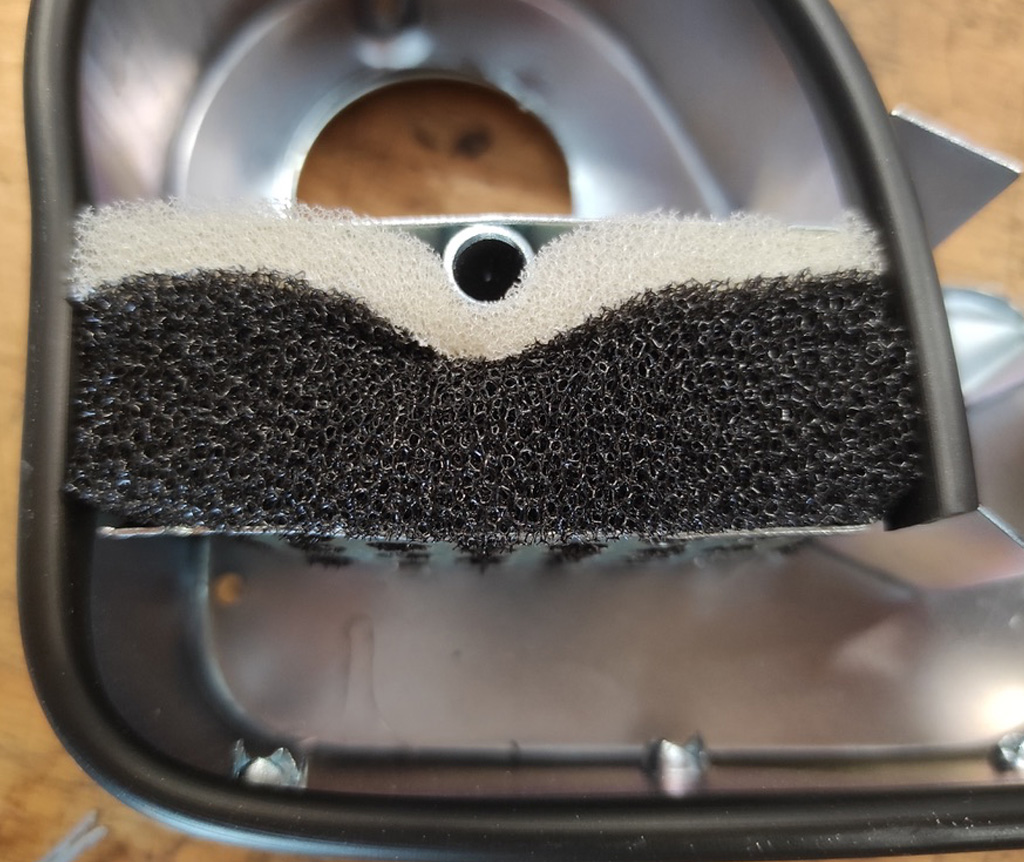
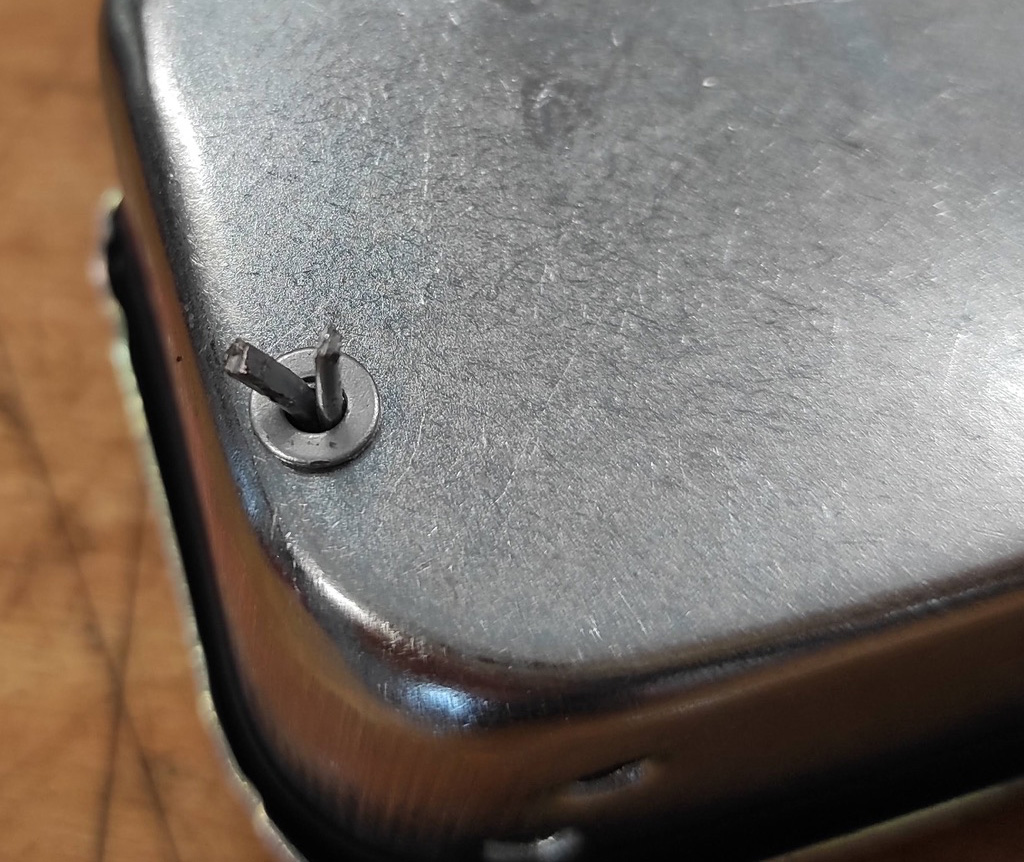
Then put the air filter cover back on and secure with the split pins.
When installing the split pins, make sure that a washer is positioned under the head and one under the ends.

With many Motovespa Largeframe The identical air filter inserts are installed in the models.
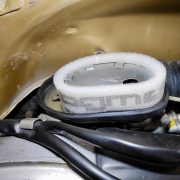
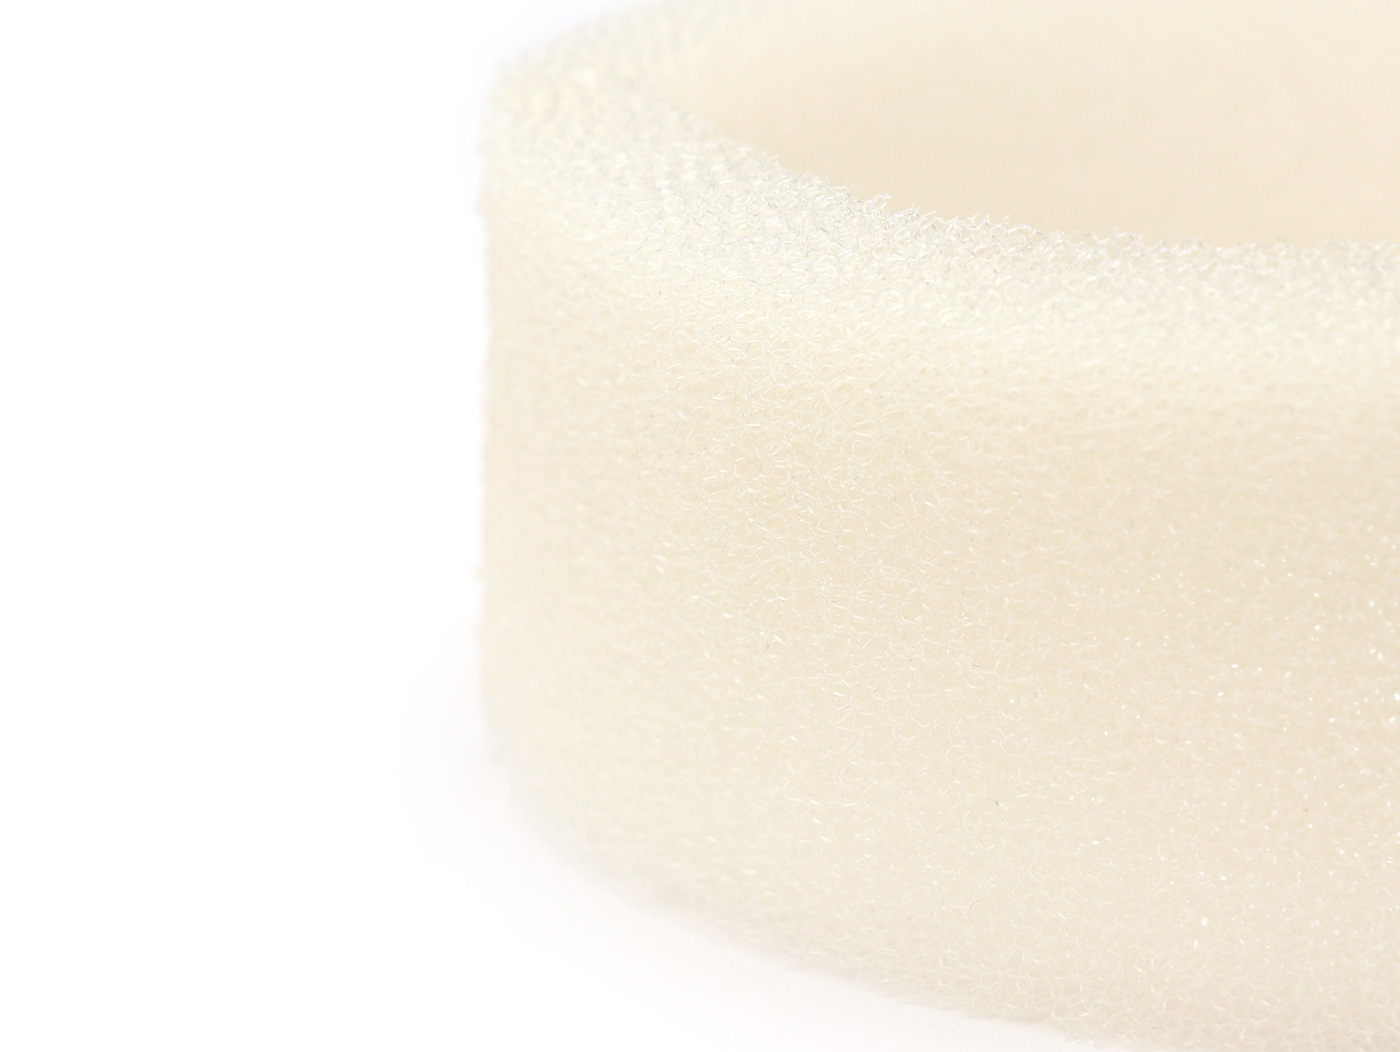
Often the important component to protect the engine is missing or is no longer in a usable condition. That's why we have the Vespa for the Spanish license builds Largeframe Models one high quality air filter insert made.
High quality filter fleece from Marchald (Italy), manufactured for bgm PRO.
Suitable for the direct intake engines (carburetor sits directly on the cylinder) of the Largeframe Motovespa engines.
Replacing the air filter element is very easy. After removing the right side panel, the view of the air filter box is immediately clear.

The cover is attached with two M5 screws.
These can be loosened with a screwdriver size 5 to 6.
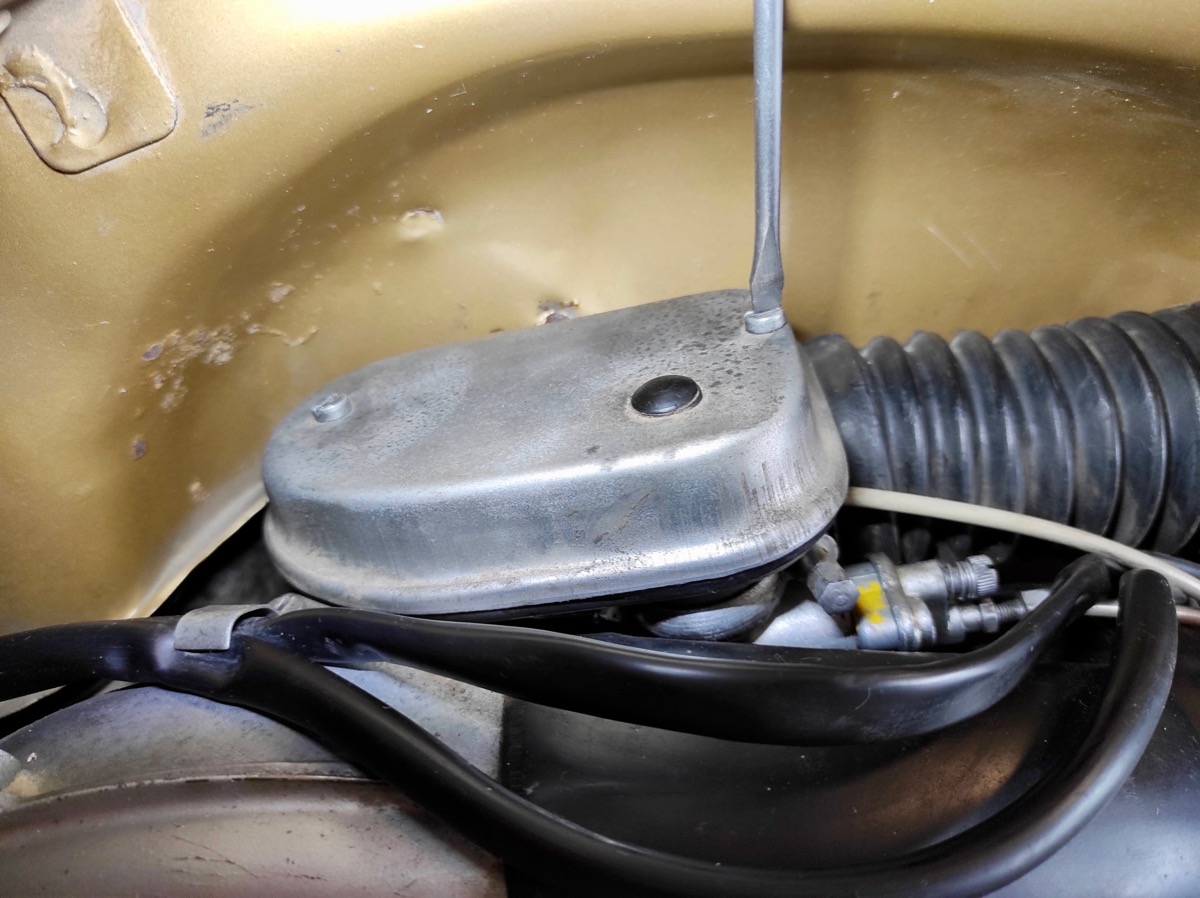
After removing the two screws, the cover can simply be lifted off.
Here, in our example, is the original one Motovespa air filter insert no longer available at first!
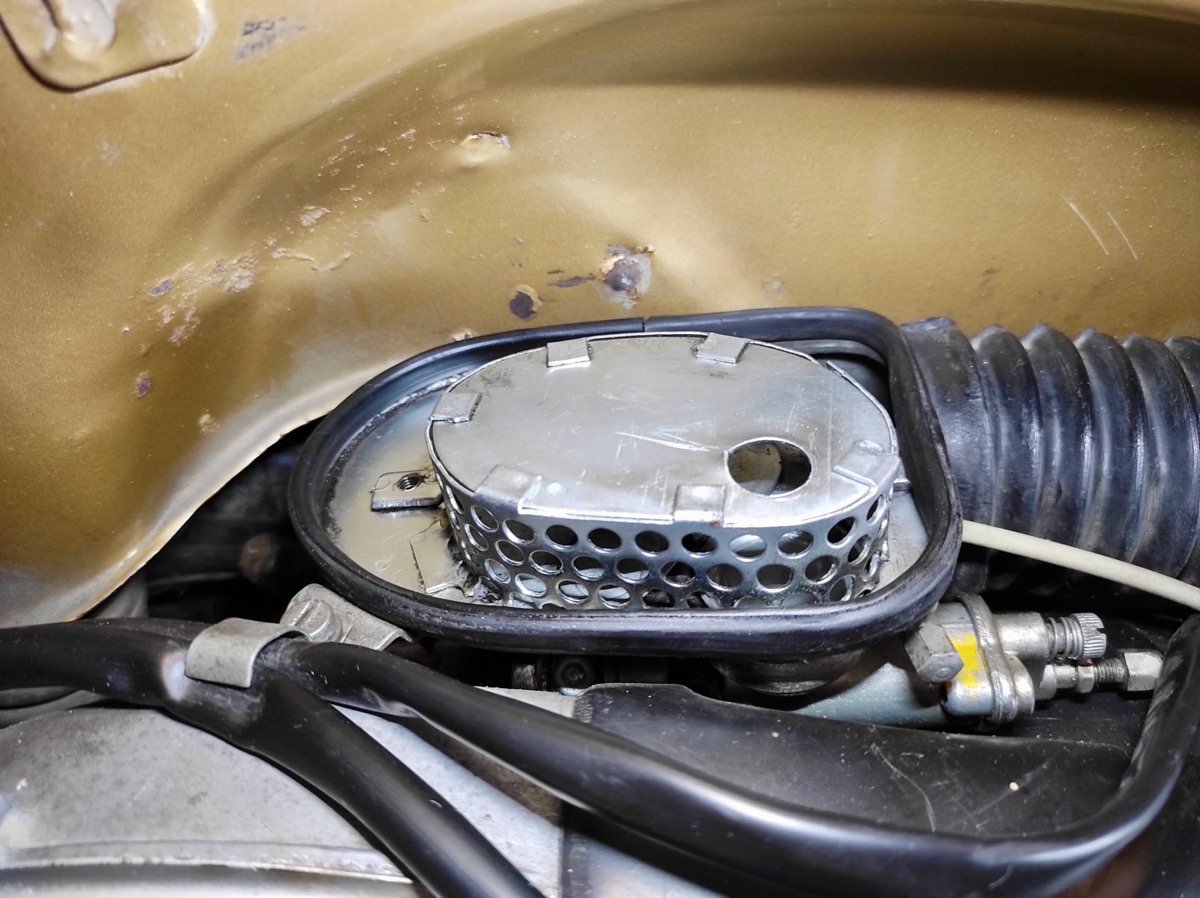
The air filter insert has no installation orientation and can simply be pushed onto the filter housing from above.
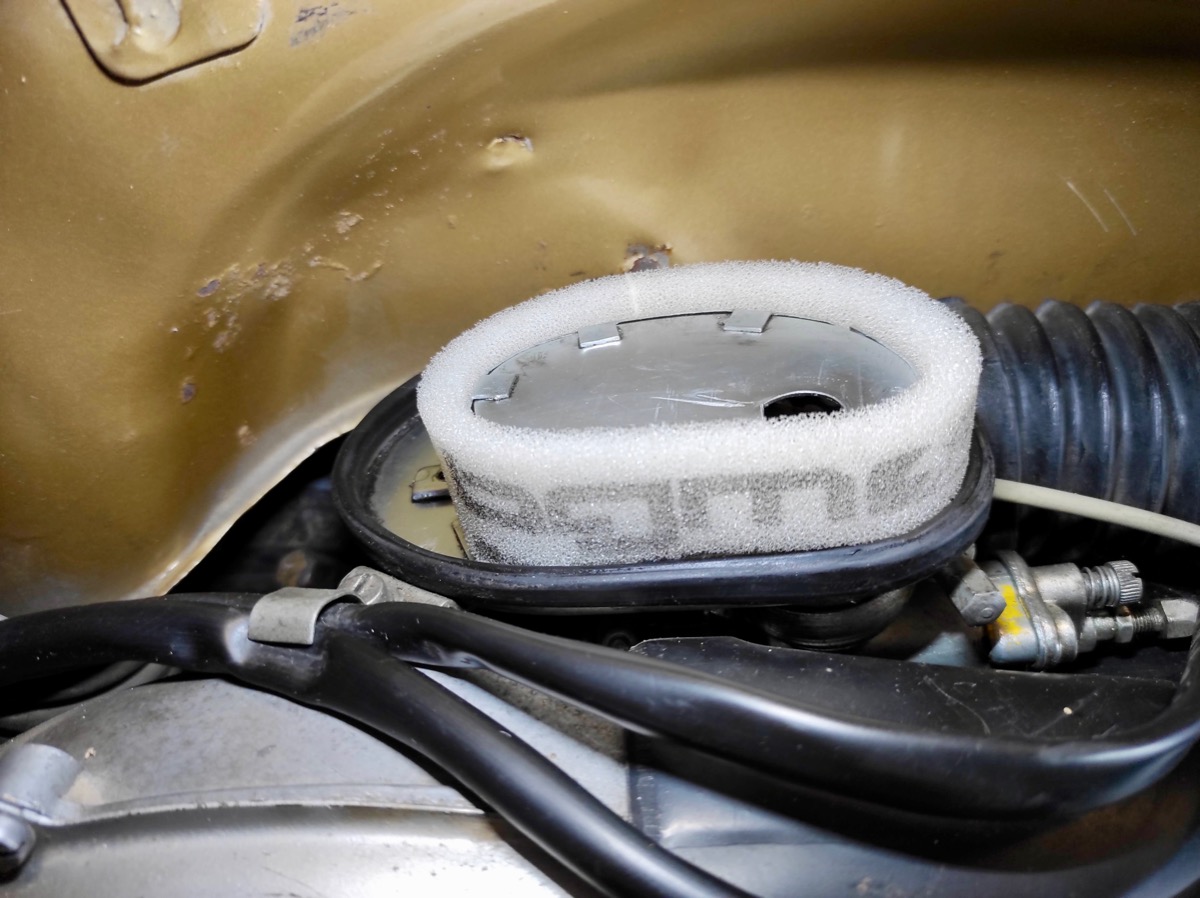
The remaining protrusion of the air filter insert seals against the air filter box cover when installed.
Fasten the cover of the air filter box again with the two screws, reassemble the side panel and the change is complete.
In order to achieve an even higher filter performance, the air filter insert with air filter oil can be used.
However, this is necessary due to the high quality filter material of the bgm PRO filter is not absolutely necessary.


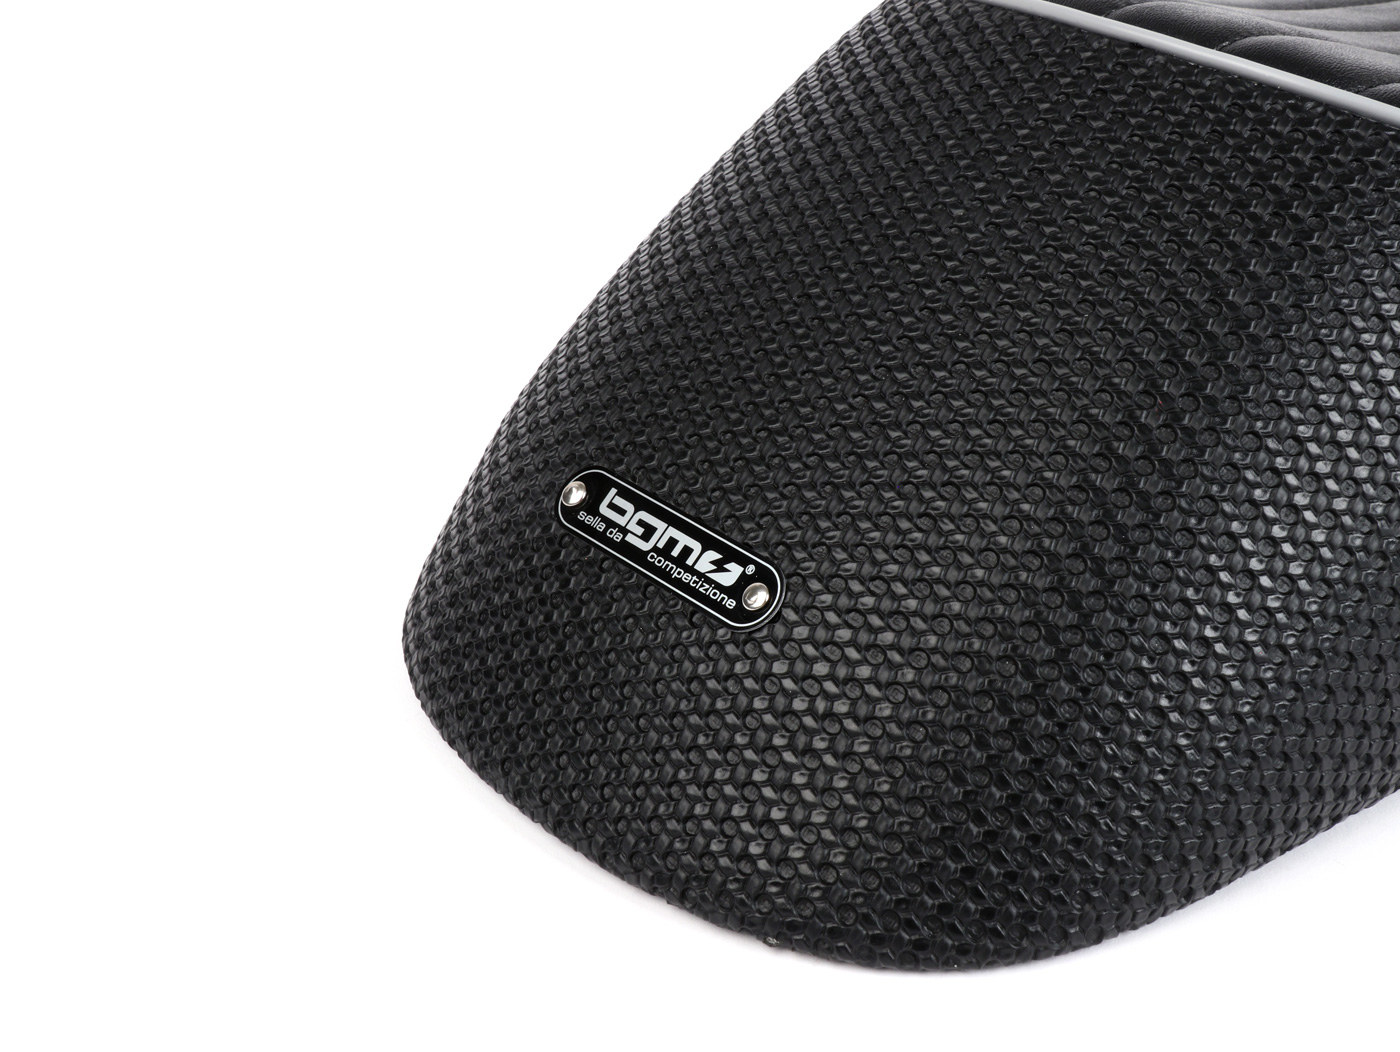
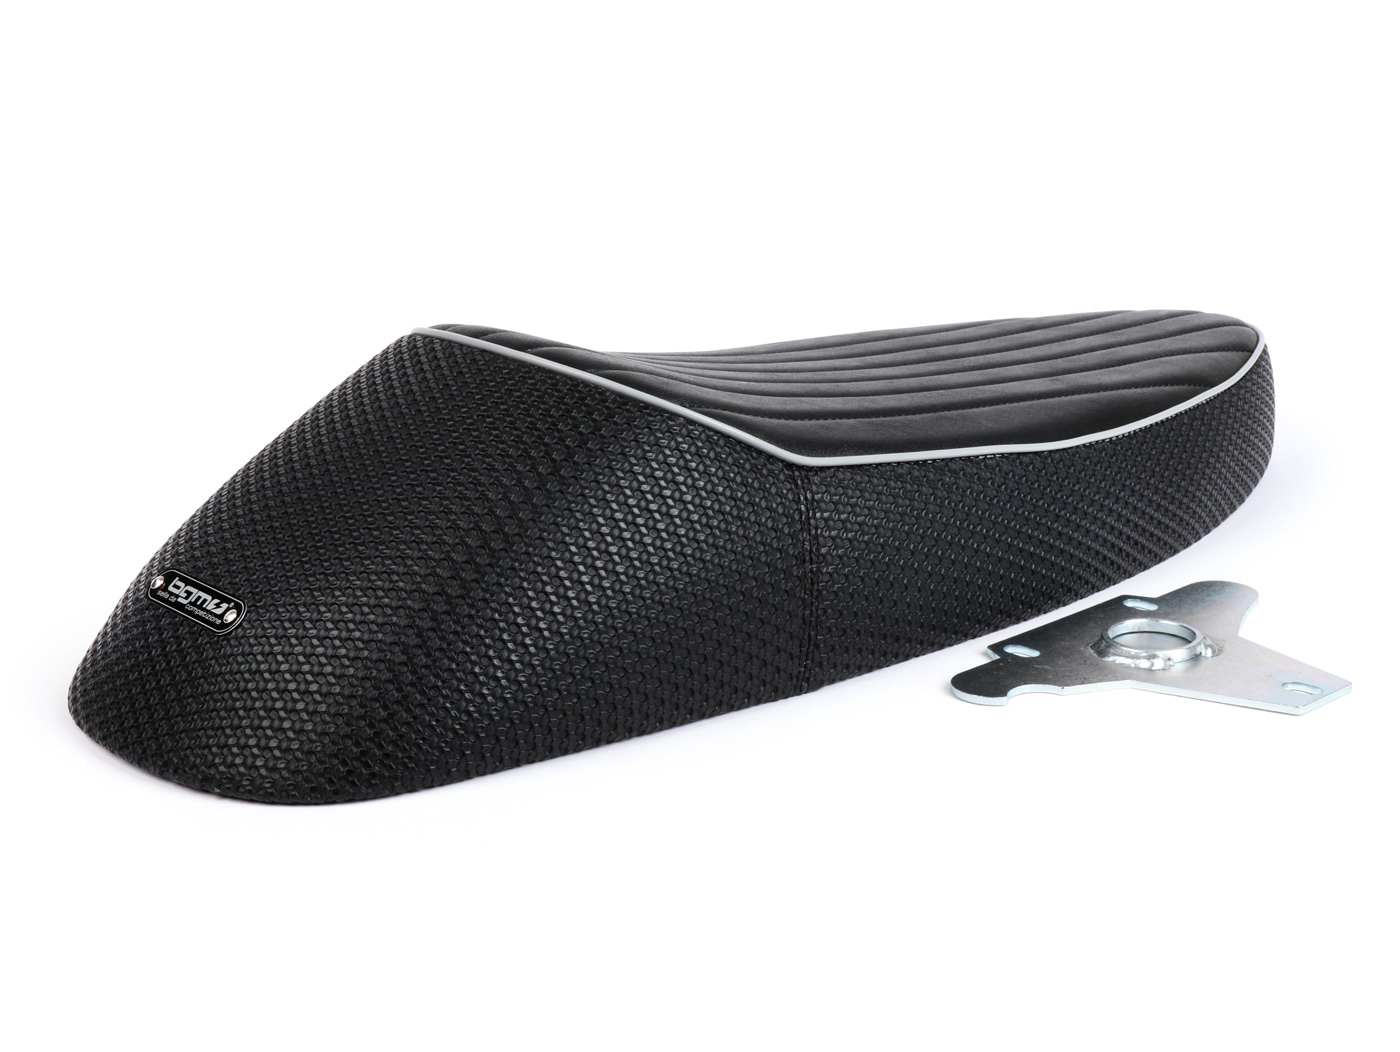
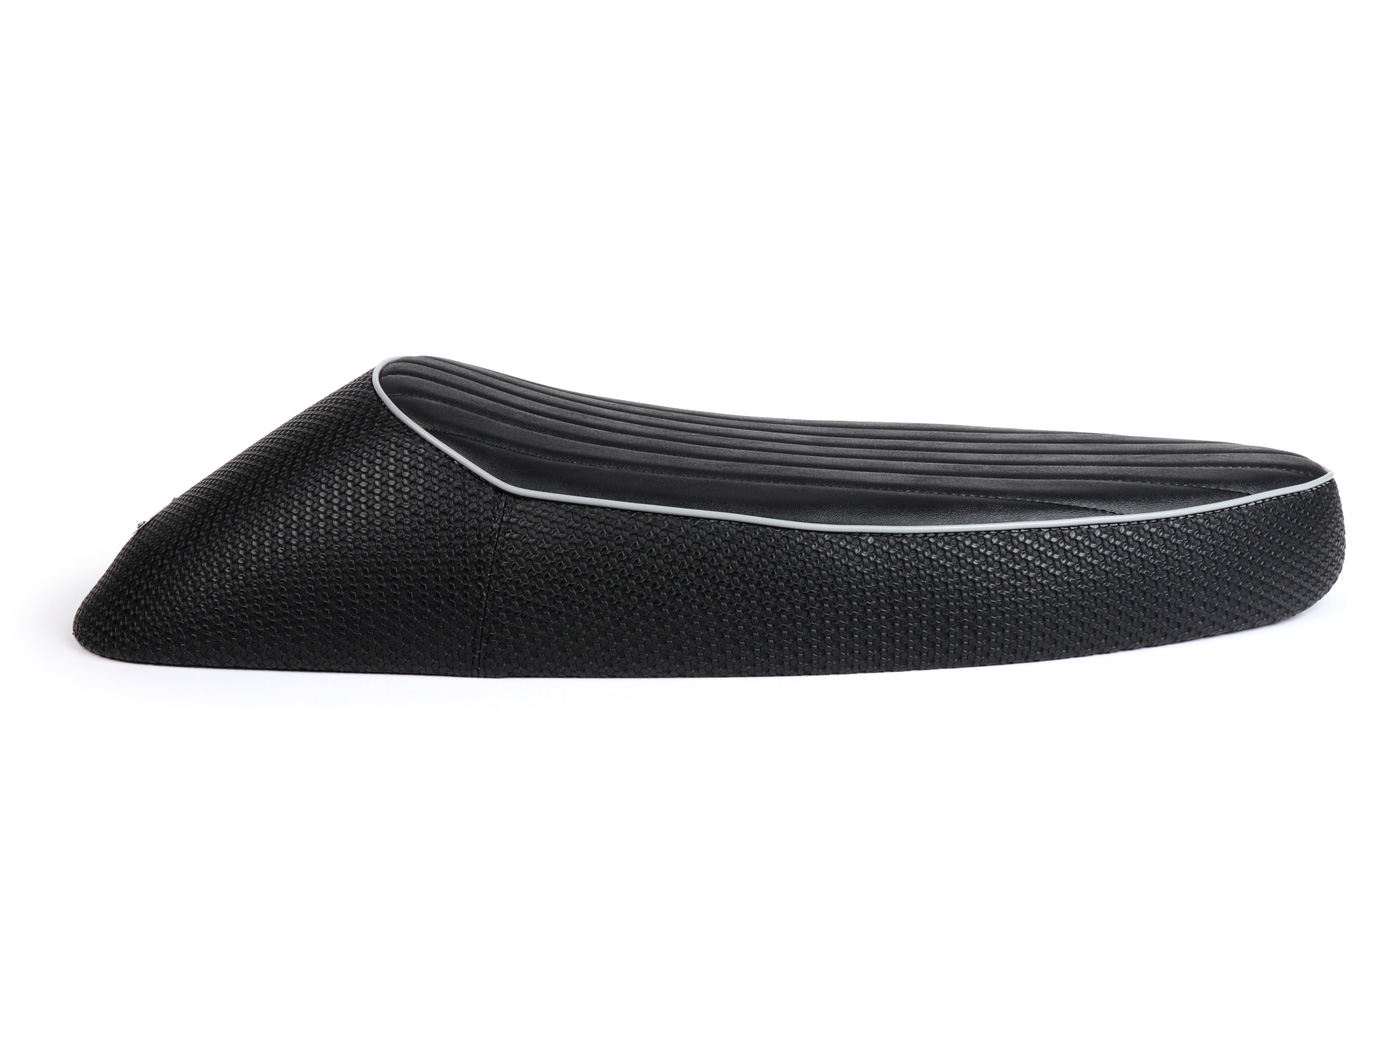
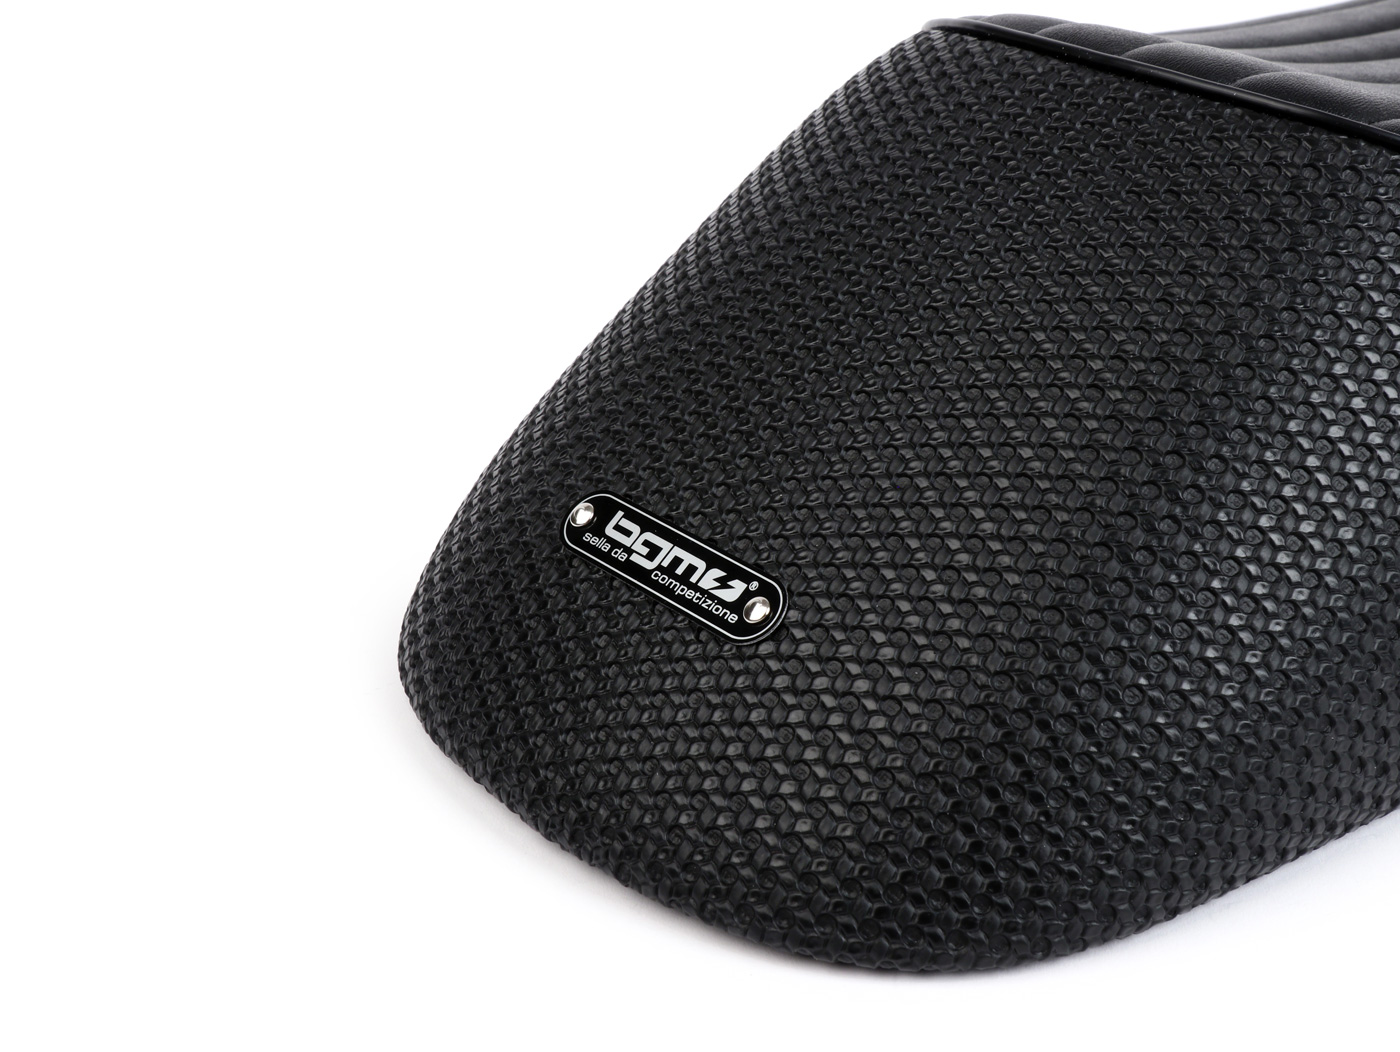
We have one based on the very popular Nisa 'Sport 20' bench Sports bench Designed for the classic Vespas in bgm design and had the bench made by the Italian bench manufacturer NISA as a bgm version. The new bgm PRO sports seat is available for Vespa Largeframe and Vespa Smallframe and is available in two versions:
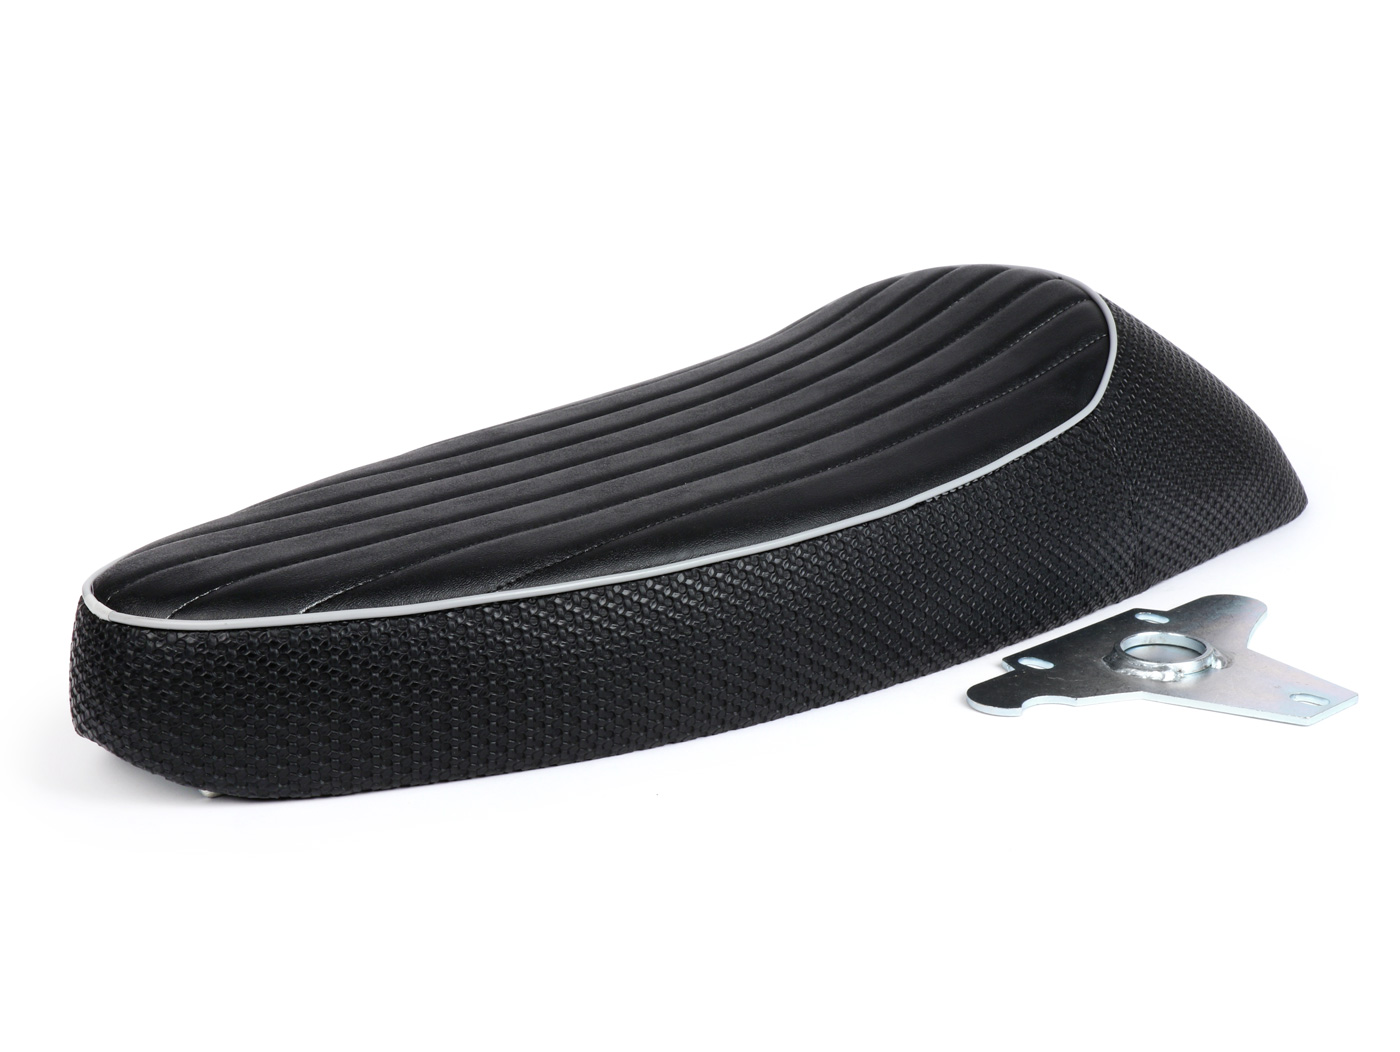
The BGM Pro Sport bench has a beautiful Alfatex cover (embossed waffle pattern) on the sides and back and is also available with gray piping. The seat is also provided with a smooth cover with parallel longitudinal seams. For a waterproof surface, these are embossed, not sewn.
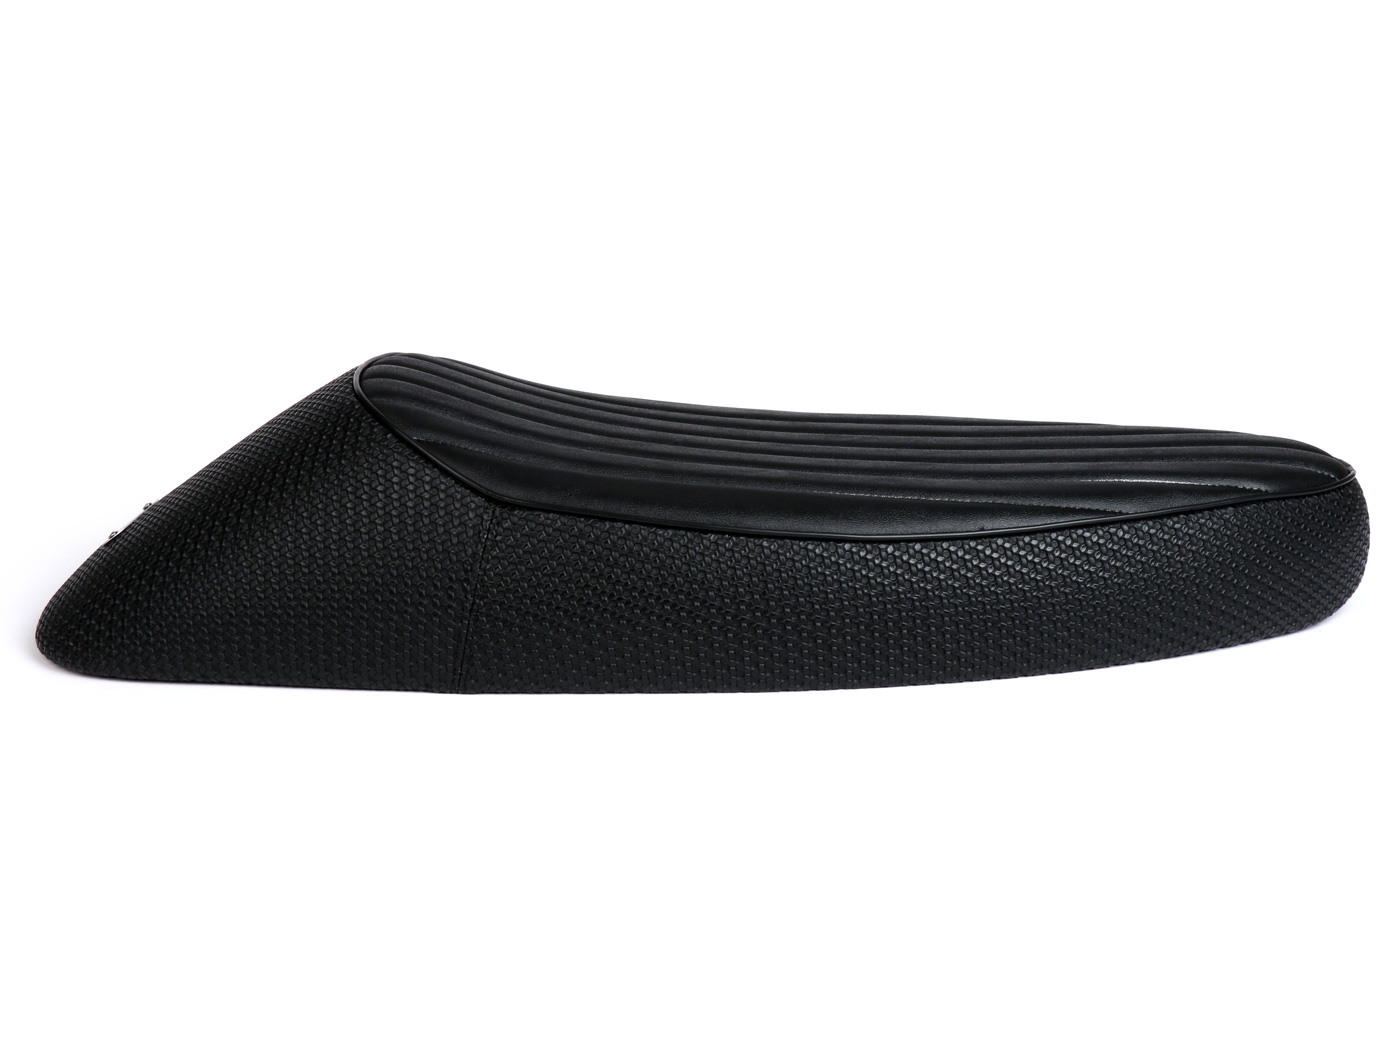
The appearance of the BGM Pro Sport is strongly reminiscent of the classic seat humps of the 70s and conveys a cool race flair even when the vehicle is standing.
You can also find the bench in the Scooter Center Bench configurator, take a look at the seat on your Vespa model:
In everyday practical use, it is very easy to drive despite its sporty look. The bench has a pleasantly dimensioned foam padding on which even long tours are fun. A nice feature is the completely padded hump. This offers a good grip when riding solo, but can also be used as a pillion seat if necessary.
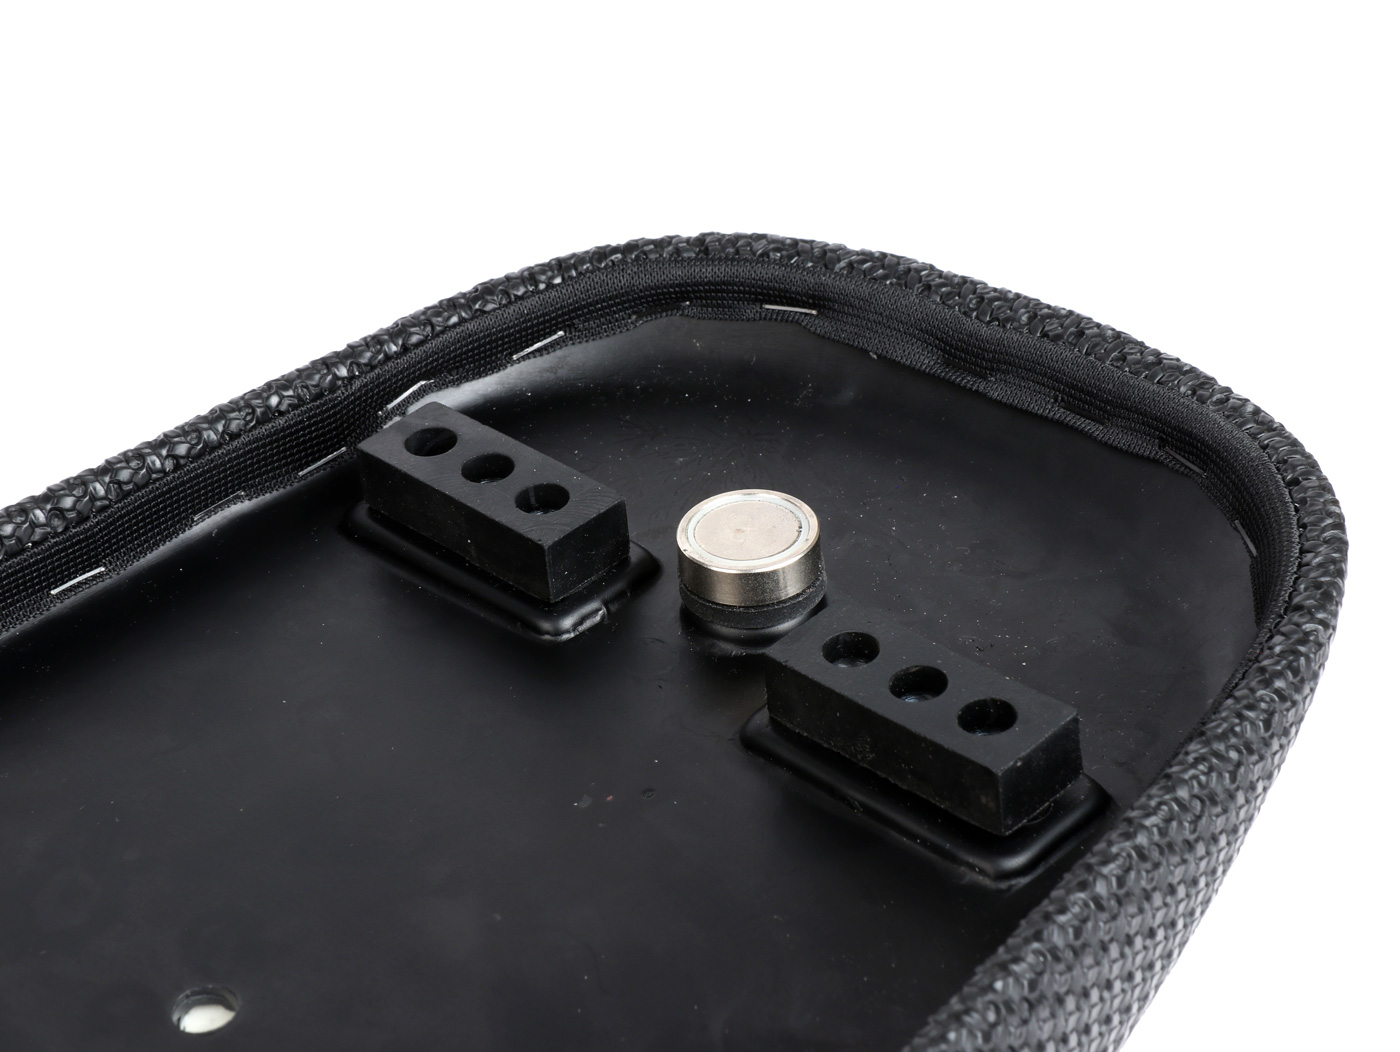
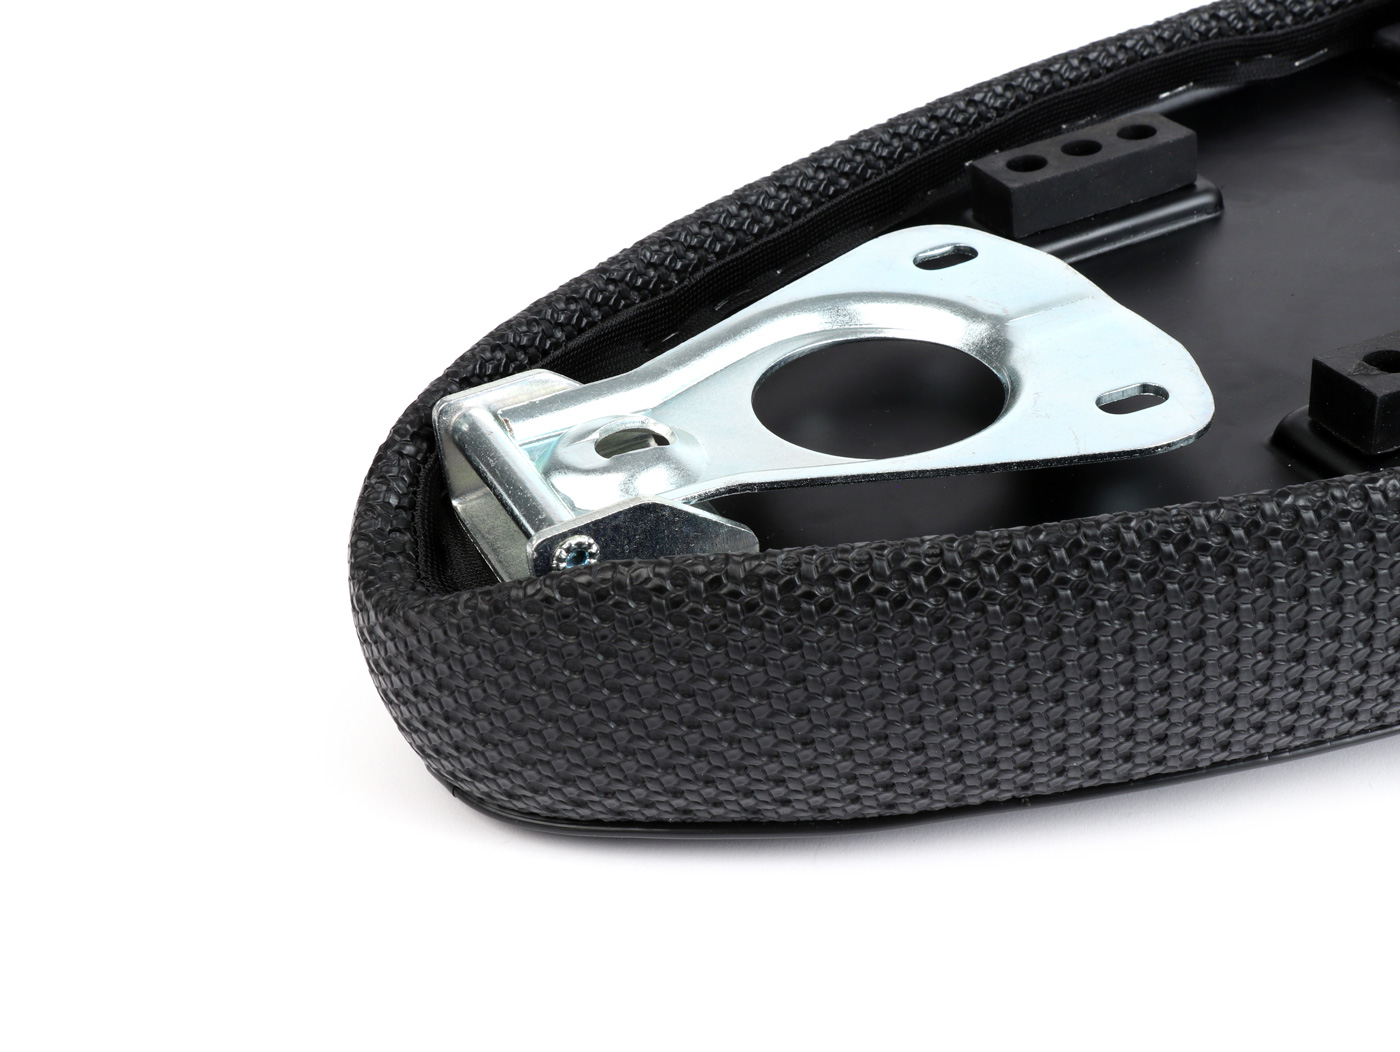
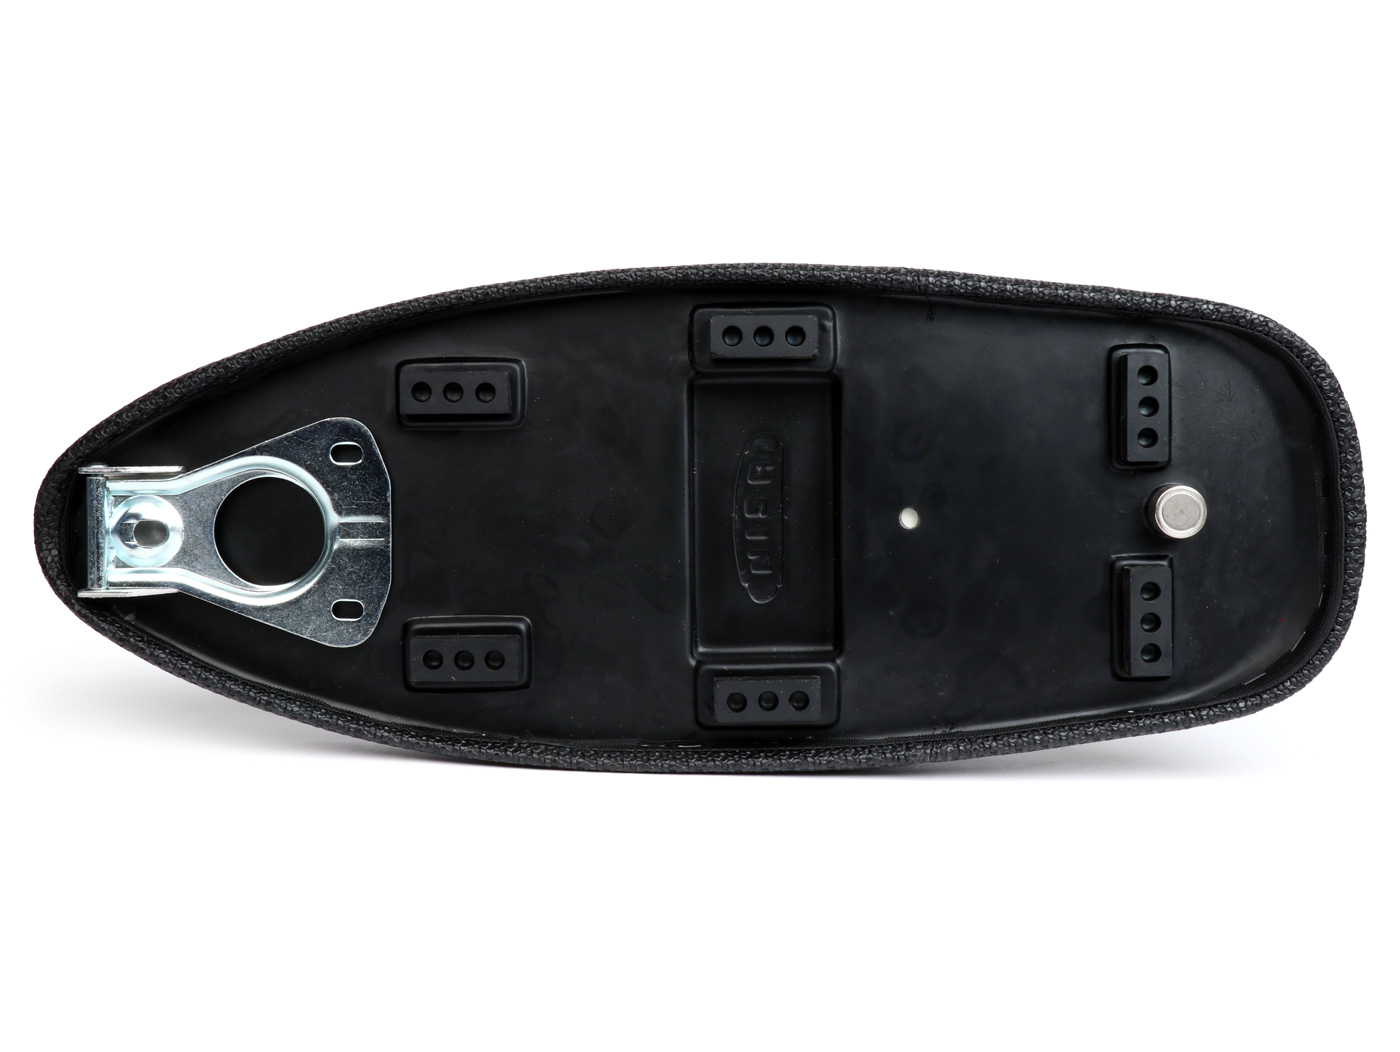
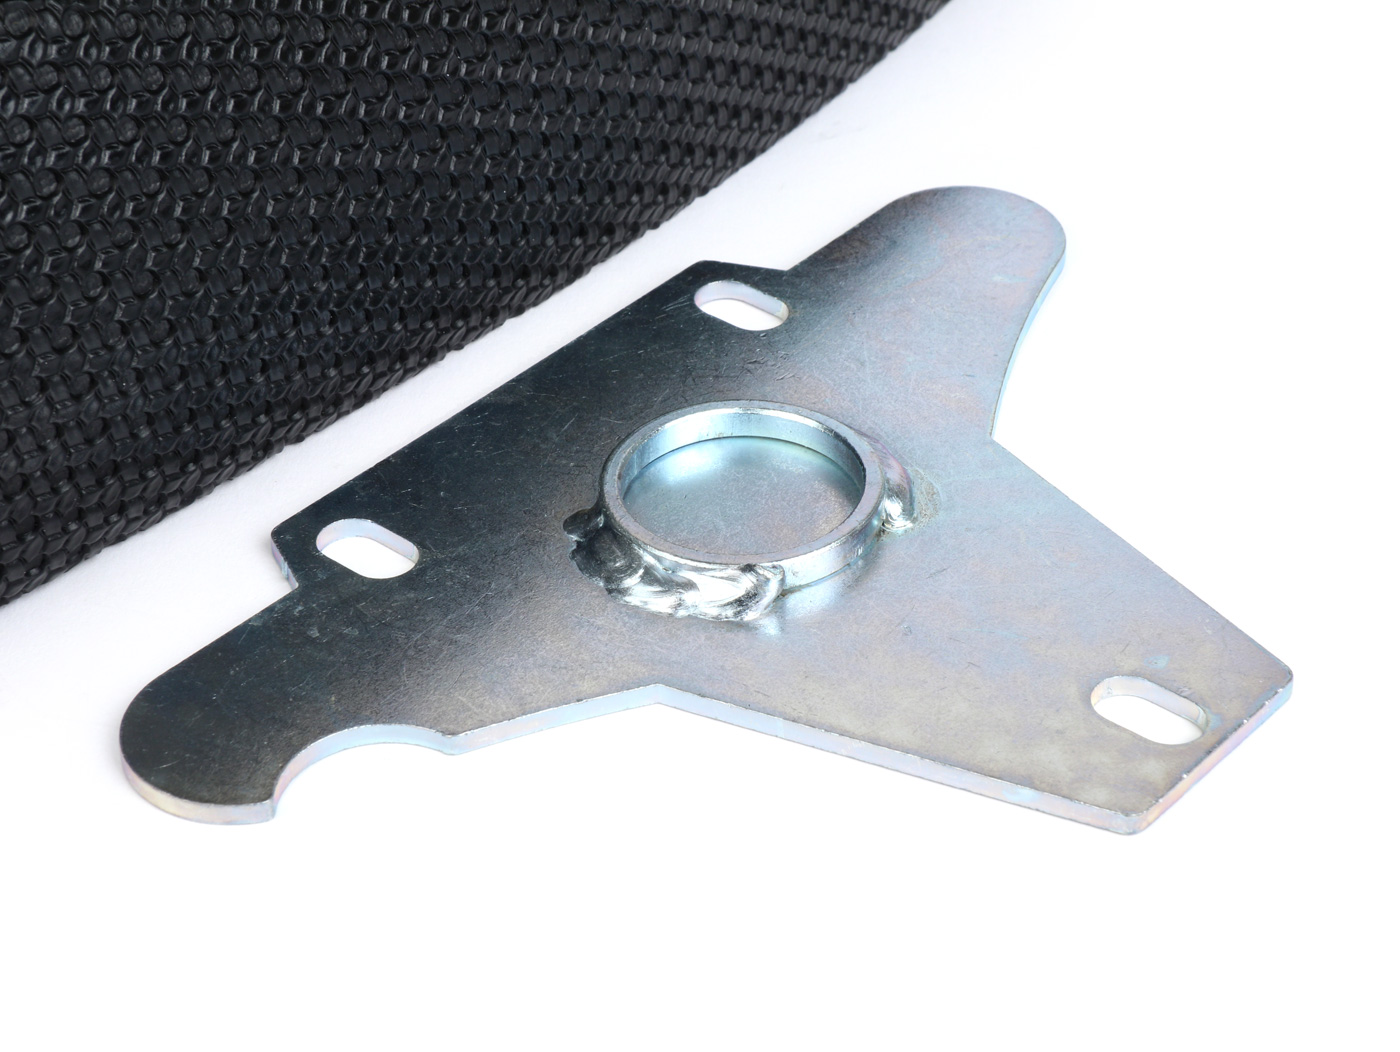
Another intelligent feature is the bank's magnetic lock with an extremely powerful neodymium magnet. The bench can be opened easily with one hand, but still holds better than many classic hook fasteners. The greatest advantage of the magnet technology is that the bench rests on the mounting plate, which is supplied and is firmly screwed to the frame. The magnetic force is so high that the ignorant who try to open the bench, assume that the bench is locked.
The bench frame is made of impact-resistant and durable ABS plastic. The cover is stapled all the way around and is therefore very securely and permanently attached (in contrast to pure gluing as is otherwise usual). The frame is provided with six rubber pads. So the load is distributed very well over the entire frame and the bench gives a very solid and full seating feeling. The bench hinge is typically very solid and solid and therefore very resilient. In addition, it is screwed and can be exchanged (in the highly unlikely event of a defect).
Available for Vespa Smallframe and Largeframe (Largeframe-Models with a high tank (GS160, SS180, Rally180 / 200 require the flat tank of the Sprint / PX models without an oil tank)
Note for the LargeframeVersion and Vespa PX
For PX models only suitable for tank versions with a hinged lid.
Not suitable for Lusso models / vehicles with oil tank.
Order a seat:
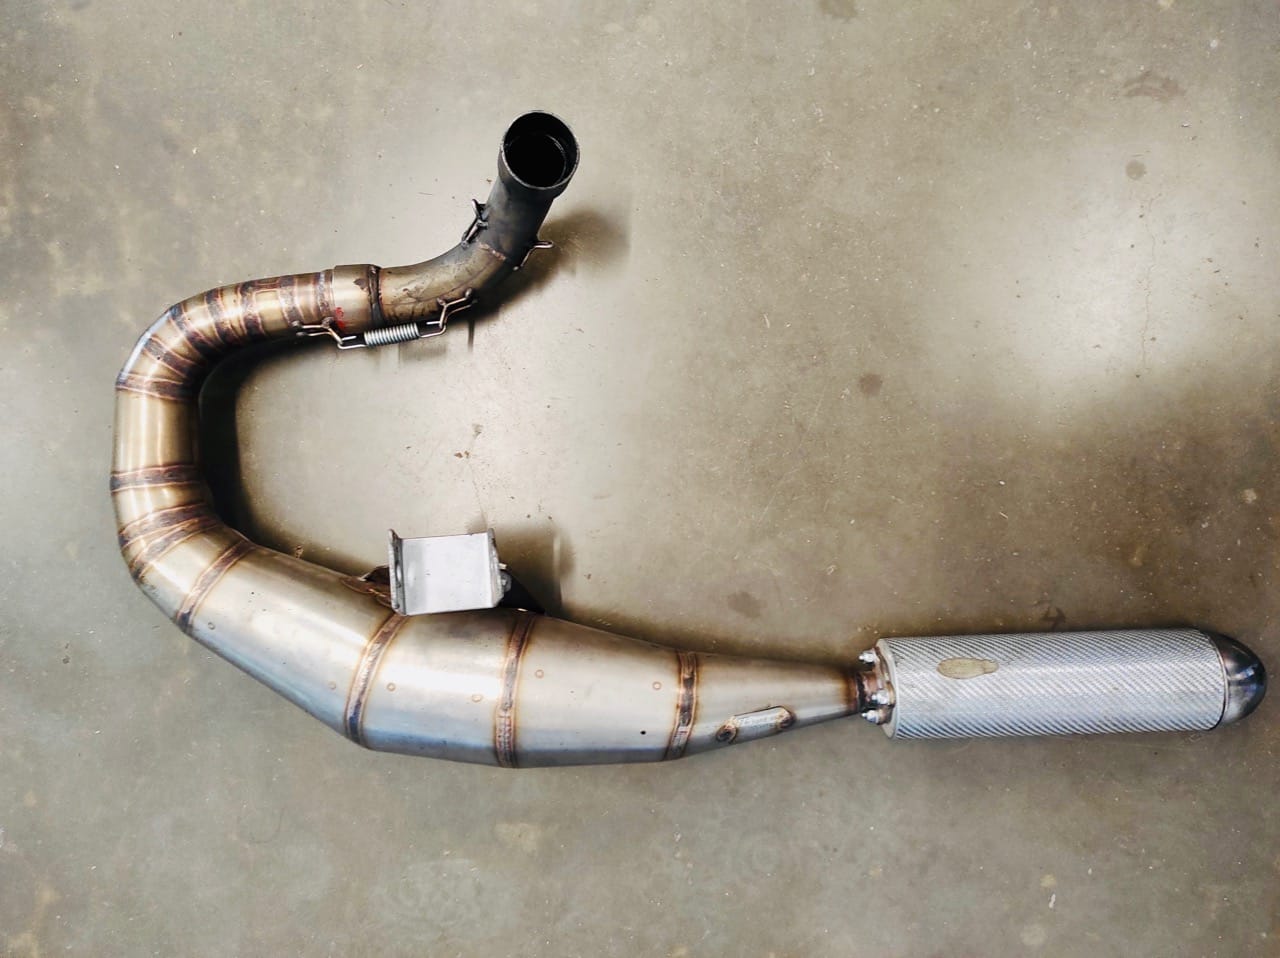
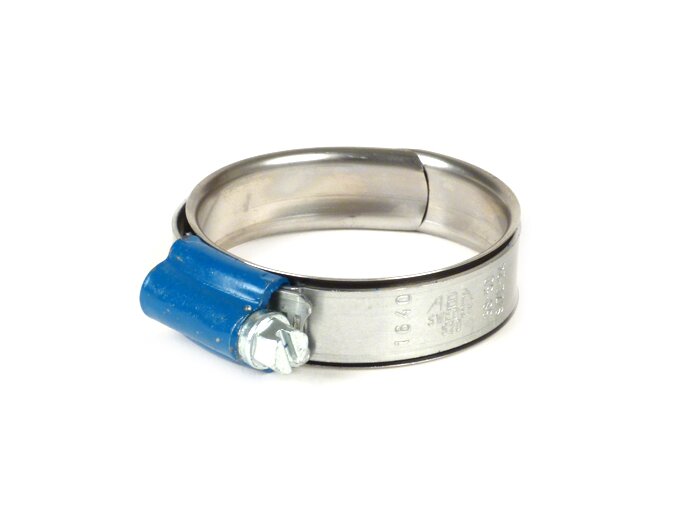
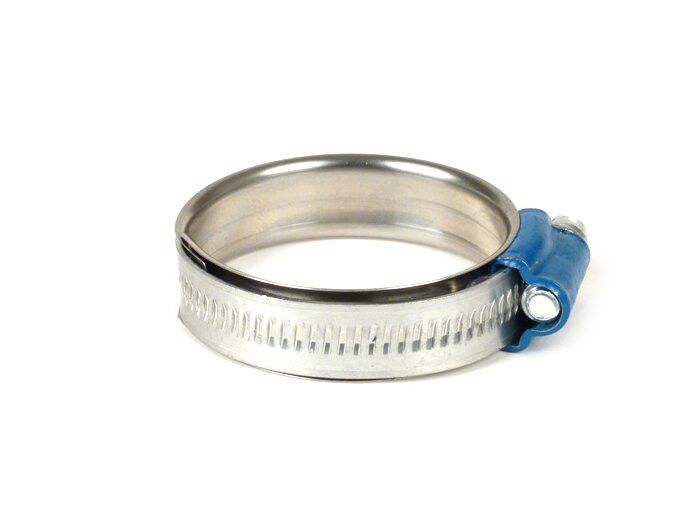
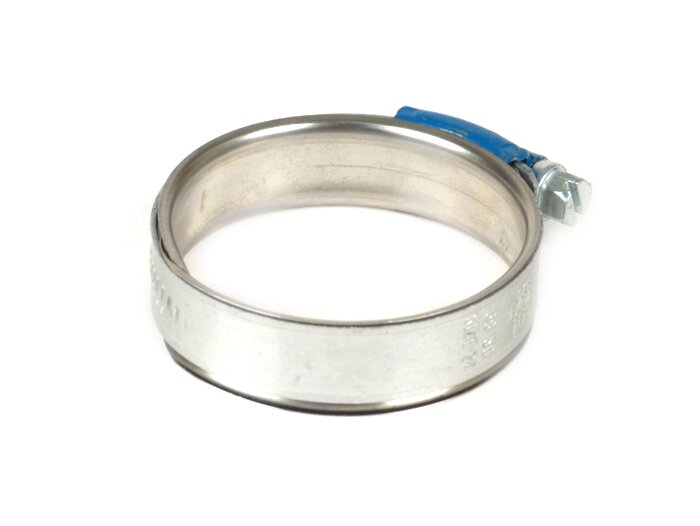
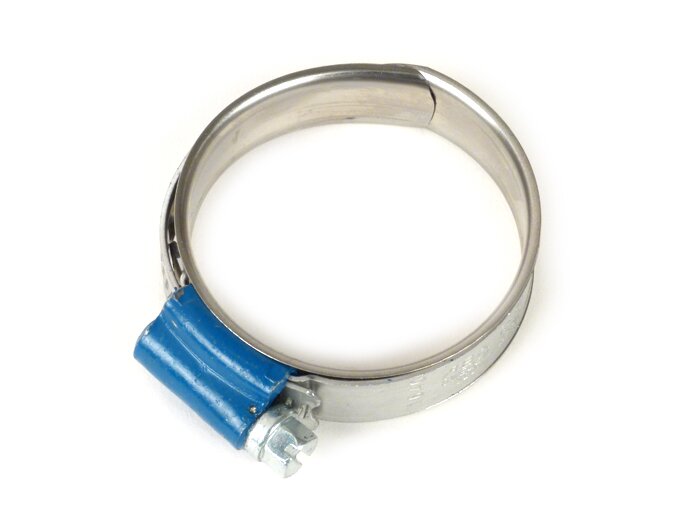
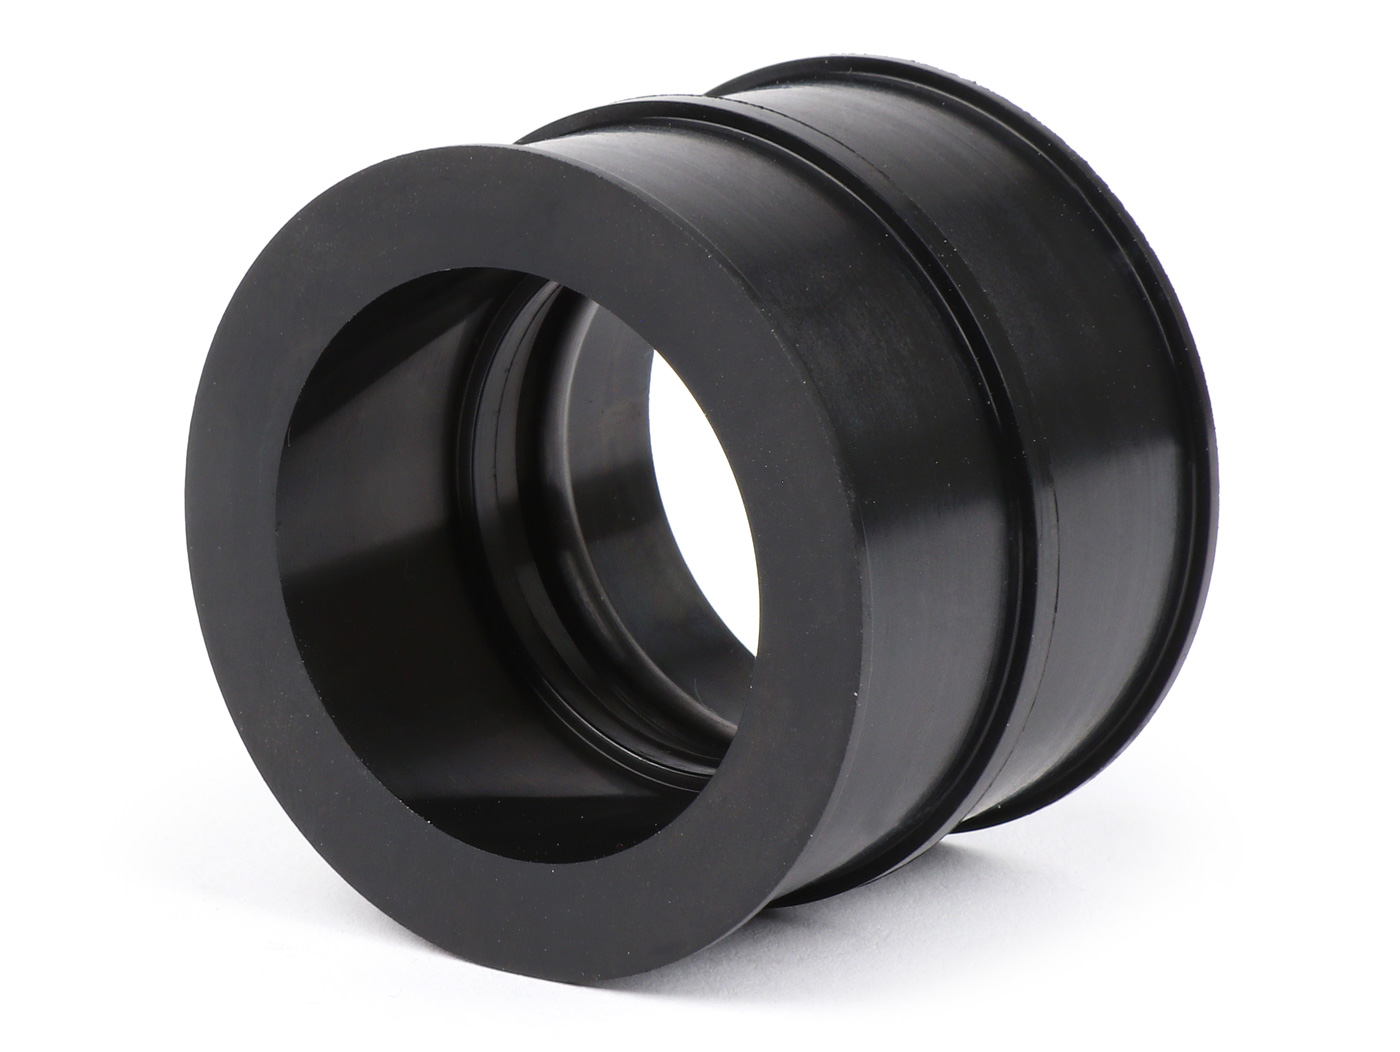
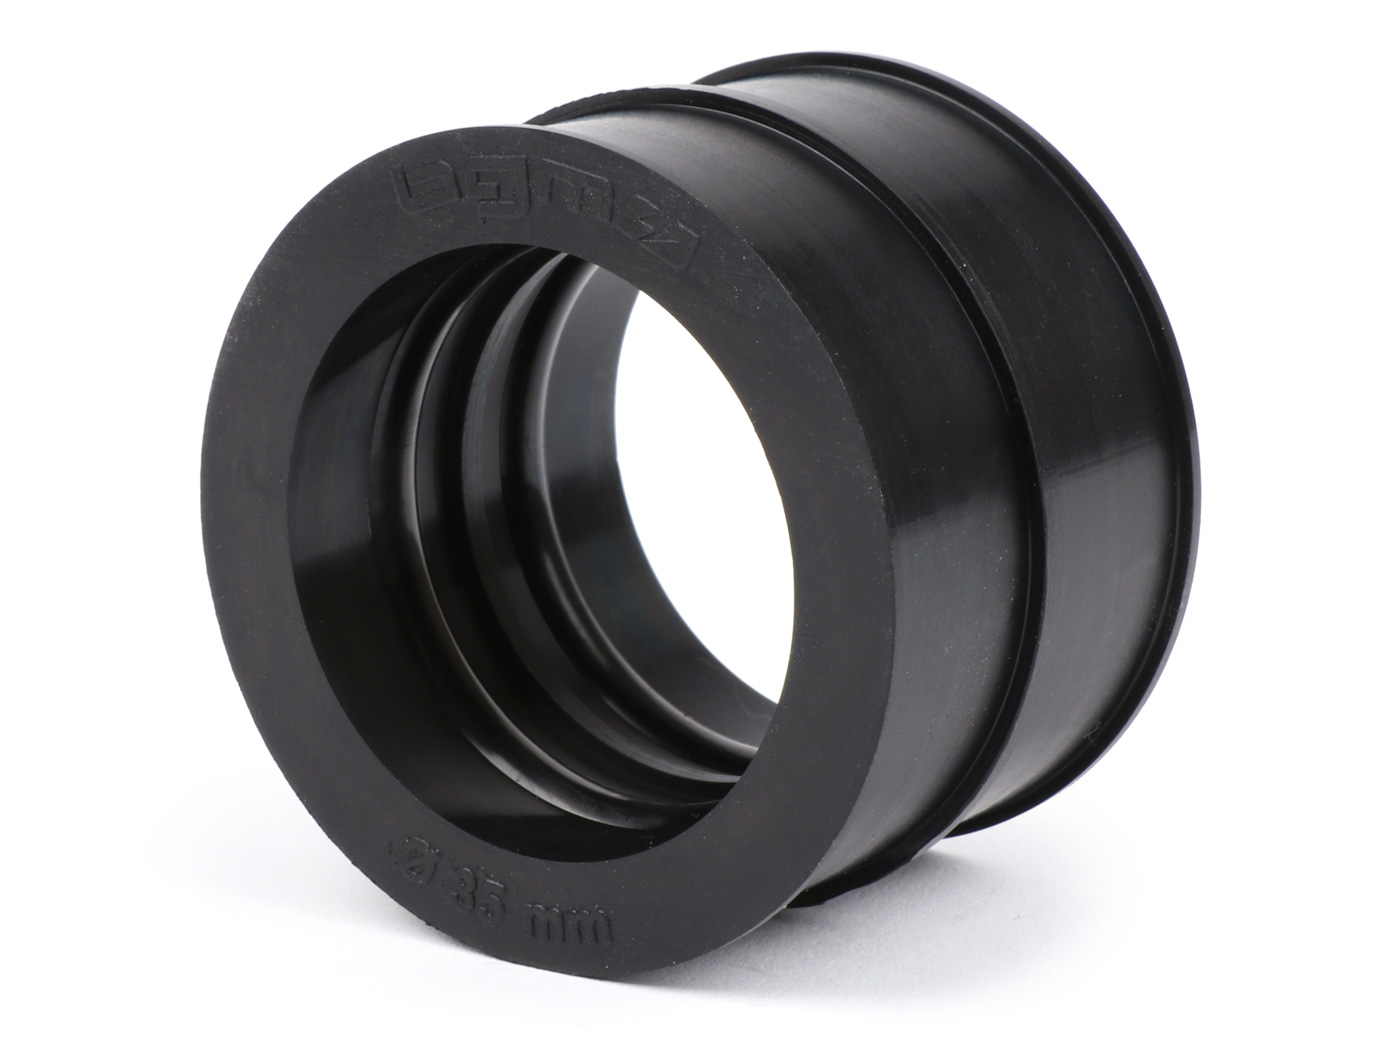
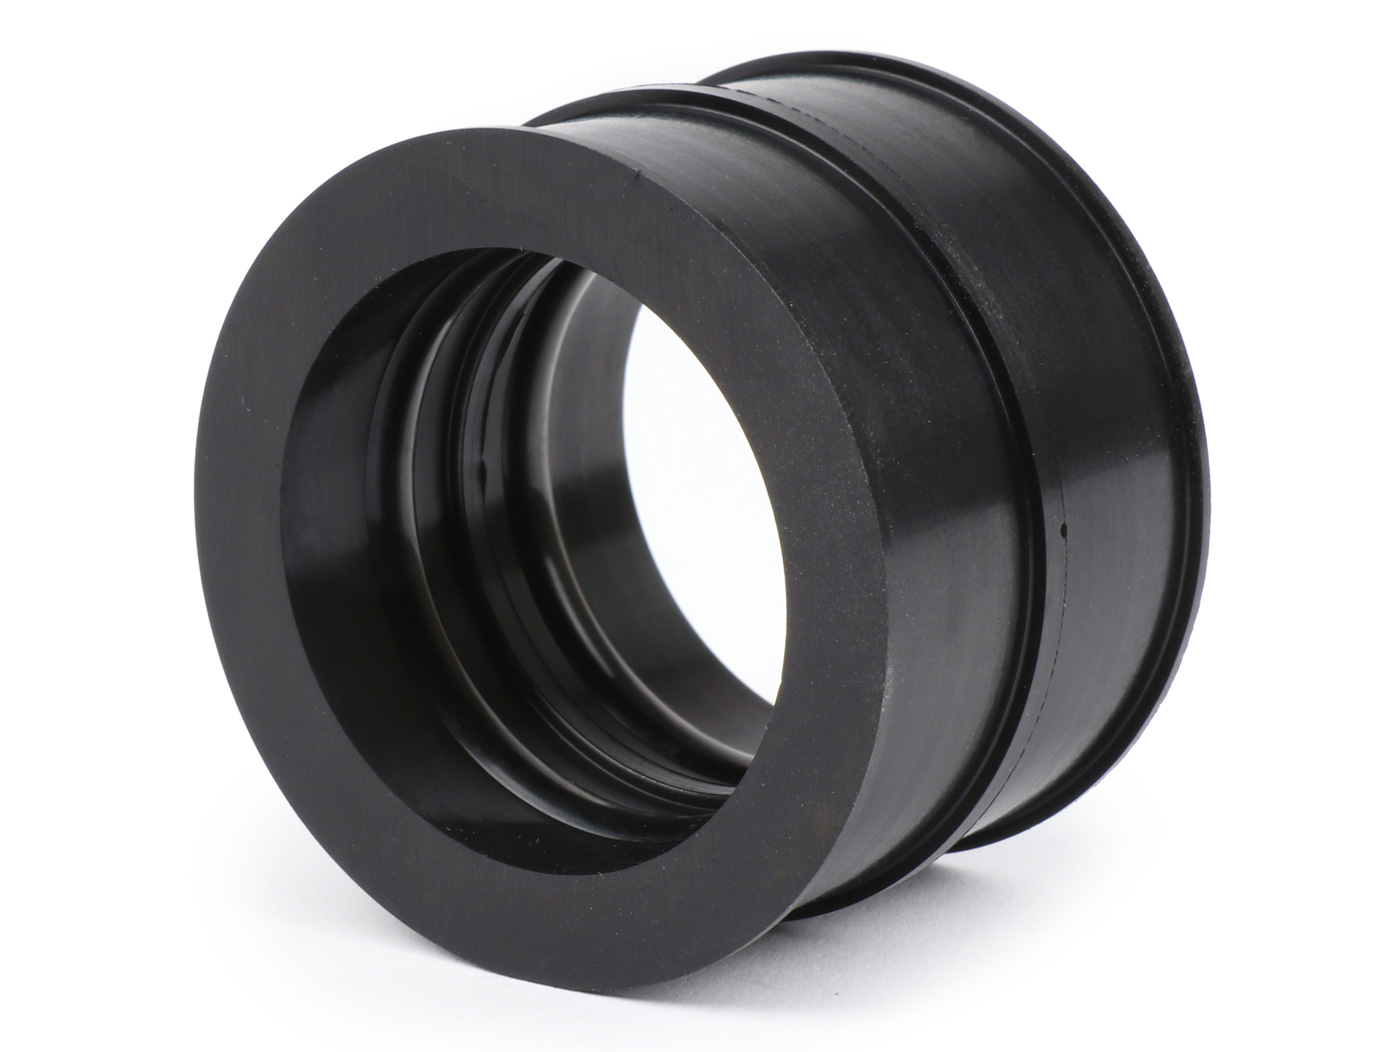
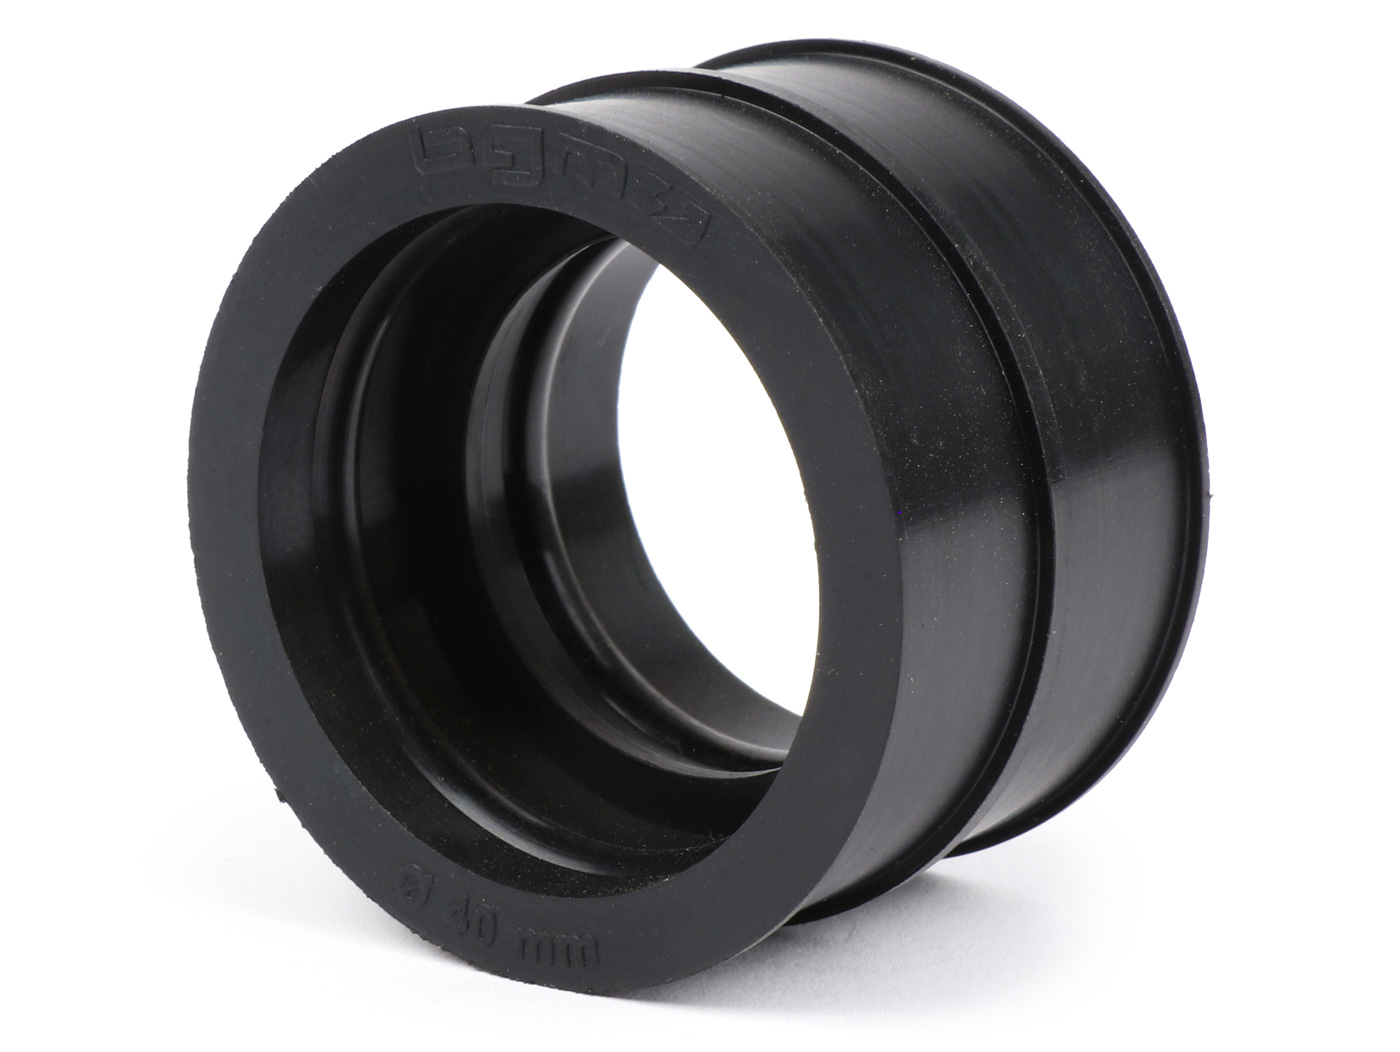
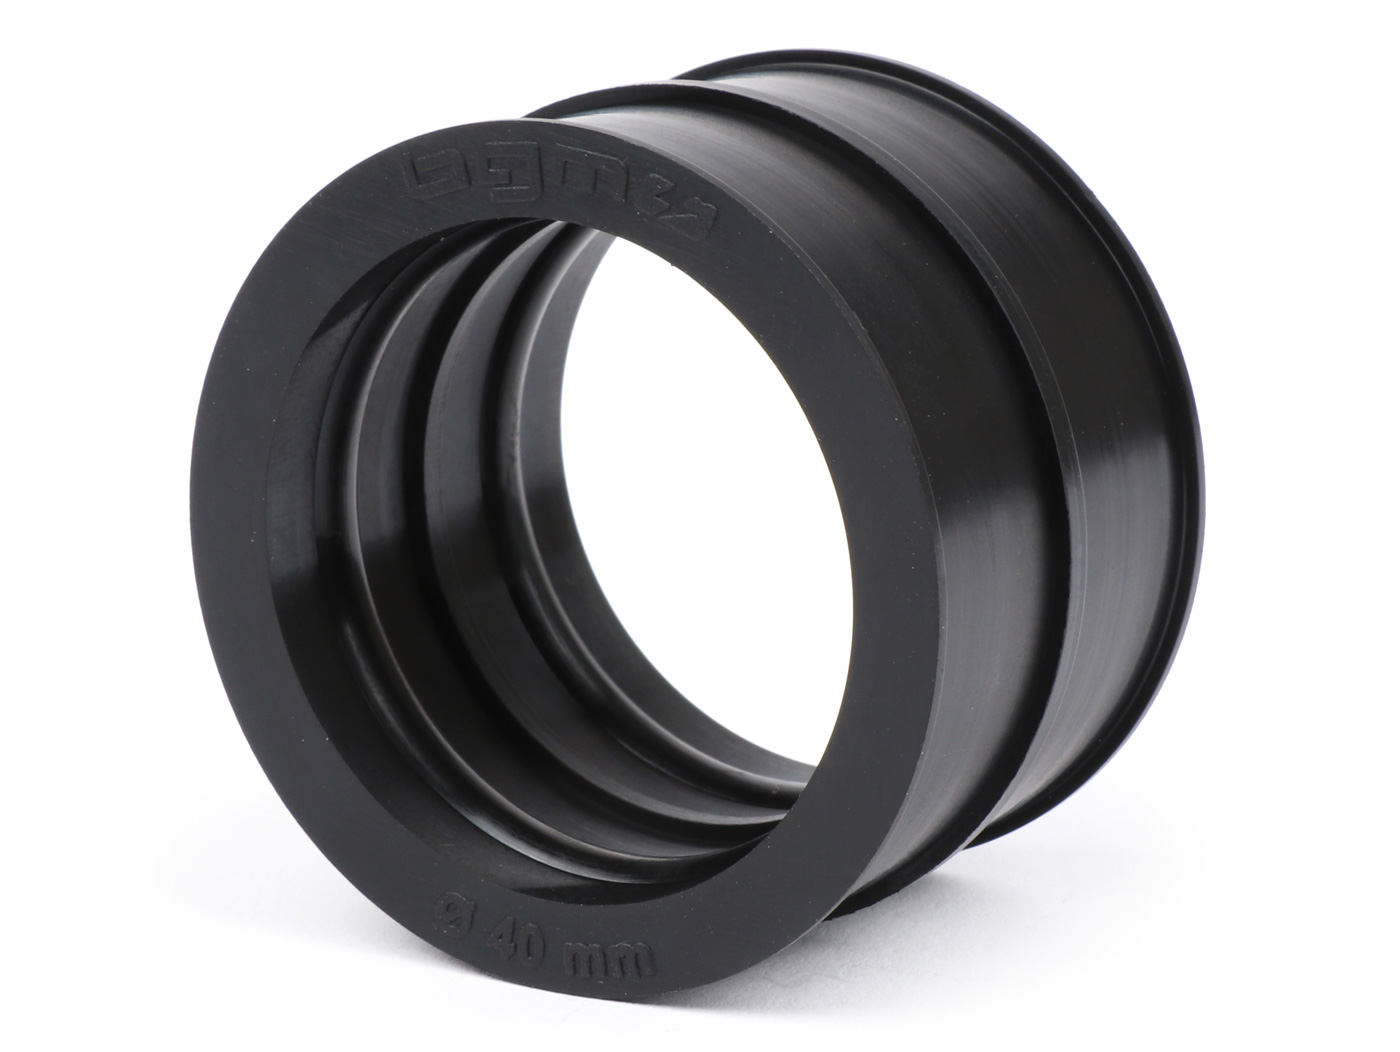
The 12mm wide hose clamps from ABA SAFE have proven themselves in countless long and short distance races and test kilometers.
The ABA Safe ™ clamp uses the elasticity of the suction rubber and protects this relatively soft rubber hose from damage. The tensioning force is increased on the profile beads, there are no sharp edges, which means that the 12mm wide clamps sit tightly without stressing the carburetor connection rubber.
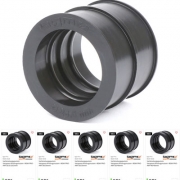
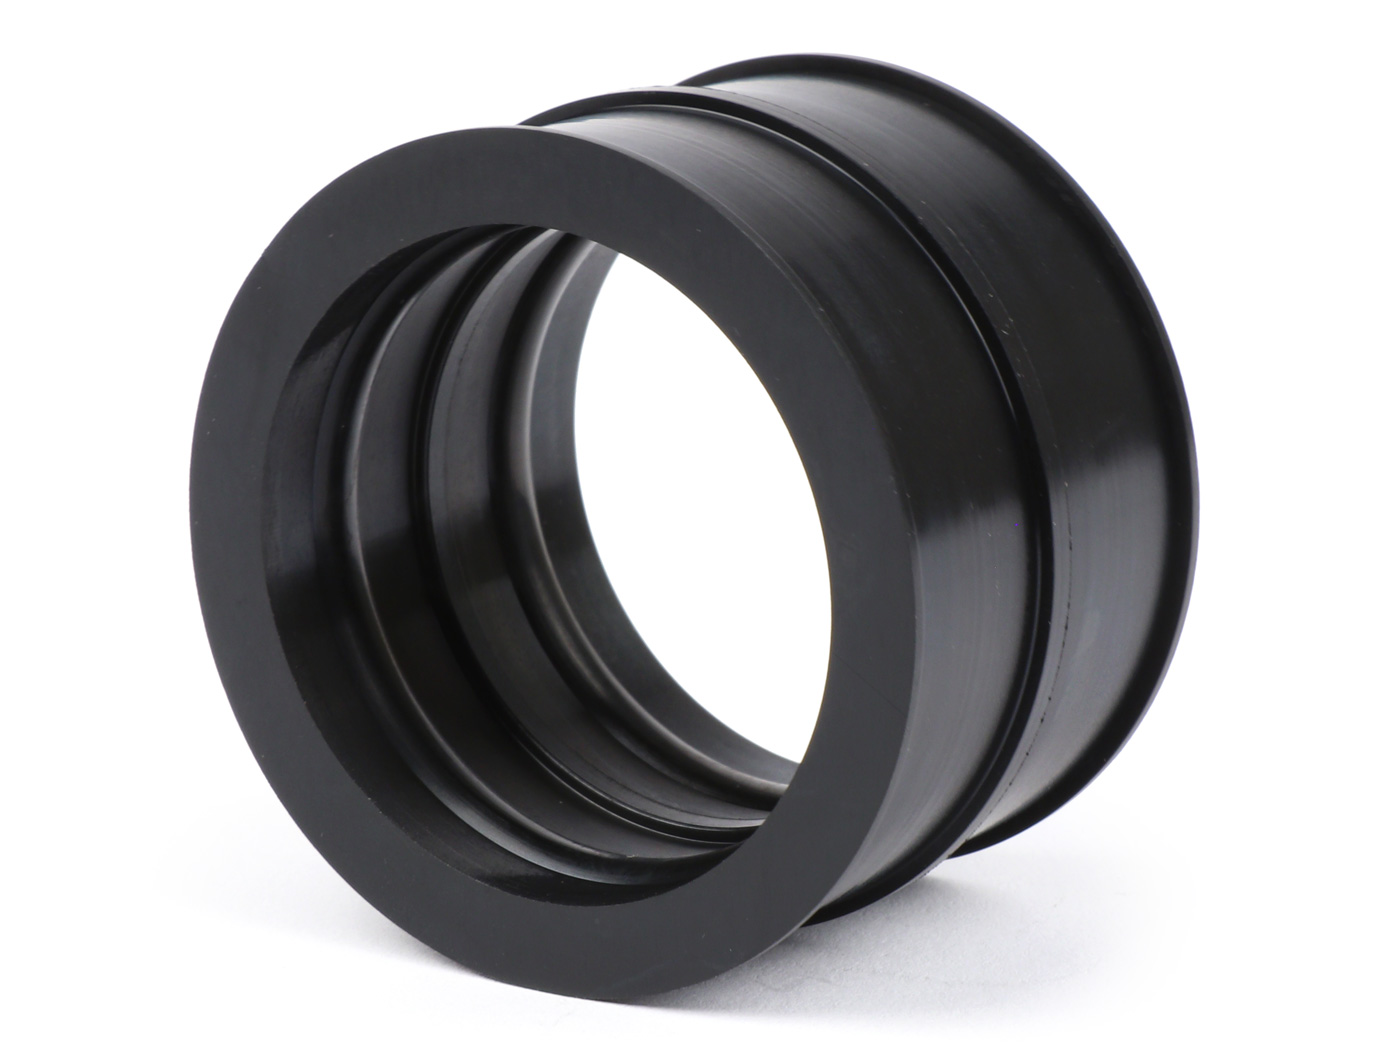
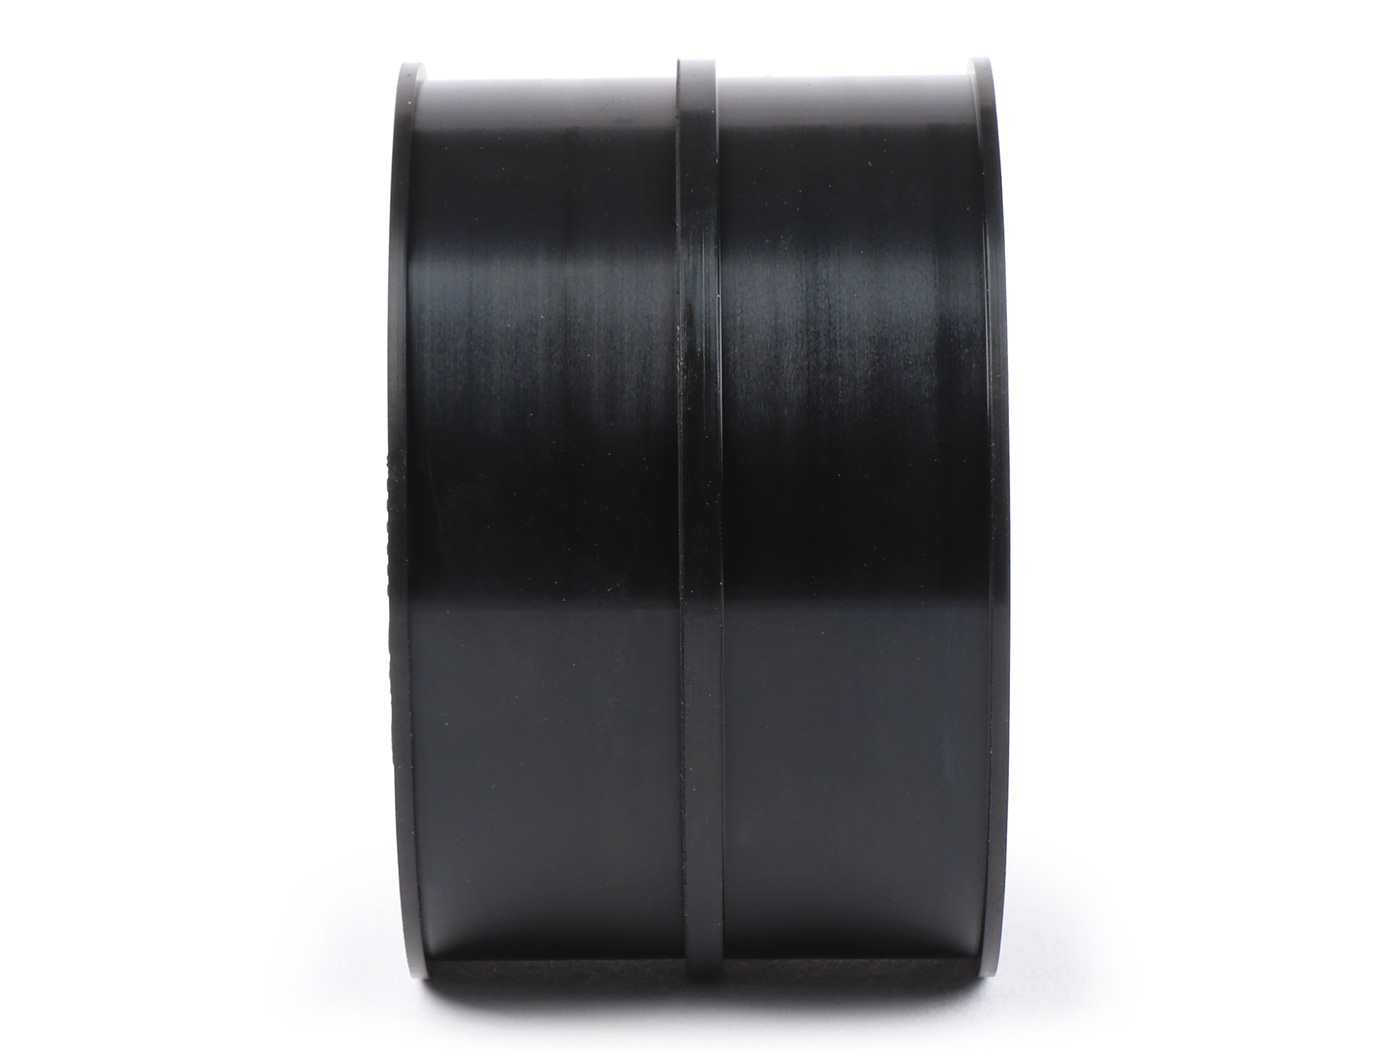
We have new ones now bgm connection rubbers that are wide enough to neatly accommodate these 12mm wide hose clamps.

Carburettor connection rubbers bgm PRO
Another benefit is that our bgm connecting rubbers from the carburetor to the intake manifold from one very oil and gasoline tolerant material are made.
That makes the carburetor connector rubbers a top reliable and durable part on your scooter.
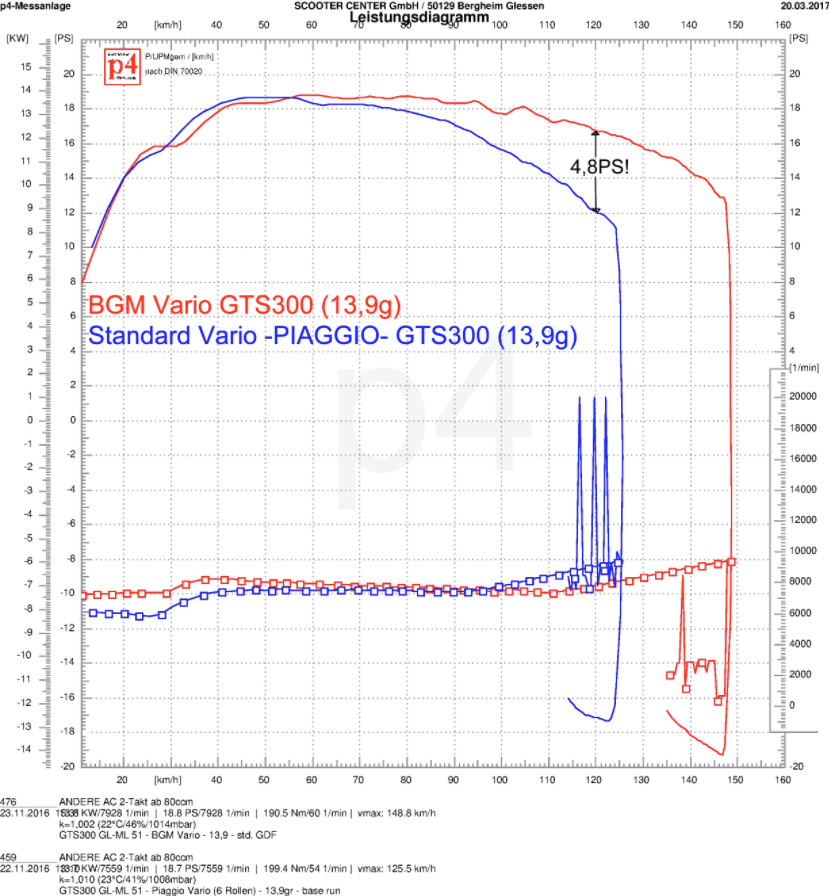
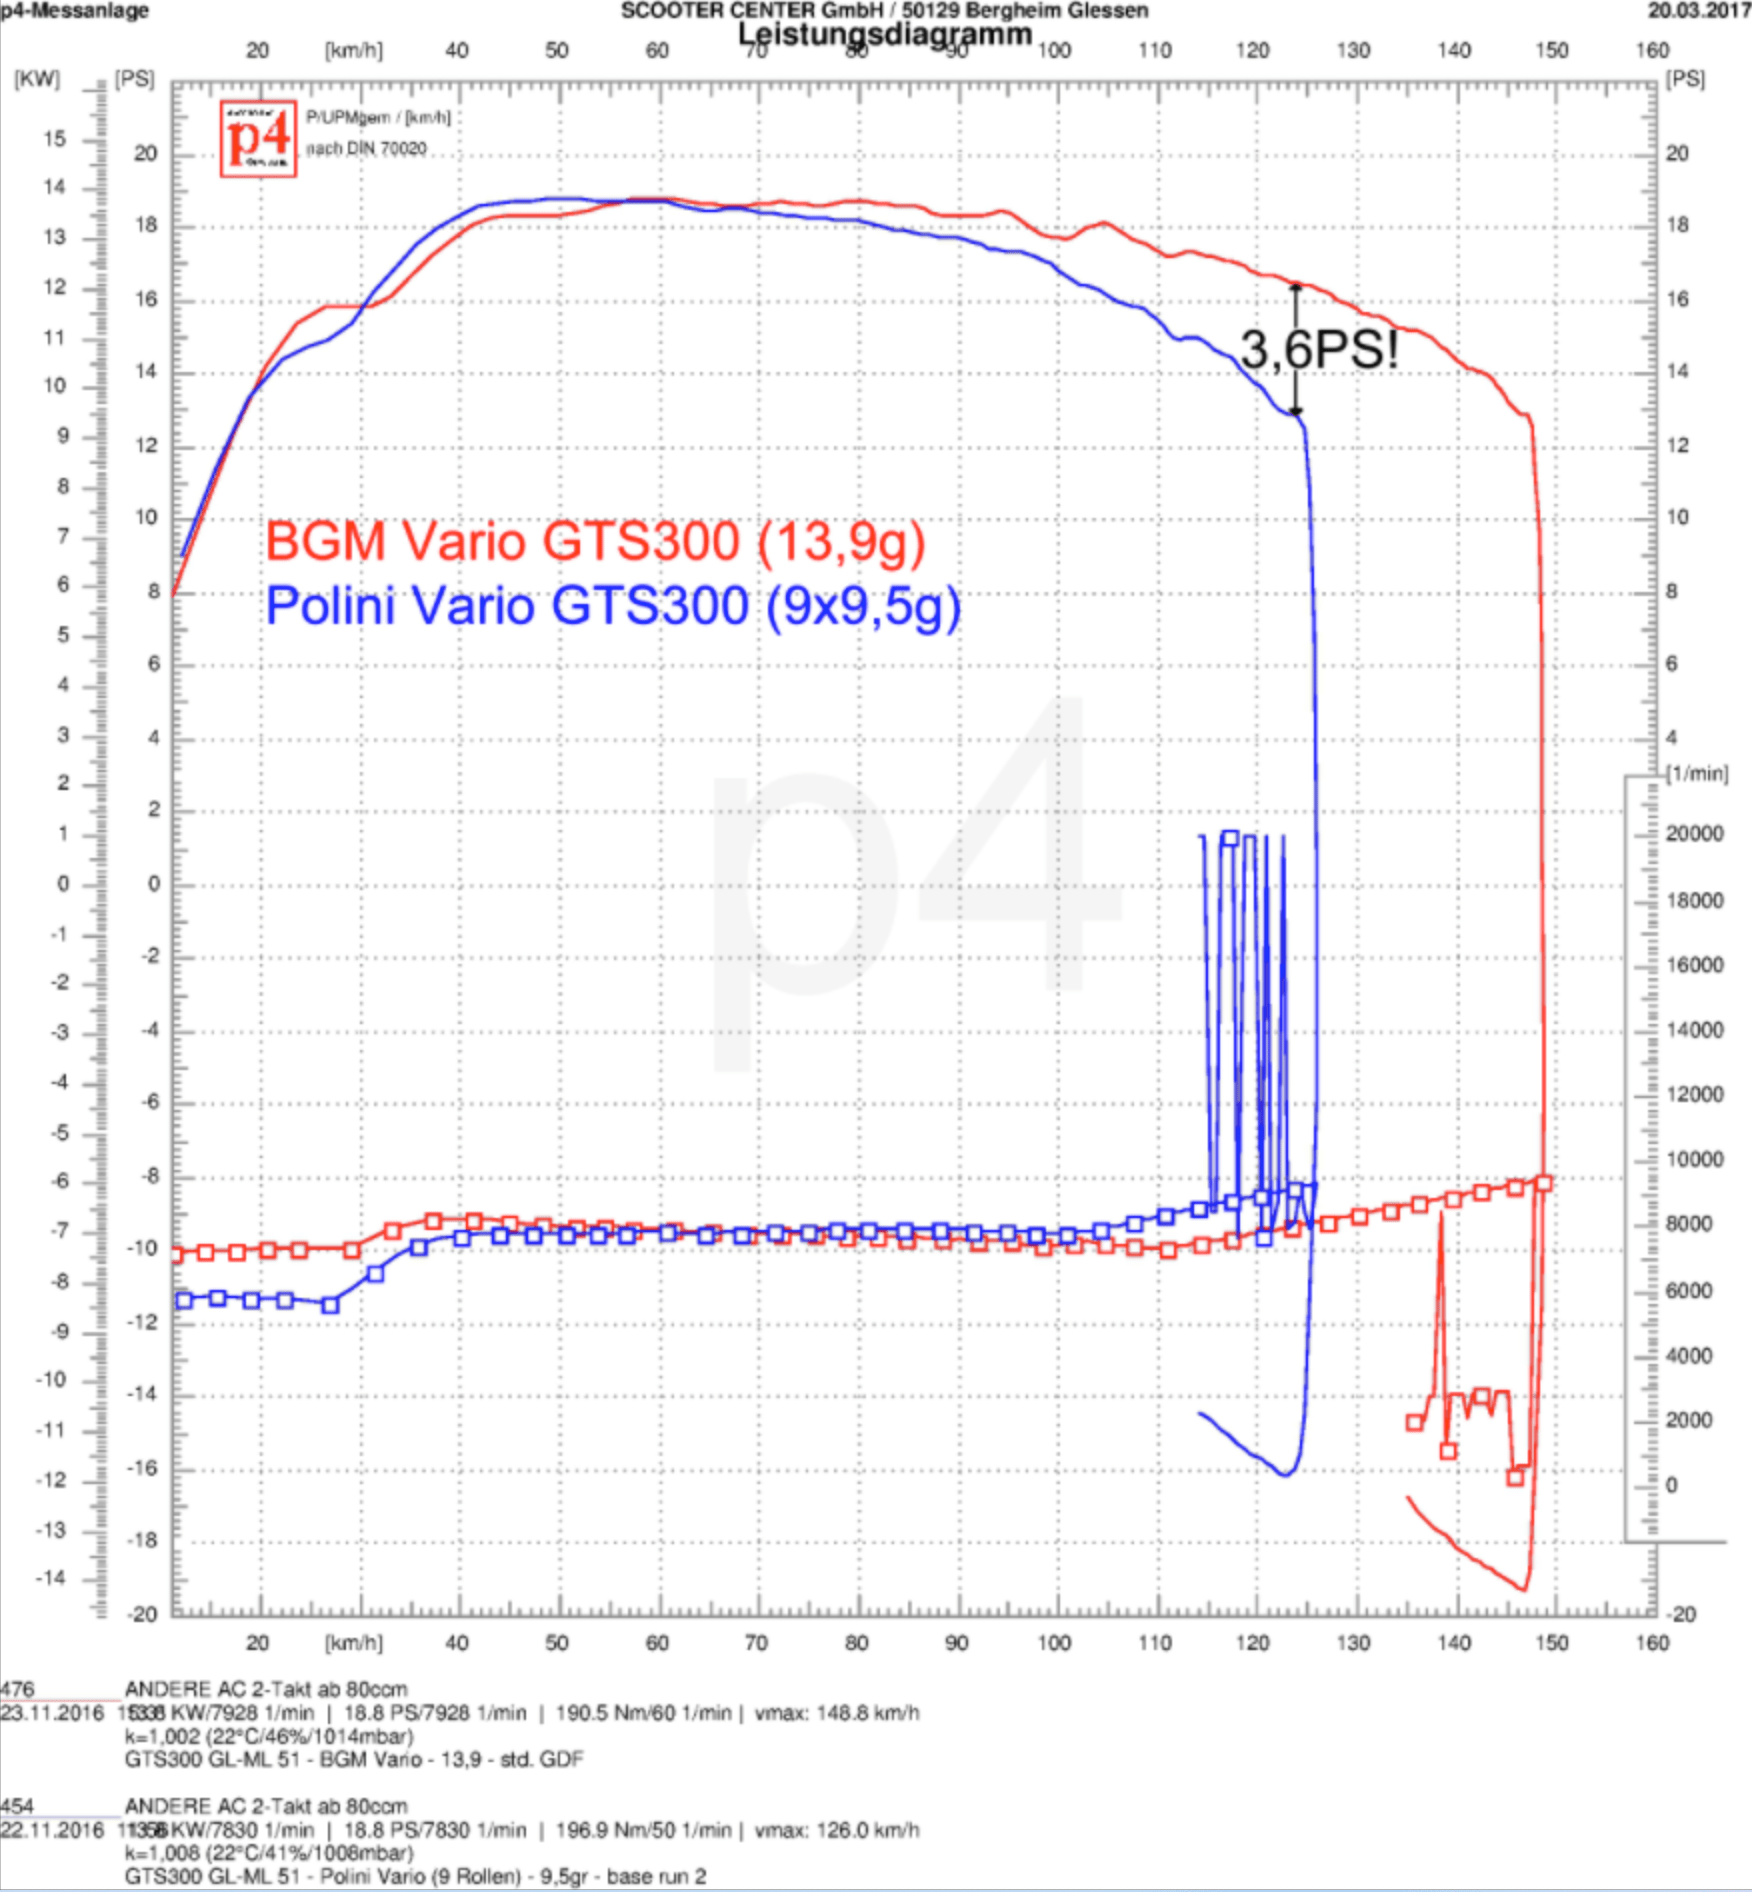
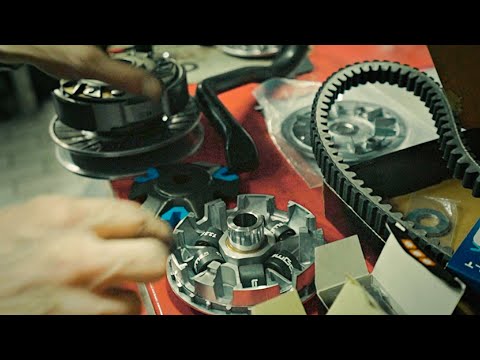
Our bgm PRO Vario for the Vespa GTS models is very popular. In this beautiful video Marc von tests Scooteria the bgm PRO V2 variator on his Vespa GTS.
Installation of the bgm PRO V2 variator in the Vespa Gts 300 hpe Supertech. Marc from Scooteria is at Cafe Racer 69 and Micha from the Cafe Racer 69 team explains very sympathetically and in detail in 25 minutes what needs to be considered when installing a Vario.
There are also tips, such as using the bgm Vario on your new GTS to use the old one GTS vario cover can drive, which many find more beautiful.
Buy the bgm PRO Vario-Kit hereYou are not sure yet? In this video Marc tests the variator in detail and shows the effect of the bgm PRO Sportvario in a driving test.

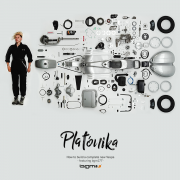
All the adventures of completely rebuilding a Vespa PX (LML) are here by Maryzabel with everyone Secrets in photos and Videos tells.
Of course, Maryzabel uses the Scooter Center High-bay warehouse with over 40.000 parts and installed everything that Scooter Center especially with its brands bgm & MOTO NOSTRA has to offer. Are you curious about it?
Here you will find a complete list of all the parts that a platonic love would need, each part individually or as a finished wishlist in the shop, loading in the shop takes a moment longer than usual because there are a lot of parts but patience is worth it.
Badge leg shield -VESPA- Vespa - Vespa PX Lusso (from 1984), Vespa T5 125cc (from 1985)
Spring plate On-Off-Lock socket -PIAGGIO- Vespa PX Lusso (1984-), T5 125cc, PK S-XL, Gilera ...
On-Off-Lock socket -PIAGGIO- Vespa PX Lusso (1984-), T5 125cc, PK S-XL, Gilera Stalker, Piaggio ...
Lock bolt -PIAGGIO Ø23mm- Vespa PX Lusso (1984-), PK50 XL, PK125 XL, Piaggio NRG, NTT, NRG ...
Rubber steering and ignition lock -PIAGGIO- Vespa PX Lusso (from 1984)
Allen screw -DIN 915 M5 x 8mm- (used for ignition lock Piaggio Storm, ...
Edge protection -OEM QUALITY- Vespa PX (from 1984) - plastic - black
Spring nut round -OEM QUALITY- (used for Vespa PX dirt rags)
Bumper - frame protection - mud flaps -PIAGGIO- Vespa PX 2011 (2001-) - black
Self-tapping screw -DIN 7981 4,2x16mm-
Serrated lock washer -DIN 6798- M5
Sheet metal nut -PIAGGIO- Ø = 4,0mm - 11x16mm - (used to fasten the cascade to the frame below ...
Self-tapping screw -DIN 7981 F- 4,2x13mm - (used to attach the cascade to the frame below ...
Plastic nut -PIAGGIO- 3,9mm (used for fastening the cascade Vespa PX (from 1984) on top)
Self-tapping screw -DIN 7981- 3,5x19mm (used to attach the horn Vespa PX from 1984)
Washer body -DIN 9021- M4 - galvanized
Lettering Kaskade -OEM QUALITY- Vespa Piaggio - Vespa PX Lusso (Bj. 1984-1997)
Lettering Kaskade -PIAGGIO- Piaggio hexagon - Vespa Cosa, Vespa ET2, ET4, Piaggio Beverly, ...
Center stand -OEM QUALITY- Vespa PX, T5 125cc - black
Stand plates / retaining plates main stand -OEM QUALITY- Vespa PX, T5 125cc
Spring sheet metal main stand / frame -PIAGGIO- Vespa PX, T5 125ccm
Stand spring -PIAGGIO, Ø = 32mm, L = 121mm- Vespa PX
Stand spring bracket -PIAGGIO- Vespa PX, T5 125cc, PK S, PK XL, Sprint150 (VLB1T), Rally180 ...
Screw -DIN 933- M6 x 20mm (8.8 strength)
Side panel lock -LML- Vespa PX (models with internal lock), T5 125cc - left
Side hood lock -LML- Vespa PX (models with internal lock), T5 125cc - right
Self-tapping screw -DIN 7981 4,8×9,5mm (used for side panel lock Vespa PX, T5 125ccm)
Rubber lever for side hood inner lock -PIAGGIO- Vespa PX (from 1981), PX Lusso, T5 125cc
Bushing frame, side panel lock, top -PIAGGIO- Vespa PX (models with internal lock), T5 ...
Side panel rubber -BGM ORIGINAL- Vespa PX, Vespa T5 125ccm - black / left
Side panel rubber -BGM ORIGINAL- Vespa PX, Vespa T5 125ccm - black / right
Rivet for side panel rubber -PIAGGIO- Vespa PX, Rally180 (VSD1T), Rally200 (VSE1T), TS
Rubber rear side hood hook -OEM QUALITY- Vespa Largeframe (from year 1958)
Cable set -BGM ORIGINAL, PE inner sleeve- Vespa PX Lusso (1984-) - black
Clamping nipple / screw nipple -BGM ORIGINAL- Ø = 6.8x8mm- Vespa all models (used for ...
Rubber sleeve clutch / front brake cable -PIAGGIO- Vespa 125 VNB3T-6T, Super, GT125 (VNL2T), ...
Choke lever on frame -PIAGGIO- Vespa PX, T5 125cc, Sprint150 (VLB1T), Rally180 (VSD1T), Rally200 ...
Choke lever spring -VESPA- PX, T5 125cc, Sprint150 (VLB1T), Rally180 (VSD1T), Rally200 (VSE1T), ...
Rubber frame / fuel hose -PIAGGIO- Vespa Largeframe and Wideframe (from year 1958)
Rubber frame / gas choke cable -PIAGGIO- Vespa Largeframe (from year 1958)
Rubber indicator cable / frame front -OEM QUALITY- Vespa PX80, PX125, PX150, PX200, T5 125cc
Rubber for wiring harness Ø = 14,5x17x6mm -PIAGGIO- Vespa PX
Rubber for wiring harness / frame -PIAGGIO- Vespa PK XL, PK XL2, PX
Rubber taillight cable / frame -PIAGGIO- Vespa
Intake hose -PIAGGIO- Vespa PX (1984-), PX Lusso - can also be used for Sprint150, Rally180, ...
Rubber ring fuel tap lever -OEM QUALITY- Vespa PX Lusso (from 1984), T5 125cc - black
Tank -PIAGGIO- Vespa PX (from 1984) - version with separate lubrication
Petrol hose -BGM ORIGINAL- Ø inside = 7mm, Ø outside = 14mm, l = 750mm
Unit: 0.75 meter (€ 4,37 / 1 meter)
Fuel tap -OEM QUALITY- Vespa PX (from 1984), PK XL1
Hose clamp -MiniFlex- bandwidth 5mm - Ø = 9-16mm
Tank sender -PIAGGIO- PX (from year 1984) - plastic cap Ø55mm (50-350 Ohm)
Tank cap -VESPA- PX (from 1984), PK XL
Screw -DIN 933- M8 x 25mm (8.8 strength)
Headset - steering head bearing -PIAGGIO- Piaggio, Gilera, Vespa - top + bottom complete set (9 ...
Screw -DIN 933- M6 x 25mm (8.8 strength)
Screw -DIN 933- M6 x 30mm (8.8 strength)
Side fender screw M5 x 12mm -OEM QUALITY, pan head- Vespa Smallframe V50, 50N, PV, ...
Plastic spacer Ø=18×6,4x6mm for mudguard -OEM QUALITY- Vespa V50, V90, PV125, ET3 125
Self-locking nut -DIN 985- M5 (used for lever screw Vespa PX, T5 125ccm, Rally, ...
Mudguard nipple -OEM QUALITY- Vespa PX Lusso (from 1984) - plastic - black
Brake line -SPIEGLER MODULAR (without fittings) - Vespa, Lambretta - black - 1400mm
Brake banjo -SPIEGLER- black - 20 °
Brake banjo -SPIEGLER- black - 45 °
Banjo bolt brake line -M10 x 1,00- aluminum - black
Brake banjo seal -DIN 7603- A10 x 16 - aluminum
Gas pipe -LML- Vespa PX Disc (1998-) - l = 177mm Ø = 24mm
Spring washer gas tube / switch tube 22 x 28x 0,75mm -PIAGGIO- Vespa Cosa, PK XL2, PK HP
Throttle pulley -OEM QUALITY- Vespa PX, T5 125cc, PK S, PK XL
Shift pulley -VESPA- PX, T5 125cc, PK S, PK XL
Cotter pin throttle / shift cable pulley -VESPA- PX, T5 125cc, Cosa
Brake pump -PIAGGIO Heng Tong- Vespa PX80, PX125, PX150, PX200 (all from 1998), PX Millenium, ...
Screw -DIN 912- M8 x 20mm (used for brake pump / handlebar Vespa PX from 1998)
Brake lever screw - clutch lever screw (cross recess) -OEM QUALITY- Vespa PX125, PX150, ...
Brake lever -BGM PRO CNC- disc brake (Heng Tong) - Vespa PX (2004-) - black matt
Clutch lever -BGM PRO CNC- cable pull- Vespa Largeframe 1957-1998 - PX, T5, Sprint, Rally, GT, ...
Speedometer -PIAGGIO- Vespa Ø = 105mm - PX Lusso (from 2001) - 120km / h
Screw -DIN 7985- M5 x 35mm - used for steering head cover Vespa PX, PK S, PK XL, air filter SI
Wavy spring washer -DIN 137 galvanized steel- M5
Screw -DIN 933- M4 x 12mm (used to fix the headlight Vespa PX)
Wavy spring washer -DIN 137 stainless steel- 100 pieces - M4
Unit: 100 pieces (€ 0,05 / 1 piece)
Handle -PIAGGIO- Vespa PX Lusso (from 2011) - black - left
Handle -PIAGGIO- Vespa PX Lusso (from 2011) - black - right
Steering head screw -LML- Vespa PX, PK, Rally, Sprint150, 180 SS, Super, TS125, GT125 (VNL2T), ...
Steering head nut -VESPA- PX, PK, Rally180 (VSD1T), Rally200 (VSE1T), Sprint150 (VLB1T), 180 SS, ...
Cable passage for handlebar -LML- Vespa PX (1998-) (used to lead through brake line and ...
Bulb -W2,1X9,5d- 12V 3W - white (used as parking light clear glass headlight Vespa PX (from Bj….
Socket for headlight bulb HS1 -PIAGGIO- Vespa Cosa 125 (VNR1T, VNR2T0001001), Vespa Cosa 200 ...
Bulb -PX43t (HS1) - 12V 35 / 35W - white
Rear light -MOTO NOSTRA- Vespa PX Lusso (MY, 2001-) - black
Light bulb -BA15s (straight pins) - 12V 10W - white
Light bulb -BA15s (straight pins) - 12V 5W - white
Indicator -PIAGGIO- Vespa PX80, PX125, PX150, PX200, T5 125cc rear right - white
Indicator -PIAGGIO- Vespa PX80, PX125, PX150, PX200, T5 125cc rear left - white
Indicator -PIAGGIO- Vespa PX80, PX125, PX150, PX200, T5 125cc front left - white
Indicator -PIAGGIO- Vespa PX80, PX125, PX150, PX200, T5 125cc front right - white
Light bulb -BA15s (straight pins) - 12V 21W - orange
Countersunk head screw -DIN 966- M4 x 25mm - (used for light switch / indicator switch PX, ...
Serrated lock washer -DIN 6798- M4
Wiring harness -GRABOR- Vespa PX Lusso (German), 1984-1997, without battery, with DC horn, ...
Indicator switch -OEM QUALITY- Vespa PK50 S / XL, PK80, PK125 S, PK125 ETS, PX80, PX125, PX150, ...
Cable branch, speedometer plug -PIAGGIO- Vespa PX (from 1998)
Horn -OEM QUALITY 12V DC- Vespa PX (from 1984)
Brake light switch front -LML- Vespa PX (1998-)
Indicator cable -PIAGGIO- Vespa PX80, PX125, PX150, PX200, T5 125cc side panels
Indicator connector - PIAGGIO- Vespa PX80, PX125, PX150, PX200- side panels with ...
Adapter cable set for horn rectifier -BGM PRO- used for BGM6710
Voltage regulator -4-pin BGM PRO 12V AC / DC- universal
Spacer rear shock absorber / silent block -VESPA l = 52mm- Vespa PX80, PX125, PX150, PX200, T5 125cc
Snap ring -DIN 127- M9 (used for shock absorber screw below (engine) and carburetor mounting) ...
Rim -BGM ORIGINAL 2.10-10 inch steel V2.0 - Vespa (type PX) - Vespa Smallframe V50, 50N, ...
Hose -BGM PRO 10 inch- 3.50-10, 90 / 90-10, 100 / 80-10, 100 / 90-10 - valve position Vespa (all ...
Tire -HEIDENAU K80SR- 3.50 - 10 inch TT 59M (reinforced)
Nut -DIN 934- M8 - black galvanized
Seat -BGM PRO SportTouring- Vespa Largeframe Sprint, GT, GTR, Super, TS, GL, VNA, VBA, VNB, ...
Circlip - BORE DIN472- Ø = 42mm - used for bearing auxiliary shaft / primary PX125, PX200, ...
Ball bearing -6302- (15x42x13mm) - (used for auxiliary shaft Vespa PX200, Rally180, Rally200, ...
Cable branch -BGM ORIGINAL- tank sender cable Vespa PX (1984-) - for tank sender with plastic lock
Gasket tank / frame -MADE IN THAILAND- Vespa all Largeframe (from 1957) - Viton®
Retaining plate for tank sender cable -VESPA- PX (from 1984)
Cylinder gasket set -BGM PRO 177/187 cc- Vespa PX125, PX150, Cosa125, Cosa150, GTR125, TS125, ...
Screw -DIN 7981- 3,9x16mm (used for fastening cascade Vespa PX (from 1984) on top)
Rubber stop for main stand -PIAGGIO- Vespa PX
Screw 2.9 x 9.5mm for fixing the floor mats, screw for fender nipple -PIAGGIO- Vespa PX, ...
Tank sender -PIAGGIO- PX (from year 1984) - sheet metal plug Ø48mm (50-270 Ohm)
Screw -DIN 7985- M5 x 12mm (used for ignition base plate Vespa PK, PX, Cosa, T5 125ccm)
Keyring -SCOOTER CENTER All you need- Red
Work gloves - Mechanic gloves - Protective gloves -BGM PRO-tection- ...
Cylinder -BGM PRO 177/187 cc- Vespa PX125, PX150, Cosa125, Cosa150, GTR125, TS125, Sprint ...
Exhaust -BGM PRO BigBox TOURING (BBT) - Vespa PX80, PX125, PX150, Sprint, GT, GTR
Motor housing -LML rotary valve inlet, Elestart, without separate lubrication- Vespa PX125, PX150
Ignition -BGM ORIGINAL base plate V2.5 silicone- Vespa PX (1984-2011) Lusso, '98, MY (also ...
Fork with disc brake (complete) -LML Classic Grimeca Style- Vespa PX80, PX125, PX150, PX200 ...
Mounting set handlebar lower part -OEM QUALITY- LML handlebar for Vespa PX - 7 sockets (used for ...
Wavy spring washer -DIN 137 galvanized steel- M6
Rear shock absorber -BGM PRO SC / R1 SPORT, 330mm- Vespa PX80, PX125, PX150, PX200, T5 125cc, ...
Primary gear -BGM PRO- Vespa PX200, Rally200 (helical teeth) - 64 teeth
Main shaft -PIAGGIO- Vespa PX (1984-), Cosa (VNR1T, VNR2T, VSR1T), T5
Clamping plate set, rear brake -PIAGGIO- Vespa V50, V90, 50N, PV125, ET3, SS50, SS90, PK S, PK ...
Fan wheel cover -OEM QUALITY- Vespa PX80, PX125, PX150, PX200 - models with electric starter - black

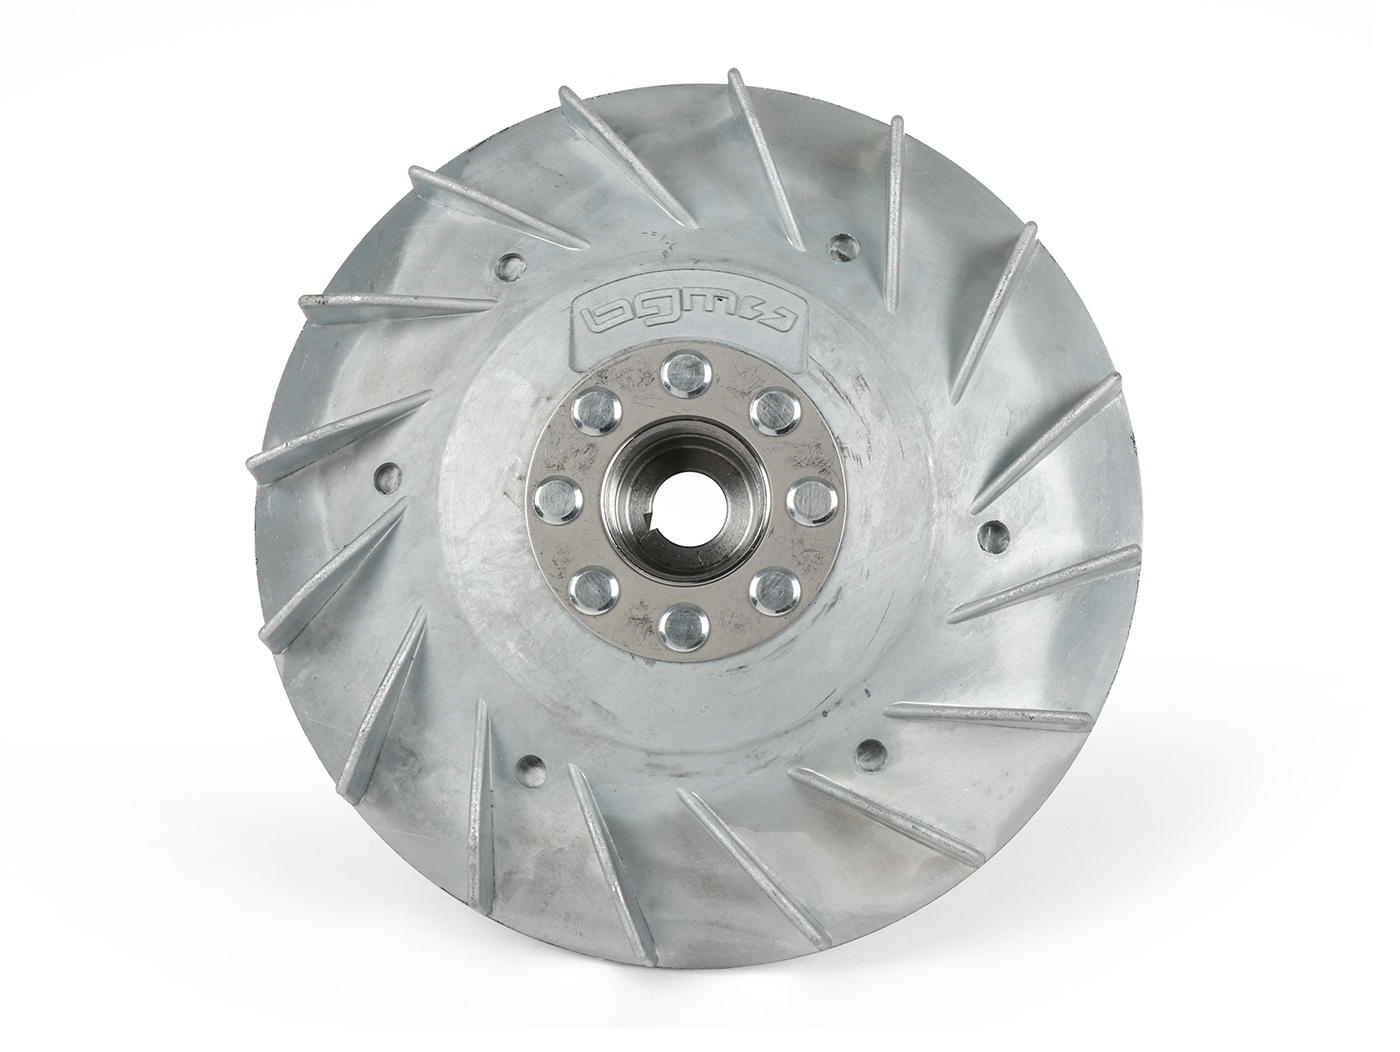
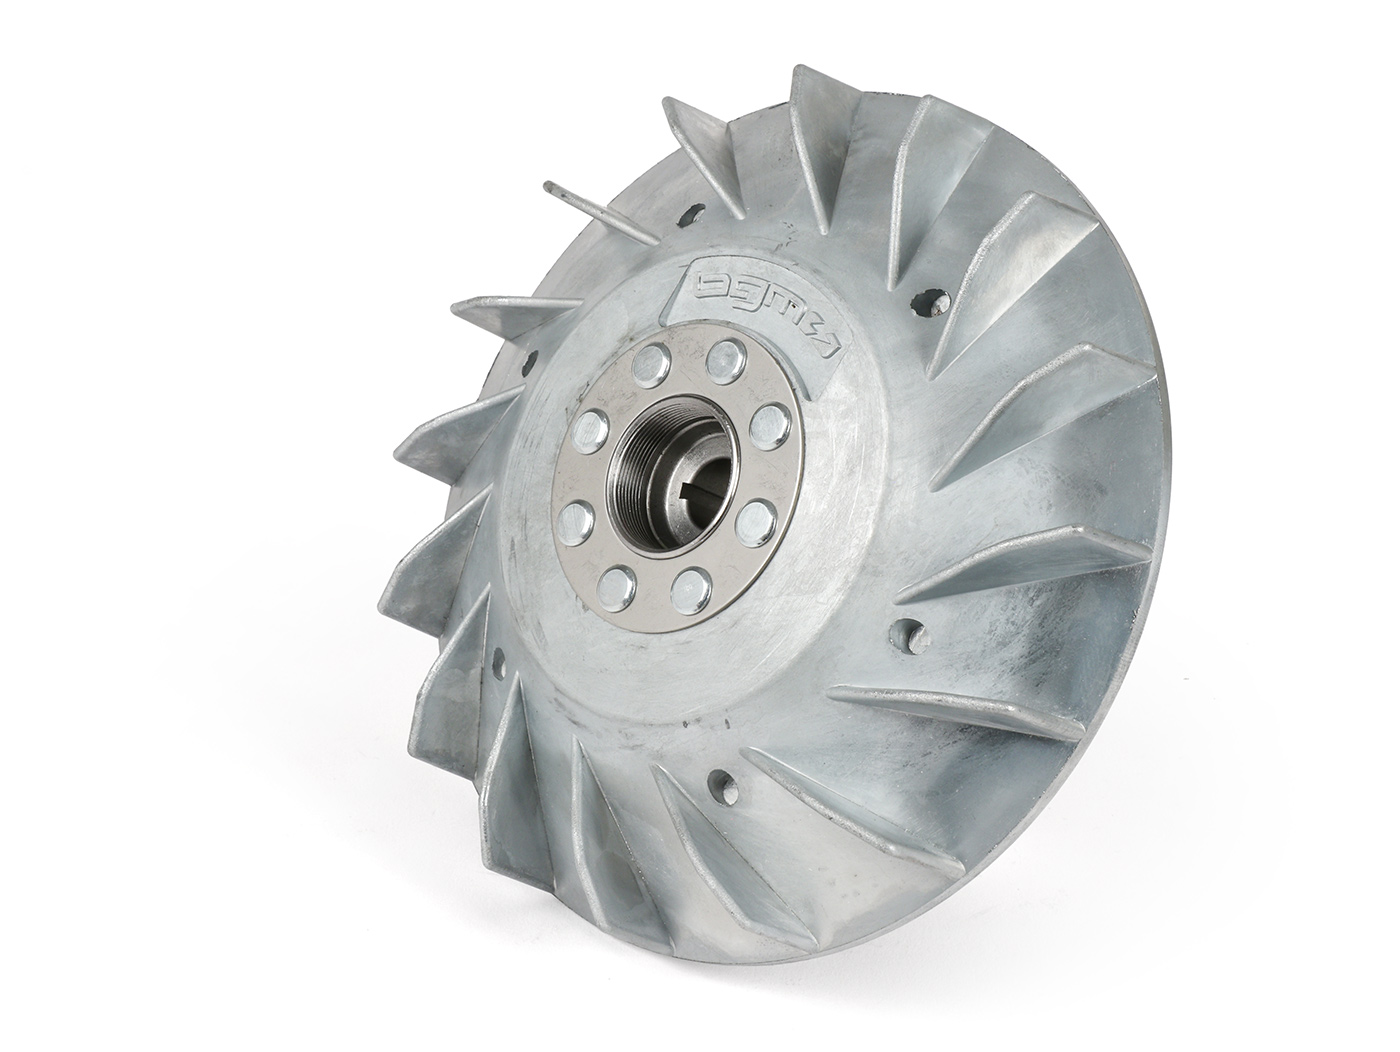
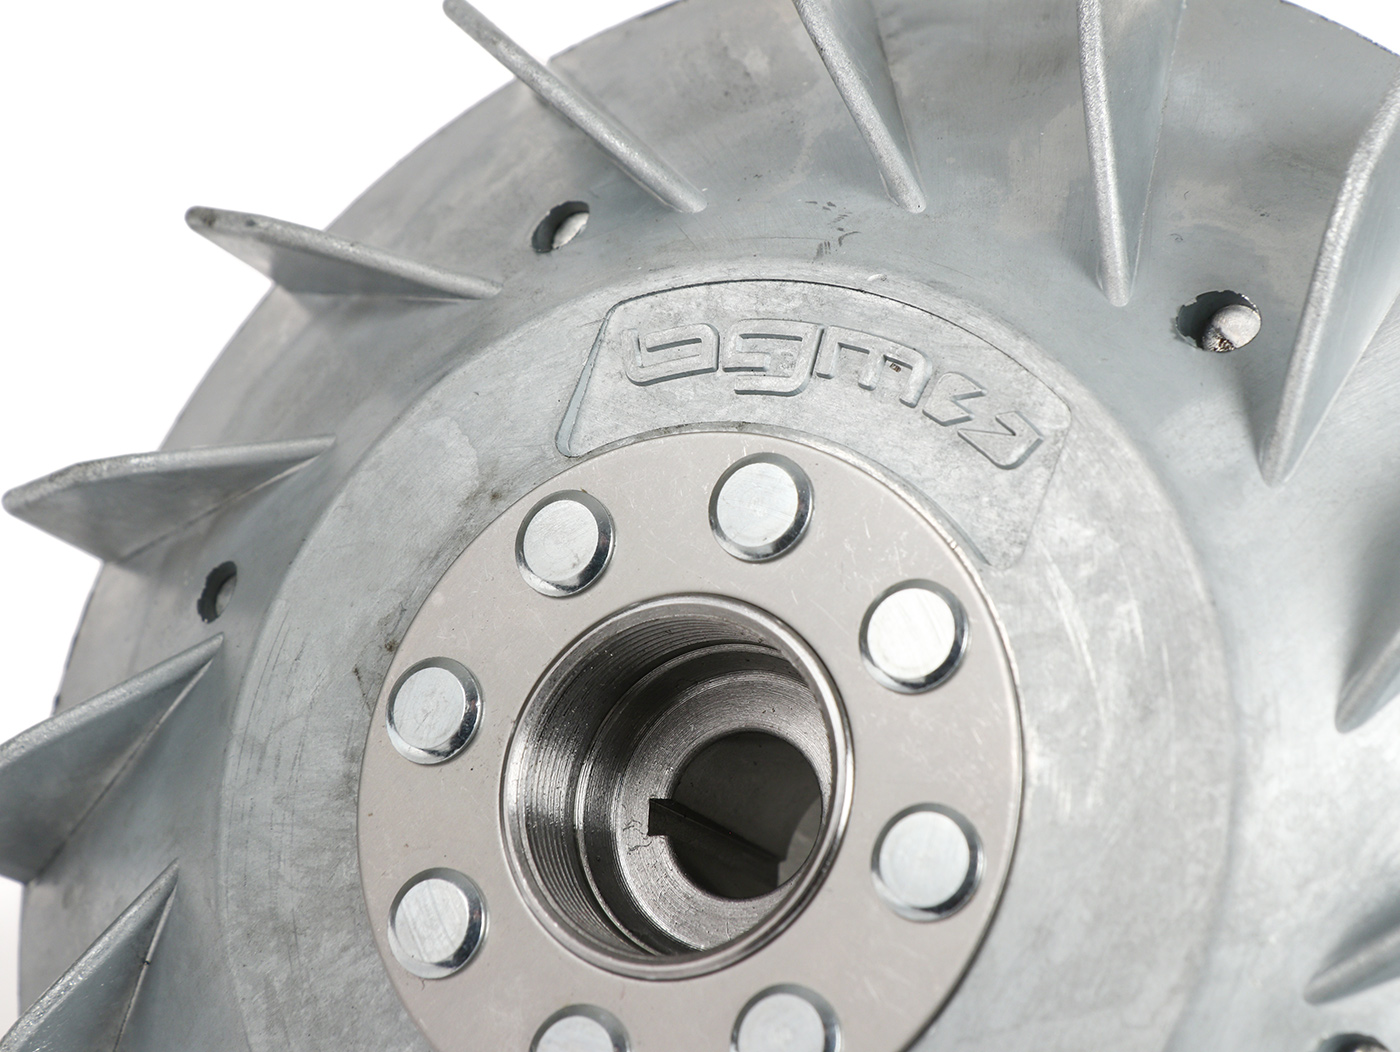
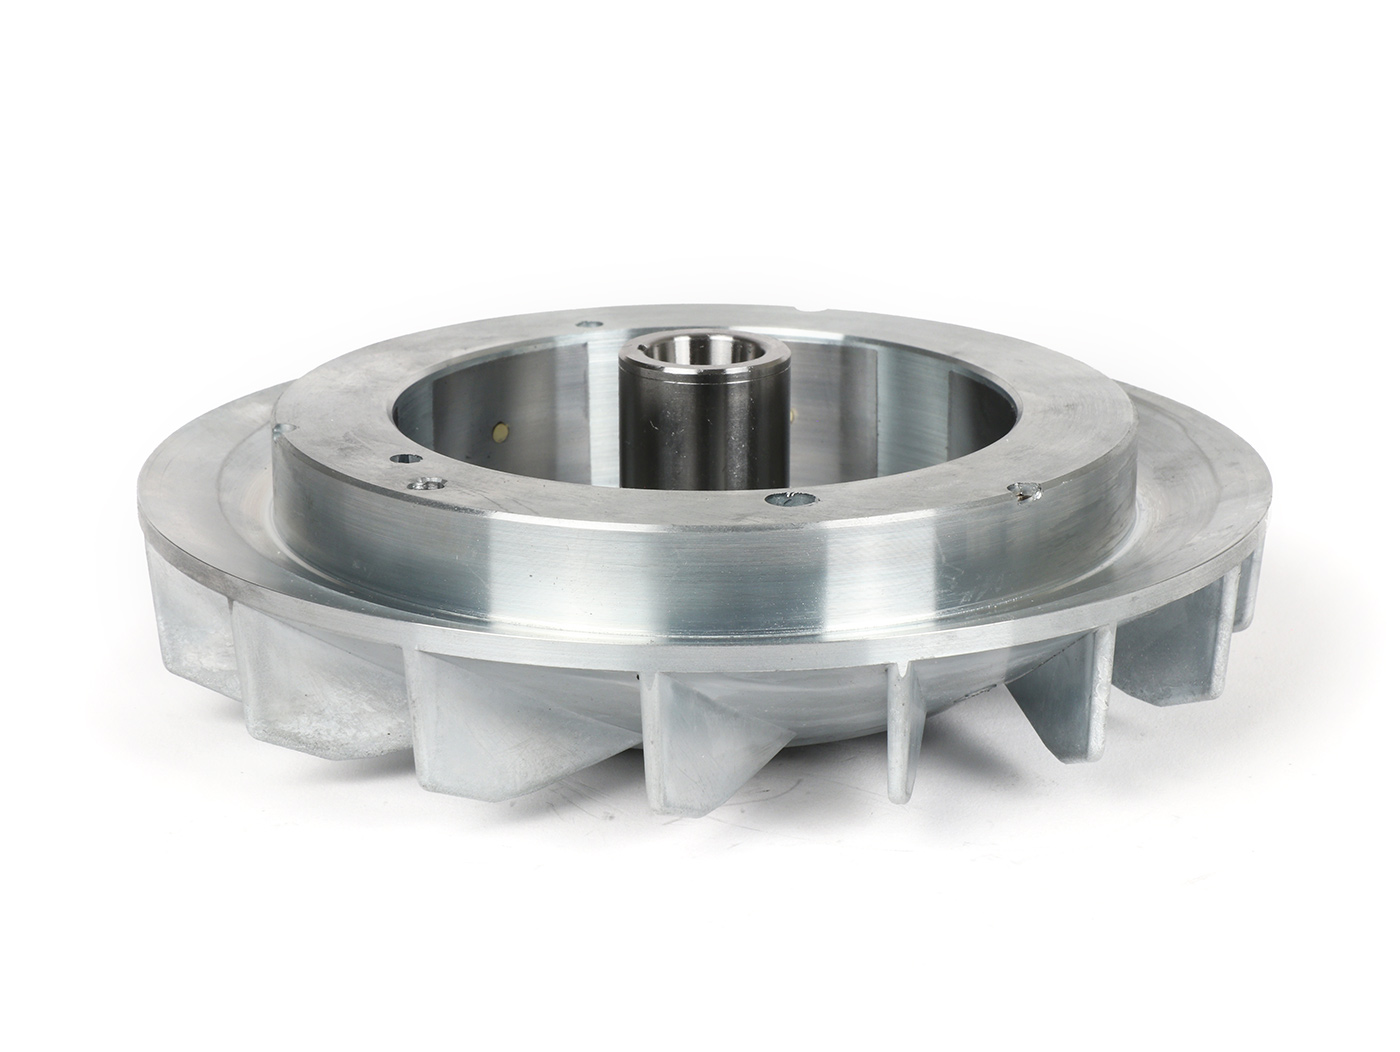
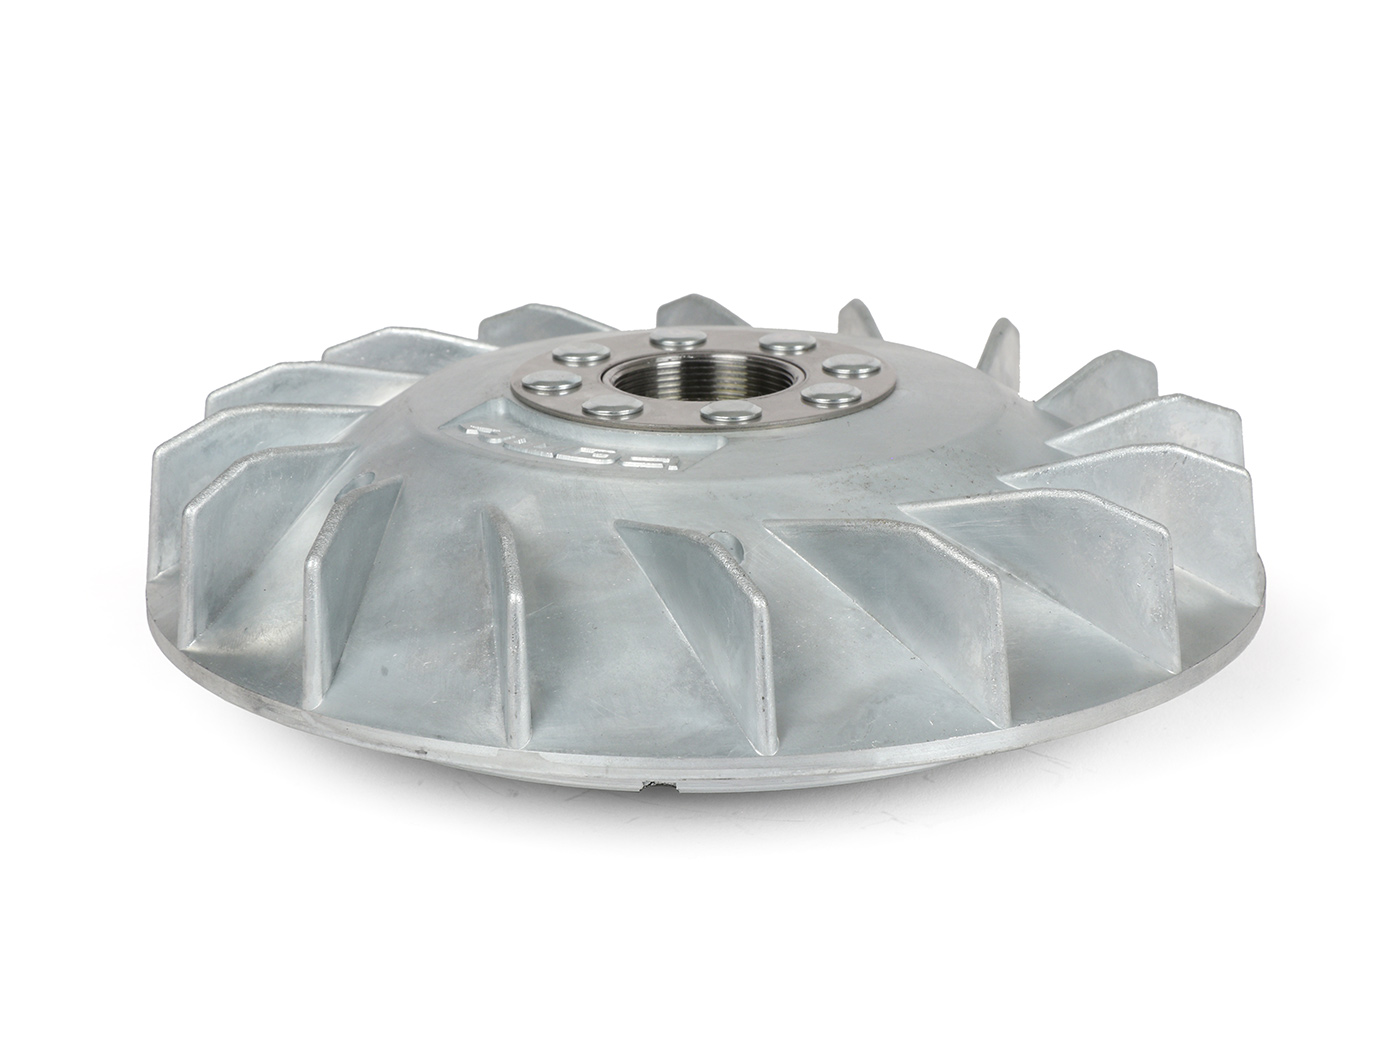
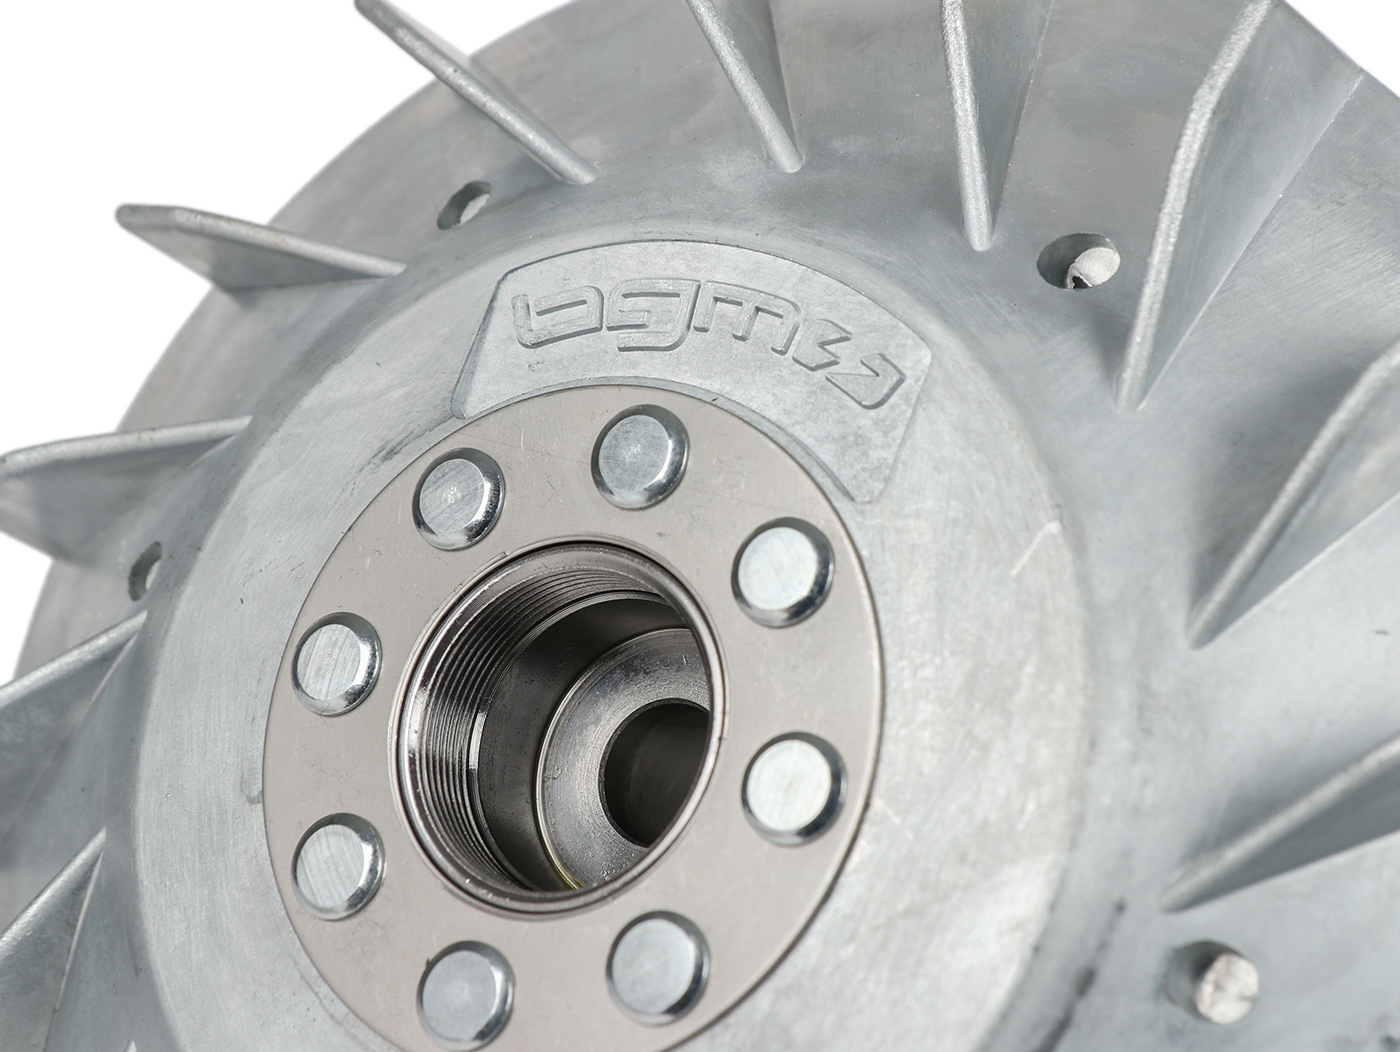
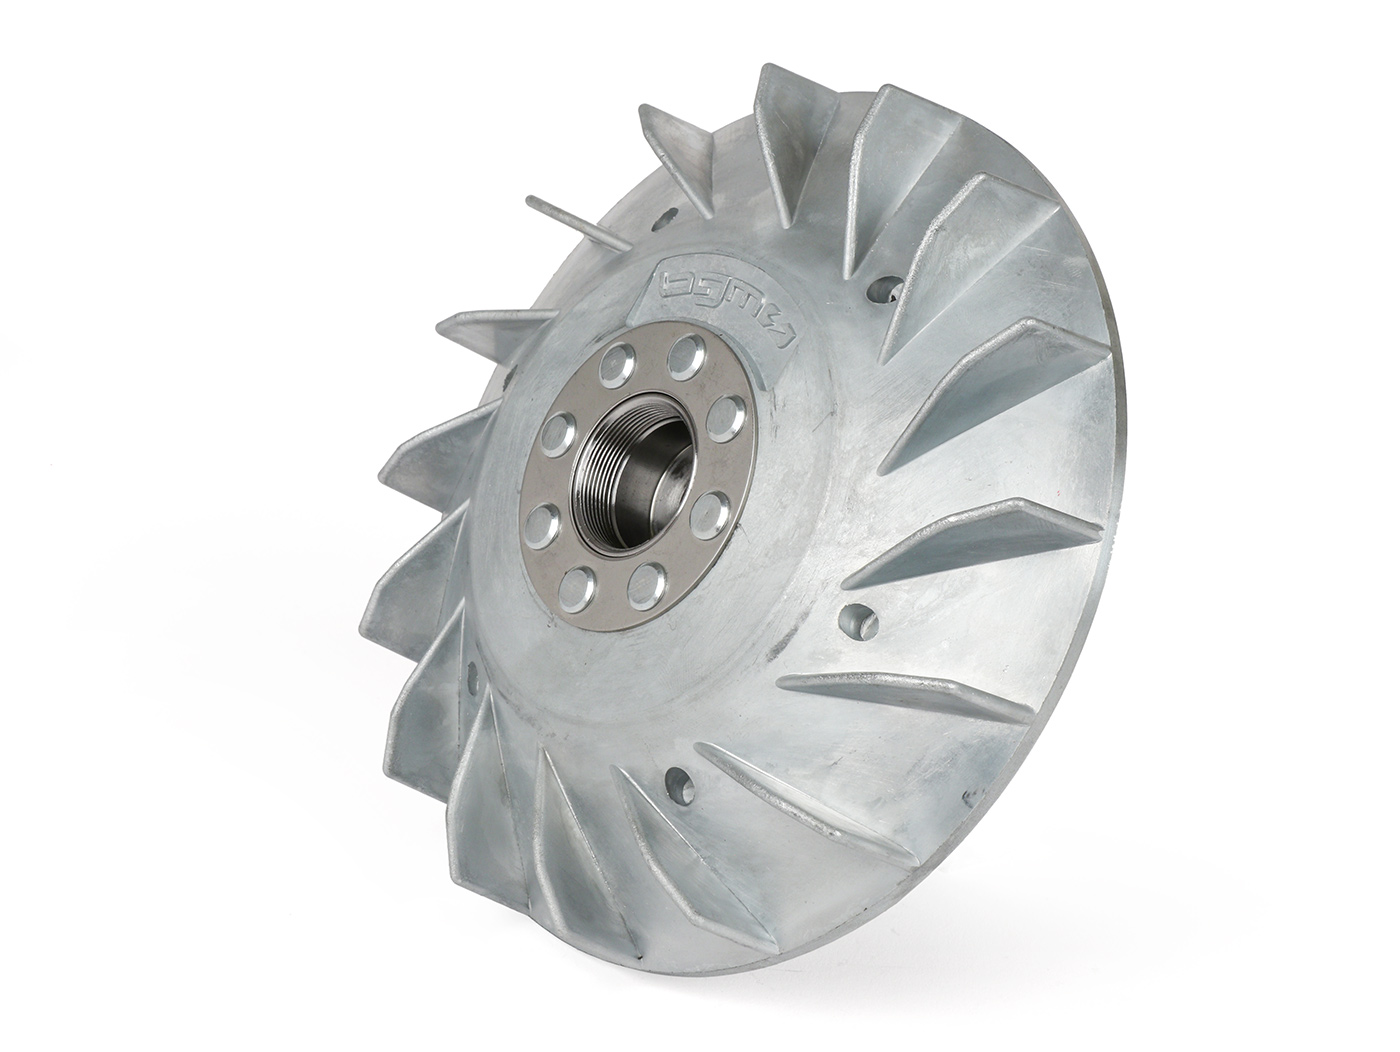
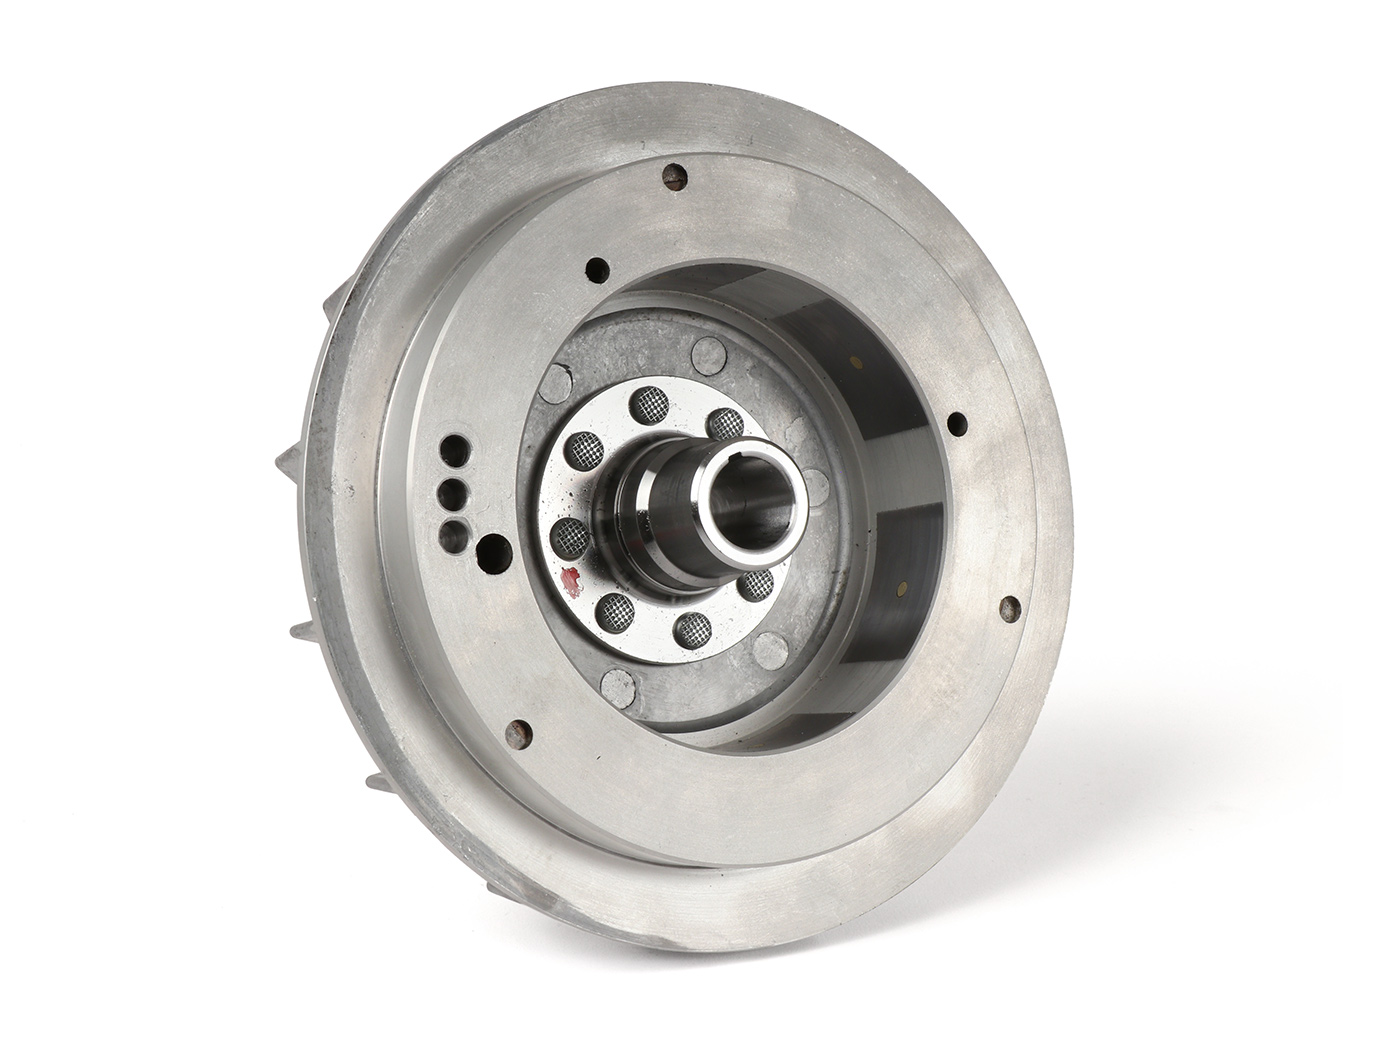
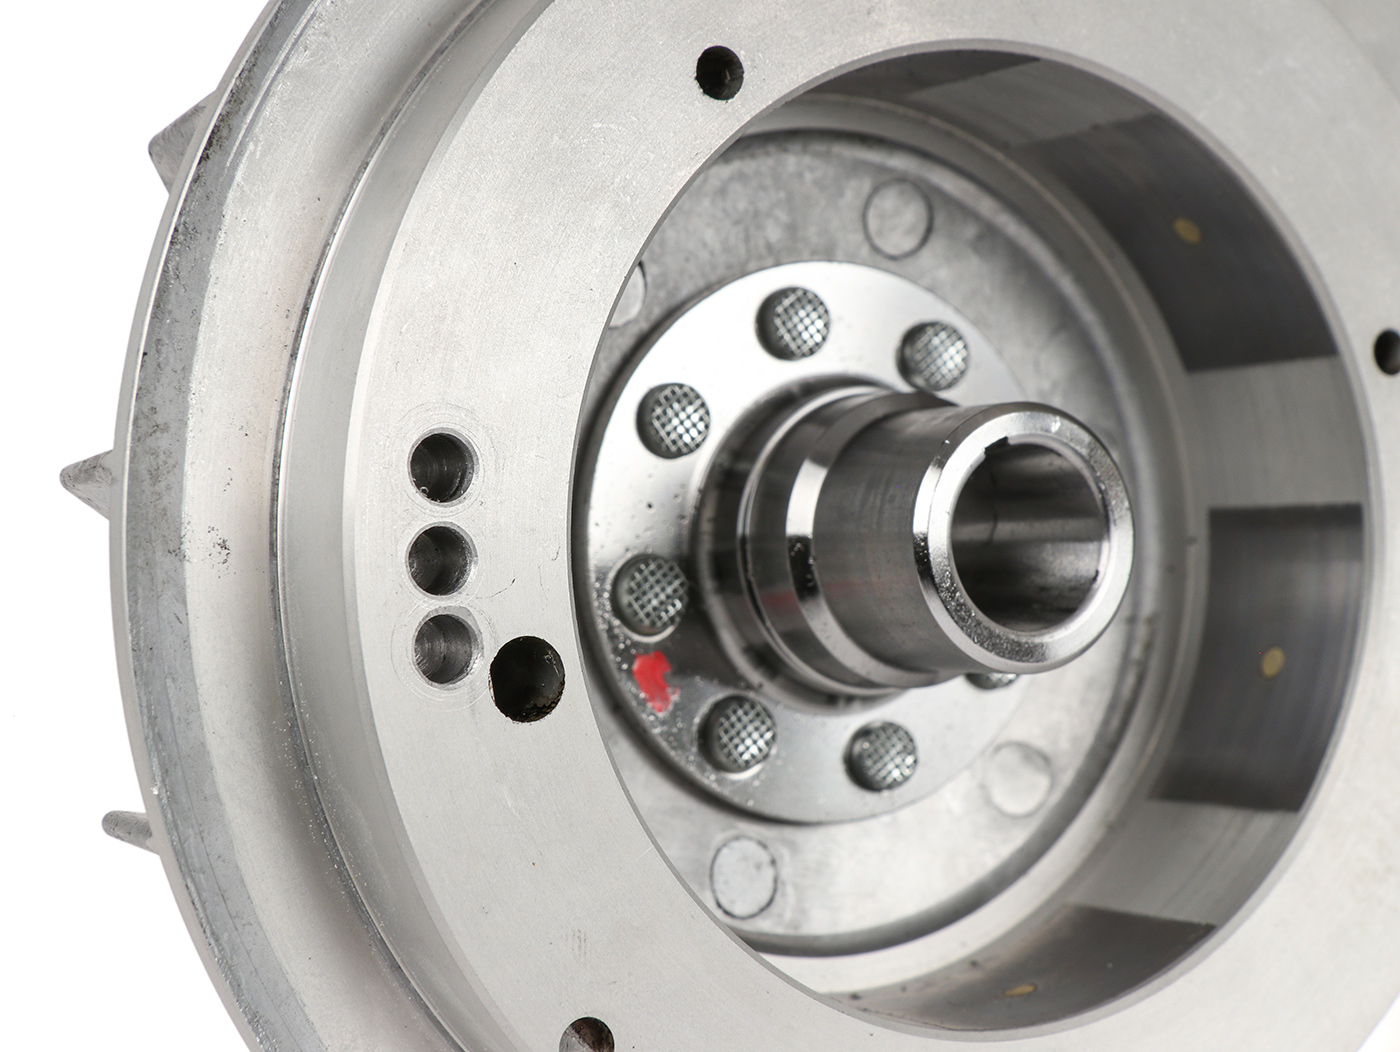
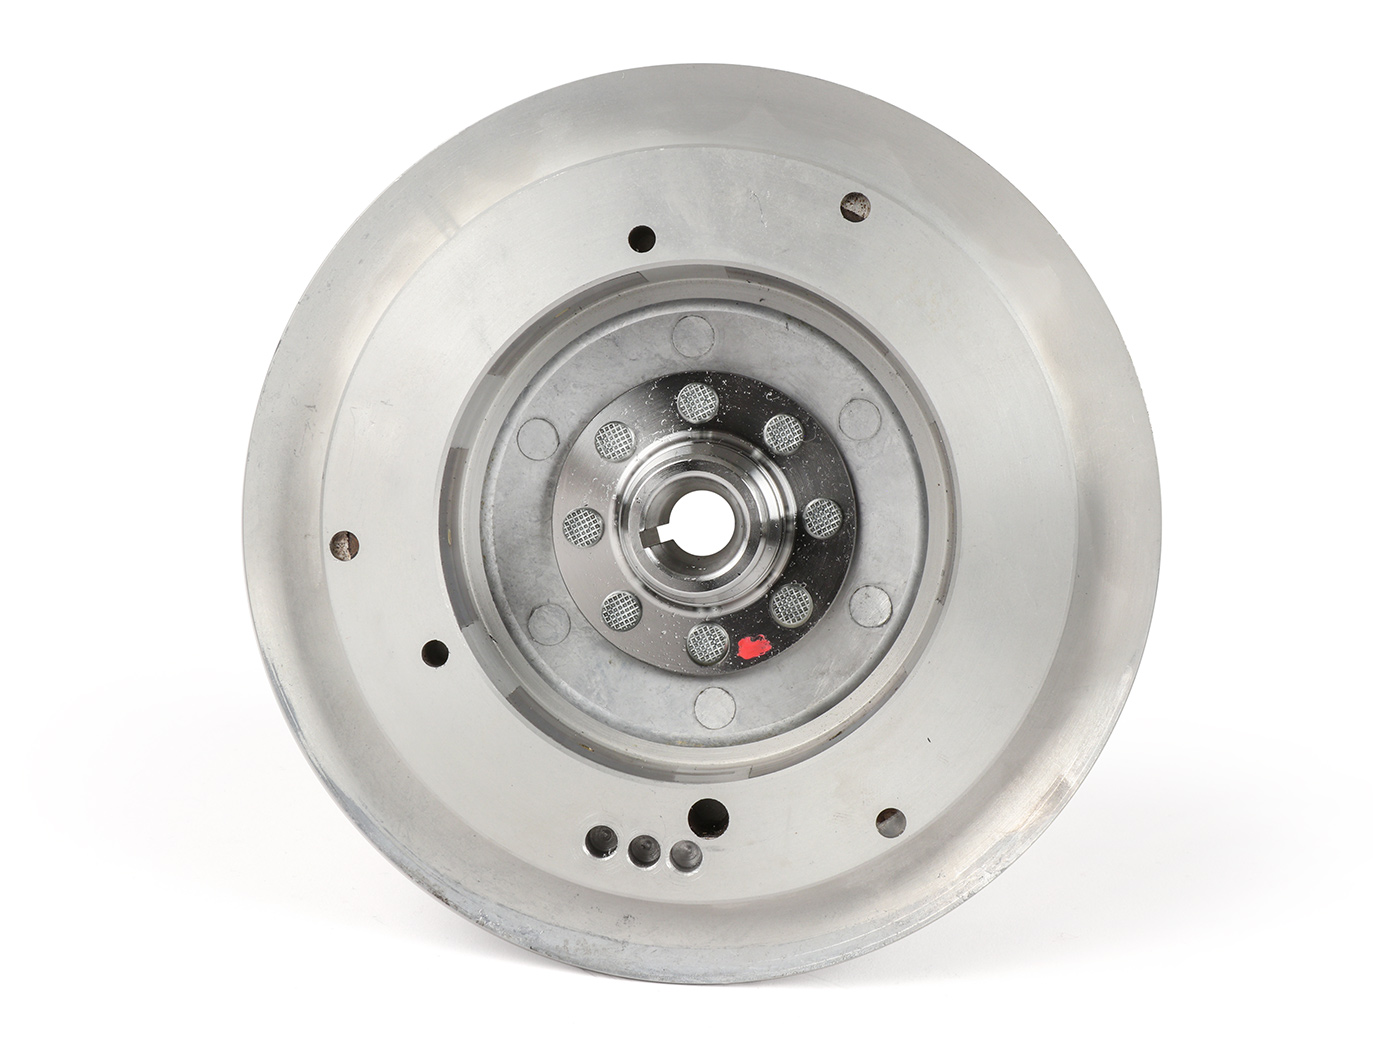
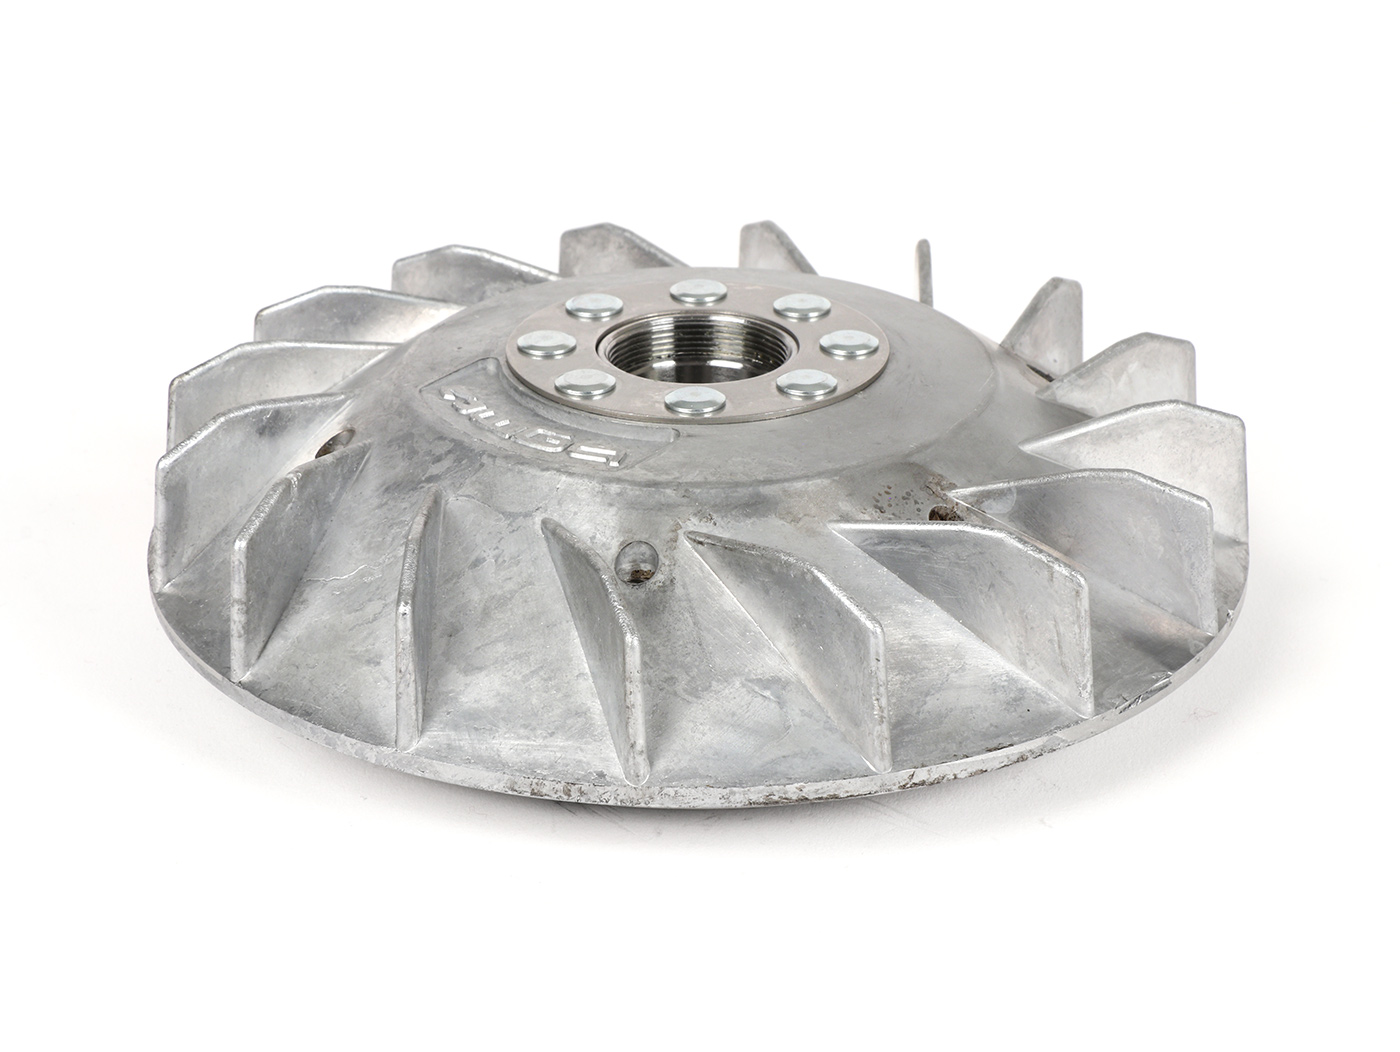
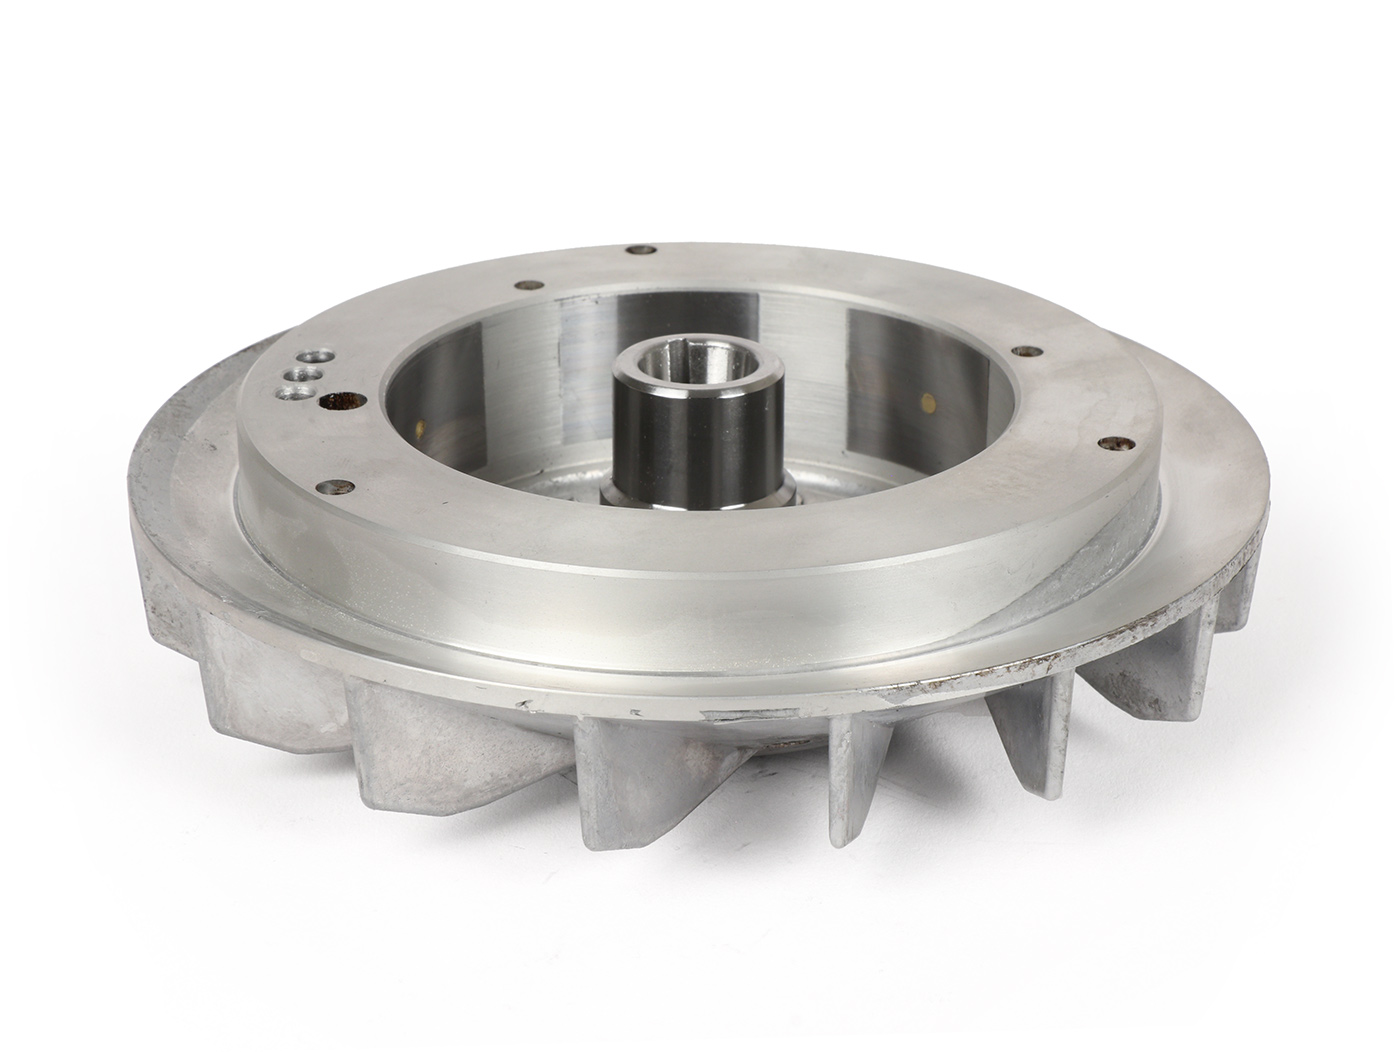
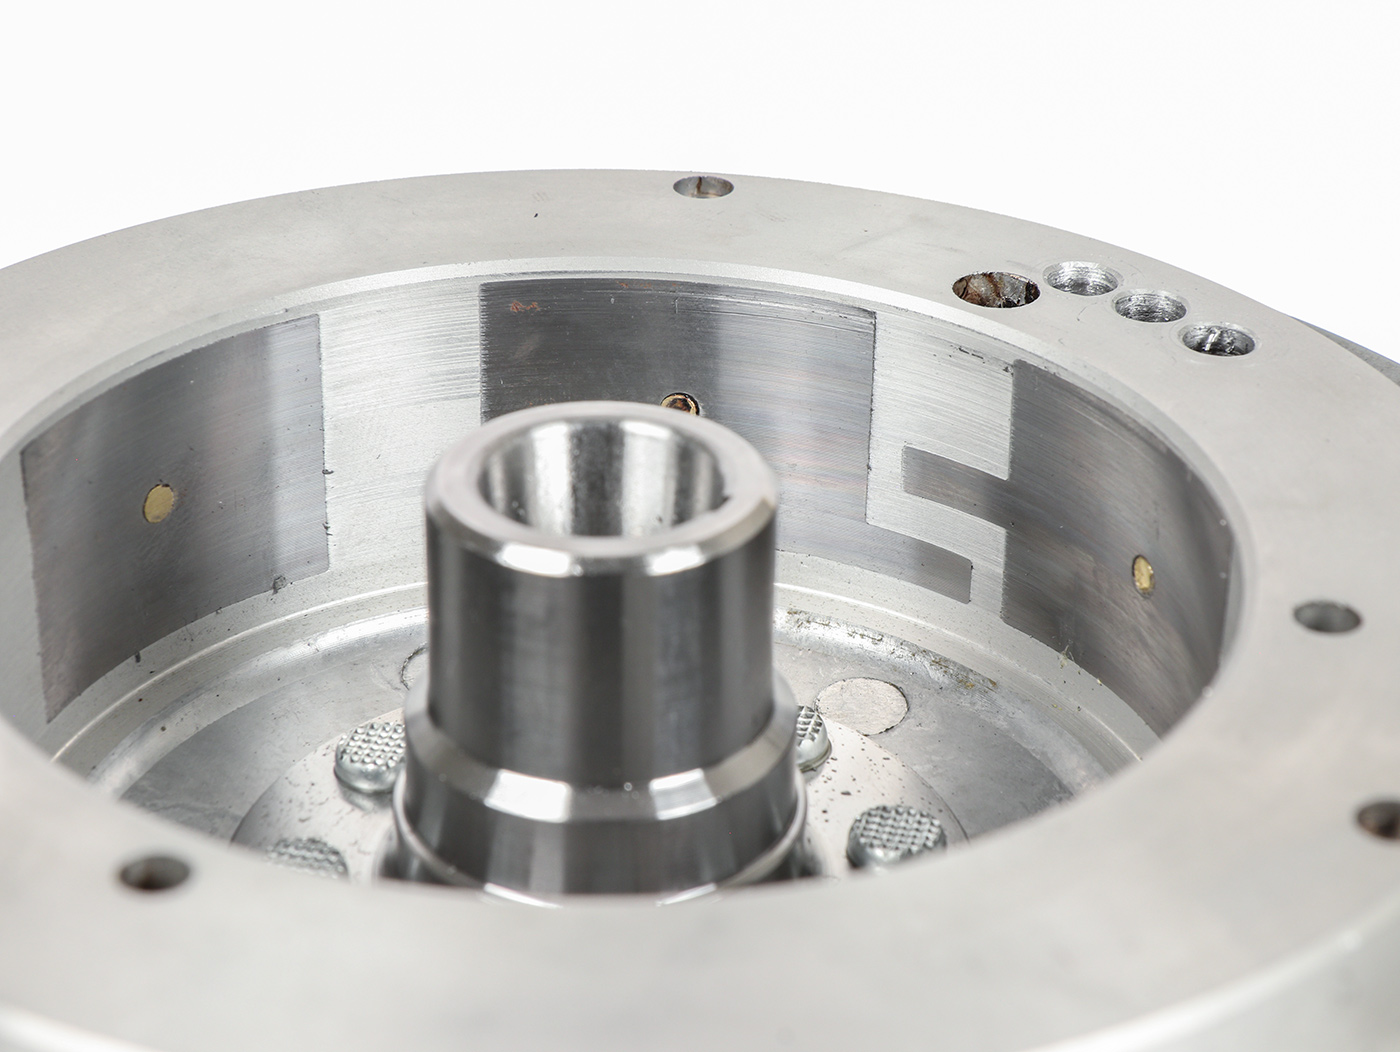
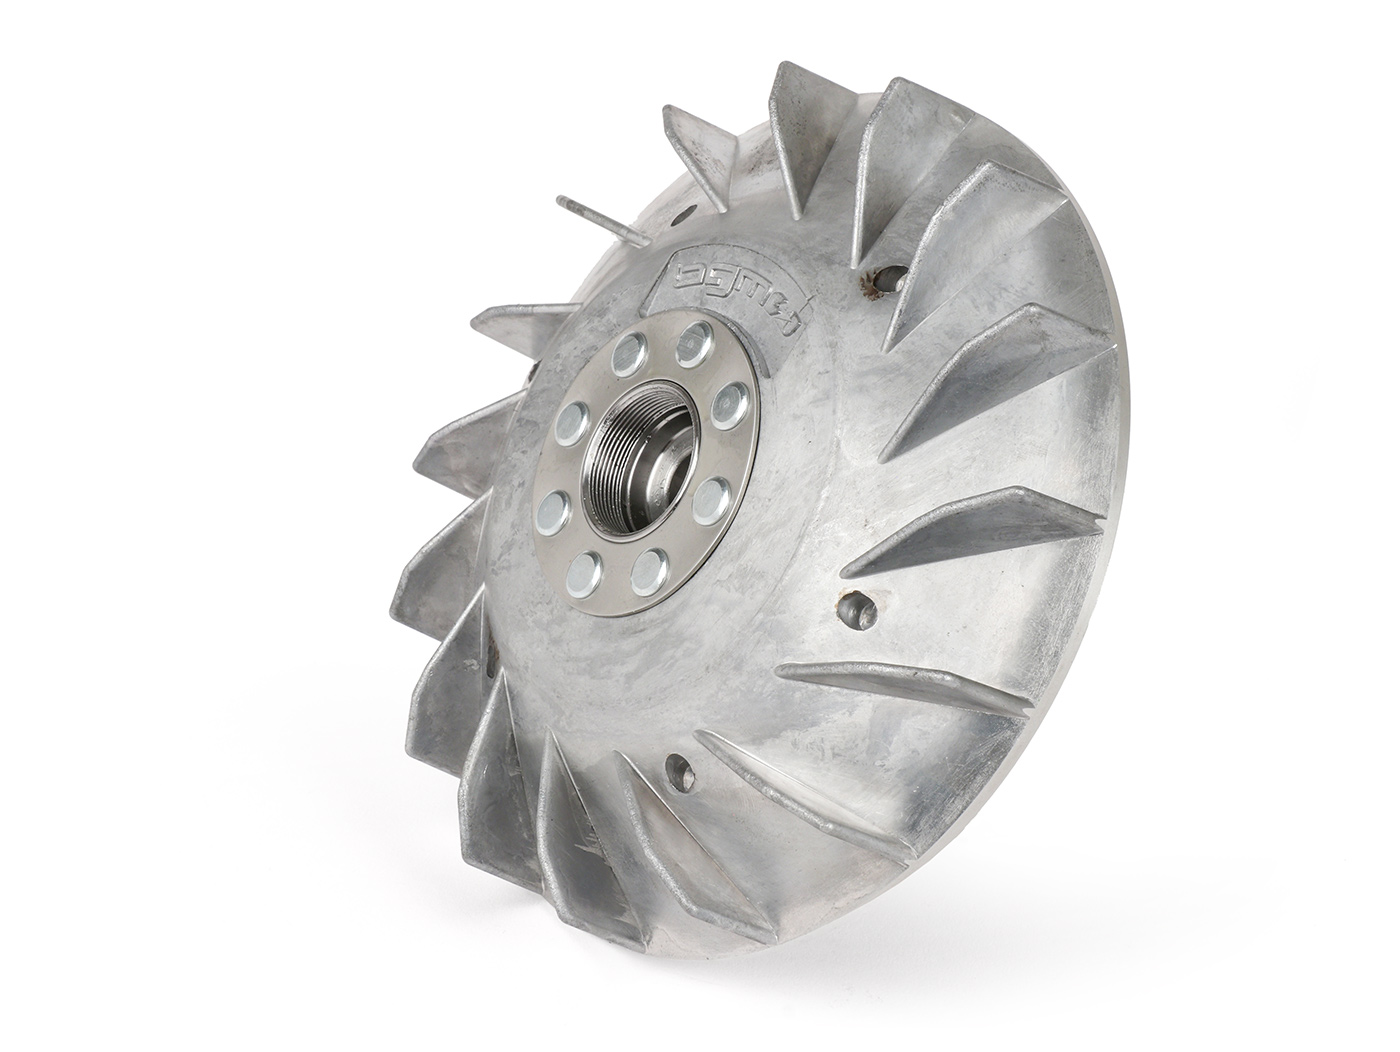
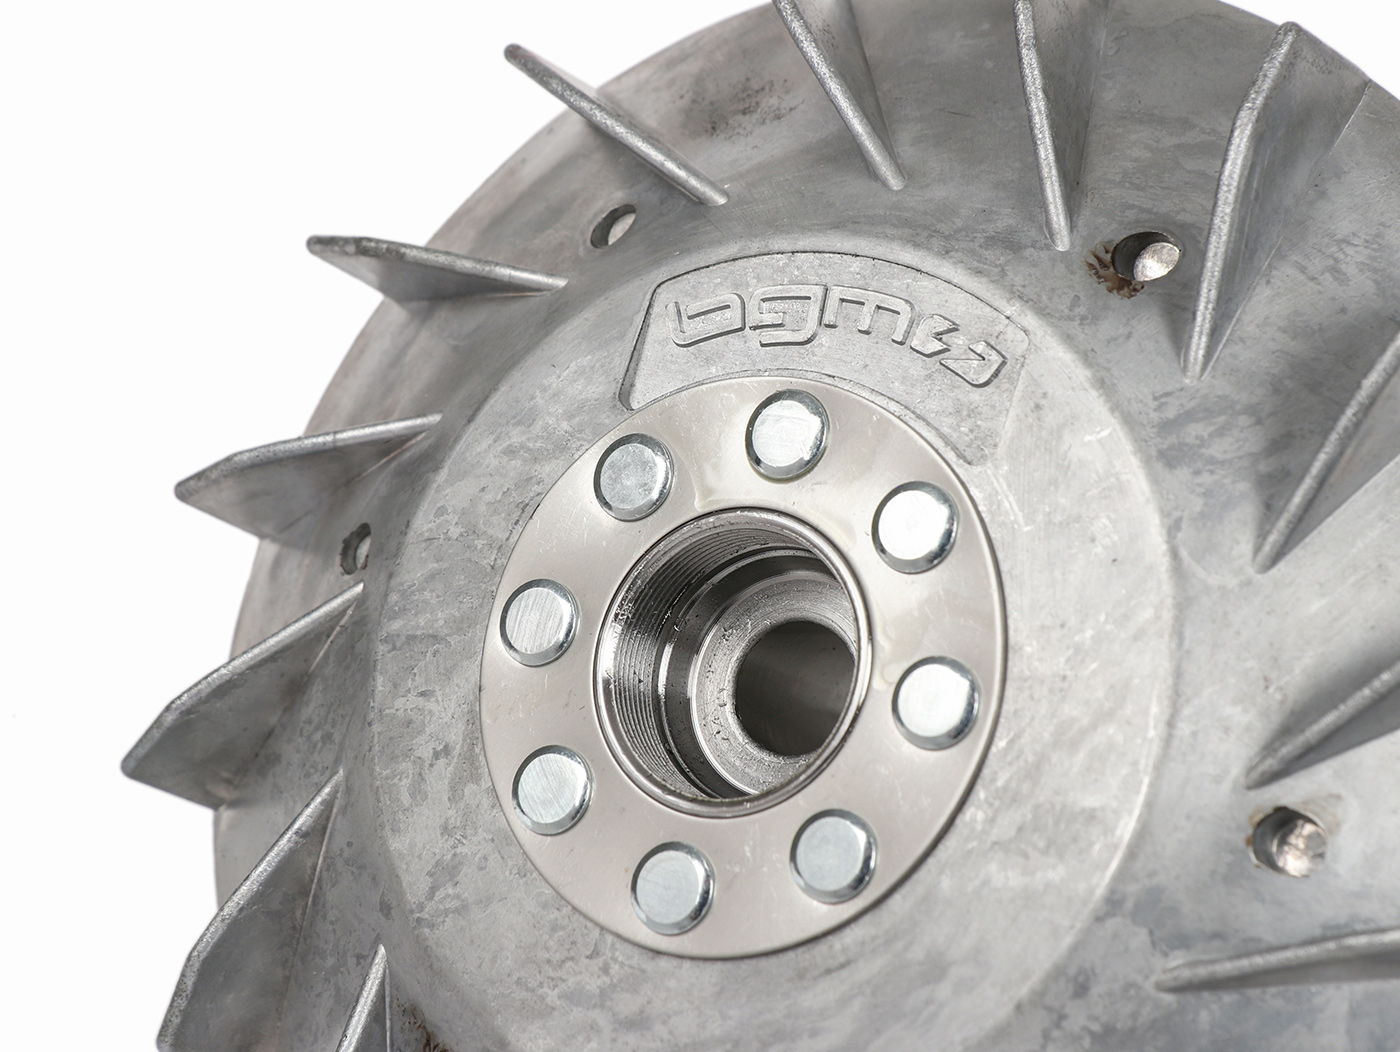
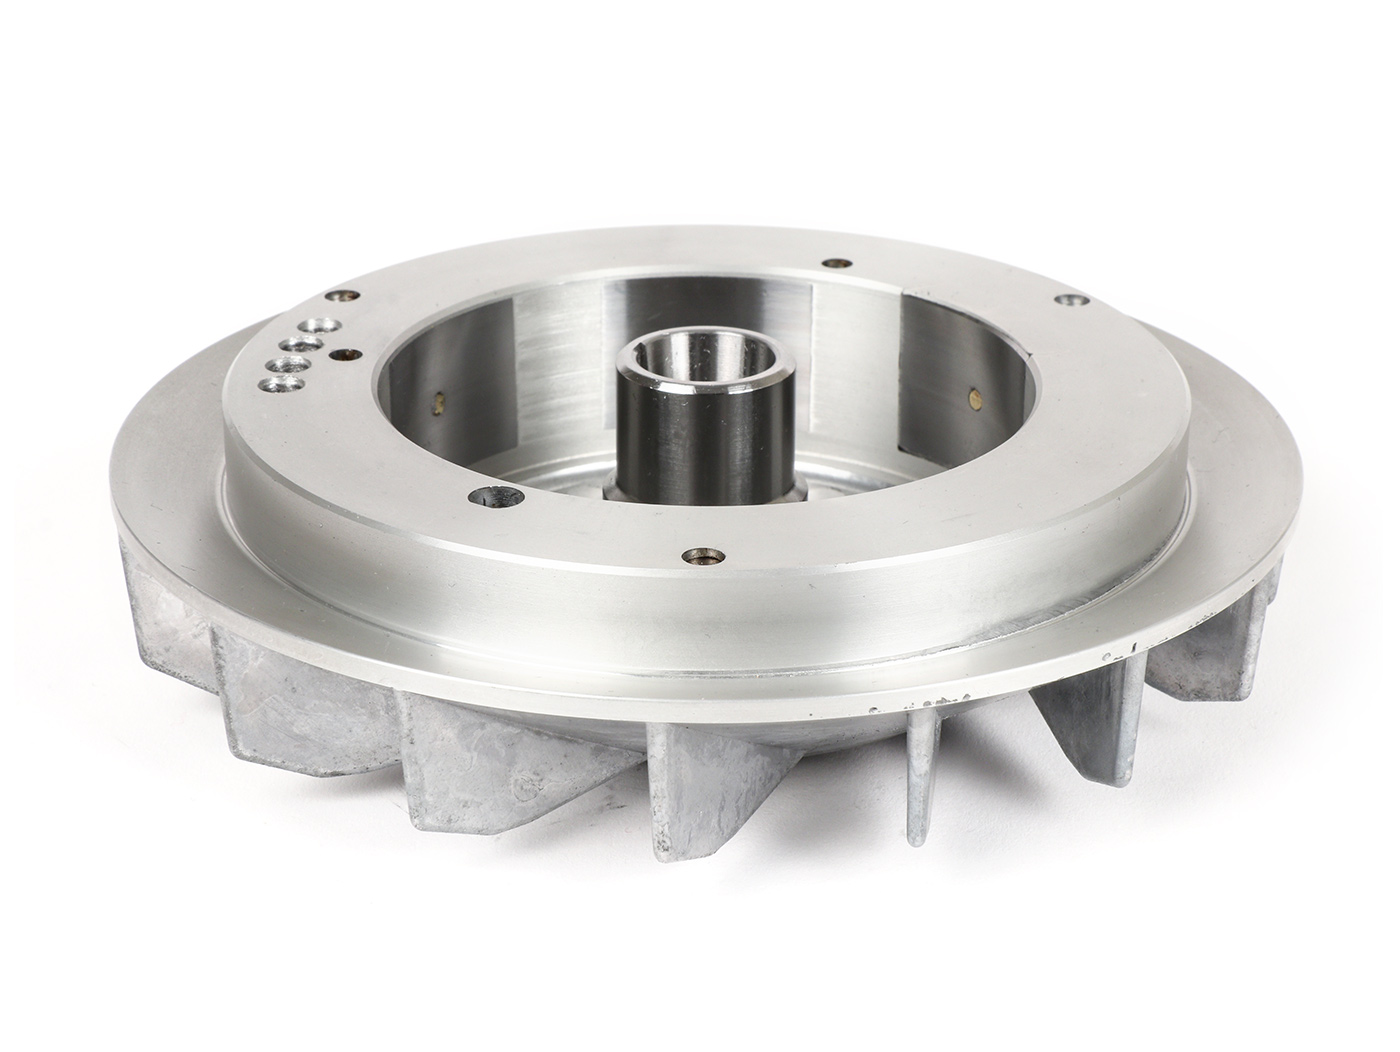
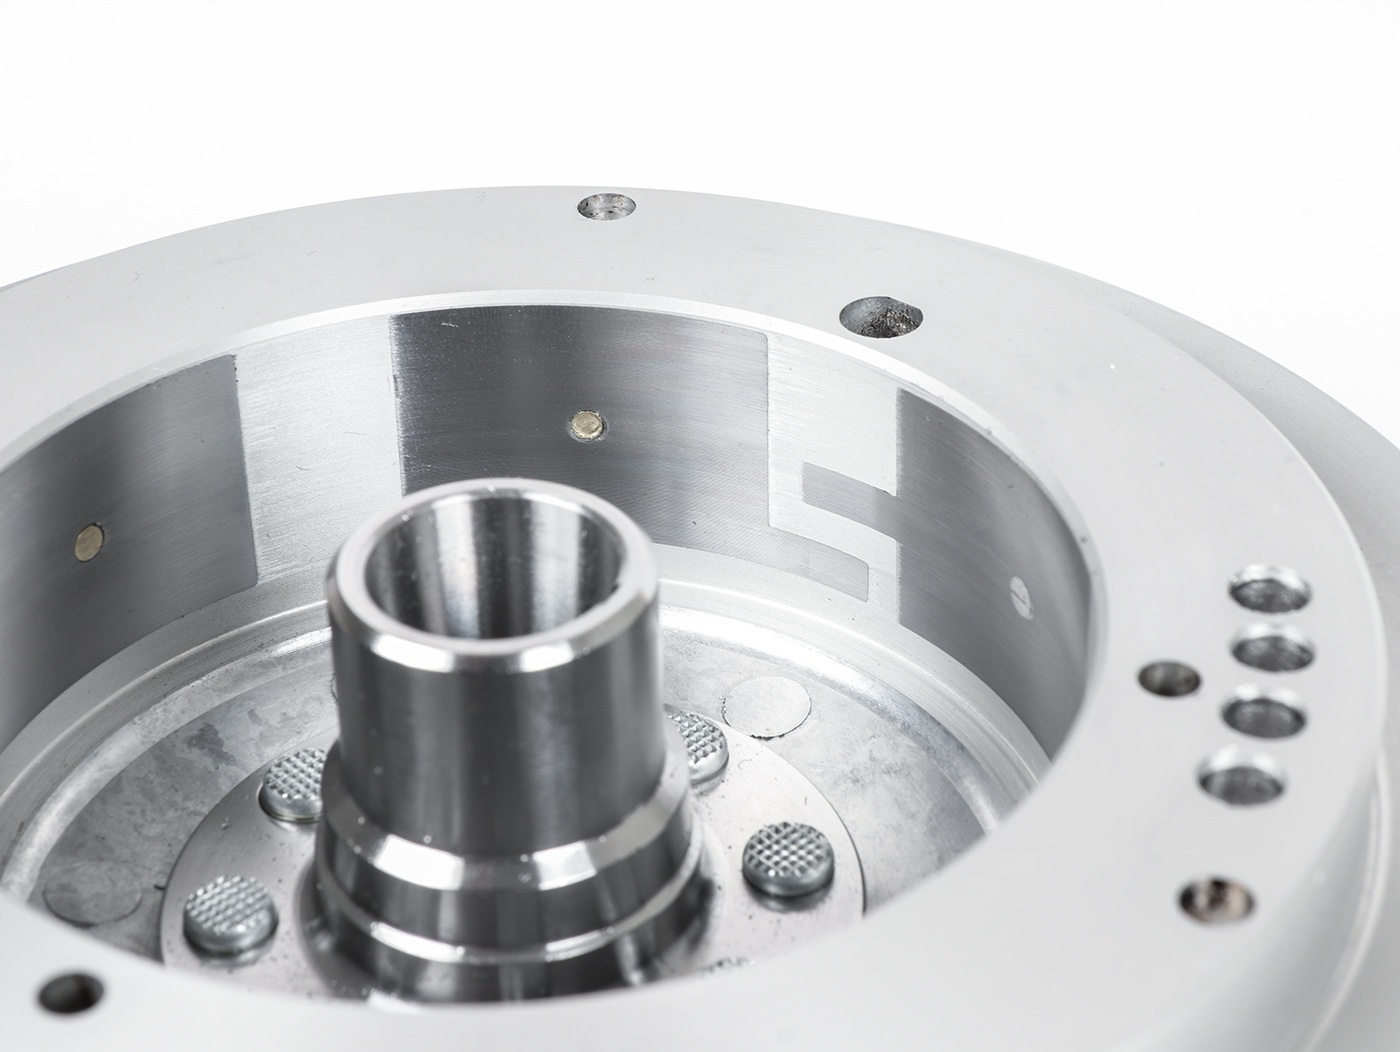
We have developed new fan wheels. With the bgm PRO pole wheel, a very high quality reproduction of the (no longer available) original Piaggio Vespa PK fan wheel is now available.
During the development of this new pole wheel, the tried and tested and the optics have been retained, while performance and quality have been optimized. For this we have invested in, for example, brand new molds and can now offer you the pole wheels that are in demand
The weight of the bgm PRO Vespa pole wheels is tailored to the respective purpose:
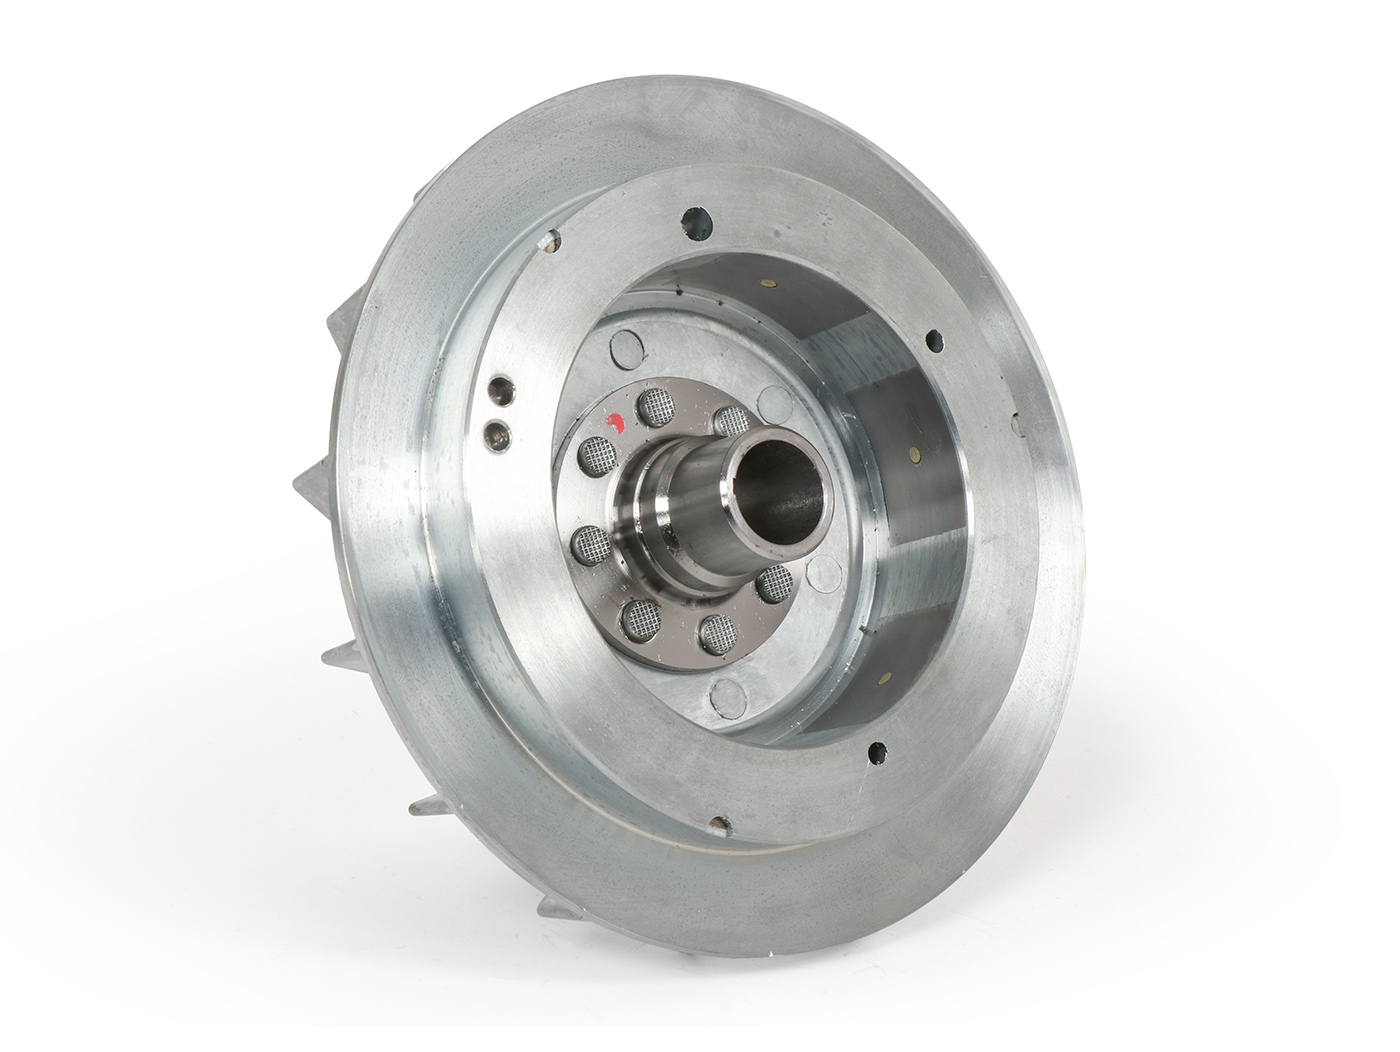
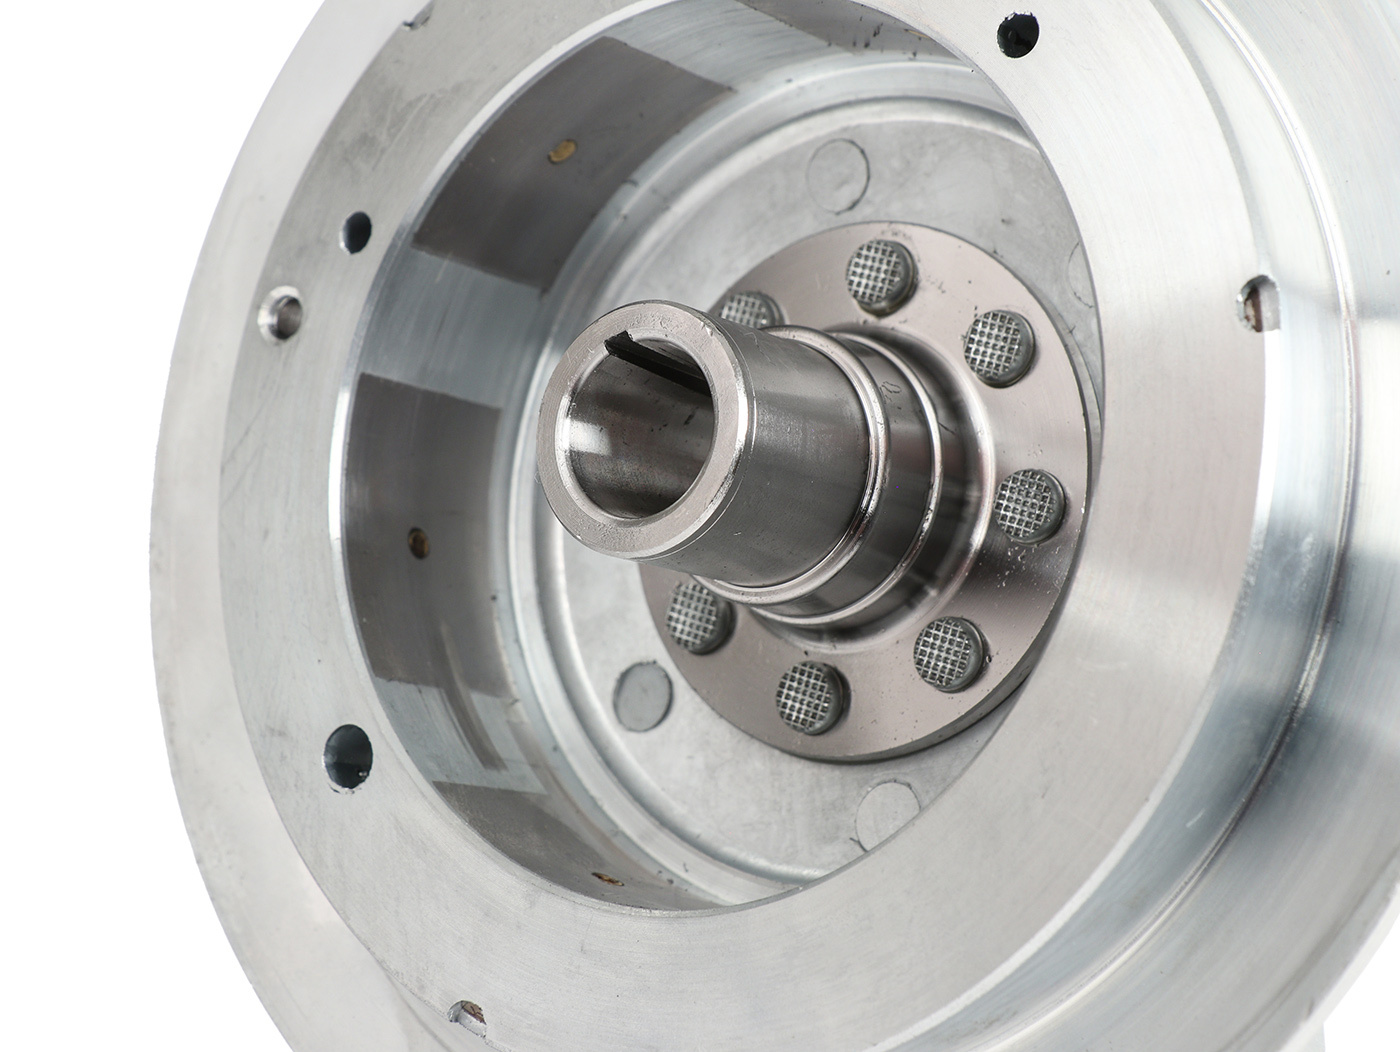
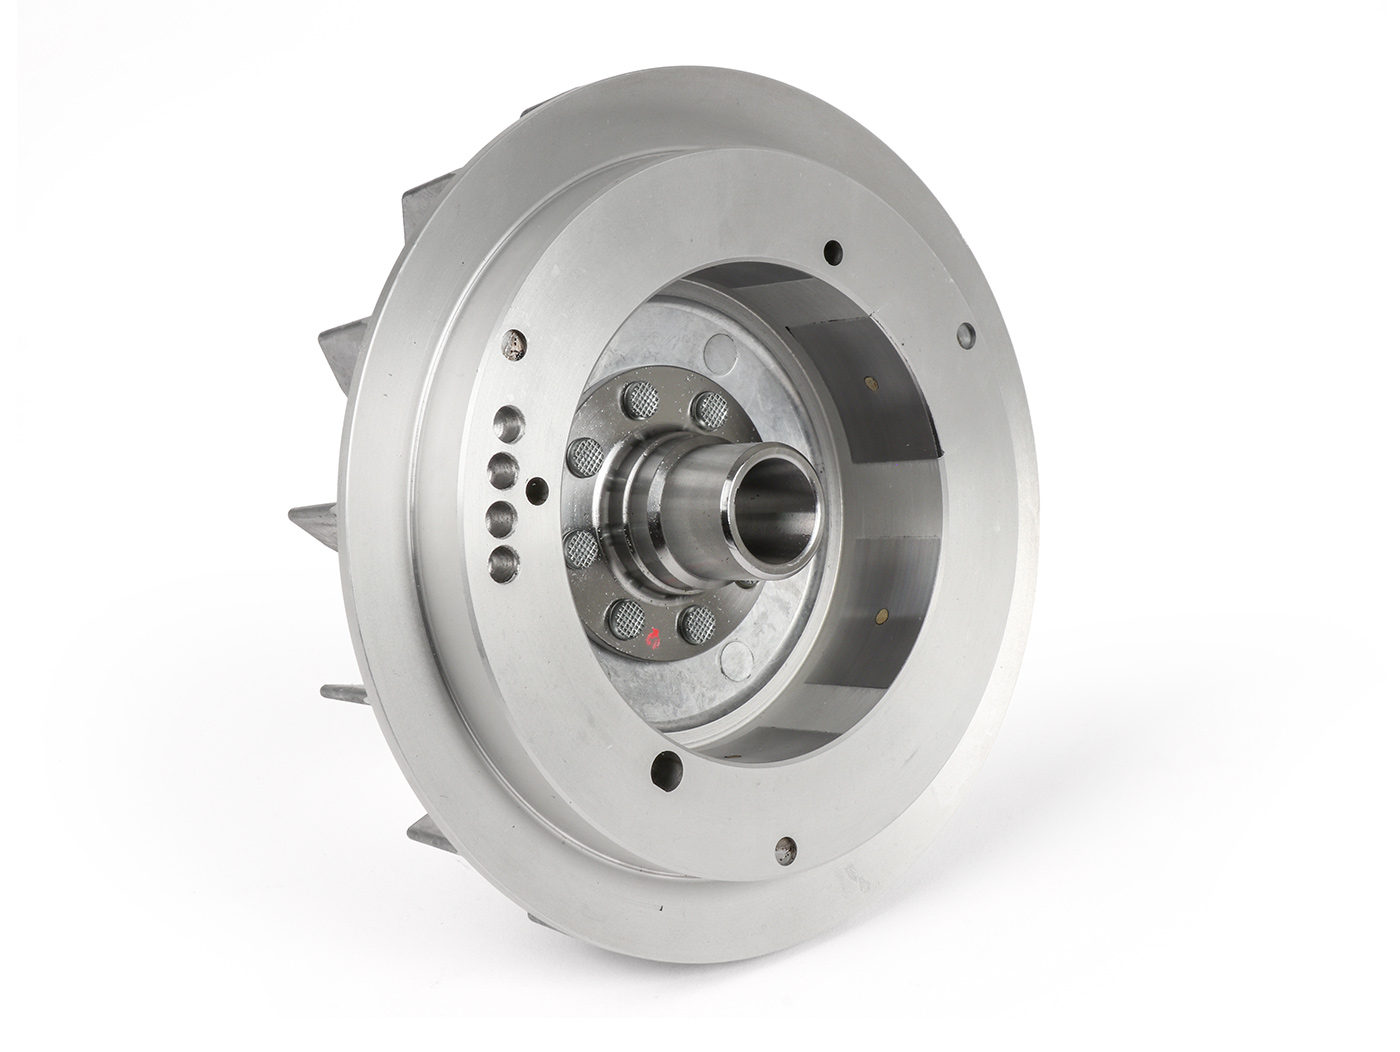
Basically, the pole wheels always require a 12V ignition base plate / alternator. This means that every previously contact-controlled motor can be converted to a fully electronic CDI ignition including voltage-controlled on-board electronics. We offer to do this complete sets with all parts required for retrofitting (see alternatives / accessories) for the ignitions:

For retrofitting everyone Largeframe Motors that already have the large cone (rotor thread M12, wrench size 18), but still have a contact-controlled ignition installed (approx. 1978-1981, PX, Sprint Veloce, GTR, Super, TS) Here the pole wheel and a new 12V ignition base plate are required. In later models (e.g. Vespa PX from around 1982, Cosa, LML) with factory-installed electronic ignition, this can continue to be used. If you convert to the BGM pole wheel, you benefit from significantly more lively engine characteristics with noticeably improved acceleration and higher engine power.
The most classic of all LargeframeEngines. Still has the old type of crankshaft with a thin (pointed) cone which can be recognized from the outside by the pole wheel nut with M11 thread and wrench size 14.
These motors always have contact ignition from the factory.
By converting the pole wheel, ignition and vehicle wiring harness, a modern vehicle electrical system is created that is absolutely maintenance-free and includes a powerful 12V alternator that provides a fantastic bright light. Starting at the first kick included.
Suitable for everyone SmallframeMotors with a small cone (flywheel nut M10, SW14 or SW16). These motors always have contact ignition ex works (exception ET3 / PK).
By converting the pole wheel, ignition and vehicle wiring harness, a modern vehicle electrical system is created that is absolutely maintenance-free and includes a powerful 12V alternator that provides a fantastic bright light. Starting at the first kick included. PK models that already have a voltage regulator do not need a new wiring harness.
For Smallframe Motors that already have the large cone (flywheel thread M12, wrench size 18).
Replaces the original (no longer available) pole wheel 1: 1. If you convert to the BGM pole wheel, you benefit from a significantly more lively engine characteristic with noticeably improved acceleration.
It is also very popular on the older engines (with originally a small cone) if they have been converted to the more stable crankshafts of the Vespa PK XL or ETS.


, Vespa T5 125cc (ab Bj. 1985)")
, T5 125cc - Chrom - 3 Schliesszylinder (Zündschloss, Gepäckfach, Sitzbank)")
, T5 125cc, PK S-XL, Gilera Stalker, Piaggio Storm, Hexagon, NRG, NTT, NRG MC2, NRG MC3,...")
, T5 125cc, PK S-XL, Gilera Stalker, Piaggio Storm, Hexagon, NRG, NTT, NRG MC2, NRG MC3, NRG Extreme, TPH,...")
, PK50 XL, PK125 XL, Piaggio NRG, NTT, NRG MC2, NRG MC3, NRG Extreme, Storm, TPH, TPH X, TPH XR, Hexagon...")
")

 - Kunststoff - Schwarz")
")
 - schwarz")

, Rally200 (VSE1T), SS180 (VSC1T) - schwarz")
, SS180")


")
")

 oben)")
")

")


, Rally180 (VSD1T), Rally200 (VSE1T), Super, GT125 (VNL2T), GTR125 (VNL2T),...")
")


, T5 125cc - links")
, T5 125cc - rechts")
")
, PX Lusso, T5 125cc")
, T5 125cc")


, Rally200 (VSE1T), TS")
")
 - schwarz")
")
, GTR125 (VNL2T), Vespa 150 VL1T-3T, VB1T, VBA1T, VBB1T-2T,...")
, Rally180 (VSD1T), Rally200 (VSE1T), SS180 (VSC1T), GS160 / GS4 (VSB1T), GT125 (VNL2T),...")
, Rally180 (VSD1T), Rally200 (VSE1T), SS180 (VSC1T), GS160 / GS4 (VSB1T), GT125 (VNL2T), GTR125...")
, Rally180 (VSD1T), Rally200 (VSE1T), SS180 (VSC1T), GS160 / GS4 (VSB1T), GT125 (VNL2T),...")
")
")


, PX Lusso - auch verwendbar für Sprint150, Rally180, Rally200, GT125 (VNL2T), GTR125 (VNL2T), GL150 (VLA1T), Super,...")
, T5 125cc - Schwarz")
 - Version mit Getrenntschmierung")

, PK XL1")

 - Kunststoffverschluss Ø55mm (50-350 Ohm)")
, PK XL")
")


 - Vespa V50, 50N, PV, ?ET3, ?PK, PX, T5, Cosa, Rally,...")
")
")


 - Kunststoff - schwarz")
- Vespa, Lambretta - schwarz - 1400mm")


 - l=177mm Ø=24mm")


, PX Millenium, PX2011 - Ø12mm")
")
 -OEM QUALITÄT- Vespa PX125, PX150, PX200, T5 125cc, ET3")
- Vespa PX (Bj. 2004-) - Schwarz matt")

 - 120km/h")


")


 - schwarz - links")
 - schwarz - rechts")
, GTR125 (VNL2T), ET3, PV125, V50, V90")
, Rally200 (VSE1T), Sprint150 (VLB1T), 180 SS, Super, TS125 (VNL3T), GT125 (VNL2T), GTR125 (VNL2T), ET3,...")
 (verwendet zur Durchführung von Bremsleitung und Bremslichtschalterkabel in den Lenkerdeckel)")
)")
, Vespa Cosa 200 (VSR1T0004755, VSR1T, VSR1T3016725), Vespa GT 250...")
- 12V 35/35W - Weiss")
 - schwarz")
 - 12V 10W - Weiss")
 - 12V 5W - Weiss")


 - 12V 21W - Orange")
")


, 1984-1997, ohne Batterie, mit DC Hupe, Hupengleichrichter, Zündgrundplatte mit 5-Kabel")
 - 6 Kabel mit Multistecker")
 - 9 Kabel (DC, Modelle ohne Batterie, mit Hupengleichrichter, Schliesser)")
")
")
, PK50 XL, PK125 XL, T5 125cc - Schliesser (Blau/Rot)")
")
, Lambretta - verwendet mit Bremspumpe")


 und Vergaserbefestigung) Vespa PX80, PX125, PX150, PX200 (-1984), Rally180 (VSD1T),...")
 - Vespa Smallframe V50, 50N, Special, PV, ET3, PK50-125 (S/XL/XL2), Largeframe PX, T5, Sprint,...")

")


 - 12V DC - mit E9-Kennzeichnung - zur Umrüstung...")

 - (verwendet für Nebenwelle Vespa PX200, Rally180, Rally200, COSA200, T5 125cc, GS150 / GS3, Hoffmann, T1, T2,T3, GL)")

- zur Montage in Lenkkopf Vespa PX, LML Star, Stella")
 - für Tankgeber mit Kunststoffverschluss")
 - Viton®")
")
")
 oben)")


, Rally200 (VSE1T), Sprint150 (VLB1T), TS125...")
 - Blechverschluss Ø48mm (50-270 Ohm)")
")

")
, LML Star 125/150, Stella 125/150")
- Vespa PX80, PX125, PX150, Sprint, GT, GTR")

 Lusso, '98, MY (auch Elestart Modelle) - 5 Kabel")
 -LML Classic Grimeca Style- Vespa PX80, PX125, PX150, PX200 Lusso (ab Bj. 1984)")
, PX My, PX Disc, PX 2011, T5ccm, Cosa 125, Cosa 200, PK50 S Lusso, PK80 S Lusso - schwarz")
")

, Cosa, Cosa FL, T5 125cc, APE")
, Rally200 (VSE1T), Sprint150 (VLB1T), TS125...")

 - 64 Zähne")
, Cosa (VNR1T, VNR2T, VSR1T), T5")
")


, PX150 (ab Nr. 264565), PX200, T5 125cc, Cosa, Rally180 (VSD1T), Rally200 (VSE1T) - 12-13-17-21 Zähne")