Test bench runs, diagrams, experiences and results

Our test engine ran warm and the spraying with a secondary nozzle 48/160, air correction nozzle 160, mixing tube BE3 and a main nozzle of 140 seems to work for now. Now we can do the first runs to measure performance.
To do this, the overall ratio in 3rd gear is measured 2-3 times on the P4. In our case, the overall ratio is 3,21. We can re-enter this value manually in later runs in order to eliminate errors when measuring and to obtain consistent, reproducible results.
So we do the first 3 runs. If all runs are almost congruent, we can assume that the experiment worked well and that we “experienced” a comparable result.
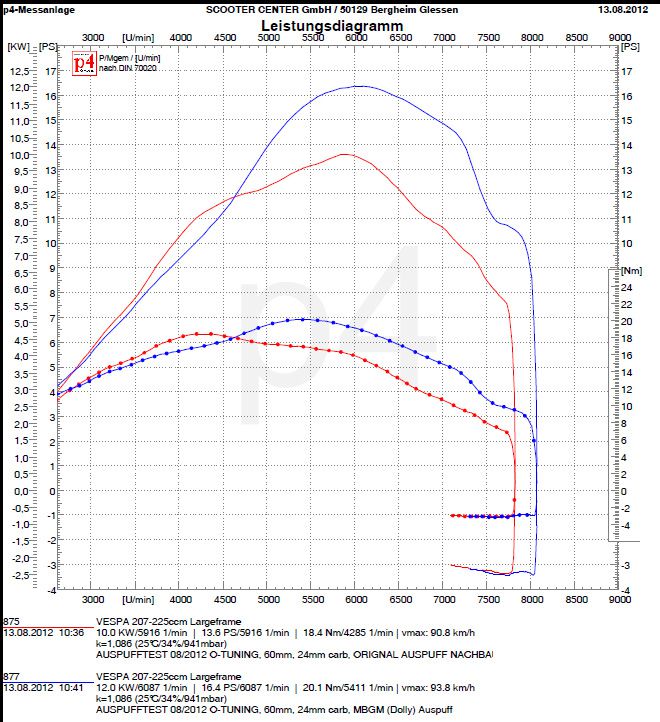
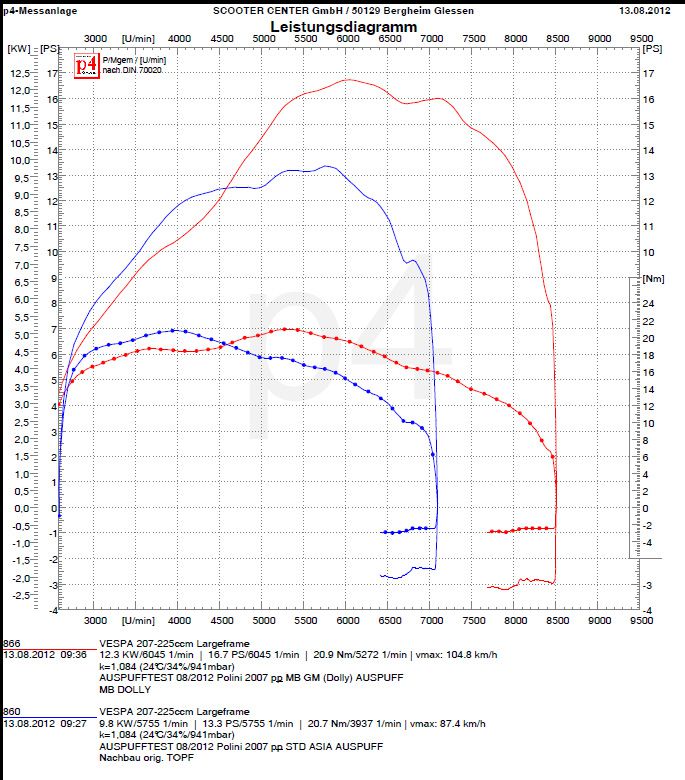
Here is the first result.

It's nice to see that, as expected, the engine makes a lot of torque available very early on. This impression is also confirmed during a test drive on the road. In terms of the tractor, the engine pushes off very nicely at 3500 rpm, i.e. practically at increased idling speed, with 17 Nm.
Besides, the unobtrusive suction noise of the Polini solution is pleasing. With the adapter, Polini has incorporated a small but important trick. The sound waves break effectively on the inner edge of the adapter and thus become a sonorous, inconspicuous suction noise.
Back on the test bench, we mount the MMW cylinder head on our 210 Polini.
For the tests on the test bench, we put a 0,5mm and 0,2mm thick Polini cylinder head gasket under it so that we get a comparable squeeze dimension of 1,70mm. It is absolutely advisable not to underlay an O-ring sealed cylinder head with an additional gasket. The material of the solid seal could be pressed into the O-ring groove by the surface pressure in connection with the thermal load on the cylinder head, damage it and thus render it unusable.
For test purposes, however, this is possible without any problems, after all we are not planning a circumnavigation of the world but a series of tests. Should the shape of the combustion chamber of the MMW cylinder head prove to be useful, we can think about a necessary change at this point.
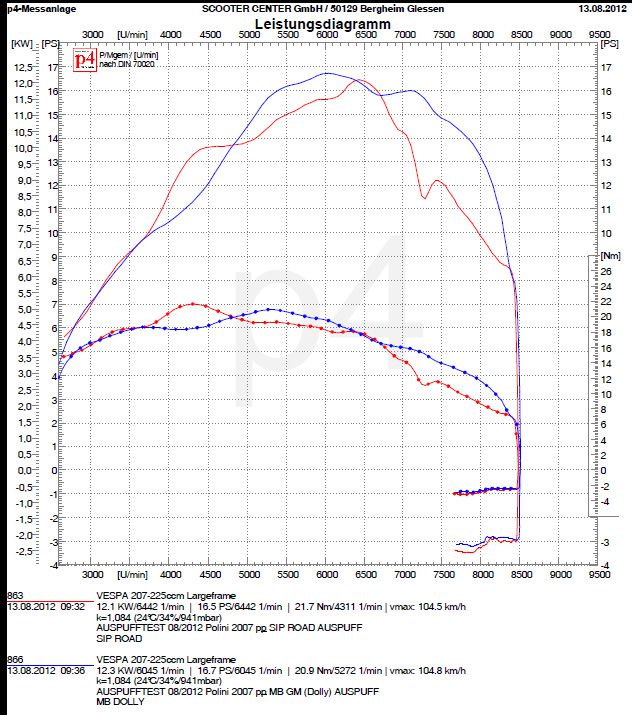
After 3 more runs we get the following nice, colorful mountain range in direct comparison.

RED: MMW

BLUE: Worb5

The extra power of the MMW cylinder head results on the one hand from the slightly higher compression and most likely from the different combustion chamber geometry compared to the Worb5 cylinder head. Since we both brought the cylinder heads designed for a 57mm stroke to the same crush dimension of 1,7mm, one can speak of a fair comparison here.
The maximum torque is as usual at 4700rpm and increases with the MMW cylinder head to a whopping 22Nm.
At 7000rpm there are still 17PS and 17Nm. Certainly good to achieve an average high travel speed.
We save ourselves the experiment with the MMW cylinder head for 60mm stroke. Not out of laziness, but because we already know that the engine responds positively to a little more compression.
Because with the same combustion chamber geometry, but with the compression reduced due to the larger crush dimension, no increase in output or torque is to be expected.
A little more band with higher torque and more power in the higher speed range would be desirable. This would enable us to better overcome the exponentially growing driving resistance with increasing speed.
Mmmmh, what else could you try now? Actually already suffering at a high level? After all, we are talking about an engine which, thanks to its well-considered selection of components and its assembly, provides quite a remarkable performance.
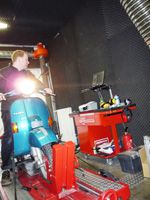
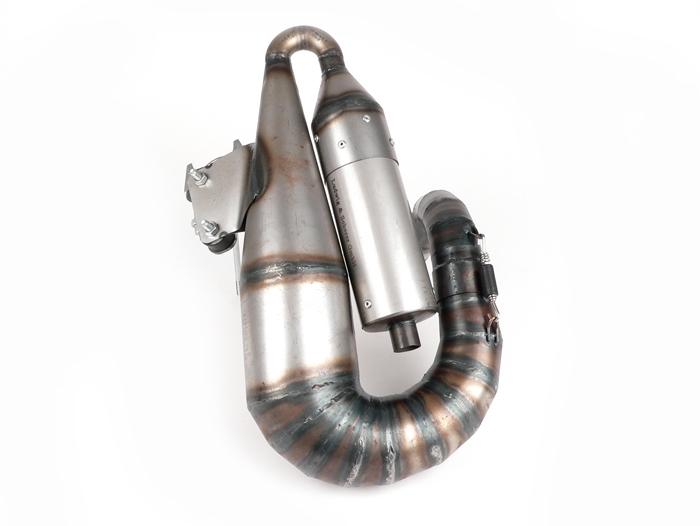
With a look through the test stand room, we discover our test prototype of the bgm bigbox -

we should still try that.

Tomorrow… (:

Only a few more steps separate us from hooking the engine into a test vehicle.

As a test victim for our Polini engine, we use the familiar one Silver Fern .
When assembling the pole wheel, make sure that the groove is the Crescent wedge hits exactly.

Then the Flywheel nut tightened with 65Nm. washer do not forget !

The rear one brake drum is initially only attached and fixed with the nut.

As soon as the rear brake is functional, the brake drum can be attached with 110Nm. Fuse cage and split pin must of course not be missing.

We still connect the controls on the handlebars to the engine, that is Gas-, switching and Clutch will attached and adjusted.

The security game on clutch lever should be between 1,5mm and 2mm in order to avoid the clutch cable being actuated when shifting into higher gears and thus the Pressure mushroom on the pressure plate works and the Clutch possibly even actuated.

Olive oil and fuel hose follow. The air bubble in the oil hose is intentional. When connecting for the first time, you can check whether the oil is being pumped into the carburettor.

However, the air bubble should not be larger than shown here, otherwise there is a risk that the pump will run empty and no more oil will be transported towards the carburetor.

For the “first firing” we fill the tank with 1 liter of super in a mixture of 1:50. This amount of fuel should be enough to bridge the gap until the oil pump delivers the valuable lubricant.

The last missing parts are the Flywheel and the Cylinder hood.

Then it's fire free!

After warming up for a few minutes, we first shift through all gears once and test whether all gears hold and the clutch disengages properly.

A quick look at the oil hose reveals - the pump is running.

So then, first attempt on the test bench with the following setup:

- Polini 210, Outlet, piston and overflow channels are not machined, Spacer cylinder base 1mm.

-YES 26, Cosa float chamber ceilingl with additional bore, nozzle holder also with additional bore

- Nozzles 48/160 - 160-BE3-a set Main jets to play around

-Inlet area freed from the disturbing edges, the seals adapted to the new contour. Polini velocity stacks with adapter and Polini air filter.

-bgm-Pro 60mm crankshaft

-SIP Road exhaust

- Ignition 18 ° bc

-Cylinder head Worb5

To be on the safe side, we check them Ignition adjustment by reversal measurement. If the tolerances on the crankshaft, pole wheel and base plate are correct, the markings should be on top of each other when flashing. This time we made the 18 ° marking on the pole wheel.

Ok, the ignition is correct - then nothing stands in the way of the first test run ...

Ludwig & Scherer are THE two-stroke exhaust gurus! Especially with the Smallframeengine, one big hit chases the next. The official debut, the Hammmerzombie, is our long-running favorite Smallframe to fire. the "Big Bertha" has been specially developed for the Parmakit SP09 cylinders. With a nice wide speed range, the engine turns freely and the 20 HP + are easily cracked. the "Franz" is currently considered state-of-the-art when it comes to maximum performance at a wide speed range. The exhaust runs best at exhaust times around 190-185 °. With a machined Polini 133, 54 mm bgm shaft, Vespatronic ignition and 30 mm Mikuni carburetor (HD 290, needle 5EN68, ND 20) our Alex achieved 27 HP on the rear wheel on our test bench.

At the last minute our Alex reached the "Fire magic" Exhaust. In direct comparison to Franz, it starts a little later, but peaks significantly higher and makes a band that is 1.000 rpm wider. 29 PS on the gray cast iron Polini are an announcement. The recommendation for the timing is 126 ° for the transfer ports and 190-192 ° exhaust time. Processing quality, brackets, dampers and fit leave nothing to be desired! The plants are there for Chassis with as well as for Chassis without luggage compartment on the left.

Vespa BigBox Vespa exhaust

Development of a new Vespa exhaust system - the Vespa BigBox from Scooter Center

After we and Mark have brought the Lambretta BIG BOX so far that we can only wait for the manufacturer and, at most, issue reminders, we sent a few sets of PX exhaust shells to Doncaster.

Mark has all of his ideas regarding PX BIG BOX implemented directly after the Eurolambretta. On Monday morning the PX 200 BIG BOX was finally here in the store. A few minutes later the test bench computer started and the games could begin.

Vespa exhaust big box test

It was tested on:

Buy Vespa BigBox here


Vespa exhaust performance charts

Here is a small selection of diagrams. Uwe did a lot more runs that we will post over the next few days.

After our youngest had thundered “performance” on the test bench yesterday, we will carry out a few more tests today.

Therefore, today we take care of the carburetor adjustment and the optimization of the drive.

Contrary to the diagram you saw yesterday, the CVK carburetor implanted a 104 main nozzle instead of a 106.

In the area of ​​the drive we have that Weights on 15,5g in the Malossi Multivar increased and the originals Piaggio 125 clutch with red Malossi clutch springs equipped.

Since 4-stroke engines usually have a much wider band than 2-stroke engines, the idea behind it is that the power, which is already available at lower speeds together with more torque, can be used over a larger speed range and thus achieve a little more top speed .

Compared:

The red curve shows the first litter.

With a speed increase of 9500 rpm at 10-20Km / h, the driving behavior seemed very rough.
The working speed of the variator is somewhat high at around 9000 rpm, as there is still very little torque at this speed. Due to the somewhat too rich carburetor setting, it stopped at approx. 110Km / h.

Green curve:

After a few attempts, heavier weights of 15,5 grams will come here. and harder clutch springs (Malossi red) are used. The speed start is significantly lower at 7500 rpm and the engine provides significantly more torque at this speed. Easy to read from the steeper increase in output up to 30Km / h. Due to the lean carburetor setting, the engine now turns out more freely and, coupled with the lower speed level, it can be turned out quickly at higher speeds of over 130Km / h.

Blue curve:

Practically everything like the green curve, but for the acoustics lover without a DB killer ... :-)
The volume limiter swallows a few percent of the valuable work done, but fortunately little.

Well done!

As a guest on our test bench, our employee Manuel with his Derbi GP1 125 @ 280ccm and a very powerful engine concept.

Even if the unobtrusive appearance of the GP1 brings tears to your eyes, the very powerful engine immediately puts a smile on the driver's face.
When the engine set up on this project began, Malossi probably only just got one Cylinders for the 300 engines thought about.

Therefore one serves here KB-Racing crankshaft with 63mm stroke from the 300 motors as the basis for one 270cc Malossi cylinder, which was actually intended for the smaller 250 engines.

So that the crankshaft and the piston can enter into a connection, the piston from the Malossi kit had to be provided with a 16mm piston pin bore.

The 270 cylinder from Malossi comes from the factory with a rather, well, cautious squeeze dimension.

Therefore, the cylinder only had to be underlaid with a 3mm thick base seal despite the 0,8mm stroke extension.

With the 4-stroke, most of it is a matter of the head, in the truest sense of the word.
What is with the well-known 2-stroke channel areas and control angle, is with the 4-stroke valve area and camshaft lift.

Especially the 250 and 300 engines from the Piaggio range suffer, in terms of performance, from the very throttled cylinder head that the Piaggio modular system uses from 125 to 300ccm.

Just replacing the factory throttle with the Malossi V4 head would already help many a GTS250 / 300 to run more smoothly and to get plenty of torque.

You can tighten the 300ccm dish even further with a Malossi camshaft.

For comparison,

a Vespa GTS300 is specified by Piaggio with 22PS - on the crankshaft.
After all horses have run through the drive and gearbox, an average of 19 of them arrive at the rear wheel.

Our test bench diagram also shows the rear wheel performance of Manuel's GP1 ...

A very good result for the first litter. Maybe even with a few modifications to the Air Filter and Power Type still some achievement can be found.
A longer gearbox couldn't harm the GP1, with the original 125 gear ratio, Vmax is achieved at 110Km / h. Sufficient power to clearly penetrate into the range of 150Km / h is definitely available.
A pair of Malossi Torque Drive has already been installed. Faster throttle response from narrower corners and better acceleration result from this measure - an effect that can only be experienced on the road and that no test bench diagram reflects - so GOOD RIDE!

Today a very nice Rally 200 was presented on our test bench.

The project to get an everyday tractor engine was well met here.

A serves as the basis PX200 motor, the rotary valve in the housing has been subtly expanded for more inlet angles before TDC. An original Piaggio comes as the crankshaft PX200 shaft used that was not processed.

The new 210 Polini will have a SI26 carburetor with Polini velocity stacks ventilated.

By the Polini velocity stacks the available torque increases very clearly in the lower speed range. For a comparable engine with Malossi cylinder Without the Polini funnel, almost 4Nm are “missing” in the same speed range!

On the outlet side, the Alu-Polini is fed by a SIP Road Exhaust supports.

From idle speed, there is a lot of torque and power.

18PS at 6000rpm and 23Nm from 4500rpm speak a clear language.

With a long Primary translation the torque, which is practically in abundance, can be stretched and high speeds can be achieved at relatively low speeds.

Very nice device!

The ESC season is just around the corner and with it the preparations. This year we will see new engines and vehicles on the racetracks in Germany, France, Austria and Hungary.

A typical K1 engine has appeared on our test bench and is checked for its performance and functionality.

The ESC rules accordingly, the stroke is limited to 51mm.
Hence in this case one comes BGM crankshaft with 51mm stroke and 105mm connecting rods are used.

The one enthroned on the case Polini Evo is from one, with 0,35mm carbon material converted to 2 flaps Polini membrane with Strohspeed intake manifold ventilated. For the mixture preparation there is a 33 Keihin responsible. To keep the crankcase clean, the air is passed through a Marchald air filter sucked in. The very good air throughput of the Marchald filter and the resulting very low power dissipation in the per mille range make this filter, which has been tried and tested on the road, also interesting for racing use.
Ignition is via Vespatronic, which is set to 24-16.

On the outlet side, the K1 will be represented by one French charged.
Good torque values ​​and moderate speeds make this exhaust very interesting for the circuit.

The power generated is currently still on a reinforced XL2 coupling DRT Runner countershaft transferred, but more on that in a moment. Now first curve discussion:

All in all a typical Franz engine, Reso entry between 5500 and 6000 rpm, peak at around 9000 rpm and funny overrev up to 10.000 rpm.

With 11PS at 6000 rpm in the ascent it is also quite pleasant to drive.

With over 20 hp from 7300 rpm to approx. 9700 rpm, you can always move in the power range if necessary thanks to the Runner auxiliary shaft.

Now comes the crux of the matter, the clutch apparently disengages at the torque applied here, at almost 20Nm it's simply over. That means in plain language, the engine is opened again and it becomes a Hartz4 coupling installed.

Perhaps then something will change in terms of power and torque.

Even if the performance does not increase any further due to a clutch that does not slip, at least wear is stopped. A slipping clutch is likely to burn within a few laps on the racetrack or on the road after a trip in the country and can also result in consequential damage.

Maybe we can still find time to make a portmap of the cylinder.

Yesterday our friend Ercole was with us again with his Lambretta D Racer. You can find the blog entry about his first visit with us here. His racer was tuned for the Cologne circuit on the Nürburgring so that nothing stands in the way of the race.

Setup has changed as follows compared to his first visit: 30 series VSH carburetor

The blue curve shows yesterday's test run and the red curve from his first visit a year ago. 1HP more power and better torque were the end result. That Scooter Center Team wishes good luck on the Cologne circuit.

Thomas from Aachen visited us with a rather bizarre conversion concept on his Smallframe Engine.

In here comes from the Malossi program 172cc cylinder used, which is actually intended for the Piaggio automatic models TPH and SKR.
With some effort, Thomas was able to put the cylinder on a Vespa Smallframe Adjust the motor housing.

You can find more detailed information on this in the GSF

Some of these individual projects bring about rather dubious "improvements for the worse".

In the case of Thomas' engine, however, one can speak of a very suitable conversion.

In comparison, you can see an early one in the diagram VSP and a typical Smallframe Exhaust, the Franz.

All in all, these are extremely good values ​​that are sure to be easy to move on the road. It doesn't always have to be the Ü30PS, the corresponding torque also makes you fast, fast.

Installation of Vespatronic ignition

The Installation of the Vespatronic requires real interpretation work on the subject of electrics.

To make matters worse, the fact that the currently enclosed connection diagram is not correct.

Here you will find the Vespatronig and a large selection of Vespa ignitions

If you were to believe the circuit diagram, you would simply have to put the mass and excitation voltage together and then redistribute them to connections 1 and 2 of the CDI.

From the ignition base plate, it is of course correct to connect red / black to -1- (the wider slot), again connected to green of the wiring harness and blue to -2- (the narrower slot), connected to black of the wiring harness.

There is a great risk of confusion in the cable box, where different colors have to be brought together. We have provided all cables on which there is voltage when the plug-in connections are loosened and the engine is running. The ground connection does not pose a potential danger and can be equipped with a plug.

So that one does not confuse the two cable connections excitation voltage and on-board network, which are each equipped with a plug-in sleeve, one can memorize “blue sea under yellow sun” - well - in practice it works ...

We place the ignition base plate on the later of the two markings as a test.

As soon as we have put all the glory in the cable box and the pole wheel is reassembled, we start the engine to check the ignition timing.

We have already determined and drawn the markings for the OT and from OT 25 ° beforehand by means of a reversal measurement.

Flashed off briefly.

The ignition is at 25 ° at 2000 rpm-1, a good starting point for a run on the test bench.

The goal was to have a 25hp engine, but look at the diagram for yourself.

Without an air filter, the 148 main jet was still OK, with the filter we had to install a 145 and move the NAPE needle by a clip to the 2nd position from the top.

19PS at 6000rpm-1 and 25Nm speak a clear language. Even at 8600rpm-1 there are still over 20Nm and 25HP on the rear wheel. With this power range there should be no gear connection problem. Unfortunately nice…

To get an impression of how fast the whole load could be in the end, we do another run, HP versus km / h.

At 140Km / h there are still 24PS available ...

What do you all mean? Mission accomplished?

Now we just have to attach the rest of the parts and then it's off to the road for a practical test ...

“Last minute” Dennis has his Polini Evolution with us on the P4.

The key data of the engine:

Carburetor PWK38

Crankshaft BGM 54mm

Ignition Vespatronic

The Falc exhaust pushes the usable tape backwards. The slightly higher peak performance of the Falc is due to the lower speed level and the resulting higher torque of the Big bertha opposite to. It is questionable whether the 1,3 HP extra power of the Falc will then pay off….

The significantly earlier power and torque entry show the typical character of the Big Bertha. The higher performance before the start of the resonance makes the Bertha by far not as aggressive as the Falc, which is over 800 rpm-1 later and feels more like coming out of the cellar.

Here are the absolute values ​​of the two systems:

Falc: 33,5HP @ 10245 rpm-1 // 23,2Nm @ 9954 rpm-1

Bertha: 32,2HP @ 9305U / min-1 // 24,6Nm @ 9150 rpm-1

Falc: 20HP @ 7600 rpm-1

Bertha: 20HP @ 6800U / min-1

Today Jonas was our guest on our dynamometer.

With a Polini 133 in the gray cast iron version did the young man with our testFire magic After all, the exhaust already achieved a very impressive 28,3 hp.

In addition to the gray cast iron Polini, which Jonas worked on more than neatly, one can help Polini membrane , and a 35 Keihin PWK Carburetor the engine to its performance.

After a few small changes, we checked again today whether it managed to break the magical 30HP limit.

The first attempts with one French, Jonas own exhaust, looked very promising compared to the last P4 session.

The change from the red to the blue curve is rather simple. The cylinder was mainly lifted with a 0,5mm thick spacer at the cylinder base.

It is nice to see from the two curves that the increased control angle and the resulting smaller discharge has a greater effect on the functioning of the exhaust than the reduced compression and the lower mixture acceleration due to the larger squeeze dimension.

Sometimes less is more.

Unfortunately, the crankshaft gave up in the course of this series of tests, and the crankshaft stump on the pole wheel side sheared off.

28PS were probably a bit much for the simple racing wave in the long run.

The aluminum chips in the boost port do not bode well ...

Hoping it will Motor housing didn't catch too much, we already have Jonas with a new one BGM crankshaft 51mm stroke and 105 connecting rod equipped - with this the new attack on the big 30 will be carried out in the near future.

From our side - Jonas succeeded a lot !!

If you are also interested in finding out which exhaust makes a bullet out of your engine or is better suited for the big tour, then we can offer you a small selection of exhaust systems for testing on the test bench.

Contact:

pruefstand@scooter-center.com

We don't want to withhold that from you! The first test run of the 130 Polini EVO engine. The motor is still in the motor holder and equipped with jet nozzles!
Many thanks to Thomas the Second, who edited the video for us in his spare time. Thomas will soon be joining us at the Scooter Center begin. We are looking forward to it!

Last week Harald was a guest on our Amerschläger P4 to check the carburetor set-up of his 225 Monza and to optimize it if necessary.

Here are the key data of the engine:

Cylinder: Monza 70mm bore

Crankshaft: BGM 60 / 110mm

Carburetor: Mikuni TMX 30

Exhaust: JL-KRP3

Steering angle: 186 ° / 126 °

Crush dimension: 1,7mm

The diagram shows the change from the red to the blue curve.

By using a thicker slider and changing the needle position, more pre-resol power and more overrev could be realized.

Sven Kauke presented his current project to us on Saturday.

A very successful concept in our opinion!

The inner values ​​were then checked on the test bench. To explain, we would like to add that the cylinder itself has not undergone any revision, so it was plugged onto the engine as it is delivered by Parmakit.

In this case, the measured control angles are 128 ° / 190 °. With a little more outlet angle, the Bertha would surely conjure up a completely different curve - maybe Sven would like to work the cylinder again with his fingers.

Here are the key data:

Cylinder: Parmakit SP09

Crankshaft: BGM 51/105

Carburetor: Keihin PWK 33

Suction system: Polini membranes on 2 flaps with Straw speed connector

Ignition: Vespatronic

Exhaust: Big bertha

Race team colleague Dennis chased his long-distance engine over the P4 with us on Friday.

Here are the key data of the engine:

Cylinder: Parmakit 144ccm, 60mm bore

Crankshaft: BGM 51/105

Carburetor: Keihin PWM 38

Exhaust: Big bertha

With an initial nozzle, auxiliary nozzle 52, main nozzle 160, needle DEG, a very useful result was achieved with the “first firing”. With the built-in 2: 46 primary from DRT is that certain
very nice engine for long distances like the Nürburgring or the Bilster Berg.

Vespa exhaust test

As part of our development of the 125cc cylinder for the PX80, different exhaust systems were tested on a completely original PX80 in order to have references available for comparison.
We tested the following exhaust systems:

Original Piaggio (green curve)
SITO Plus (red curve)
SIP Road (blue curve)

It is remarkable how brave the Sito Plus does against the strong Road. Up to 4500rpm, the original pot is not only at eye level but even a little bit stronger to then say goodbye to the other two in a spectacular way.
As expected, surprises cannot be expected from an exhaust change on such a tame cylinder. The absolute numbers only result in a difference of a maximum of half a horsepower.

However, it is more important to consider the performance curve here. So the engine with the Sito Plus at 7000rpm still has a remarkable 5HP on the rear wheel, the original pot only has 3,5HP.
The 7000 rpm correspond to approx. 80 km / h in fourth gear (the diagram shows measurements in third gear). So there are only 2,5 HP more on the rear wheel by changing the exhaust with the Sito Plus.
The result is that the motor can maintain this speed much better without being forced to its knees by increased driving resistance such as an incline or headwind.
The SIP Road, on the other hand, has more torque in absolute terms, but this is applied much earlier and, in direct comparison to the Sito Plus, is only noticeable in the draft or mid-speed.
Here, the final translation might have to be lengthened somewhat in order to utilize the full potential of the system.

This week there is the final report on our conversion cylinder for the PX80. With this complete kit, each PX80 can easily be brought up to 125 cc displacement and benefit from the significantly lower insurance rates associated with it. All you have to do is change the cylinder including the piston and head, the short motor remains unopened!

Originally the 80ccm engine has about 5HP on the rear wheel.
The SCK conversion cylinder increases the performance by a whopping 60% to a remarkable 8PS, all with extreme reliability.

We are already above the level of a DR135, despite 10cc less displacement!
The diagram shows the direct comparison between the DR135 (red curve) and the new 125cc conversion cylinder.
In conjunction with a longer gear ratio (possible by simply replacing the clutch pinion), the top speed is also greatly improved.

Another big plus point is the significantly cheaper insurance due to 125 cc displacement instead of 80 cc.
In addition, with a vehicle that has been converted to 125cm, you are not only more confident and cheaper on the road, the consumption is also usually cheaper because the significantly higher torque means that you no longer have to constantly drive at full throttle in order not to represent a traffic obstacle.
Something that may only become apparent at second glance is the significantly improved resale value of the vehicle. Holders of a car driver's license, if it was issued before April 01.04.1980st, 125, are able to drive motorized two-wheelers up to XNUMXccm without having to pass an extra test.
As a result, the market value of the 80cc vehicles specially designed for the German market was reduced substantially overnight. Anyone who has the appropriate driving license will use a more powerful 125cc vehicle than a weaker 80cc drive.
The conversion will make the vehicle much more attractive for a possible sale.
All in all, the cylinder purchase pays for itself quite quickly.

Two vehicles equipped with the conversion cylinder were on the road for several thousand kilometers without problems or breakdowns in 2011. The drivers are very satisfied with the performance and the low consumption.
We will test a few more optimizations during the week, especially with regard to performance, and then give our GO.

Here is a direct comparison between an original PX80 with SITO Plus sports exhaust (blue curve) and our 125cc conversion cylinder with original exhaust (red curve):

[Nggallery id = 6]

As already announced, Polini brings the 210cc cylinder in a version for use with a crankshaft with 60mm stroke (standard 57mm). The already available cylinder for 57mm stroke can only be driven to a limited extent with a crankshaft with 60mm stroke because the piston has an upper so-called L-ring.
This type of ring includes or forms the upper piston closure, so it controls the channels and not the piston upper edge as usual. If you now use a crankshaft with a 60mm stroke, the 3mm extra stroke must of course go somewhere ...

Since the piston moves 1,5mm more up and 1,5mm more down, the cylinder must theoretically be lengthened by this 1,5mm. For practical reasons, for the sake of simplicity, a suitably strong base or head gasket is simply used.
The problem with the two-stroke engine is that it also has an enormous influence on the exhaust and overcurrent control angles, which are important for the performance characteristics. To make matters worse, in the stupidest case you do not change both to the same extent, but usually take advantage of the overcurrent angle. Both values ​​(outlet and overflow angle) should always be in a ratio for the best possible power output.

In the case of the Polini, it looks like you are forced to use a foot seal. If you were to use a head gasket, the L-ring placed very high on the edge of the piston would simply rebound out of the raceway.
If a foot seal is used, the control angle is generally raised and, as already mentioned, the values ​​are taken advantage of in favor of the overcurrent angle.

This can lead to the engine starting too late with its power output and also being stalled in the upper speed range by a pre-exhaust angle that is too small (the angle that the piston releases the exhaust in front of the overflow ducts). This means that it can turn down further, but the power curve drops very quickly after the power peak.

In order to preserve the characteristics of the Polini, it would be better to recommend the use of a head gasket to compensate for the multiple stroke. As mentioned above, this is not possible with the standard Polini piston, otherwise the piston ring would rebound.

Facts ...

If the Polini 210 comes with 57mm crankshaft used, it has a very touring-friendly 123 ° overflow angle and 171 ° outlet angle.

When using a crankshaft with a 60mm stroke and a 1,5mm thick base seal this changes to approx. 135 ° / 179 °.
In other words, the overcurrent angle increased by a full 12 ° CA, the outlet angle, however, only by 8 °.
Both the absolute increase in both values ​​and, in particular, that of the overcurrent angle lead to a later increase in power. The whole thing can be done very well by using a tame, broadband touring exhaust system like one SitePlus, SIP Road be compensated.
The exhaust then still ensures good performance in the lower engine speed range, the greatly extended control angles allow the cylinder to rev up further in the upper engine speed range.

230cc ???
One of our customers (Thomas aka schoeni230) has exhausted the whole thing even further and a Polini 210cc aluminum cylinder with a special one 62,5mm long stroke crankshaft combined by Scooter & Service.
In order to avoid the problem of piston ring rebound mentioned above, the Polini was created here Piston against a counterpart of Grand Sport exchanged. This piston has only one piston ring and this is conventionally shaped and sits much deeper than the original L-ring in the Polini piston.

This made it possible to let the piston run out of the cylinder by the measure,
as the piston ring just gave:


As a result, the cylinder did not have to be lined very strongly at the cylinder base (approx. 0,4 mm) so that the control angle did not get too much out of balance despite a multiple stroke of a full 5,5 mm.
So the cylinder ran at ~ 133 ° / 179 ° and a special cylinder head that accommodates the piston in the head.
Due to the multiple stroke, the piston clearly undercuts the overflow channels at bottom dead center:
In connection with a modified Sito Plus exhaust (similar to the PEP3 exhaust), the engine impresses with its enormous torque in the lower rev range, an insane range and, measured by the exhaust type used, a very good top performance.

The carburetor was a 35mm Keihin PWK on a scooter & service Diaphragm intake manifold (myth V-Force membrane) used. One came as an ignition Vespatronic for use.

The cylinder has hardly been redesigned, only the outlet has been changed minimally in width and height.

And finally ...
Despite the very long steering angle, it is an enormously mobile and broadband motor that is sure to be the best for a touring rider. Full torque from the lower speed range and still still 20PS at well over 9000rpm.

Certainly not something that can be recreated, furthermore it is often problematic to let the piston extend that far out of the cylinder. Not only because of the then mandatory head centering to ensure that the piston does not hit the head, but also because of the increased thermal load on the zone above the piston ring.

The new Polini 210 for 60mm stroke will make the whole thing feasible for 'normal' screwdrivers, especially with a much cheaper 60mm stroke shaft. With it, many will certainly be able to build their 'dream' touring engine which combines a full torque with a wide speed range and a very good peak performance!

For those who find it takes too long for the 60mm Polini with 221cc to hit the market, this article encourages you to try out unusual combinations. Ie a Polini 210 for 57mm stroke with a 1,5mm base seal and 60mm crankshaft can also be expanded into a very nice touring concept.

In the sense of a well-known one (Harry B. from E.): try it, it works!