Exhaust -BGM PRO BigBox SPORT (BBS) - Vespa PX200, Rally200 Item no. BGM1011SP

Now available again: bgm BigBox Sport exhaust Vespa PX200

Performance like a racing exhaust - optics and acoustics like a series exhaust

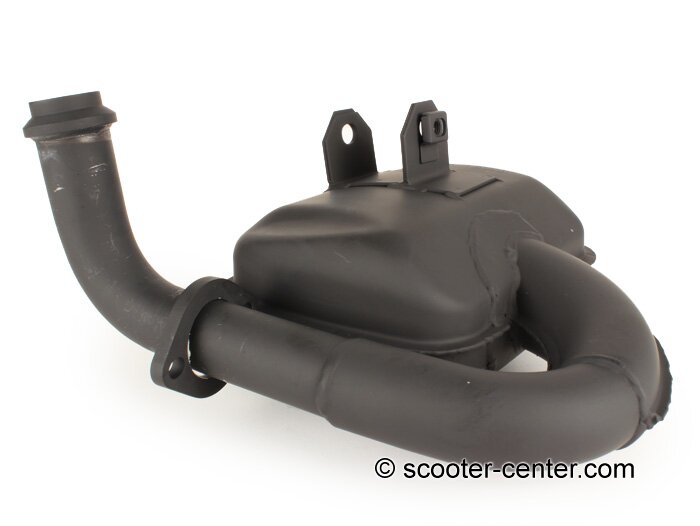
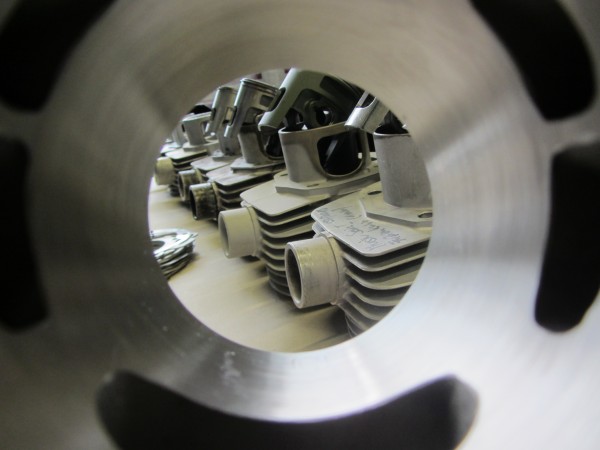
The BGM BigBox Sport is a thoroughbred Vespa racing exhaust, in the unsuspicious design of an original exhaust. Just like the original Vespa exhaust, the BigBox is of course double-walled and provided with insulating wool. It positions itself as a clear alternative to eye-catching and mostly loud copies of our original BigBox and large resonance exhaust systems. The high level of motivation clearly sets the bgm BigBox Sport apart from other boxing facilities. Designed for performance-oriented drivers who appreciate the benefits of an inconspicuous vehicle.

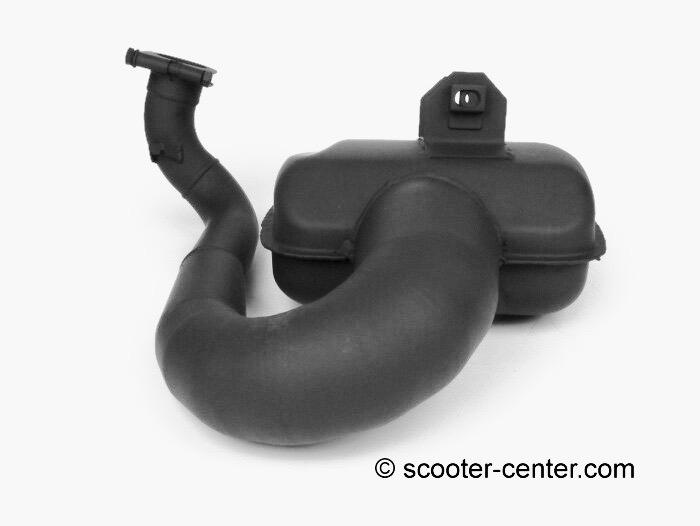
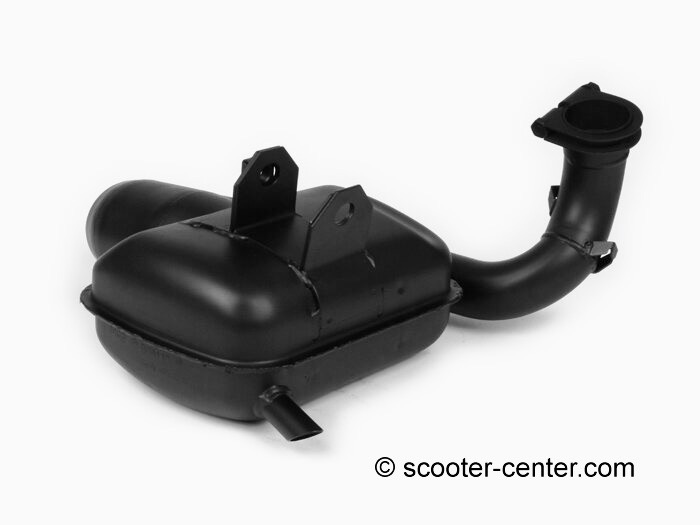
Real Vespa racing exhaust

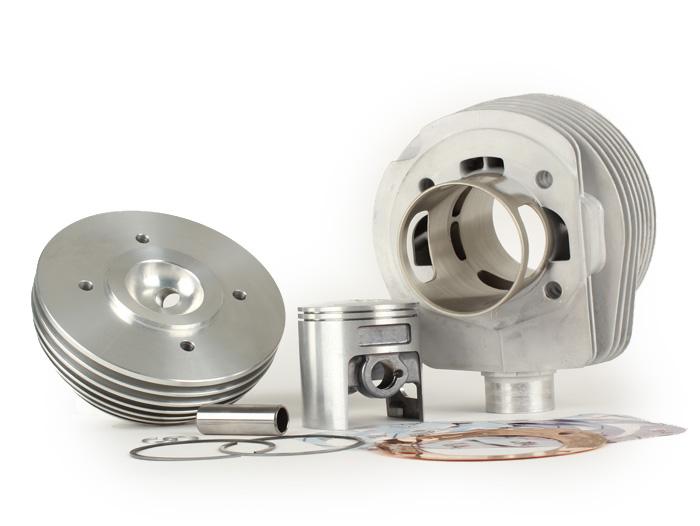
The Sport Box, like everyone else, needs it good racing exhaust, a powerful engine concept to develop your full performance. In the environment of cylinders such as the Polini 210, Malossi MHR and Co., it offers impressive results. It also supports engine outputs above 25PS without any problems and pushes ahead with full torque. Despite its high peak performance, the Sport Box gets in early and also enables comfortable driving.

Due to its consistent design for a high gas throughput, the BigBox Sport is not intended for use with near-series engines or tame tuning cylinders. It needs a clear and powerful outlet impulse to fill the large volume and the thick elbow of the Sport Box with life.

Order your Vespa sport exhaust now

PRO:

  • Original optics
  • Quiet thanks to the double wall and insulation wool like the original exhaust
  • Top performance like a resonance exhaust
  • No performance hole
  • Broad speed range
  • More top speed
  • Very unobtrusive
  • Also fits rally / sprint without modifications
  • Solid construction with clamp on the cylinder
  • Handcrafted in Europe

CONS:

  • Not for vehicles with 8 inch tires (ground clearance too low)
  • Not for near-series engines

Heads-up: Choose the main jet about 4-6 sizes larger than with the original exhaust.

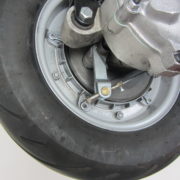
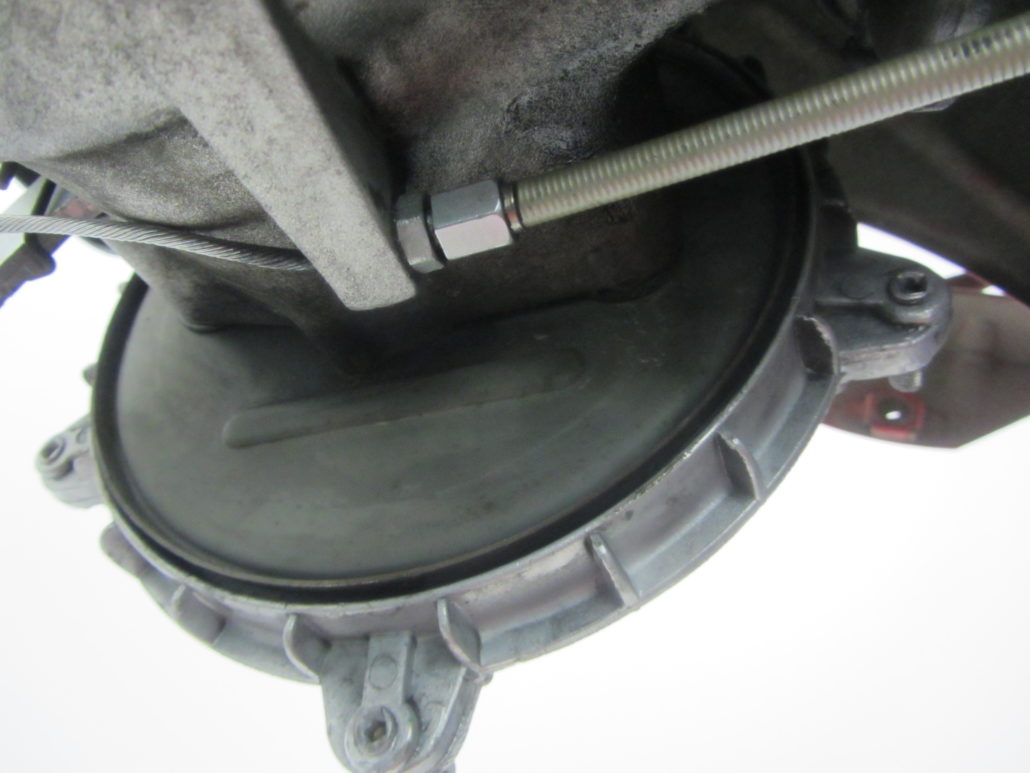
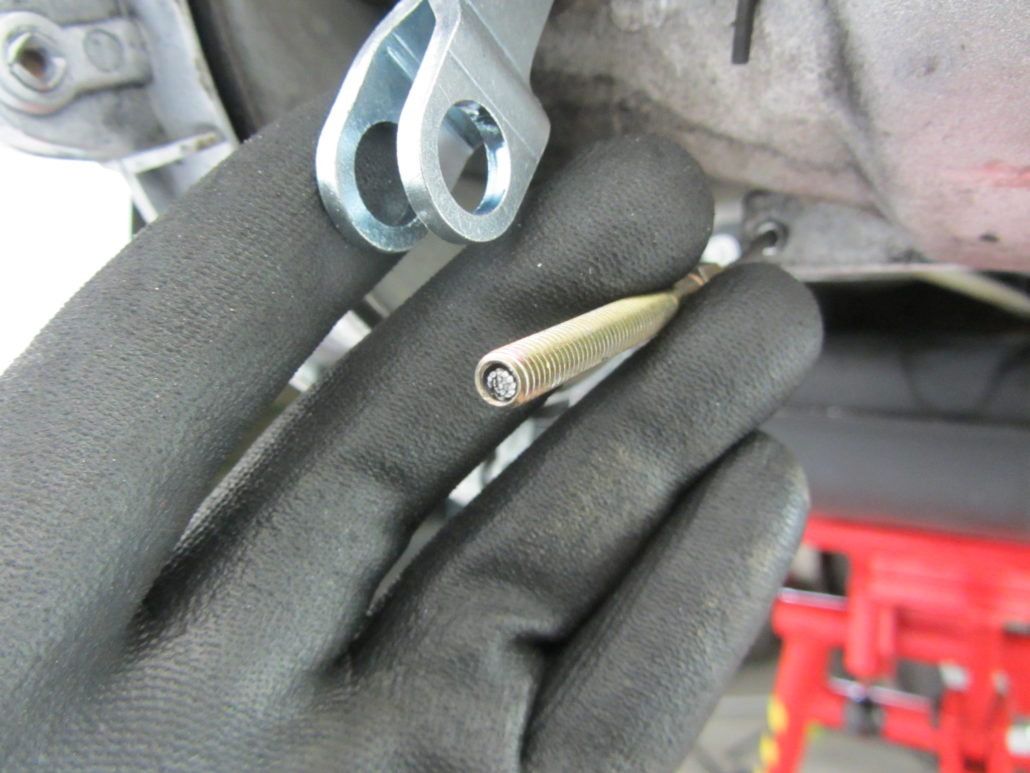
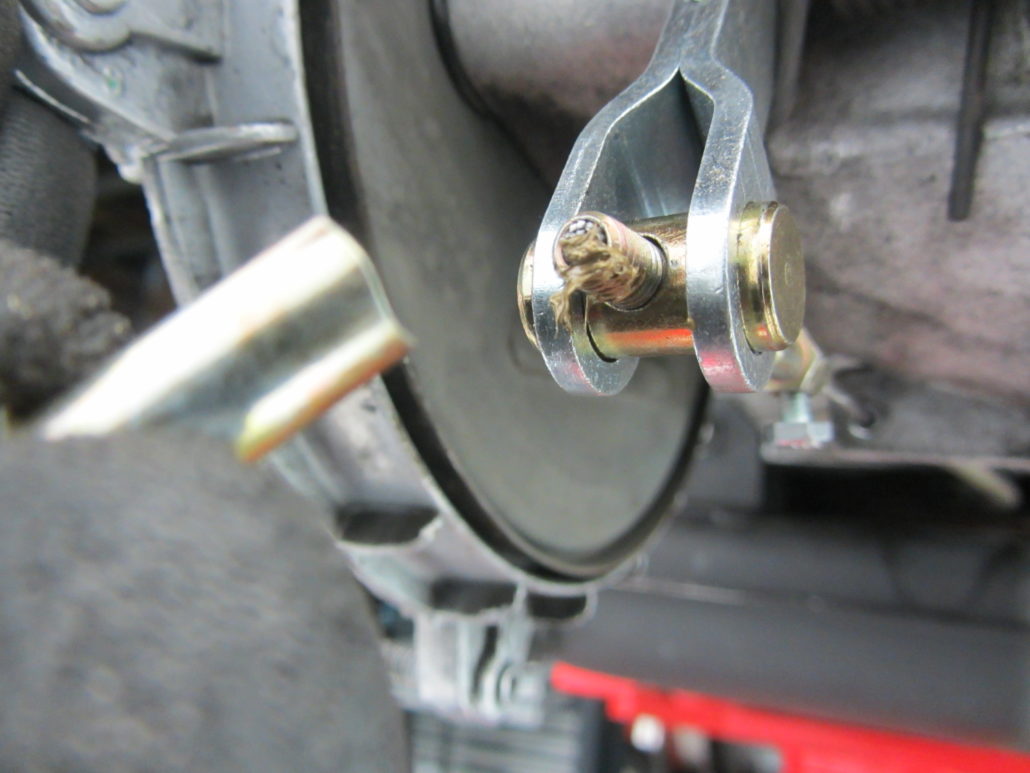
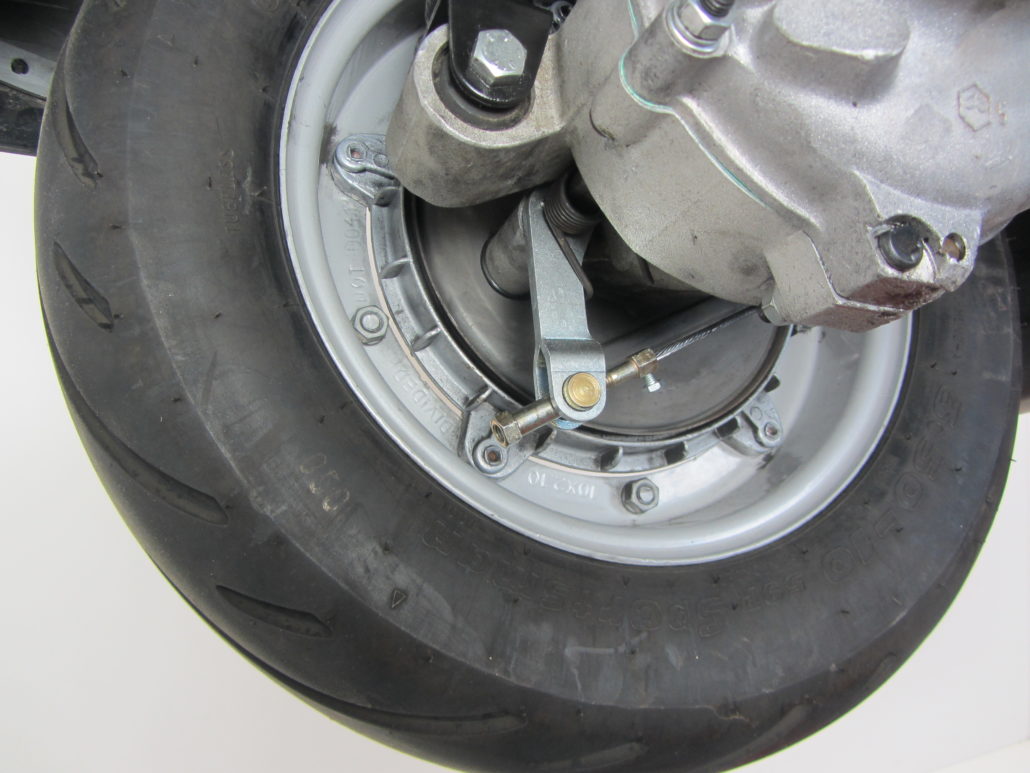
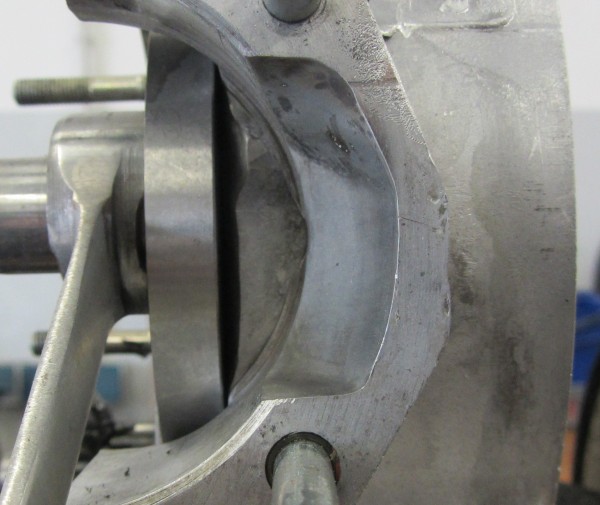
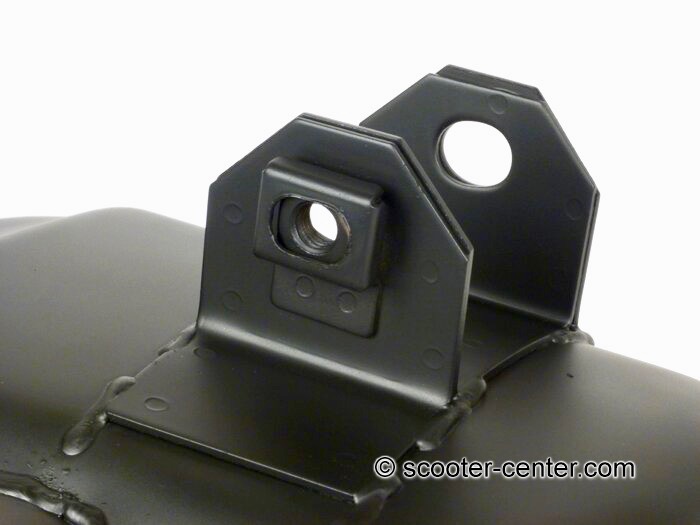
The elbow is attached to the cylinder using a clamp. Compared to loose fastening with an O-ring seal, this results in the best stability and prevents damage to the outlet flange. A long spacer should be used on the rear shock absorber for optimal ground clearance.

And finally ...

Pure understatement. Performance like a racing exhaust, optics and sound similar to an original exhaust.

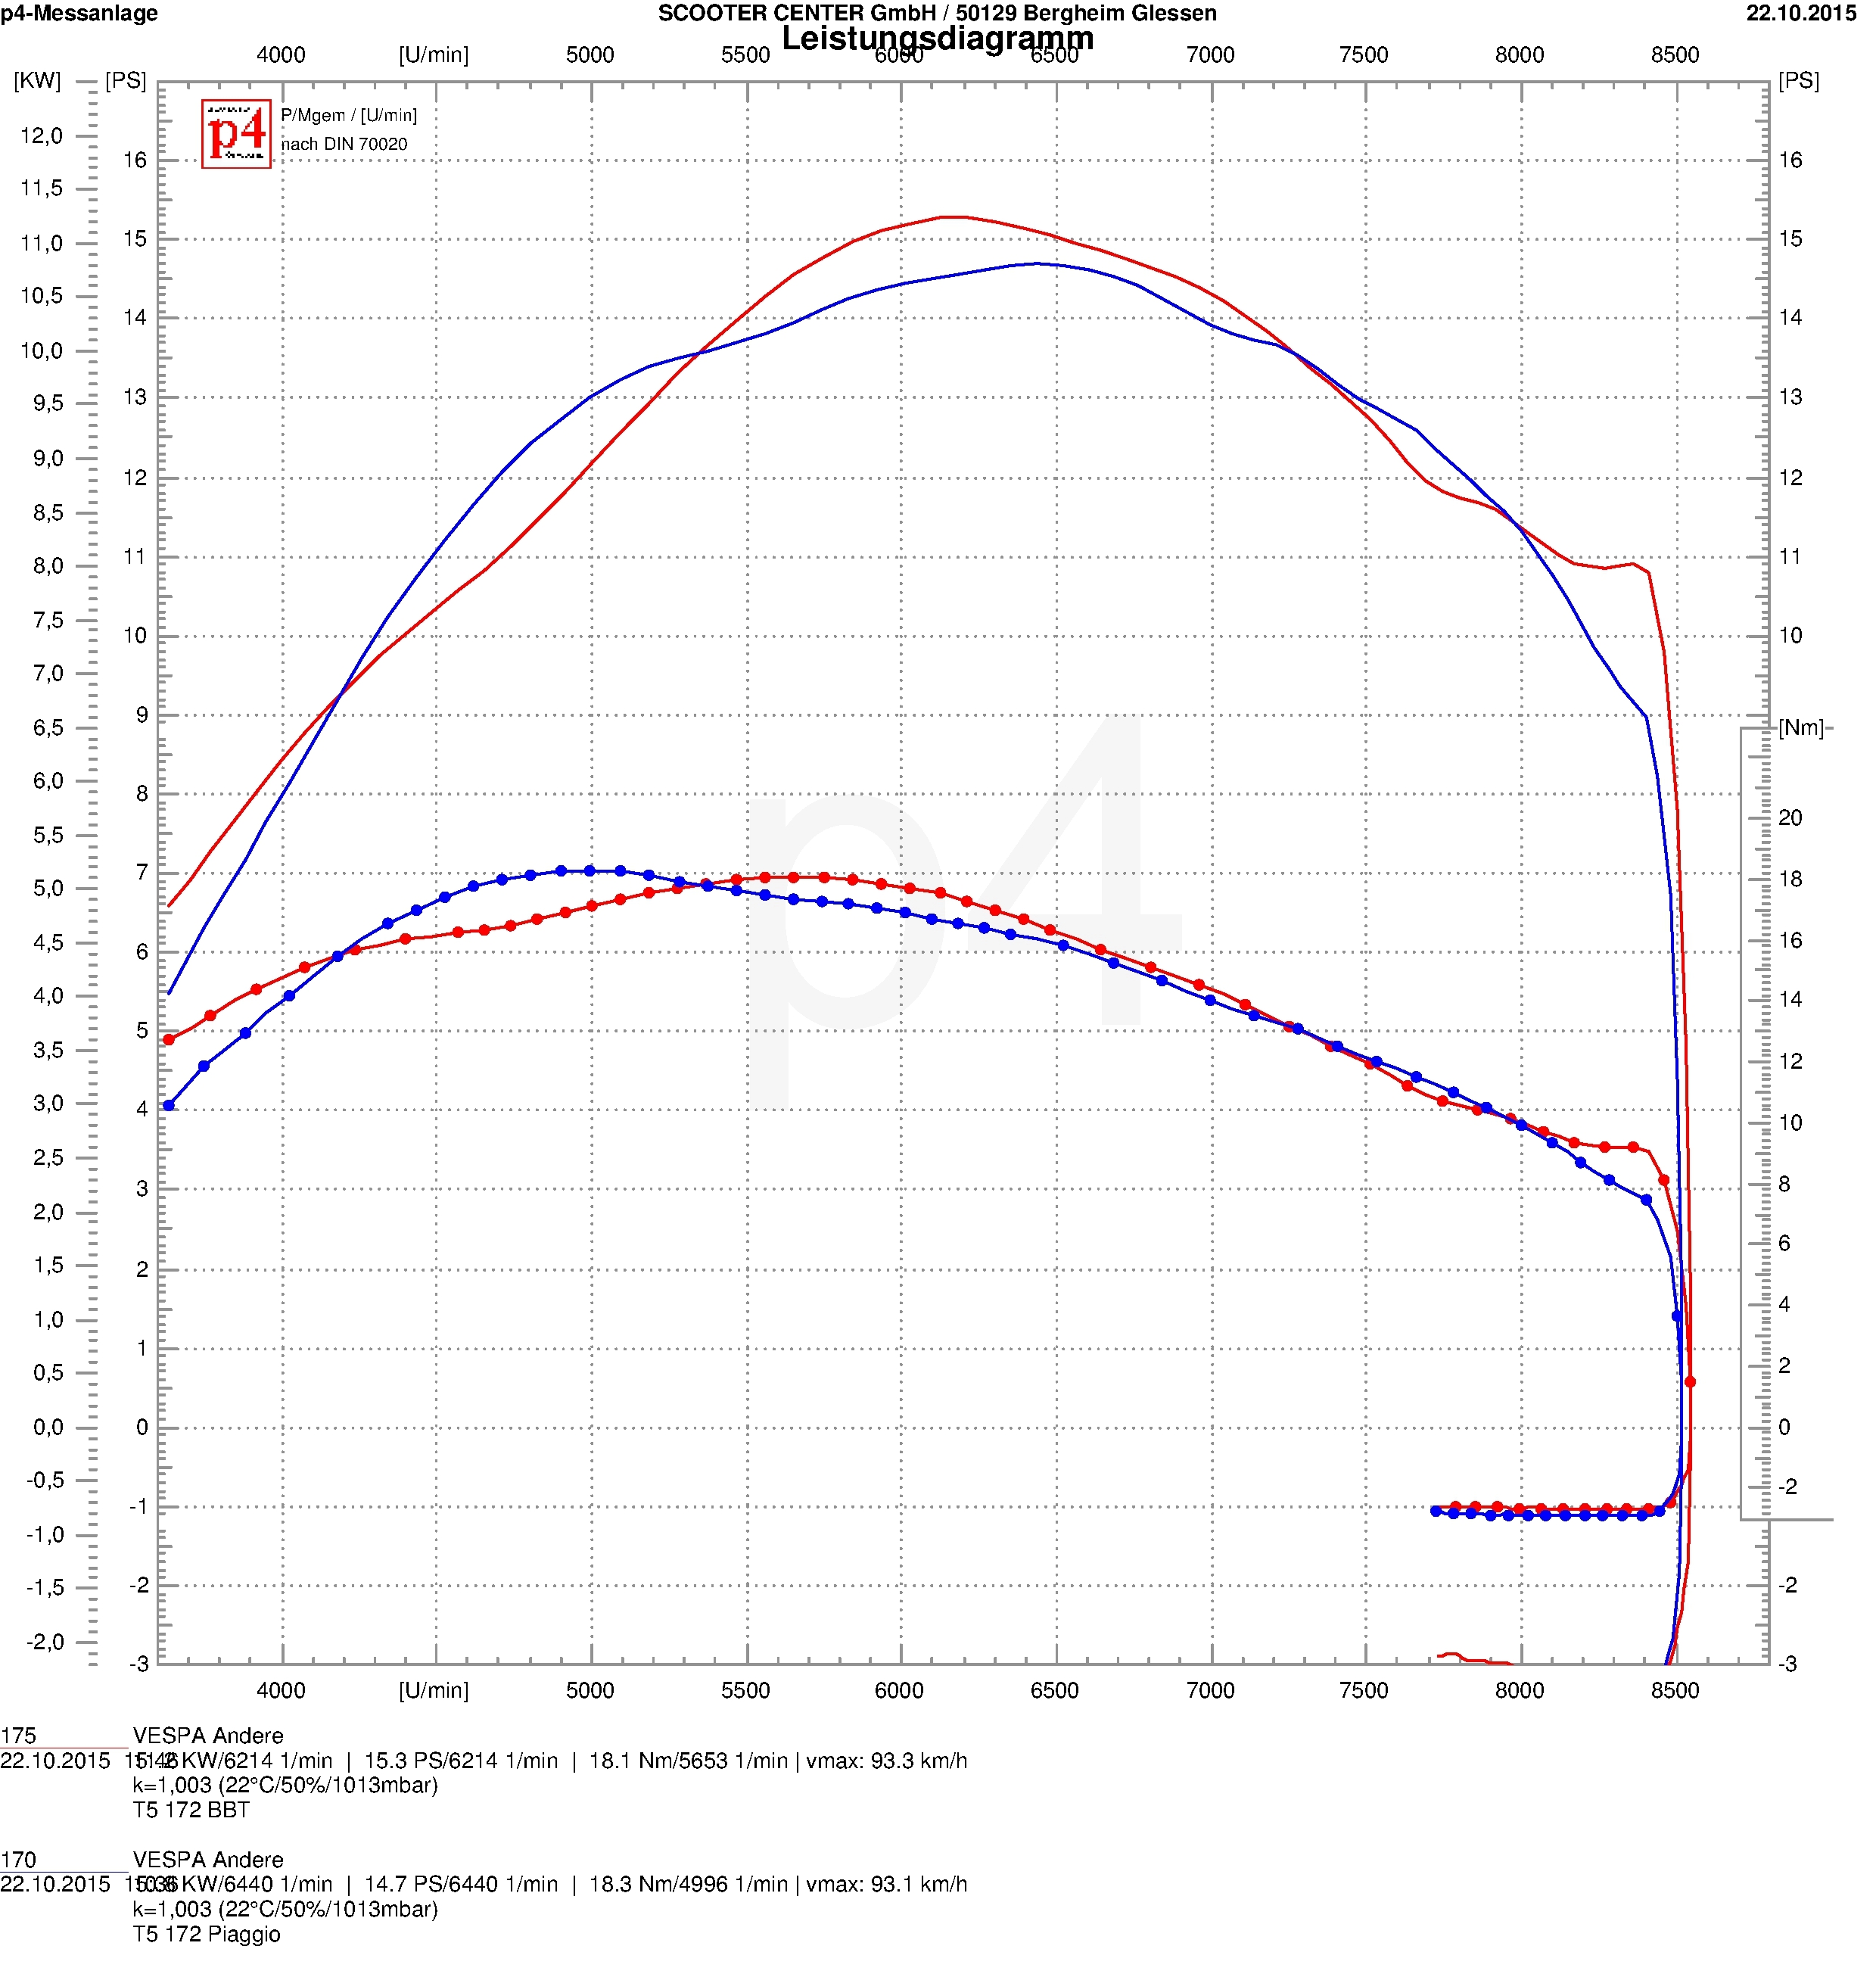
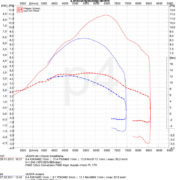
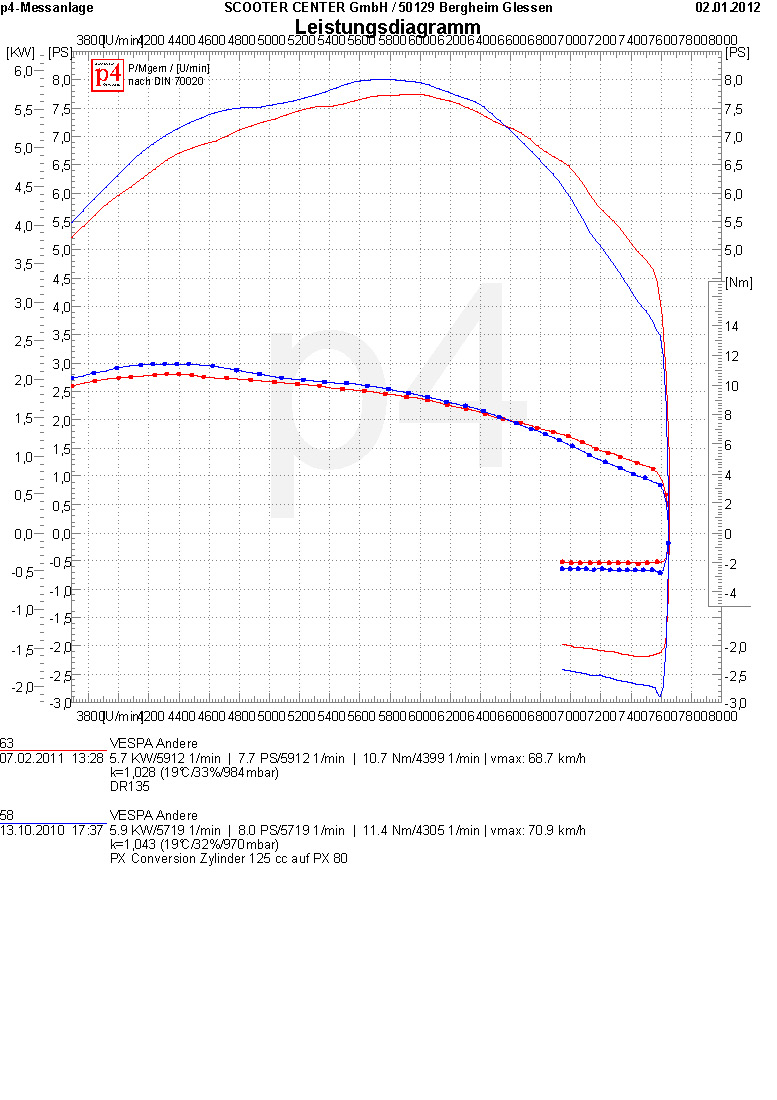
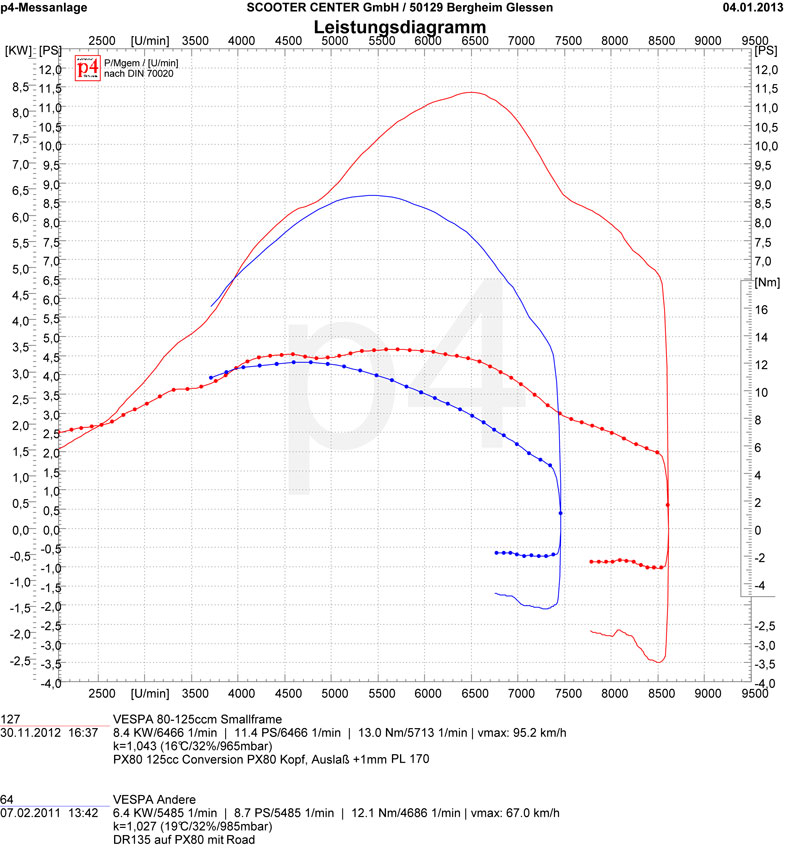
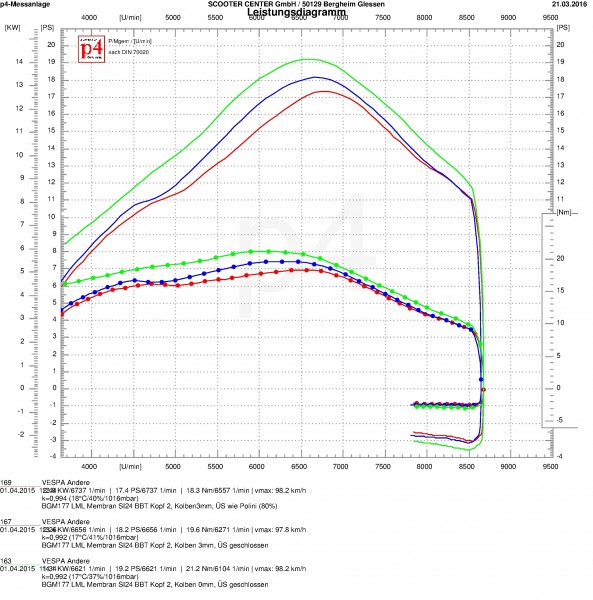
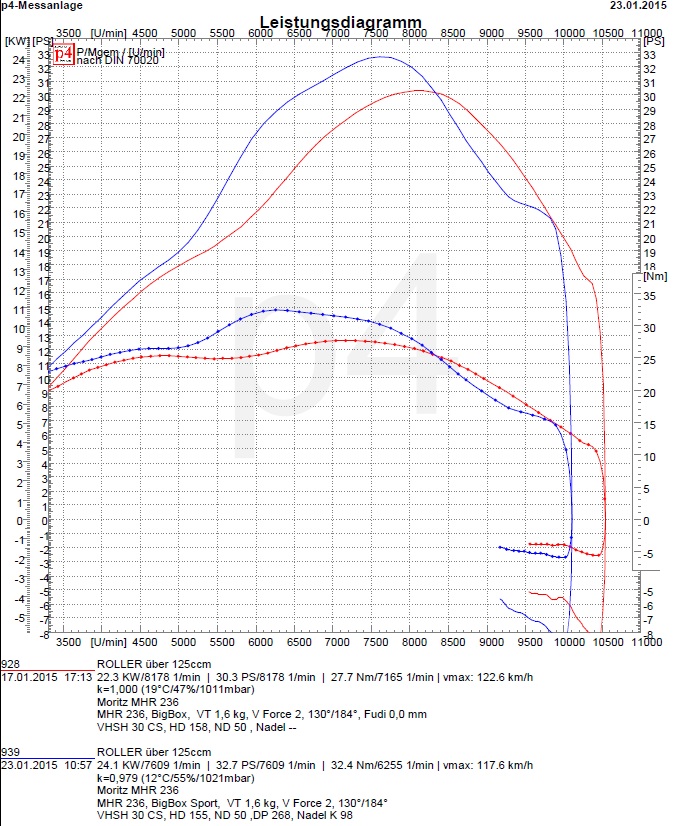
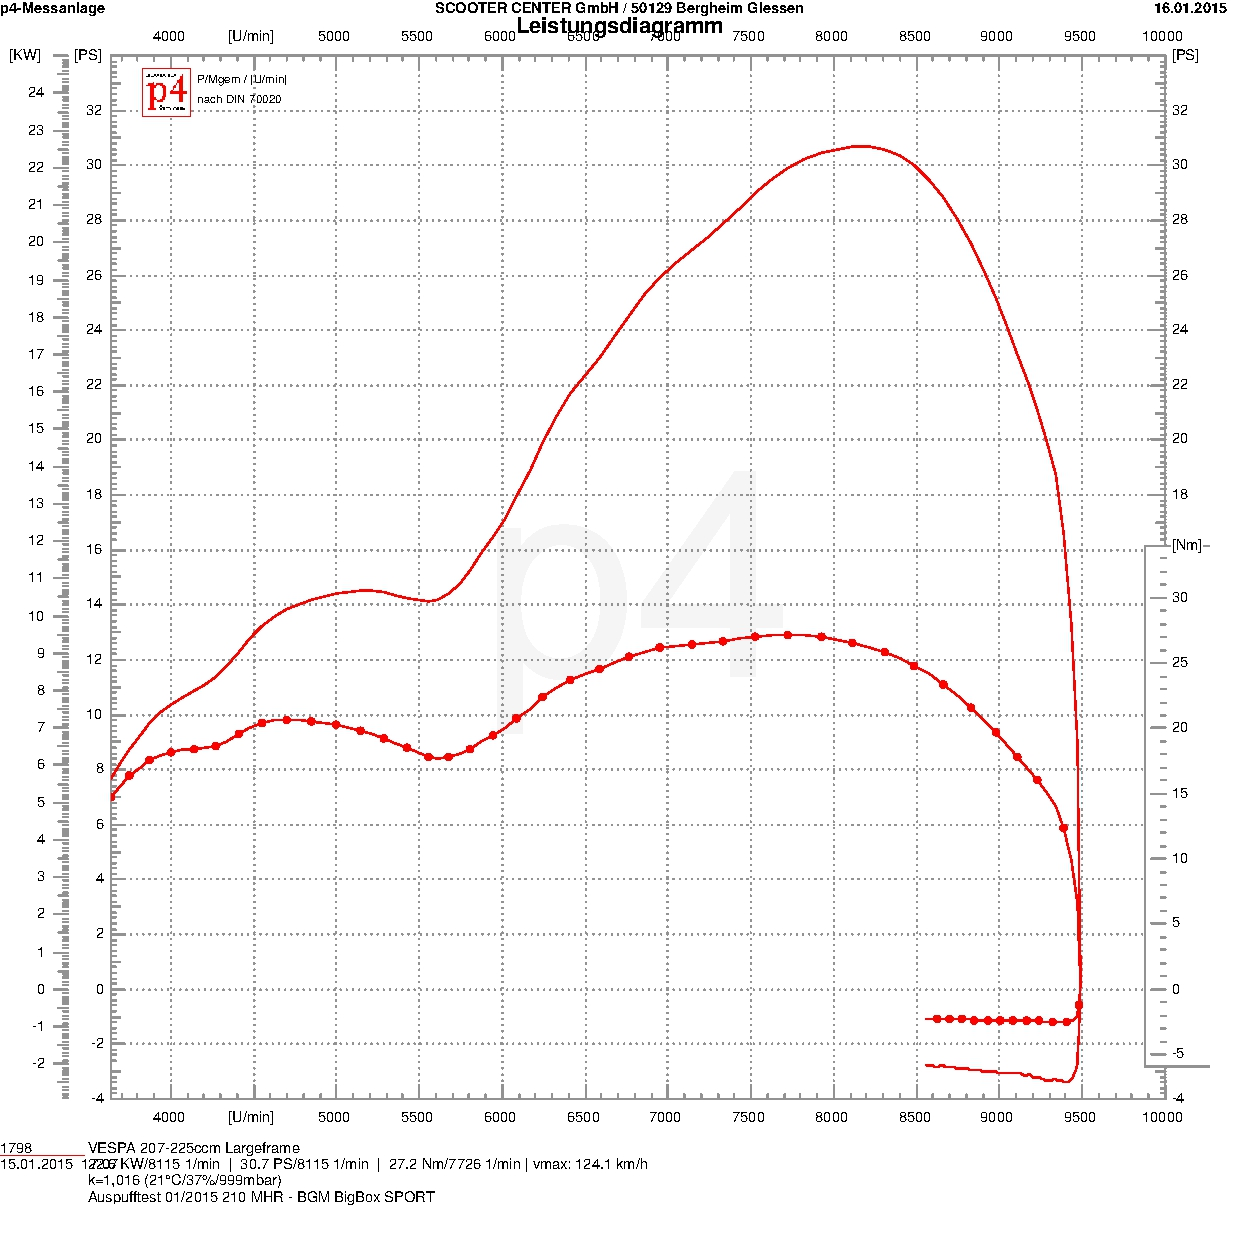
Performance diagrams Vespa exhaust BigBox Sport 200

Polini 207

Polini 207 plug & play on original PX200 engine.

Malossi MHR 210 (unprocessed)

Malossi MHR 210 on crankshaft with 59mm stroke, membrane inlet, PWK33, QK: 0,95mm, 1mm base gasket, 0,5mm head gasket

Malossi MHR 221

64mm stroke (= 236ccm), reed valve inlet, 30mm Dell'Orto, 130 ° / 184 °
Red curve = BigBox old
Blue curve = BigBox Sport


Order your Vespa sport exhaust now
Brake T5 rear 005 (2)

Conversion to adjustable brake cable Vespa PX, Rally, Sprint,

The brake pad wear of the front brake of the PX series up to 1998 and the PK-XL can be easily adjusted without tools using the well-known knurled screw on the brake cable.

On the Vespa PX125T5, this luxury can even be found on the rear brake.
With this model, Piaggio has already seen that the fiddly-to-use adjusting screw in hard-to-reach places is no longer state-of-the-art.

We leave the no longer available Piaggio original part of the T5 in excellent quality reproduce.

Greater braking force with the same pedal force

The brake arm fits almost all Vespa Largeframe Models and is one meaningful improvement especially for all PX before 1984, as well as rally, sprint and co, because the brake arm is longer and a greater braking force is generated with the same pedal force.

Our practical conversion kit

With the Set for retrofitting every PX can be brought up to the state-of-the-art.

The solution for perfectionists with a T5 brake cable

In order to carry out the conversion, a slot must be made in the cable guide of the brake pedal. The T5 brake cable has a cast nipple at each end and can therefore no longer be threaded through the bare hole in the cable guide on the pedal. In addition, the M8 set screw on the PX engine blocks must be removed and drilled to the size of the brake cable abutment.


The simple adapter solution

Those who shy away from the effort described above can easily fall back on the variant with our adapter for the pulling thread:

If the brake cable is not to be completely replaced, we also offer a fast one Adapter solution

Conversion for Largeframe Our Oldies

For the Vespa Largeframe Models with an external brake pedal, such as Vespa Rally, Sprint, VNA, VNB, etc., can also be converted either with the adapter or with one loose brake cablethat has one end with the matching thread.

The simple installation using a Vespa PX

Here we briefly present the conversion using the example of a Vespa PX.

In order to be able to replace the brake arm, it is necessary to remove the brake cam.
In order to gain access to the cam, the rear wheel and the brake drum are dismantled.


cap and Sapwood remove


Dismantle the rear wheel


and then the brake drum remove.
ohne impact wrench is the Holding tool for Vespa and Lambretta brake drums a real help.


If the brake drum is removed, the brake shoes are freely accessible. Here it is worth taking a look at the position of the brake cam.
If the cam is almost 45 ° inclined to the brake shoes with the brake pedal unloaded, as shown here, this is an indication that the Brake shoes are soon worn out.


In order to be able to pull the brake cam a bit out of the guide, it is necessary to Brake shoes to remove. the Retaining rings can be removed quite easily.
However, care should be taken to secure the little nasty things against jumping away.


With a wider one screwdriver the jaws can be spread apart and removed one at a time. Shouldn't the brake shoes
are replaced, it makes sense to mark the installation position on one of the brake shoes. As can be seen in the picture above based on the abrasion,
the approaching brake shoe is subject to a different wear pattern than the decelerating brake shoe. Therefore, it makes sense to remove the brake shoes when reassembling
to put them back in their accustomed place.


After unhooking the spring for the brake arm is the Safety split pin accessible. Once the split pin has been removed, the Brake cam pulled out
become and gives the Feder and the brake arm free.


The brake cam is provided with a franking in which a Fat storage is introduced for long-term lubrication. Just fill up if necessary.


If the brake cam has the latest lubricant technology, the brake arm and the spring can be installed.


Do not forget the cotter pin before attaching the spring.


In this case, new brake shoes are used. To protect the guides from corrosion and to prevent the brake shoes from seizing up,
will be here copper paste applied.


With the main shaft as support, the brake shoes are placed in the guides.


The Mother the Lusso main shaft with SW24, for example, is fitted with a torque fastened by 110Nm.


Before cutting the old inner cable to length, check whether the Adjusting screw is on “0”.


The required pull length for the adapter can be determined based on the position of the brake arm. The pull should be right right up to the end of the arm
are sufficient. the Cable shears ensures a clean and safe cut without the cable fraying.


Push the adapter up to the end of the inner cable and secure it with the clamping screw. After the first test braking, check whether the end of the train
is still in the same position. If not, the clamping screw must be checked and retightened.


So that the adjusting nut on the adapter is easy to move at all times and does not corrode, a little copper paste can also be used here.


Mount the rear wheel again and the wild ride can go on.


DNperformance digital timing meter PT360

DN Performance 360 ​​° Port Timing Tool

Measure the steering angle of your 2-stroke engine professionally?
Up to now, this has only been possible with a relatively large amount of effort with Vespa, Lambretta and Co.

We have them now Digital Degree Disc -DN Performance 360 ​​° Port Timing Tool--  for digital measurement of the control angle in 2-stroke engines!

DNperformance digital timing meter PT360

DNperformance digital timing meter PT360

The new Port timing tool from DN Performance works extremely easily, can be used universally on almost any motor and measures to an accuracy of 0,05 °!

No annoying installation of a degree disk, no parallax (reading errors due to lateral viewing angle), extremely fast, extremely accurate! Simply fix it to the engine housing and connect it to the crankshaft using a suitable socket from the tool box.

TIPP: Useful and useful for this is ours gauge to measure the OT:

Dial gauge -UNIVERSAL 0,01-10mm- with holder

Item number. 8099009: Precision measuring tool for determining the top dead center and the ignition point. The suitable holder for mounting in place of the cylinder head is included.

Dial gauge -UNIVERSAL 0,01-10mm- with holder article no. 8099009

Measure timing via video

Check out this cool video on how to measure professional tax displays easily and quickly!

DNperformance digital timing meter PT360

DNperformance digital timing meter PT360 DNperformance digital timing meter PT360 DNperformance digital timing meter PT360 DNperformance digital timing meter PT360


Pinasco

Motor housing Vespa T5 from Pinasco

Just got us from Pinasco the news reaches us that the long-announced engine housings for the Vespa T5 should arrive next Thursday.

The engine housings of the rare Vespa PX125T5 have always been few and far between. We are all the more pleased that something is happening again with the products for the T5.

Diaphragm and rotary valve engines for Vespa T5

Pinasco now offers two alternatives. Like the PX motor housings also, it will for the T5

  • a classic Rotary valve (Master) and article number: PN26482024
  • a motor housing with Membran (Slave) give. Item number: PN26482025

In terms of price, the T5 motor housings are slightly higher than the PX variant lie.

More technical details We can only give you this when we have received the first motor housings in the next few days. We keep you here in Scooter Center Blog up to date.

Build T5 engine

The easiest way to complete such an engine is to order the appropriate engine revision kit: Engine revision set Vespa 125T5

Engine revision set -OEM QUALITY- Vespa T5 125cc article no. 3330409

Information about a super suitable Exhaust you find here Vespa T5 exhaust

bigbox-vespa-t5-bgm1012tr4

First pictures of the Pinasco T5 engine

Here are some pictures that Pinasco made available to us.

The motor housings are expected to be delivered with all fixed stud bolts and suitable silent rubbers for the motor cross-member and shock absorber mount.


Pinasco engine housing for Vespa

The Pinasco motor housings are very high quality replacement motor housings made of the finest die-cast aluminum. In addition to the very precise processing, they also offer many special features that are particularly interesting for tuners.
In addition to the significantly larger sealing surfaces on the cylinder base and carburetor inlet, Pinasco also offers the housing as a version with a diaphragm inlet. This suction technology, which has long been standard in the automatic sector, also offers large carburettors a good passage to breathe deeply. Further reinforcements in the cast, a larger crankshaft bearing and the great scope of delivery round off the superb overall picture of the Pinasco engine housing perfectly.

The housings are manufactured in two variants:
MASTER = ROTARY VALVE INLET (LIKE FROM THE PIAGGIO FACTORY)
SLAVE = DIAPHRAGM CONTROLLED

The engine internals and ignition components of all 125-200ccm models from 1982 onwards can be taken over. The components built from 1984 onwards are preferable due to the improved and more stable gearbox and the more powerful alternator. The motor of the COSA models is also well suited as a donor motor. Their engine block is outwardly different, but uses the same innards as the PX models from 1992 onwards.

Both versions have the same useful improvements:

  • MATERIAL
    High quality die-cast aluminum with a fine surface
  • SEALING SURFACES
    Very precisely milled sealing surfaces
  • STRONGER
    Reinforcing ribs in the area of ​​the main shaft bearing on the switch latch side and the shock absorber mount
  • SOLID
    Significantly more material in the area of ​​the cylinder base sealing surface and the carburetor inlet
  • OIL SEAL
    The housings are made to accommodate a metal shaft seal (coupling side). Please always use the version for the 200cc versions with a brown sealing lip.
  • FIT
    Two additional fitting bushes = crankshafts with an excessively long stroke can do without the centering edge of the Lima half. Dimensions of fitting bushes AØ = 9,95mm, IØ = 8,40mm, h = 13,80mm
  • RUBBER
    The holes for the large silent rubbers are Ø = 44mm (original Piaggio Ø = 43mm).
    The enclosed silent rubbers are stiffer and offer better guidance of the motor in the frame.
    Piaggio silent rubbers also fit. Solutions with metal bushing or without pre-tensioning usually do not fit if they were manufactured for Piaggio engine housings (Jockey, PLC).
  • NUMBER
    The motor housings do not have an embossed motor number or prefix
  • OIL HOLE
    No drip hole for gear oil = the nonsensical drip hole that shows whether the inner shaft sealing ring is defective has been left out *.

* Our tip: run the sealed bearing and external shaft seal with the appropriate brake drum.


SPECIAL FEATURES ROTARY VALVE VERSION
- Extra large sealing surface over both engine halves, suitable for all intake manifolds
- Can be used as a 1: 1 replacement for an original motor housing
SPECIAL FEATURES OF THE MEMBRANE VERSION
- Central, full-surface membrane inlet
- Incl. Membrane intake, incl. Membrane in RD350 format (hole 58x48mm)
- Suction rubber can be rotated 360 °, connection width carburetor = Ø34mm
- Rubber suitable for Keihin PWK28, Mikuni TMX27 / 30, Dell'Orto PHBH28 / 30, VHS24-30
- No cast-in axis for oil pump control
- No hole for oil pump drive

The enclosed fitting bush for the auxiliary shaft must be inserted by yourself
If transmission components other than those of the PX models from 125cc are to be used, please check the auxiliary shaft axis for compatibility beforehand and change it if necessary.
Please insert all stud bolts with high-strength screw adhesive. The cylinder studs are not oversized on one side, as is the case with the original Piaggio. Therefore, glue in the supplied Pinasco cylinder studs here as well. We recommend cutting all threads and cleaning them with compressed air.
ASSEMBLY NOTE:
The crankshaft bearing NU205 on the alternator side is not seated flush in the engine housing.
It protrudes approx. 1mm towards the crankshaft.

DELIVERY

· ROTARY VALVE
- All studs
- Silent rubbers + washers for silent rubbers
- Housing seals
- Bushing for auxiliary shaft axis

· MEMBRANE
- as above, additionally included:
- Intake manifold including membrane, suction rubber, seal and small parts
- NOTE: No screws included for attaching the intake manifold to the engine block (see: Accessories)

THIS IS 177

Order the bgm PRO 177/187 cylinder now

The 177 tuning cylinder for Vespa is now available again!

BGM1770


Vespa T5 big box review SLUK

bgm BigBox Vespa exhaust for T5 is test winner

Our Racing exhaust for Vespa has been tested again. And again it is the test winner with the greatest performance. In that case it became ours BigBox for the Vespa T5 from UK online scooter magazine SLUK tested. Here is a video of the test:

BGM BigBox Touring for Vespa T5

The bgm BigBox Vespa T5 is designed as a replacement for the original sensationally good exhaust system of the Vespa PX special model T5. The T5 engine designed by Morini has some peculiarities due to the adapted powerful 125cc motorcycle cylinder.

The T5 engine reacts very strongly to the exchange of the exhaust system. The BGM BigBox for the T5 is based on the standard exhaust in order to keep the torque in the lower and middle speed range at a similarly high level as the standard exhaust. Depending on the setup, it can turn out a little further.

Nice to see at our customer Nino in Portugal, Original T5 with the bgm BigBox. Seems to be fun:

BigBox T5 Touring performance diagrams

Vespa T5 Original with BigBox

dyno-diagram_bgm_bigbox-bgm1012tr

Vespa T5 152cc Polini with BigBox

dyno-diagram_bgm_bigbox-polini-bgm1012tr

Conclusion

Nice to see in the diagrams: ours bgm BigBox harmonizes with the original engine as well as with Polini 152 or Malossi 172 tuning cylinders. On revised engines, the larger volume of the BigBox Touring results in a significantly better torque and power curve than with the original exhaust.

Final Words

You can find the detailed test here: SLUK

Nothing Found

Sorry, no posts matched your criteria

intermot 2016

We are for you at the Intermot in Cologne

intermittent: Scooter Center Mandatory date!

Full throttle! When hundreds of thousands of scooters and motorcycle fans from all over the world come together in Cologne in October 2016 and for five days nothing counts other than displacement, horsepower and a lot of gas - then it's finally INTERMOT again and that Scooter Center is at the start for you!

Intermot live ticker:

++Piaggio

+++ Ciao Bella - who would have thought that we would miss the PX one day?

The Vespa PX is history. Even if it will be exhibited again at the Intermot 2016, it belongs to the “old iron” with the Euro 3 standard. All orders that were received up to June 2016 will, according to Piaggio, still be delivered.

+++ GTS 300 special model Touring, with ABS and Euro 4 & less power

By converting to Euro 4, the Vespa Gts 300 lost half a horsepower and is now with it 21,5 PS delivered

+++ New GTS 125 with Euro 4 and new engine

The Vespa GTS125 also comes with Euro4 and has a completely new engine from the Piaggio medley 125 get.

++ New swallow

A new start for the Schwalbe in 2017? With the latest lithium-ion technology from Bosch and a Range of 150km should the swallow 2017 at a price of 5.000 Euros come on the market. I personally like this one Electric Vespa better.

++ Remus Vespa GTS 300 ie exhaust

Remus slip-on RSC Dual Row (carbon with EG / ABE)

  • deep special sound
  • sporty look
  • High quality material
  • Weight optimization

Now available from us:

++ BELL helmets with new designs

Bell helmets are cult and these are the new designs of the Custom 500 jet helmet:

++ Wilbers front shock absorber for the Vespa GTS - 799 euros

Wilbers - known as a manufacturer of high-end motorcycle suspension struts - now also has a front shock absorber for the Vespa GTS in its range. ABE and a 5 year guarantee may justify it high price of € 799 for the front shock absorber.

Click here for the bgm Shock absorbers for the Vespa GTS with ABE.

BGM Pro SC SPORT shock absorber -porty- comfortable -adjustable -with TÜV-

BGM Pro SC SPORT shock absorber -porty- comfortable -adjustable -with TÜV-

++ Moto Guzzi Tourer

Moto Guzzi shows its new MGX 21 tourer

Moto Guzzi MGX 21 Tourer

++ Polini Vespa GTS exhaust

So, last but not least, a shot of the Polini exhaust on a GTS. We had it Polini but during our visit we had already introduced you to the exhaust here: Polini exhaust Vespa GTS

That's all for today! Unfortunately no news for classic Vesps so far. Apart from the fact that the Vespa PX is now finally being discontinued, see above.
Have a nice evening! Tomorrow we will be on our way again to the nearby Cologne fair to check out the Intermot for you ...

Evening mood Cologne

Vespa PX Quattrini Brown Sugar_1

Vespa custom scooter with Quattrini engine

We had visitors in ours Scootershop in Bergheim-Glessen (Cologne): Basti, who has been a customer of ours for a long time, came by with his Vespa PX.

Vespa PX Quattrini Brown Sugar_1

The weather was great, so we took the opportunity and took a few photos. At that time he already had ours with the “Brown Sugar” scooter Facebook custom show won. In addition, the custom scooter was released in 2013 as a BEST RACERS at our international custom show awarded in Cologne.

Vespa PX Quattrini Brown Sugar_1

Scooter Custom Show 2017

The PX got a few cosmetic updates and Basti is still on the ball. Live & in color you can definitely see this hot scooter again on our 10th #Scootershow admire in Cologne: Save the date: 2April 9, 2017

Save the Date: Scooter Custom Show 2017

Nothing Found

Sorry, no posts matched your criteria

Replace the speedometer glass on the Vespa PX Lusso?

For years there was no way that Speedometer glass Easy to swap with the Vespa PX Lusso. With a broken speedometer dial the same had to be complete speedometer be exchanged and that is of course quite expensive. Until recently the situation became more and more dramatic because the speedometers for the first Vespa PX-Lusso are no longer new and the second-hand market often only offers defective speedometers. The susceptible Asian replica disco digital speedometers are also not to everyone's taste.

Speedometer glass set for easy replacement

We now have a speedometer glass set, consisting of a speedometer glass and a speedometer ring. The glass (made of plastic) is optionally available in clear (like the original) or with tinted glass, the ring is available in black and chrome.

Speedometer glass Vespa PX Lusso gt gtv

The speedometer glass also fits the Modernvespa models: Vespa GT and Vespa GTV!

Easy installation of the new speedometer glass

To change the speedometer disc, the old speedometer must first be removed from the handlebar cover. The ring is then opened around the bottom with a fine screwdriver, for example, until it can be pulled off the speedometer housing. Now the speedometer ring can be removed together with the glass and easily replaced with the new parts.

To attach the new ring, the best thing to do is to lay the speedometer with the glass facing down on a table with a soft cloth as a base and carefully bead the speedometer ring again. A small rubber mallet or a piece of wood / plastic is suitable for this.

TIPP: Before installing the speedometer in the cover, we recommend that you do the same rubber seal to replace. This seal between Tachometer and Steering head prevents moisture from penetrating the handlebar head. This keeps the electrical system, shift and gas pipe protected from splashing water and prevents the Bowden cables and power cables from corroding.


Gasket for speedometer / steering head cover

The speedometer dial set fits the following vehicles:

  • Vespa
    • Vespa GTV 125
    • Vespa GTV 250
    • Vespa GTV 300
    • Vespa GTV 300ie Vie della Moda (2012, ZAPM 45201)
    • Vespa GTV 300ie Via Montenapoleone (ZAPM 45201)
    • Vespa GT 60 250ie
    • 80 PX E Lusso Elestart (V8X1T - 1984-1990)
    • 150 PX E Lusso (VLX1T - 1984-97)
    • 125 PX E Lusso (VNX2T - 1984-97)
    • 200 PX E Lusso (VSX1T - 1984-97)
    • 125 PX E Lusso (ZAPM09300 - Bj.'98-'00)
    • 125 PX E Lusso (ZAPM09302 - Bj.'01-'10)
    • 150 PX E Lusso (ZAPM09400 - Bj.'98-'00)
    • 150 PX E Lusso (ZAPM09401 - Bj.'01-'10)
    • 200 PX E Lusso (ZAPM18 - 1998-)
    • 50 PK XL (V5X3T)

The clutch tool for Vespa

Our new clutch tool is also a clutch puller for the Vespa Largeframe and a clutch compressor for large and Smallframe. This super small and practical helper in Workshop quality should not be missing in any vehicle tool kit or workshop!

Fast, safe and gentle dismantling even of stuck couplings!

bgm clutch puller clutch puller (15)

The so-called 6- and 7-spring clutches of the Vespa Largeframe Models are still attached with a castle nut.

Often, however, this screw connection is not up to the power transmission.
This often results in the crescent wedge shearing off and the clutch hub twisting on the crankshaft. “Secured” in this way on the stub shaft, the entire clutch cannot be easily detached from the crankshaft as usual after opening the castle nut, but in most cases offers bitter resistance.

Tip: Should you continue to drive one of the 6- or 7-spring clutches, you can attach the clutch our special nut with hexagon head use. Handling is much easier and safer than the conventional castle nut.

Clutch puller for Vespa Largeframe

Our bgm PRO puller convinces even very unruly clutches and makes it easier to remove.

bgm clutch puller clutch puller (2)

The usual use of heavy equipment, large levers that damage the sealing surface for the clutch cover, or even the processing or destruction of the entire clutch with massive use of tools, is no longer necessary.

The puller off high strength steel engages in the clutch basket, wedges itself securely there and pulls the clutch hub off the shaft.

bgm clutch puller clutch puller (17)

Clutch compressor for Vespa Smallframe and Largeframe

The little helper can also be used as a Clutch compressor for changing the linings and springs for Largeframe and Smallframe Use couplings.

bgm clutch puller clutch puller 002

Thanks to its small design, the practical tool fits in every overhead locker. We no longer drive without ...

Vespa clutches available

bgm PRO SUPERSTRONG couplings are back in stock

Here you come directly to the Superstrong couplings in the Scooter Center Shop


Vespa clutches available

BGM6823S

bgm PRO - THE VESPA COUPLING

The bgm PRO - couplings for Vespa, and also those for Lambretta, are among our top sellers!

The couplings are available complete and in various designs as well as all parts individually.

The latest components for Vespa Largeframe, are now the Clutch pinion for the 67 and 68 primary gear.

Clutch pinion -BGM PRO- Vespa Cosa2, PX (1995-), BGM Superstrong, Superstrong CR - (for 67/68 teeth primary gear, helical teeth)

Developed for enormous power and torque

The bgm PRO couplings were designed for the enormous powers and torques of today's engines. They are made from high-alloy steel (SCM415 / 15 CrMo 5) according to the highest manufacturing standards. The extremely high strength of the base material (up to 1100N / mm2, HRC 58-62) provides a reassuringly secure basis for the production of BGM pinions.

Manufacturing at the highest level

The production meets the high standard for transmission production by Honda. Each individual part receives a test report. BGM thus has a permanent quality assurance.

  • High quality material 15 CrMo 5
  • Precise production according to Honda standards
  • Continuous quality control
  • Can be used on COSA2 coupling types
  • Available with 20,21,22, 23, 23 and XNUMXT (XNUMXT = special pinion)
  • Suitable for the original primary of all 80-150ccm engines, as well as all Cosa models
  • Suitable for engines with retrofitted 67/68 tooth primary gear

A characteristic feature of the BGM pinion is its black color and the practical labeling stating the number of teeth the pinion itself has and which primary gear it is suitable for.

Longer translation without disassembling the engine?

The pinion with 23 teeth is particularly interesting. This was never original from the factory.
It is intended to extend the reduction of the 80-150ccm as much as possible. A 23/67 or 23/68 gear ratio can be used without opening the engine. Ideal for all drivers of large-capacity cylinders on, for example, original PX125 or Sprint 150 engines.It even fits into the Vespa Cosa models, as here, without exception, a (too short) reduction ratio of 21/68 was installed ex works.
Every PX125 driver who wants to drive a 177cc cylinder can install a suitably long gear ratio simply by exchanging the clutch. The reduction is extended by a whopping 15%, which corresponds roughly to the same increase in the top speed in km / h.

BGM clutch pinions are the perfect complement to the indestructible BGM Superstrong clutch.
All BGM Superstrong clutches with 20, 21, 22 and 23 teeth are equipped with this pinion ex works. It can be combined with all Cosa2 coupling types (recognizable by at least 8 spring positions).

Vespa clutches bgm Superstrong

Vespa clutches bgm Superstrong


Vespa PX80 conversion tuning

Easily convert the Vespa PX80 to 125ccm - this is how it works:

The vehicle prices for the Vespa PX models have been rising for years. The cheapest models are still the Vespa PX 80 / PX80 Lusso. The 80s Vespas have the least performance and are rated the most expensive by insurance companies. When converting to 135ccm or 139ccm, the scooter can no longer be driven with the 125cc driver's license. Here we show you how you can easily convert a PX80 to a PX125 without having to work on the crankshaft or the gearbox:

Cylinder -SCOOTER CENTER Conversion cylinder Vespa PX80 to 125 cc- Vespa PX80 / PX80 Elestart

TÜV registration possible! TIP: Suitable for Elestart engines without modifications!

Advantages of retrofitting:

  • more performance and safety reserves in road traffic
  • less consumption approx. 20% according to customer experience
  • Can be driven with an old 125 driver's license
  • cheaper insurance
  • same durability
  • easy installation

We offer you a complete cylinder kit to bring every PX80 plug & play to 125ccm displacement.
If the kit is registered with the TÜV as an individual approval, you can use the significantly lower insurance rates of the 125cc models benefit. All you have to do is change the cylinder, including the piston and head, the short motor remains unopened!

More performance - less consumption

Originally the 80ccm engine has about 5HP on the rear wheel. With our conversion cylinder, the performance increases by a whopping 60% to a remarkable 8PS and that with extreme reliability. This means that the performance of the cylinder is already in the range of a 135 DR. In this diagram you can see a direct comparison between a 135 DR tuning cylinder (blue curve) and the SCK 125cc conversion cylinder (red curve). In connection with an extended transmission (possible by simply changing the clutch pinion to 22 teeth), the top speed is also significantly increased. The significantly wider torque curve means that the gears no longer have to be fully accelerated, and consumption is reduced.


Performance Graph 125cc Conversion Kit vs DR135

Performance Graph 125cc Conversion Kit vs DR135

Are the brakes and frame overloaded?

No, with the conversion kit you are on the safe side - the Vespa PX80 has the identical brake and chassis components like a Vespa PX125 and even a Vespa PX200, which is / was available from the factory with 12PS.

Durability of the cylinder

The durability is at least as good as the original cylinder: almost indestructible. Two, with prototypes of the Scooter Center In 2011, vehicles equipped with conversion cylinders were on the road for several thousand kilometers without problems or breakdowns. The drivers are from the Performance and low consumption simply enthusiastic.

5 star rating of Bernd:

"installation was easy, it only took 1 hour has run for about 300 km without problems with a 105 hd now drive in 3rd gear with half throttle where I used to have to take 2nd gear with full throttle fuel consumption has decreased by about 20% this cylinder set was the best investment in my vesp so far"
Complete cylinder kit to bring every PX80 plug & play to 125ccm displacement. If the kit is registered with the TÜV as an individual approval, you can benefit from the significantly lower insurance rates of the 125cc models. All you have to do is change the cylinder, including the piston and head, the short motor remains unopened!

Rating in Scooter Center Online-Shop

Recommended motor settings:

optional:


Video about the Vespa PX80 - PX125 conversion cylinder


TÜV certificate and Piaggio approval

Unfortunately, it is currently not possible to deliver this cylinder with a TÜV certificate.
The technical and formal hurdles for such an expert opinion are now so high that it is not economically feasible (the selling price of the cylinder would then be much too high).

The Vespa PX80 has the same brake and chassis components as a Vespa PX125 and even a Vespa PX200!
It is therefore possible to have one official approval from Piaggio you can get it Request online HERE. This is made specific to the chassis number, so a mere copy is not enough.
The TÜV then has the working document in black and white that the PX80 also has the same brake and chassis components as a PX125 (or even PX200). Equipped with this, the engine that has been converted with our cylinder can then be demonstrated. The official Piaggio document usually opens doors and gates.


Possible tuning measures

"Stage 1"
If you want to elicit more power from the cylinder, you can turn the cylinder by approx. 1mm on the head sealing surface.
The crush dimension (distance piston to cylinder head) should then be approx. 1,1mm at the narrowest point. Simply push 2mm solder through the spark plug hole into the edge area of ​​the combustion chamber and turn the crankshaft.

"Stage 2"
If you want significantly more power and torque, you can easily achieve this with the original cylinder head of the PX80. Due to the smaller combustion chamber, the compression increases again significantly and the power / torque increases by at least 1PS / 1NM. For this, however, the distance between the cylinder head and piston should also be checked (at least 0,8mm) to avoid mechanical damage. The sealing surface of the cylinder head protrudes into the combustion chamber of the cylinder. This is only an optical shortcoming, technically this solution is completely unproblematic. .

"Stage 3"
Furthermore, the outlet window can be widened 1mm on each side. With these measures, the cylinder is already scratching the 10PS brand. With a lighter fan wheel we already have over 11PS and 13Nm is reached (see second diagram). The driving behavior is therefore very similar to an original Vespa T5. Individual adjustments to the jets and the ignition setting are then of course mandatory.


Vespa PX80 conversion tuning


Our best Vespa clutch is back in stock

In time for the summer season is ours bgm Superstrong clutch for the Vespa Largeframe Models available again. The robust and reliable coupling is so popular that we were unfortunately sold out at times.

New generation of friction disks for the Vespa clutch

From now on we deliver the bgm superstrong and the Superstrong CR with a new generation of steel discs. Did you know that the steel discs should be installed in a certain order?

Vepsa Superstrong clutch for Vespa Largeframe P1390241

Vepsa Superstrong clutch for Vespa Largeframe P1390241

The new clutch is each disc is clearly markedso that it is always clear in which position it should find its place.

bgm Superstrong - new friction discs for the Vespa clutch

bgm Superstrong - new friction discs for the Vespa clutch

All lenses have been redesigned and the fit has been optimized.

The disc at position two was given a defined curvature in a specially designed radius so that a clean separation behavior is achieved under every load condition when the clutch is operated.

The steel disks are subject to series testing, during which we always keep an eye on the concentricity and the planar quality, as well as the material quality and hardness. All steel disks are here in the 10hrc range.

Except for the optimization of the steel discs, nothing changes in the proven and stable concept of the Superstrong clutch for Vespa PX, T5, Sprint, Rally etc.


1 liter Vespa scooter reserve canister

FuelFriend, the smallest fuel canister on the market!

The season is in full swing! Many Vespisti are on their way to the Vespa World Days to Saint Tropez / South France. Next year it won't be quite that far for Vespa fans traveling from Germany - the Vespa World Days 2017 take place in Celle / Germany.

Either way, the scooter tours with friends are great fun. With the optimal equipment make it just a tad more fun and it will make the trip even more fun much safer!

Transporting luggage on Vespa

Proper stowage of luggage is an important point. Your luggage should be attached to the scooter as centrally and securely as possible. Preferably with a bag that lasts at least as long as your Vespa: with the SEA'N'SAND T-Bag Vespa travel bag (Leg shield pocket / tunnel pocket / footwell pocket).

Increase the range of your Vespa

Have you ever been left without fuel? The range of our beloved scooters is not always very large and may be even smaller with appropriate tuning measures. Here we have a great tip: the permanent and safe mini fuel reserve, that too even fits in the smallest luggage or helmet compartment! The scooter reserve canisters with a capacity of 1, 2 or 3 liters fit into the glove compartment of the Vespa PX, T5, etc. see photos:

Petrol can FuelFriend PLUS 1L

  • the smallest fuel canister on the market
  • the emergency reserve for motorcycles, scooters, quads and other small engines
  • small pack size, extremely stable, meets the highest security requirements
  • with laterally introduced eyelets for fastening with tension band etc.
  • E10 suitable
  • Range up to 30 km
  • with black screw connection
  • Outlet pipes as a separate accessory:

Dimensions Vespa 1 liter canister

  • Inside-Ø of the filling opening = 29mm
  • Depth = 65mm
  • Width = 125mm
  • Height = 165mm

Also available as a 2 liter reserve canister and larger:

canister

Cable entry and blind plugs for Vespa & Co.

Often it is just little things that affect the renovation or the Overhaul of a scooter are missing and therefore sometimes gnaw a lot on the nerves of the screwdriver.

If a little rubber ring, too Grommet called, is missing to connect the battery, to mount the indicators or a blind plug to close holes that are no longer required because another taillight is to be installed -

Rubber stopper 003

those are the little swipes when screwing that really take time and are just annoying.

Rubber stopper 004

An open hole in the side panel is now not necessarily visually convincing. But to avoid the big circus with welding, grinding and painting, you can close these visible, open holes with a blind plug.

Rubber stopper 006

With a Assortment of blind plugs or cable glands one is at least immune to these circumstances.

The tip for every workshop

The assortments cover a large range of the usual diameters that can be found on a roller. All plugs are sorted according to their outer diameter and delivered in a transparent box, so that the scooter workshop stays tidy!

Grommet

SKU: 3331729
Rubber stopper set (assortment) Frame -UNIVERSAL, open (type cable entry) 128 pieces - black - Ø = 6-24mm

3331729

Blind plug

SKU: 3331728

Rubber stopper set (assortment) Frame -UNIVERSAL, closed (type blind stopper) 140 pieces- black - Ø = 7,0-9,5-12,0-15,8-19,0-22,0-25,4mm

3331728

Vespa silent block

Hand on heart - do you ever have that on your Vespa Replaced silent blocks? Unfortunately, this is usually neglected even with complete restorations.

After many, faithfully completed kilometers, it sometimes happens that when you look at the most beautiful rear part in the world you notice that something is wrong here.

If the rear wheel is tilted slightly to the side when viewed from the rear in the direction of travel, then you have vibration, also called silent blocks, put their prime behind them in the motor housing.

Why silent rubbers?

The silent rubbers do not have an easy task: they are supposed to be uncomfortable vibrations Eliminate the drive train swing arm and at the same time for a predictable and safe leadership of the rear wheel. Because the silent rubber on the right-hand side also has to carry a large part of the mass of the engine, this side is subject to greater stress and is therefore also subject to greater wear.

This problem should be solved with a fresh set of silicone rubbers - do you think ...

Beware of the "OEM quality"

In the meantime, let's call them “other” suppliers have apparently found their way into the Piaggo bag.
The original silent rubbers are sometimes so soft that the engine is tilted back in the frame due to its own weight. This condition does not improve under a load, i.e. with the driver. Due to worn or too soft silent blocks, brisk Vesps sometimes also tend to oscillate significantly in the longitudinal axis even at higher speeds.

The solution: load-optimized silent blocks

So we have the bgm PRO silent blocks Equipped with a somewhat tougher rubber and the more heavily loaded engine side has also been chosen one step tighter.

The firmer, right-hand side thus stands in the way of the motor's own life and the increased load, and ensures that the drive train swing arm is guided safely.

The bgm PRO silent blocks for Vespa engines are therefore color coded:

BGM7952 (1)

  • GREEN is the somewhat firmer silent rubber for the right side in the direction of travel
  • RED is the silent block for the left side.


Vespa silent block


Simple assembly of the silent blocks

We decided on the two-part solution for the design of the silent blocks.

This makes the assembly of the silent rubbers much easier.
To use the rubbers is suitable Tire fitting paste pretty good.
Fat should not be used.

So far we have been offering the silent blocks for the following Vespa models:


BGM7955

Engine silent block set -BGM PRO- Vespa V50, V90, SS50, SS90, PV125, ET3, PK S, PK XL

BGM7955


BGM7951

Engine silent block set -BGM PRO- Vespa PX80, PX125, PX150, Sprint150 (VLB1T), TS125 (VNL3T), GT125 (VNL2T),
GTR125 (VNL2T), Super, GL150 (VLA1T), VNA, VNB, VBA, VBB


BGM7951


BGM7952

Engine silent block set -BGM PRO- Vespa PX200

BGM7952

BGM7954

Engine silent block set -BGM PRO- Vespa PK 50-125, PK 50-125 S, PK 50-125 XL

Silent block Vespa silent rubber

Silent rubber shock absorber mount Vespa

Tip: As optimal addition We also offer the silent rubbers in the motor cross-member the silent rubber for the rear lower shock absorber mounte at.

1157103 (2)

The wide rubber optimally supports the damper and is contrary to the narrow-chested competitors significantly more resistant to wear and tear.
The rubber is available in a set with the most common silent block sleeves:

Lambretta silent blocks

We have been offering Sinlentblock sets for fans of Lambretta tracked vehicles for a long time.
The positive experience from development the different hardness of the silent rubbers, we have also incorporated into the silent block sets of the Vespa.

BGM7950G

Silent block set engine -BGM PRO- Lambretta LIS, SX, TV (series 2-3), DL, GP - 29cm engine bolts


ImageDocument BGM7950G

bgm177 vespa cylinder development

bgm 177 - the new 177 - cylinder for Vespa

In this post we have already introduced you to the new cylinder. Today we give you a little insight into the development of the cylinder. From the beginning of April 2016 the cylinder finally available!

bgm 177 - the development of the Vespa cylinder

Developing a two-stroke cylinder is very exciting.
Countless parameters that have to be taken into account, thousands of test bench runs, repeatedly measured, calculated, tested, thousands of kilometers of road tests ...

Everything to get a cylinder as a finished end product that high-torque and willing to perform is, but also at the same time durable is and uses little fuel.
At the same time, it should offer the broadest possible range of applications for touring riders who simply combine it with series components, as well as for the sporty, ambitious tuner who is more concerned with performance.

Here is a little insight into the test series that were on the daily program for the BGM177.

THIS IS 177

OVERCURRENT DESIGN

We have tested a wide variety of solutions for the external shape and design of the overcurrent channels.
We created various duct geometries, control angles and cylinder combustion chambers and compared them both on the road and on the test bench.

BGM177 cylinder test

TEST MOTORS SPRINT150

For some of the tests, in addition to an original Piaggio Sprint, we also used an LML engine housing with original inlet membrane control as a starting point.
The Sprint's motor housing is representative of the very small, original rotary valve inlet of the Largeframe Engines. The rotary valve inlet of a PX125 is only slightly larger than the inlet of the Sprint engines and the control angles of the crankshafts are almost identical. In terms of the expected output, this is the “most unattractive” starting position. Nevertheless, we wanted to know what performance can be expected with these basic requirements or, better yet, which performance can be achieved.

We presented the result on a Sprint engine with the 24mm SI carburetor of the PX200 in comparison to a 12HP 200 engine.

So that you can interpret the graph below a little better, just imagine a normal PX200. Up to approx. 90km / h something like acceleration can still be felt on a standard 200. This speed corresponds to about 5500min? ¹ of the motor. From this speed, the torque of a 200 engine drops so far that it takes some time to reach 100km / h (6000min? ¹). If you now compare these speed points of the blue curve with those of the red curve on the graph, you can see that the BGM177 is still increasing torque in this area. In other words, when the 200 slowly runs out of air, the BGM177 accelerates even further.

BGM177 vs PX200

BGM177_ROTARY_vs_PX200_std

TEST MOTOR LML150 MEMBRANE

Since the 125cc engine of the Vespa Sprint with the small rotary valve is too restrictive on the power delivery from a certain power and speed level onwards, we used an LML engine housing for various tests and comparisons. The LML motor housing offers the best prerequisites due to the diaphragm inlet that is already present at the factory and the large overflow channels in the housing. As a result, for example, an inlet that is too small or differently designed overflow channels can have no or only an insignificant influence on tests within a test series.

BGM177_9 023

So on the LML housing you can easily switch between an SI carburetor and a large, adult intake manifold.

We performed the tests in this area with a pre-series cylinder with small duct cutouts in the cylinder base
and started with a piston specially made for this test.

BGM177_9 015

The aim of the game was to find out how much space the piston must allow for the overflow duct due to its design in order to ensure good filling. The piston was manufactured in such a way that the clearance around the piston pin in the area of ​​the ÜS channels could be continuously modified by milling.
We tested each of these intermediate steps on our test bench to find out which shape or which combination works best.

Piston BGM177 V2

TEST OVERCURRENT CROSS SECTION, CYLINDER BASE

The test series below was run on an LML membrane motor with a 24 SI carburetor, BigBox Touring and pistons and ducts that have just been processed in different ways.
At this point in time, the cylinder head was still relatively highly compressed. With the cylinder head in series production, we have reduced the compression somewhat in favor of a broader performance curve.

In its original state, the test piston had the contour of an original PX piston. The piston skirt was closed on the red curve (similar to Piaggio, Polini, Grand Sport, ...)
In the blue curve, the piston has been exposed by a few millimeters in the area around the piston pin. The picture above shows such a piston.
The green curve shows the power curve with partially open overflow channels at the cylinder base and the machined piston. The released area of ​​the channels in the cylinder base corresponds to approx. 80% of the possible channel area that the cylinder can offer.

Comparison of the BGM177 piston and channel

  • RED CURVE: Closed piston skirt
  • BLUE CURVE: Half-open piston skirt
  • GREEN CURVE: Open piston skirt

The BGM177 can therefore be equipped with a gearbox from the 200 series engines without any problems and offers significantly better performance than the large 200 series engine.
The PX125 and PX150 motors were equipped with a gearbox from around 1982 that is almost identical to that of the PX200. With these engines, the primary drive can be extended directly in order to convert the gained power into speed.
The use of a primary gear with 64 teeth would be recommended here. Depending on the desired area of ​​application, the overall reduction can then be adjusted accordingly with the coupling pinion. The primary gear with 64 teeth offers the advantage that the bgm clutch pinions with 22, 23 and 24 teeth can be used.
This offers the possibility of changing the engine from “sporty short for the city (22/64)” to “Autobahn - everything that works (24/64)”.

In the next post we equip our LML test engine with different carburetors and intake manifolds ...